Rear disc brake
HINT:
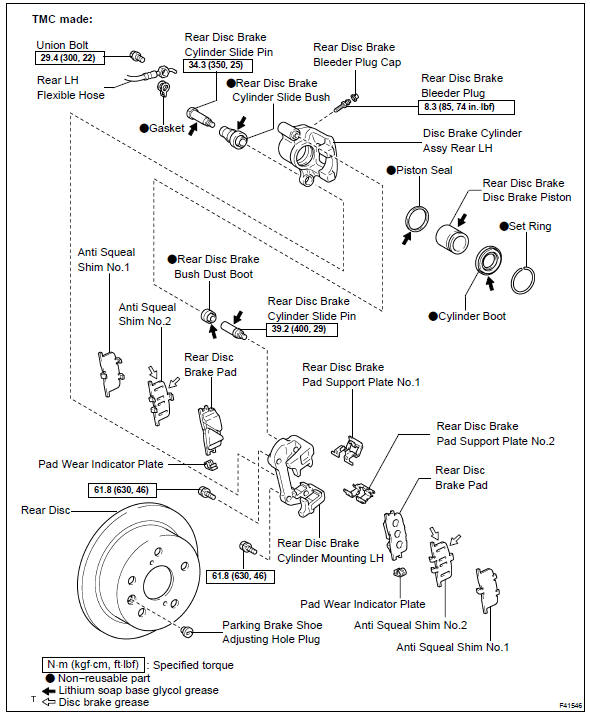
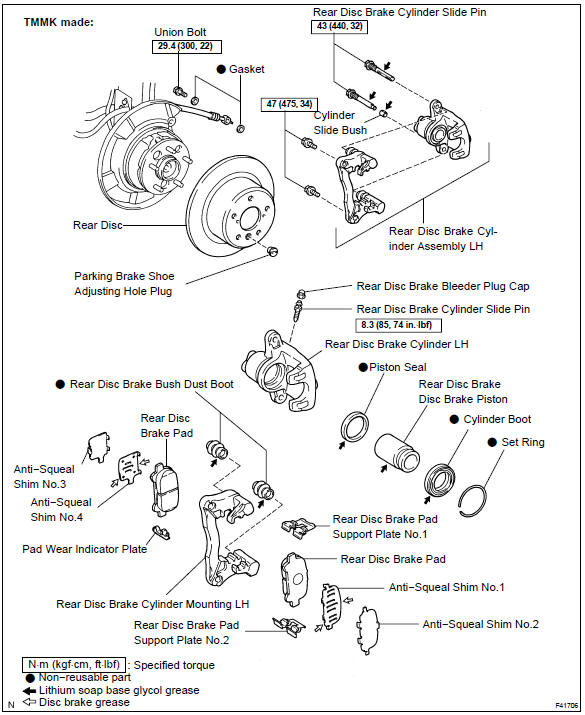
COMPONENTS:
Overhaul the RH side by the same procedures with LH side.
Two types of brake pad exist; one is with slit and the other without slit.
- REMOVE REAR WHEEL
- DRAIN BRAKE FLUID
Remove the union bolt and a gasket from the disc brake cylinder, then disconnect the flexible hose from the disc brake cylinder.
HINT: Gasket has 2 types: 2−piece type and 1−piece type.
TMC made: Remove the cylinder slide pin.
TMMK made: Remove the cylinder slide pin and cylinder slide bush.
TMC made: Lift up the disc brake cylinder and remove the disc brake cylinder.
TMMK made: Remove the cylinder slide pin and disc brake cylinder.
Remove the 2 brake pads with the anti−squeal shim.
Remove the 2 anti−squeal shims and pad wear indicator from each of 2 brake pads.
TMC made: Remove the 2 pad wear indicator plates from each of 2 brake pads.
TMMK made: Remove the pad wear indicator plate from inner pad.
Remove the rear disc brake pad support plate No.1.
Remove the rear disc brake pad support plate No.2.
TMC made: Remove the rear disc brake bush dust boot.
TMMK made: Remove the 2 rear disc brake bush dust boots.
TMC made: Using a hexagon wrench (f8 mm), remove the cylinder slide pin.
Remove the 2 bolts and cylinder mounting LH.
Using a screwdriver, remove the set ring and disc cylinder boot.
Place a piece of cloth or similar, between the piston and the disc brake cylinder.
Use compressed air to remove the piston from the disc brake cylinder.
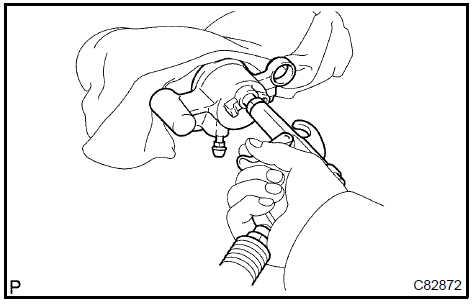
Remove rear disc brake piston 14. REMOVE PISTON SEAL
Using a screwdriver, remove the piston seal from the brake cylinder.
- REMOVE REAR DISC BRAKE BLEEDER PLUG CAP
- REMOVE REAR DISC BRAKE BLEEDER PLUG
- INSPECT BRAKE CYLINDER AND PISTON
Check the cylinder bore and piston for rust or scoring.
Using a ruler, measure the pad lining thickness.
Standard thickness: 10.0 mm (0.394 in.) Minimum thickness: 1.0 mm (0.039 in.)
Make sure that they have sufficient rebound, no deformation cracks or wear, and have had all rust and dirt cleaned off.
Make sure that they have sufficient rebound, no deformation cracks or wear, and have had all rust and dirt and cleaned off.
Using a micrometer, measure the disc thickness.
Standard thickness: 12.0 mm (0.472 in.) Minimum thickness: 10.5 mm (0.413 in.)
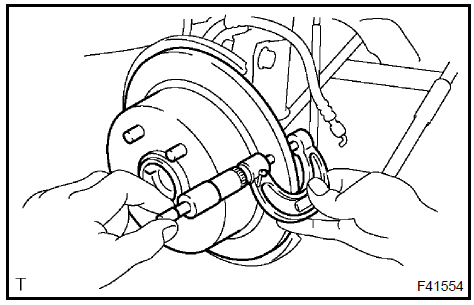
Inspect disc thickness
- REMOVE PARKING BRAKE SHOE ADJUSTING HOLE PLUG
- REMOVE REAR DISC
Put matchmarks on the disc and the axle hub.
Remove the disc.
Aligning the matchmarks, install the rear disc.
HINT: When replacing the disc with new one, select the installation position where the disc has the minimum runout.
- INSTALL PARKING BRAKE SHOE ADJUSTING HOLE PLUG
- INSPECT DISC RUNOUT
Temporarily fasten the disc with hub nuts.
Torque: 103 N·mUsing dial indicator, measure the disc runout 10 mm (0.39 in.) away from the outer edge of the disc.
Maximum disc runout: 0.15 mm (0.0059 in.)If the disc’s runout is maximum value or greater, check the bearing play in the axial direction and check the axle hub runout. If the bearing play and axle hub runout are not abnormal, adjust the disc runout or grind it on a ”On−car” brake lathe.
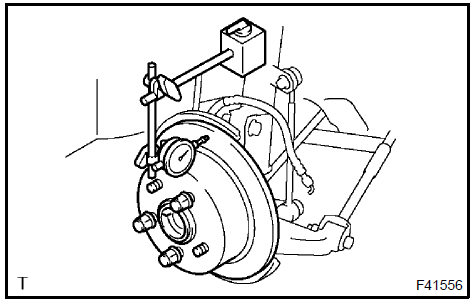
Inspect disc runout
- ADJUST PARKING BRAKE SHOE CLEARANCE
- TEMPORARILY TIGHTEN REAR DISC BRAKE BLEEDER PLUG
Temporarily tighten the bleeder plug to the disc brake cylinder.
- INSTALL REAR DISC BRAKE BLEEDER PLUG CAP
- INSTALL PISTON SEAL
Apply the lithium soap base glycol grease on a new piston seal.
Install the piston seal to the disc brake cylinder.
Apply the lithium soap base glycol grease on the piston.
Install the piston to the disc brake cylinder.
Apply the lithium soap base glycol grease on a new cylinder boot.
Install the cylinder boot to the disc brake cylinder.
HINT: Install the boot securely to the grooves of the cylinder and piston.
Using a screwdriver, install a new set ring.
Install the cylinder mounting LH with the 2 bolts.
Torque: TMC made: 62 N·m TMMK made: 47 N·m
TMC made: Using a hexagon wrench (8 mm), install the cylinder slide pin.
Torque: 39 N·mTMMK made: Install the cylinder slide pin with the cylinder slide bush.
Torque: 43 N·m
Apply the lithium soap base glycol grease on a new cylinder slide bush.
Install the cylinder slide bush to the disc brake cylinder assy.

Install rear disc brake cylinder slide bush (TMC made) 36. INSTALL REAR DISC BRAKE BUSH DUST BOOT
TMC made: Install the rear disc brake bush dust boot.
Apply the lithium soap base glycol grease to seal surface of a new bush dust boot.
Install the bush dust boot to the cylinder slide pin.
TMMK made: Install the rear disc brake bush dust boot.
Apply the lithium soap base glycol grease to seal surface of a 2 new bush dust boots.
Install the 2 bush dust boots to the each cylinder slide pin.

Install rear disc brake bush dust boot 37. INSTALL REAR DISC BRAKE PAD SUPPORT PLATE
Install the rear disc brake pad support plate No.1.
Install the rear disc brake pad support plate No.2.
Coat the both sides of No.1 anti−squeal shim with pad grease all over, and install the shim together with No.2 anti−squeal shim to each pad.
TMC made: Install the 2 pad wear indicator plates to the each of 2 brake pads.
TMMK made: Install the pad wear indicator plate to the inner pad.
Install the 2 brake pads with the anti−squeal shim.
Apply the lithium soap base glycol grease to the cylinder slide pin.
Install the disc brake cylinder assembly rear LH to the cylinder slide pin.
Apply the lithium soap base glycol grease to the cylinder slide pin.
Install and torque the cylinder slide pin to the disc brake cylinder assembly.
Torque: TMC made: 34 N·m TMMK made: 43 N·m
Connect a new gasket and flexible hose with the union bolt.
Torque: 29 N·m- FILL RESERVOIR WITH BRAKE FLUID
- BLEED MASTER CYLINDER SST 09023−00101
- BLEED BRAKE LINE
- CHECK FLUID LEVEL IN RESERVOIR
- CHECK BRAKE FLUID LEAKAGE
- INSTALL REAR WHEEL Torque: 103 N·m
Test yourself
A quick Toyota Camry quiz: every answer comes with an explanation and a link to the manual page.