Replacement
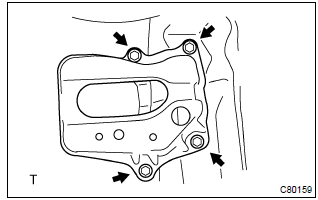
- Remove the 4 bolts and battery carrier.
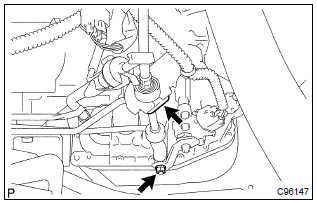
- Remove the nut from the control shaft lever.
- disconnect the control cable from the control shaft lever.
- remove the clip and disconnect the control cable from the control cable bracket.
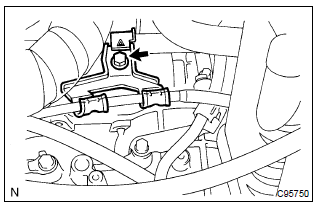
- Disconnect the wire harness clamp and control cable from the control cable support.
- remove the bolt and control cable support.
- remove the 2 bolts and control cable bracket.
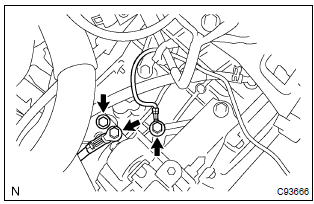
- Remove the 2 bolts and disconnect the 2 wire harnesses.
- remove the bolt and disconnect the wire harness clamp bracket.
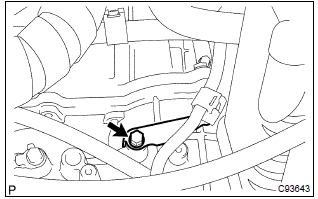
- Remove the bolt and disconnect the wire harness clamp bracket.
- disconnect the transmission wire connector.
- disconnect the park/neutral position switch connector.
- w/o abs: disconnect the speedometer sensor connector.
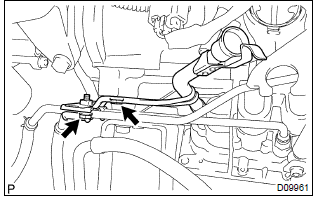
- Remove the atf lever gauge.
- remove the 2 bolts, oil cooler tube clamp and oil filler tube.
- remove the o–ring from the oil filler tube.
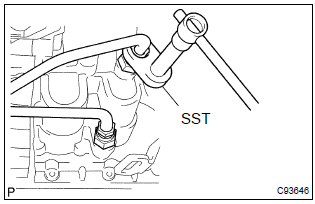
- Using sst, disconnect the oil cooler inlet tube no. 1.
Sst 09023–12700
- using sst, disconnect the oil cooler outlet tube no. 1.
Sst 09023–12700
- remove the foot rest.
- pull up the floor carpet.
- disconnect the oxygen sensor connector.
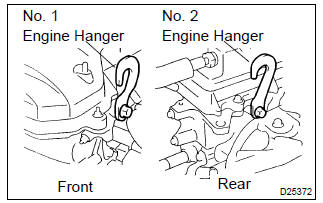
- Disconnect the 2 pcv hoses.
- install the no.1 And no.2 Engine hangers in the correct direction.
Parts no.:
No.1 Engine hanger: 12281–22021 no.2 Engine hanger: 12281–15040 bolt: 91512–b1016 torque: 38 nvm (387 Kgf·cm, 28 ft·lbf) - attach the engine chain hoist to the engine hangers.
: do not attempt to hang the engine by hooking the chain to any other parts.
16. Remove front wheels 17. Remove engine under cover rh 18. Remove engine under cover lh 19. Drain automatic transaxle fluid- remove the drain plug and gasket, and drain atf.
- install a new gasket and drain plug.
Torque: 17.5 Nvm (178 Kgf·cm, 13 ft·lbf)
sst 09520–01010, 09520–24010 (09520–32040)
22. Remove front drive shaft assy lhsst 09520–01010, 09520–24010 (09520–32040)
23. Remove automatic transmission case protector- remove the 2 bolts and case protector.
- remove the nut and disconnect the starter wire.
- disconnect the connector.
- remove the 2 bolts and starter.
- support the automatic transaxle with a transmission jack.
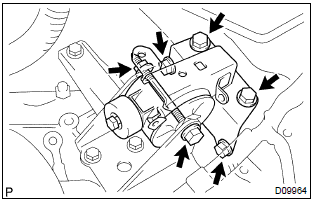
- Remove the 5 bolts, nut and engine mounting insulator lh.
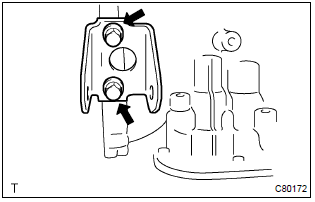
- Remove the 2 bolts and engine mounting bracket fr.
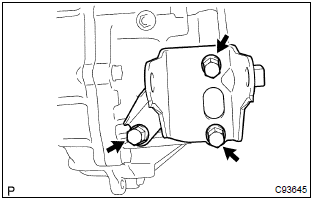
- Remove the 3 bolts and engine mounting bracket rr.
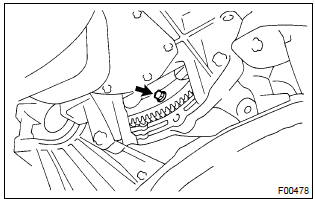
- Turn the crankshaft to gain access and remove the 6 bolts while holding the crankshaft pulley bolt with a wrench.
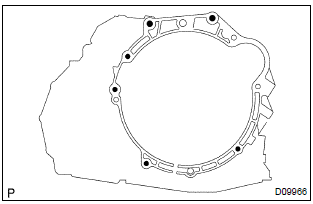
- Remove the 6 bolts.
- separate and remove the automatic transaxle.
sst 09350–32014 (09351–32010, 09351–32020)
37. Install torque converter clutch assy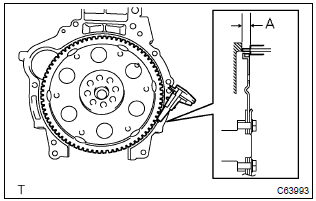
- Install the torque converter clutch to the automatic transaxle.
- using vernier calipers, measure the dimension ”a” between the transaxle fitting part and the converter fitting part of the drive plate.
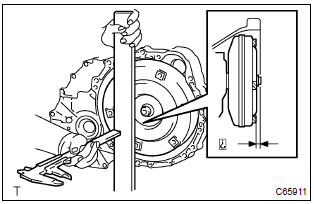
- Using vernier calipers and a straight edge, measure the dimension ”b” shown in the illustration and check that ”b” is greater than ”a” measured in (b).
Standard: a + 1 mm or more
: do not add the thickness of straight edge
. 38. Install automatic transaxle assy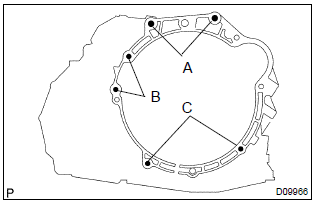
- Install the automatic transaxle and 6 bolts to the engine.
Torque:
bolt a: 64 nvm (650 Kgf·cm, 47 ft·lbf) bolt b: 46 nvm (470 Kgf·cm, 34 ft·lbf) bolt c: 23 nvm (235 Kgf·cm, 17 ft·lbf)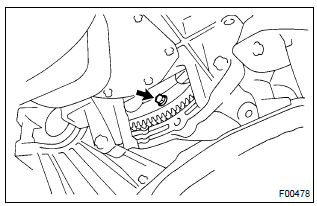
- Install the 6 torque converter mounting bolts.
Torque: 28 nvm (285 Kgf·cm, 20 ft·lbf)
: first install yellowish green colored bolt and then the 5 bolts.
39. Install flywheel housing under cover 40. Install transverse engine engine mounting bracket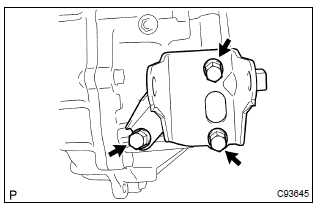
- Install the engine mounting bracket rr and 3 bolts to the automatic transaxle.
Torque: 64 nvm (652 Kgf·cm, 47 ft·lbf)
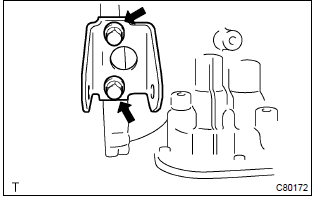
- Install the engine mounting bracket fr and 2 bolts to the automatic transaxle.
Torque: 64 nvm (652 Kgf·cm, 47 ft·lbf)
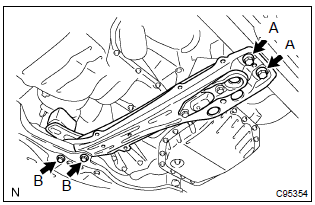
- Install the dynamic damper, member sub–assy center with engine mounting insulator fr and 4 bolts.
Torque:
bolt a: 39 nvm (398 Kgf·cm, 29 ft·lbf) bolt b: 52 nvm (530 Kgf·cm, 38 ft·lbf)
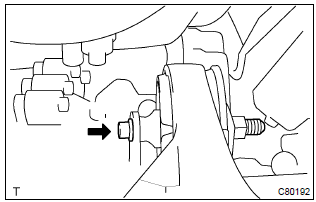
- Install the engine mounting insulator rr and bolt to the engine mounting bracket rr.
Torque: 87 nvm (887 Kgf·cm, 64 ft·lbf)
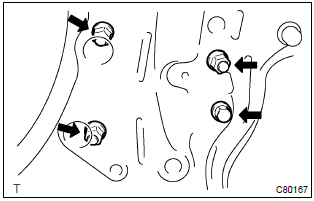
- Tighten the 3 nuts and bolt.
Torque: 52 nvm (530 Kgf·cm, 38 ft·lbf)
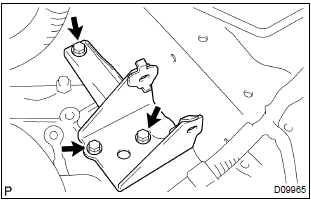
- Install the engine mounting bracket lh and 3 bolts to the automatic transaxle.
Torque: 52 nvm (530 Kgf·cm, 38 ft·lbf)
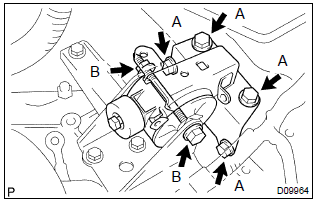
- Install the engine mounting insulator lh, 5 bolts and nut.
Torque:
bolt a: 52 nvm (530 Kgf·cm, 38 ft·lbf) bolt b: 80 nvm (815 Kgf·cm, 59 ft·lbf) nut b: 80 nvm (815 Kgf·cm, 59 ft·lbf)
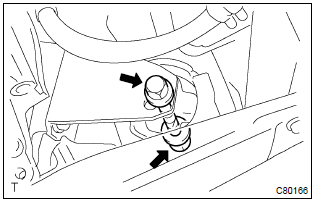
- Install the bolt and nut to the engine mounting bracket fr.
Torque: 52 nvm (530 Kgf·cm, 38 ft·lbf)
- install the starter and 2 bolts.
Torque: 39 nvm (400 Kgf·cm, 29 ft·lbf)
connect the connecter.
- install the starter wire and nut.
Torque: 13 nvm (132 Kgf·cm, 10 ft·lbf)
- install the case protector with the 2 bolts.
Torque: 18 nvm (182 Kgf·cm, 14 ft·lbf)
torque: 103 nvm (1,050 Kgf·cm, 76 ft·lbf)
55. Install oxygen sensor connector- connect the oxygen sensor connector.
- install the floor carpet and foot rest.
- Temporarily install the oil cooler outlet tube no. 1.
- temporarily install the oil cooler inlet tube no. 1.
- coat a new o–ring with atf, and install them to the oil filler tube.
- install the oil filler tube to the automatic transaxle.
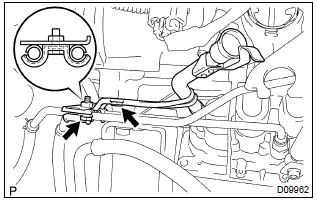
- Install the oil cooler tube clamp and 2 bolts.
Torque: 5.5 Nvm (56 Kgf·cm, 49 in.Vlbf)
- install the atf lever gauge.
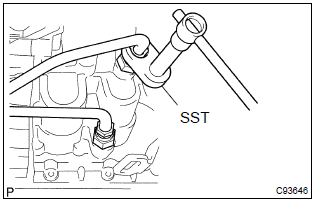
- Using sst, tighten the oil cooler inlet tube no. 1.
Sst 09023–12700
torque: 34.5 Nvm (350 Kgf·cm, 25 ft·lbf)
- using sst, tighten the oil cooler outlet tube no. 1.
Sst 09023–12700
torque: 34.5 Nvm (350 Kgf·cm, 25 ft·lbf)
- connect the transmission wire connector.
- connect the park/neutral position switch connector.
- w/o abs: connect the speedometer sensor connector.
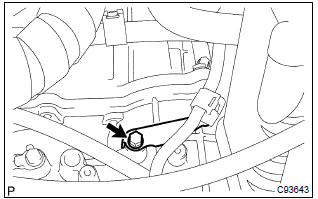
- Install the wire harness clamp bracket and bolt.
Torque: 12.75 Nvm (130 Kgf·cm, 9 ft·lbf)
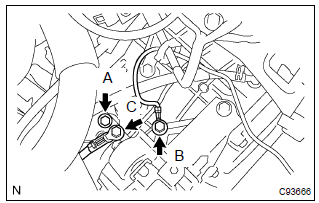
- Install the wire harness clamp bracket and 2 wire harnesses with the 3 bolts.
Torque:
bolt a: 25.5 Nvm (260 Kgf·cm, 19 ft·lbf) bolt b: 10 nvm (102 Kgf·cm, 7 ft·lbf) bolt c: 13 nvm (132 Kgf·cm, 10 ft·lbf)
- install the control cable bracket and 2 bolts.
Torque: 12 nvm (122 Kgf·cm, 9 ft·lbf)
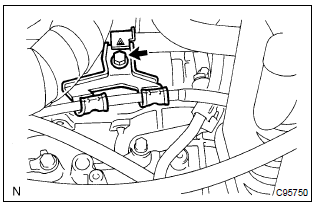
- Install the control cable support and bolt.
Torque: 12 nvm (122 Kgf·cm, 9 ft·lbf)
- connect the control cable and wire harness to the control cable support.
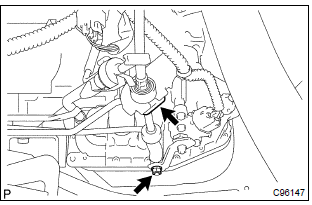
- Temporarily install the control cable to the control shaft lever with the nut.
- install the control cable and clip to the bracket.
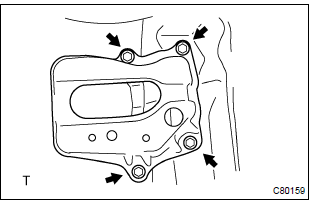
- Install the battery carrier and 4 bolts.
Torque: 13 nvm (132 Kgf·cm, 10 ft·lbf)
torque: 7.0 Nvm (71 Kgf·cm, 62 in.Vlbf)
66. Install cylinder head cover no.2Torque: 7.0 Nvm (71 Kgf·cm, 62 in.Vlbf)
67. Install hood sub–assytorque: 13 nvm (130 Kgf·cm, 10 ft·lbf)
68. Inspect hood sub–assy 69. Adjust hood sub–assy 70. Add automatic transaxle fluid 71. Inspect automatic transaxle fluid 72. Adjust shift lever position 73. Inspect shift lever position 74. Inspect front wheel ariment 75. Check abs speed sensor signal (w/ abs)Test yourself
A quick Toyota Corolla quiz: every answer comes with an explanation and a link to the manual page.