Speedometer Malfunction
DESCRIPTION
Factors that affect the indicated vehicle speed include tire size, tire inflation, and tire wear. The speed indicated on the speedometer has an allowable margin of error. This can be tested using a speedometer tester (calibrated chassis dynamometer). For details about testing and the margin of error, see the reference chart.
WIRING DIAGRAM
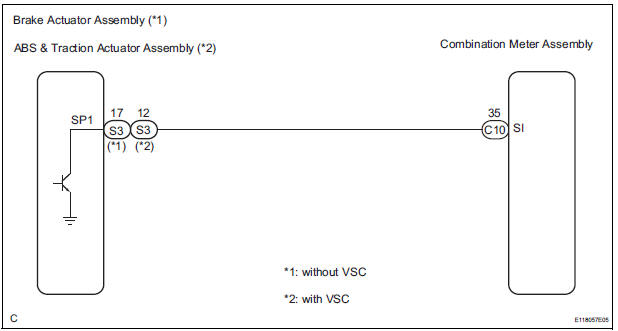
INSPECTION PROCEDURE
NOTICE: If the vehicle speed is outside the allowable range when tested, perform the following procedure.
1 PERFORM ACTIVE TEST BY INTELLIGENT TESTER
- Connect the tester to the DLC3.
- Turn the ignition switch to the ON position.
- Turn the tester ON.
- Enter the following menus: DIAGNOSIS / OBD/MOBD / METER / ACTIVE TEST
- Check the operation by referring to the values in the table below.
METER:

*1: for U.S.A.
*2: Except for U.S.A.
OK: Needle indication is within the allowable range.
2 READ VALUE OF INTELLIGENT TESTER
- Connect the intelligent tester to the DLC3.
- Turn the ignition switch to the ON position.
- Turn the tester ON.
- Enter the following menus: DIAGNOSIS / OBD/MOBD / METER / DATA LIST.
- Check the values by referring to the values in the table below.
METER:

OK: Vehicle speed displayed on the tester is almost the same as the actual vehicle speed measured using a speedometer tester (calibrated chassis dynamometer).
REPLACE COMBINATION METER ASSEMBLY
3 READ VALUE OF INTELLIGENT TESTER
- Connect the intelligent tester to the DLC3.
- Turn the ignition switch to the ON position.
- Turn the tester ON.
- Enter the following menus: DIAGNOSIS / ABS/TRAC/ VSC / DATA LIST.
- Check the values by referring to the values in the table below.
ABS/TRAC/VSC:

OK: Vehicle speed displayed on the tester is almost the same as the actual vehicle speed measured using a speedometer tester (calibrated chassis dynamometer).
4 INSPECT COMBINATION METER ASSEMBLY
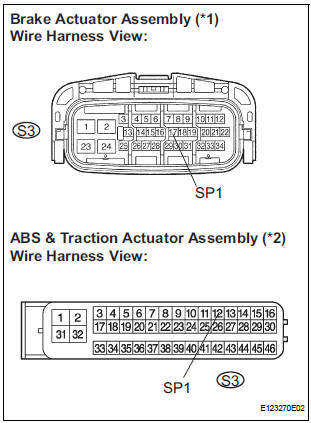
- Disconnect the S3 connector.
- Measure the voltage according to the value(s) in the table below.
Standard voltage
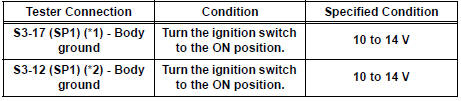
*1: without VSC
*2: with VSC
Result

5 INSPECT COMBINATION METER ASSEMBLY

- Check the input signal waveform.
- Remove the combination meter assembly with connector(s) still connected.
- Connect the oscilloscope to terminal C10-35 (SI) and body ground.
- Turn the wheel slowly.
- Check the signal waveform according to the condition(s) in the table below.

OK: The waveform is displayed as shown in the illustration.
HINT: As the vehicle speed increases, the cycle of the signal waveform narrows.
Result

REPLACE COMBINATION METER ASSEMBLY
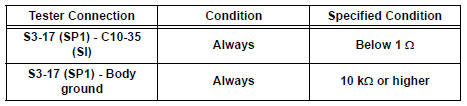
6 CHECK HARNESS AND CONNECTOR (COMBINATION METER - BRAKE ACTUATOR ASSEMBLY)
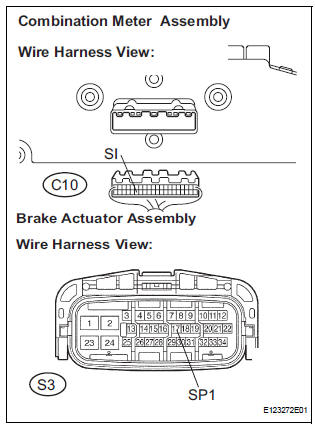
- Disconnect the S3 and C10 connectors.
- Measure the resistance according to the value(s) in the table below.
Standard resistance
REPLACE COMBINATION METER ASSEMBLY
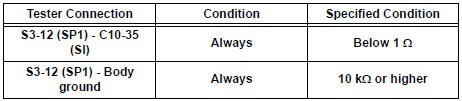
7 CHECK HARNESS AND CONNECTOR (COMBINATION METER - ABS & TRACTION ACTUATOR ASSEMBLY)
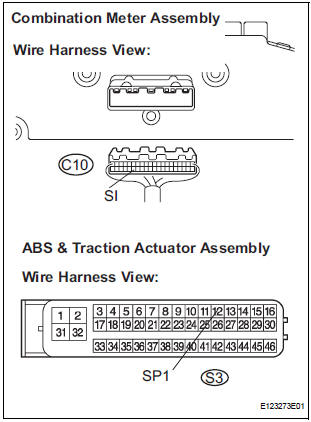
- Disconnect the S3 and C10 connectors.
- Measure the resistance according to the value(s) in the table below.
Standard resistance
REPLACE COMBINATION METER ASSEMBLY
Test yourself
A quick Toyota Sienna quiz: every answer comes with an explanation and a link to the manual page.