Engine Stall History (P1603,P1605)
After starting the engine, this DTC is stored when the engine stops without the ignition switch being operated.
Using the Techstream, the conditions present when the DTC was stored can be confirmed by referring to the freeze frame data. Freeze frame data records engine conditions when a malfunction occurs. This information can be useful when troubleshooting.
It is necessary to check if the vehicle has ran out of fuel before performing troubleshooting, as this DTC is also stored when the engine stalls due to running out of fuel.
DTC No. | DTC Detection Condition | Trouble Area |
|---|---|---|
P1603 |
After monitoring for startability problems (P1604) finishes and 5 seconds or more elapse after starting the engine, with the engine running, the engine stops (the engine speed drops to 200 rpm or less) without the ignition switch being operated for 0.5 seconds or more (1 trip detection logic). |
|
This DTC is stored if the engine speed drops below the set speed.
Using the Techstream, the conditions present when the DTC was stored can be confirmed by referring to the freeze frame data. Freeze frame data records engine conditions when a malfunction occurs. This information can be useful when troubleshooting.
It is necessary to check if the vehicle ran out of fuel before performing troubleshooting, as this DTC is also stored when idling is unstable due to running out of fuel.
DTC No. | DTC Detection Condition | Trouble Area |
|---|---|---|
P1605 |
After 5 seconds or more elapse after starting the engine, with the engine running, the engine speed drops to 400 rpm or less (1 trip detection logic). |
|
1. Reference waveforms showing a normal cold engine start

2. Reference waveforms showing a normal warm engine start
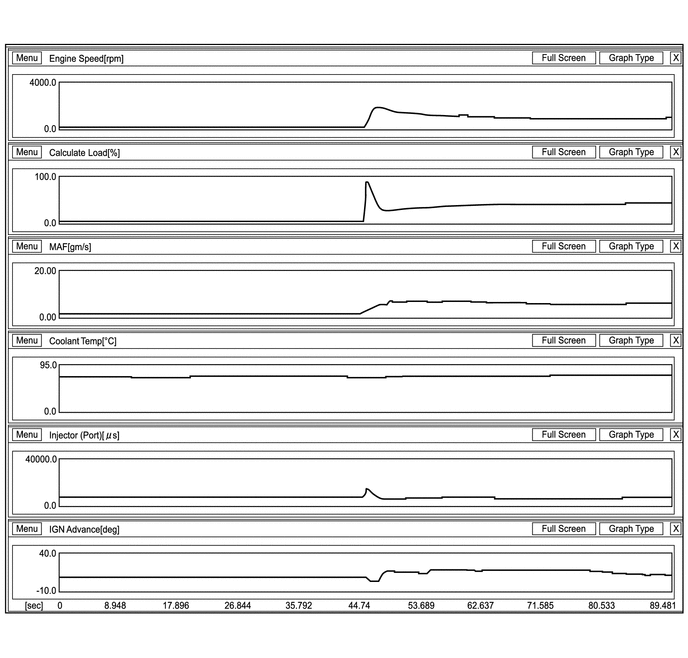
3. Reference values when there is an air leak in the intake system during rough idling
Freeze Frame Data P1605 Rough IdlingParameter | -3 | -2 | -1 | 0 | 1 | Unit |
|---|---|---|---|---|---|---|
Engine Speed |
533 |
516 |
612 |
420 |
416 |
rpm |
Calculate Load |
39.2 |
40.0 |
40.0 |
41.1 |
42.3 |
% |
Vehicle Load |
24.7 |
27.0 |
16.8 |
40.7 |
35.2 |
% |
MAF |
3.56 |
3.75 |
2.81 |
4.59 |
3.93 |
gm/s |
Atmosphere Pressure |
14.5 |
14.5 |
14.5 |
14.5 |
14.5 |
psi(gauge) |
Coolant Temp |
85 |
85 |
85 |
85 |
85 |
°C |
Intake Air |
46 |
46 |
46 |
46 |
46 |
°C |
Battery Voltage |
13.105 |
13.144 |
13.359 |
12.949 |
12.910 |
V |
Throttle Sensor Volt % |
17.2 |
15.6 |
15.2 |
16.8 |
16.4 |
% |
Throttl Sensor #2 Volt % |
49.4 |
47.4 |
47.0 |
49.0 |
48.6 |
% |
Throttle Sensor Position |
0.0 |
0.0 |
0.0 |
0.0 |
0.0 |
% |
Throttle Motor DUTY |
17.6 |
15.2 |
15.2 |
15.2 |
16.8 |
% |
Injector (Port) |
4160 |
4194 |
4056 |
4979 |
5042 |
μs |
Injection Volum (Cylinder 1) |
0.175 |
0.175 |
0.228 |
0.228 |
0.228 |
ml |
Fuel Pump/Speed Status |
ON |
ON |
ON |
ON |
ON |
|
EVAP (Purge) VSV |
0.0 |
0.0 |
0.0 |
0.0 |
0.0 |
% |
Evap Purge Flow |
0.0 |
0.0 |
0.0 |
0.0 |
0.0 |
% |
Purge Density Learn Value |
0.000 |
0.000 |
0.000 |
0.000 |
0.000 |
|
EVAP Purge VSV |
OFF |
OFF |
OFF |
OFF |
OFF |
|
Target Air-Fuel Ratio |
0.999 |
0.999 |
0.999 |
0.999 |
0.999 |
|
AF Lambda B1S1 |
1.232 |
1.232 |
1.232 |
1.232 |
1.232 |
|
AFS Voltage B1S1 |
4.996 |
4.996 |
4.996 |
4.996 |
4.996 |
V |
O2S B1S2 |
0.000 |
0.000 |
0.000 |
0.000 |
0.000 |
V |
Short FT #1 |
18.750 |
18.750 |
18.750 |
18.750 |
18.750 |
% |
Long FT #1 |
3.906 |
3.906 |
3.906 |
3.906 |
3.906 |
% |
Total FT #1 |
0.000 |
0.000 |
0.000 |
0.000 |
0.000 |
|
Fuel System Status #1 |
CL |
CL |
CL |
CL |
CL |
|
IGN Advance |
15.0 |
14.0 |
14.5 |
15.0 |
0.5 |
deg |
Knock Feedback Value |
-3.0 |
-3.0 |
-3.0 |
-3.0 |
-3.0 |
deg(CA) |
Knock Correct Learn Value |
19.0 |
19.0 |
19.0 |
19.0 |
19.0 |
deg(CA) |
VVT Control Status #1 |
OFF |
OFF |
OFF |
OFF |
OFF |
|
Starter Signal |
OFF |
OFF |
OFF |
OFF |
OFF |
Refer to DTC P0351 for ignition coil assembly circuit (See page  ).
Refer to DTC P2195 for air fuel ratio sensor circuit (See page ).
Refer EVAP System for purge VSV circuit (See page ).
Refer to Fuel Pump Control Circuit (See page ).
Refer to Fuel Injector Circuit (See page ).
CAUTION / NOTICE / HINT
HINT:
- In contrast to normal malfunction diagnosis for components, circuits and systems, DTCs P1603 and P1605 are used to determine the malfunctioning area from the problem symptoms and freeze frame data when the user mentions problems such as engine stall.
As these DTCs can be stored as a result of certain user actions, even if these DTCs are output, if the customer makes no mention of problems, clear these DTCs without performing any troubleshooting and return the vehicle to the customer.
- If any other DTCs are output, perform troubleshooting for those DTCs first.
- Use any information from the customer problem analysis about the condition of the vehicle at the time when the problem occurred (how the engine stopped, conditions when the engine was restarted, etc.) as a reference.
Symptom
Suspected Area
Engine vibration occurs and engine stops
Air-fuel ratio abnormal
Engine stops with no engine vibration
Ignition system, injection stoppage, high load from external parts
Engine can be started with accelerator pedal depressed
Insufficient air volume
Rough idling after engine started
Air-fuel ratio abnormal, abnormal combustion
- Read freeze frame data using the Techstream. Freeze frame data records engine conditions when a malfunction occurs. This information can be useful when troubleshooting.
- When confirming the freeze frame data, be sure to check all 5 sets of freeze frame data (See page ).
- When DTC P1603 (Engine Stall History) is stored, DTC P1605 (Rough Idling) is also stored. When confirming freeze frame data, check DTC P1605. The ECM stores DTC P1605 first. Therefore, 5 sets of freeze frame data can be confirmed through DTC P1605, enabling the technician to obtain more information.
- When confirming freeze frame data, if there are multiple items related to the cause of the malfunction, perform troubleshooting for all related items.
- Try to operate the vehicle under the conditions recorded in the freeze frame data which were present when the malfunction occurred. Confirm the data at this time and the data when the engine is idling (engine warmed up, no load, and shift lever in D or N) and compare these data with the freeze frame data.
- Inspections take into account the fact that the malfunction may not have reoccurred and place emphasis on checking the vehicle conditions present at the time when the malfunction occurred.
- When performing inspections, jiggle the relevant wire harnesses and connectors in an attempt to reproduce malfunctions that do not always occur.
Inspection flow:
Using freeze frame data, narrow down the parts to be inspected according to the vehicle conditions at the time when the malfunction occurred.
P1603: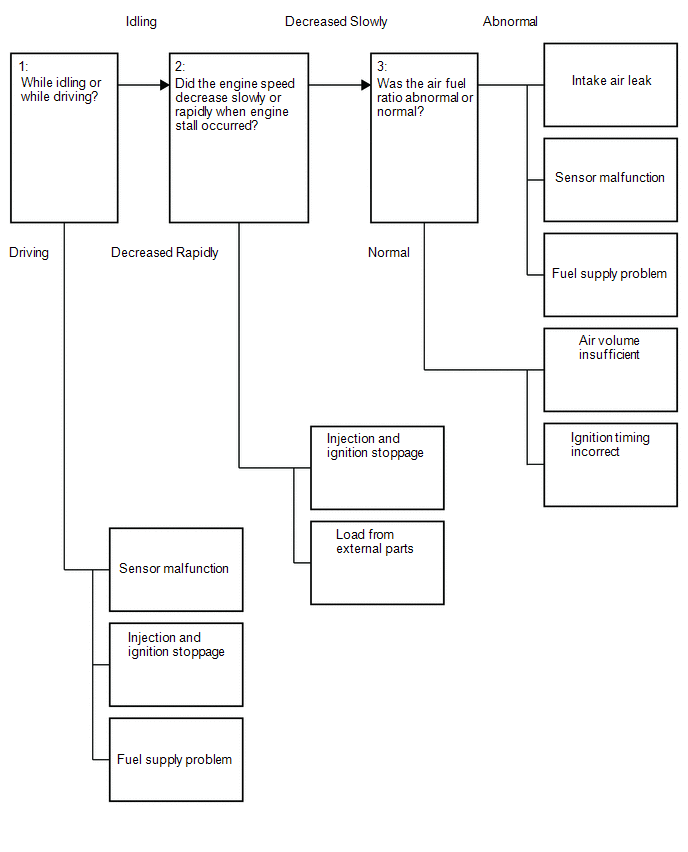
1:
- If the engine stalled when the intake air volume was low (during idling or deceleration), there may be a decrease in torque due to an incorrect air fuel ratio, etc.
- If the engine stalled when the intake air volume was high (during driving or acceleration), there may be a major malfunction such as continuous misfire due to ignition stoppage, fuel injection stoppage, etc. and the torque drops to zero.
- If the engine speed decreased slowly, there may have been a decrease in torque due to an air fuel ratio that was incorrect (by approximately 20 to 30%), etc.
- If the engine speed decreased rapidly, there may have been a malfunction such as when the engine misfires almost continuously due to ignition stoppage, fuel injection stoppage, etc., or when the external load increases due to an external part malfunctioning.
- If the air fuel ratio is abnormal, there may have been an intake air leak, sensor malfunction, or fuel supply problem.
- If the vehicle was normal, the air volume may have been insufficient or the ignition timing may have been incorrect.
P1603 inspection flow: Narrow down the parts to be inspected according to the vehicle conditions at the time when the malfunction occurred (freeze frame data).
Vehicle State | Engine Speed | Suspected Area | Primary Parts to Inspect | Procedure |
|
|---|---|---|---|---|---|
Idling or decelerating |
Slowly decreases and engine stalls |
Ignition system abnormal |
Igniter abnormal |
|
10, 38, 52 |
Air fuel ratio abnormal |
Air suction |
|
5 to 9 |
||
Sensor malfunction (value from sensor too lean) |
|
11 to 23 |
|||
Sensor malfunction (value from sensor too rich) |
39 to 51 |
||||
Fuel supply problem |
|
24 to 37 |
|||
Intake air volume insufficient |
Problem with air passage |
|
53 to 55 |
||
Excessive valve overlap |
|
56 to 59 |
|||
Ignition timing incorrect |
Does not operate as expected |
|
60 to 64 |
||
Rapidly decreases and engine stalls |
Ignition and injection stops (electrical system malfunction) |
Power temporarily cut |
|
65, 66 |
|
External part malfunctioning |
Increase in load |
|
67 to 69 |
||
Accelerating |
- |
Crankshaft position sensor or VVT sensor malfunction |
Power temporarily cut |
|
1 |
Mass air flow meter sub-assembly |
Foreign matter adhesion |
|
70 to 73 |
||
Ignition and injection stops (electrical system malfunction) |
Power temporarily cut |
|
74, 75 |
||
Fuel supply problem |
Fuel leak, clog |
|
76 to 80 |
||

1:
- If the engine speed decreased slowly, there may have been a decrease in torque due to an air fuel ratio that was incorrect (by approximately 20 to 30%), etc.
- If the engine speed decreased rapidly, there may have been a malfunction such as when the engine misfires almost continuously due to ignition stoppage, fuel injection stoppage, etc., or when the external load increases due to an external part malfunctioning.
- If the air fuel ratio is abnormal, there may have been an intake air leak, sensor malfunction, or fuel supply problem.
- If the vehicle was normal, the air volume may have been insufficient or the ignition timing may have been incorrect.
P1605 inspection flow: Narrow down the parts to be inspected according to the vehicle conditions at the time when the malfunction occurred (freeze frame data).
Engine Speed | Suspected Area | Primary Parts to Inspect | Procedure |
|
|---|---|---|---|---|
Slowly decreases |
Ignition system abnormal |
Igniter abnormal |
|
10, 38, 52 |
Air fuel ratio abnormal |
Air suction |
|
5 to 9 |
|
Sensor malfunction (value from sensor too lean) |
|
11 to 23 |
||
Sensor malfunction (value from sensor too rich) |
39 to 51 |
|||
Fuel supply problem |
|
24 to 37 |
||
Intake air volume insufficient |
Problem with air passage |
|
53 to 55 |
|
Excessive valve overlap |
|
56 to 59 |
||
Ignition timing incorrect |
Does not operate as expected |
|
60 to 64 |
|
Rapidly decreases |
Ignition and injection stops (electrical system malfunction) |
Power temporarily cut |
|
65, 66 |
External part malfunctioning |
Increase in load |
|
67 to 69 |
|
NOTICE:
Inspect the fuses for circuits related to this system before performing the following inspection procedure.
PROCEDURECHECK FOR ANY OTHER DTCS OUTPUT
(a) Connect the Techstream to the DLC3.
(b) Turn the ignition switch to ON.
(c) Turn the Techstream on.
(d) Enter the following menus: Powertrain / Engine / Trouble Codes.
(e) Read the DTCs (See page ).
Result
Result | Proceed to |
|---|---|
Only DTC P1603 and/or P1605 is output |
A |
DTC and other DTCs P1603 and/or P1605 are output |
B |
HINT:
If any DTCs other than P1603 or P1605 are output, troubleshoot those DTCs first.
| B |  | GO TO DTC CHART |
|

CHECK FREEZE FRAME DATA
(a) Connect the Techstream to the DLC3.
(b) Turn the ignition switch to ON.
(c) Using the Techstream, confirm the vehicle conditions recorded in the freeze frame data which were present when the DTC was stored (See page ).
OK:
Immobiliser Fuel Cut is OFF.
ResultResult | Proceed to |
|---|---|
Abnormal |
A |
Normal |
B |
| B | | GO TO STEP 4 |
|
CHECK ENGINE IMMOBILISER SYSTEM
(a) Connect the Techstream to the DLC3.
(b) Start the engine.
(c) Idle the engine
(d) Enter the following menus: Powertrain / Engine / Data List / Immobiliser Communication and Immobiliser Fuel Cut.
(e) Check the Data List indication.
OKData List Item | Techstream Display |
|---|---|
Immobiliser Communication |
ON |
Immobiliser Fuel Cut |
OFF |
Result | Proceed to |
|---|---|
OK |
A |
NG (w/ Smart Key System) |
B |
NG (w/o Smart Key System) |
C |
| B | | CHECK ENGINE IMMOBILISER SYSTEM |
| C | | CHECK ENGINE IMMOBILISER SYSTEM |
|
READ FREEZE FRAME DATA
(a) Connect the Techstream to the DLC3.
(b) Turn the ignition switch to ON.
(c) Using the Techstream, confirm the vehicle conditions recorded in the freeze frame data which were present when the DTC was stored (See page ).
Result
Problem Symptom | Freeze Frame Data Item for DTC P1605 | Suspected Area | Proceed to |
||
|---|---|---|---|---|---|
Closed Throttle Position SW | Engine Speed | Total of Short FT and Long FT |
|||
When idling or decelerating, engine speed slowly decreases (and engine stalls) |
All 5 sets of freeze frame data are ON |
Decreases slowly*1 |
All 5 sets of freeze frame data are +15% or more*2 |
|
A |
At least 1 of the 5 sets of freeze frame data is -15% or less*3 |
Sensor malfunction (value from sensor too rich) |
B |
|||
All 5 sets of freeze frame data are from -15% to +15% |
|
C |
|||
When idling or decelerating, engine speed rapidly decreases (and engine stalls) |
Decreases rapidly*1 |
- |
|
D |
|
When accelerating or driving at constant speed, engine stalls*4 |
At least one is OFF |
- |
- |
|
E |

HINT:
- *1: A rapid decrease in engine speed may be caused by an electrical fault in the shared wiring of all or a number of cylinders, an increase in load from external parts, etc. The engine speed is considered to have decreased rapidly if either of the following conditions applies.
Otherwise, the engine speed is considered to have decreased slowly.
- In the freeze frame data, the decrease in engine speed from #3 to #5 is 400 rpm or more.
- In the freeze frame data, the engine speed at #5 is 120 rpm or less.
- If the vehicle speed is 20 km/h or less and the difference between Engine Speed and SPD (NT) is 100 rpm or less, inspect the automatic transmission. (Depending on the rate of vehicle deceleration, the engine speed may have decreased due to the A/T lock-up release being late.)
- *2: When a DTC is stored, feedback compensation increases because the air fuel ratio is determined to be lean.
- *3: When a DTC is stored, feedback compensation decreases because the air fuel ratio is determined to be rich.
- *4: This item should be checked when DTC P1603 is output and is not necessary to check when only P1605 is output.
| B | | GO TO STEP 38 |
| C | | GO TO STEP 52 |
| D | | GO TO STEP 65 |
| E | | GO TO STEP 70 |
|
CHECK INTAKE SYSTEM
(a) Check for air leakage in the intake system [vacuum hose disconnection, cracks, damaged gaskets, etc.] (See page ).
HINT:
- If the accelerator pedal is released after racing the engine, the inspection is easier to perform because the vacuum inside the intake pipes increases and the air suction noise becomes louder.
- If Short FT and Long FT are largely different from the normal values when idling (the intake air volume is small) and almost the same as the normal values when racing the engine (the intake air volume is high), air leakage may be present.
OK:
There is no air leakage.
HINT:
Perform "Inspection After Repair" after repairing or replacing the intake system (See page ).
| NG | | REPAIR OR REPLACE INTAKE SYSTEM |
|
CHECK PURGE VSV
(a) Disconnect the purge hose (on the canister side) of the purge VSV. Text in Illustration
|
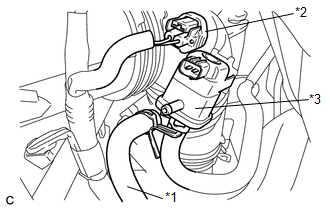 |
(b) Start the engine.
(c) Idle the engine.
(d) Disconnect the connector of the purge VSV.
(e) Check if air flows through the purge VSV.
OK:
Air does not flow.
HINT:
When this inspection is performed, the MIL may illuminate. After finishing the inspection, check and clear DTCs (See page ).
| NG | | REPLACE PURGE VSV |
|
READ FREEZE FRAME DATA
(a) Connect the Techstream to the DLC3.
(b) Turn the ignition switch to ON.
(c) Using the Techstream, confirm the vehicle conditions recorded in the freeze frame data which were present when the DTC was stored (See page ).
Result
Freeze Frame Data Item for DTC P1605 | Result | Suspected Area | Proceed to |
|---|---|---|---|
Stop Light Switch |
At least 1 of the 5 sets of freeze frame data is ON |
Air suction from brake booster |
A |
All 5 sets of freeze frame data are OFF |
- |
B |
| B | | GO TO STEP 10 |
|
READ VALUE USING TECHSTREAM (SHORT FT)
(a) Connect the Techstream to the DLC3. |
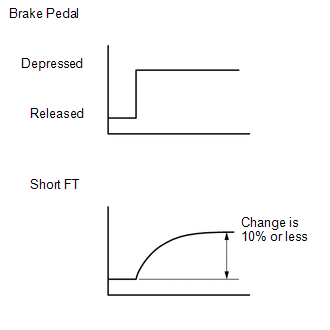 |
(b) Turn the ignition switch to ON.
(c) Start the engine and warm it up until the engine coolant temperature stabilizes.
HINT:
The A/C switch and all accessory switches should be off.
(d) Idle the engine.
(e) Using the Techstream, read the value of Short FT #1 in the Data List while depressing the brake pedal.
Standard:
Short FT #1 changes by +10% or less.
HINT:
When air leakage from the brake booster is present, the feedback compensation increases because the air fuel ratio becomes lean.
| NG | | INSPECT BRAKE BOOSTER ASSEMBLY |
|
PERFORM DRIVE TEST
(a) Connect the Techstream to the DLC3.
(b) Start the engine and warm it up until the engine coolant temperature stabilizes.
HINT:
The A/C switch and all accessory switches should be off.
(c) Idle the engine.
(d) Using the Techstream, read the value of Short FT #1 and Long FT #1 in the Data List.
Standard:
Data List | Condition | Specified Condition |
|---|---|---|
Short FT #1 + Long FT #1 |
The conditions of the vehicle are matched to those present when the problem occurs |
-15 to +15% |
| NG | | INSPECT BRAKE BOOSTER ASSEMBLY |
|
CHECK IGNITION SYSTEM
(a) Perform ignition system On-vehicle Inspection (See page ).
HINT:
Perform "Inspection After Repair" after repairing or replacing the ignition system (See page ).
| NG | | REPAIR OR REPLACE MALFUNCTIONING PARTS, COMPONENT AND AREA |
|
READ FREEZE FRAME DATA
(a) Connect the Techstream to the DLC3.
(b) Turn the ignition switch to ON.
(c) Using the Techstream, confirm the vehicle conditions recorded in the freeze frame data which were present when the DTC was stored (See page ).
Result
Freeze Frame Data Item for DTC P1605 | Result | Suspected Area | Proceed to |
|---|---|---|---|
Calculate Load |
Below 90% of the current value of the vehicle*1 |
Mass air flow meter sub-assembly |
A |
AFS Voltage B1S1 |
3.3 V or higher*2 |
|
B |
HINT:
- *1: If the mass air flow meter sub-assembly is malfunctioning and incorrectly measures the intake air volume to be less than the actual volume, the freeze frame data will show a low engine load value.
- *2: If the air fuel ratio sensor is malfunctioning and constantly outputs a value indicating the air fuel ratio is lean, the actual air fuel ratio will become rich and the engine may stall.
| B | | GO TO STEP 15 |
|
CHECK MASS AIR FLOW METER SUB-ASSEMBLY
(a) Remove the mass air flow meter sub-assembly.
(b) Check for foreign matter in the air flow passage of the mass air flow meter sub-assembly.
ResultResult | Proceed to |
|---|---|
Visible foreign matter is not present |
A |
Visible foreign matter is present |
B |
HINT:
Perform "Inspection After Repair" after replacing the mass air flow meter sub-assembly (See page ).
| B | | REPLACE MASS AIR FLOW METER SUB-ASSEMBLY |
|
CHECK HARNESS AND CONNECTOR (MASS AIR FLOW METER SUB-ASSEMBLY - ECM)
(a) Check the harnesses and connectors, referring to DTC P0102 inspection procedure (See page ).
HINT:
- Jiggle the wire harness and connector to increase the likelihood of detecting malfunctions that do not always occur.
- Make sure there is not an excessive amount of force applied to the wire harness.
| NG | | REPAIR OR REPLACE HARNESS OR CONNECTOR |
|
PERFORM DRIVE TEST
(a) Connect the Techstream to the DLC3.
(b) Start the engine and warm it up until the engine coolant temperature stabilizes.
HINT:
The A/C switch and all accessory switches should be off.
(c) Idle the engine.
(d) Using the Techstream, read the value of Calculate Load in the Data List.
Standard:
Data List | Specified Condition |
|---|---|
Calculate Load |
90 to 110% of the current value of the vehicle |
Result | Proceed to |
|---|---|
Abnormal |
A |
Normal |
B |
HINT:
Perform "Inspection After Repair" after replacing the mass air flow meter sub-assembly (See page ).
| A | | REPLACE MASS AIR FLOW METER SUB-ASSEMBLY |
| B | | GO TO STEP 18 |
PERFORM ACTIVE TEST USING TECHSTREAM (CONTROL THE INJECTION VOLUME FOR A/F SENSOR)
(a) Connect the Techstream to the DLC3. |
 |
(b) Start the engine, turn off all accessory switches and warm up the engine until the engine coolant temperature stabilizes.
(c) Idle the engine.
(d) Turn the Techstream on.
(e) Enter the following menus: Powertrain / Engine / Active Test / Control the Injection Volume for A/F Sensor / AFS Voltage B1S1.
(f) Read the output voltage from the air fuel ratio sensor when increasing and decreasing the fuel injection volume.
Standard:
Techstream Display | Specified Condition |
|---|---|
Control the Injection Volume for A/F Sensor (+12.5%) |
Air fuel ratio sensor output voltage is below 3.1 V |
Control the Injection Volume for A/F Sensor (-12.5%) |
Air fuel ratio sensor output voltage is higher than 3.4 V |
Result | Proceed to |
|---|---|
Abnormal |
A |
Normal |
B |
HINT:
The air fuel ratio sensor has an output delay of a few seconds and the heated oxygen sensor has a maximum output delay of approximately 20 seconds.
| B | | GO TO STEP 18 |
|
CHECK TERMINAL VOLTAGE (POWER SOURCE OF AIR FUEL RATIO SENSOR)
(a) Check the harnesses and connectors, referring to DTC P0031 inspection procedure (See page ).
HINT:
- Jiggle the wire harness and connector to increase the likelihood of detecting malfunctions that do not always occur.
- Make sure there is not an excessive amount of force applied to the wire harness.
| NG | | REPAIR AIR FUEL RATIO SENSOR POWER SOURCE CIRCUIT |
|
CHECK HARNESS AND CONNECTOR (AIR FUEL RATIO SENSOR - ECM)
(a) Check the harnesses and connectors, referring to DTC P2237 inspection procedure (See page ).
HINT:
- Jiggle the wire harness and connector to increase the likelihood of detecting malfunctions that do not always occur.
- Make sure there is not an excessive amount of force applied to the wire harness.
| NG | | REPAIR OR REPLACE HARNESS OR CONNECTOR |
|
READ FREEZE FRAME DATA
(a) Connect the Techstream to the DLC3.
(b) Turn the ignition switch to ON.
(c) Using the Techstream, confirm the vehicle conditions recorded in the freeze frame data which were present when the DTC was stored (See page ).
Result
Freeze Frame Data Item for DTC P1605 | Result | Proceed to |
|---|---|---|
Initial Engine Coolant Temp, Ambient Temp for A/C, Initial Intake Air Temp |
Difference in temperature between each item is less than 10 °C *1 |
A |
Difference in temperature between each item is 10 °C or more*2 |
B |
HINT:
- *1: A long time had elapsed after stopping the engine.
- *2: A long time had not elapsed after stopping the engine.
| B | | GO TO STEP 21 |
|
READ FREEZE FRAME DATA
(a) Connect the Techstream to the DLC3.
(b) Turn the ignition switch to ON.
(c) Using the Techstream, confirm the vehicle conditions recorded in the freeze frame data which were present when the DTC was stored (See page ).
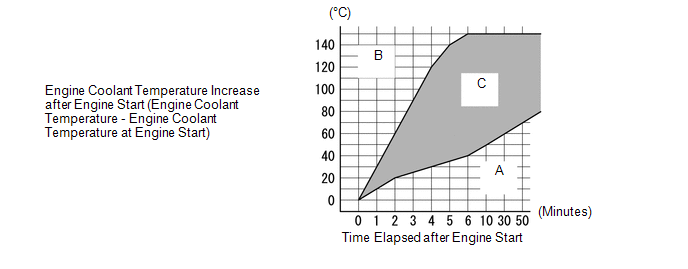 Result
Freeze Frame Data Item for DTC P1605 | Result | Suspected Area | Proceed to |
|---|---|---|---|
Initial Engine Coolant Temp, Coolant Temp, Engine Run Time |
Range A |
|
A |
Range B |
Engine coolant temperature sensor |
B |
|
Range C |
- |
C |
HINT:
This step is not directly related to engine stall.
| B | | GO TO STEP 22 |
| C | | GO TO STEP 24 |
|
INSPECT THERMOSTAT
(a) Inspect the thermostat (See page ).
Result
Result | Proceed to |
|---|---|
Abnormal |
A |
Normal |
B |
| A | | REPLACE THERMOSTAT |
| B | | GO TO STEP 22 |
READ FREEZE FRAME DATA
(a) Connect the Techstream to the DLC3.
(b) Turn the ignition switch to ON.
(c) Using the Techstream, confirm the vehicle conditions recorded in the freeze frame data which were present when the DTC was stored (See page ).
Result
Freeze Frame Data Item for DTC P1605 | Result | Suspected Area | Proceed to |
|---|---|---|---|
Coolant Temp |
120 °C or higher |
Engine coolant temperature sensor |
A |
Engine coolant temperature is lower than outside temperature* by 15 °C or more |
Engine coolant temperature sensor |
||
Values are other than above |
- |
B |
HINT:
*: Use an actual outside temperature estimated from the Initial Intake Air, Ambient Temp for A/C, and (if possible) the weather when the DTC was detected.
| B | | GO TO STEP 24 |
|
INSPECT ENGINE COOLANT TEMPERATURE SENSOR
(a) Inspect the engine coolant temperature sensor (See page ).
HINT:
Perform "Inspection After Repair" after replacing the engine coolant temperature sensor (See page ).
| NG | | REPLACE ENGINE COOLANT TEMPERATURE SENSOR |
|
CHECK HARNESS AND CONNECTOR (ECM - ENGINE COOLANT TEMPERATURE SENSOR)
(a) Disconnect the ECM connector.
(b) Disconnect the engine coolant temperature sensor connector.
(c) Measure the resistance according to the value(s) in the table below.
Standard Resistance:
Tester Connection | Condition | Specified Condition |
|---|---|---|
B58-64 (THW) - B6-2 |
Always |
Below 1 Ω |
B58-65 (ETHW) - B6-1 |
Always |
Below 1 Ω |
B58-64 (THW) or B6-2 - Body ground |
Always |
10 kΩ or higher |
HINT:
- Jiggle the wire harness and connector to increase the likelihood of detecting malfunctions that do not always occur.
- Make sure there is not an excessive amount of force applied to the wire harness.
| NG | | REPAIR OR REPLACE HARNESS OR CONNECTOR |
|
READ FREEZE FRAME DATA
(a) Connect the Techstream to the DLC3.
(b) Turn the ignition switch to ON.
(c) Using the Techstream, confirm the vehicle conditions recorded in the freeze frame data which were present when the DTC was stored (See page ).
Result
Freeze Frame Data Item for DTC P1605 | Result | Suspected Area | Proceed to |
|---|---|---|---|
EVAP (Purge) VSV |
At least 1 of the 5 sets of freeze frame data is not 0% |
Purge VSV |
A |
All 5 sets of freeze frame data are 0% |
- |
B |
HINT:
If the purge VSV is stuck closed, air fuel ratio compensation by the purge VSV is incorrectly adjusted, and then the air fuel ratio becomes lean and the engine may stall.
| B | | GO TO STEP 33 |
|
PERFORM ACTIVE TEST USING TECHSTREAM (ACTIVATE THE VSV FOR EVAP CONTROL)
(a) Disconnect the purge hose (on the canister side) of the purge VSV. Text in Illustration
|
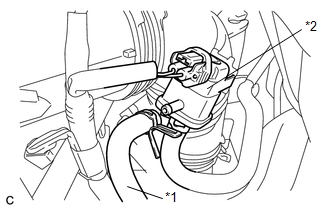 |
(b) Connect the Techstream to the DLC3.
(c) Turn the ignition switch to ON.
(d) Start the engine.
(e) Enter the following menus: Powertrain / Engine / Active Test / Activate the VSV for Evap Control.
(f) Operate the purge VSV and check the air flow.
OK:
Activate the VSV for Evap Control | Specified Condition |
|---|---|
ON |
Air flows |
OFF |
Air does not flow |
Result | Proceed to |
|---|---|
NG |
A |
OK |
B |
HINT:
Jiggle the wire harness and connector to increase the likelihood of detecting malfunctions that do not always occur.
| B | | GO TO STEP 33 |
|
INSPECT PURGE VSV
(a) Inspect the purge VSV (See page ).
| NG | | REPLACE PURGE VSV |
|
CHECK TERMINAL VOLTAGE (PURGE VSV POWER SOURCE)
(a) Disconnect the purge VSV connector. |
 |
(b) Turn the ignition switch to ON.
(c) Measure the voltage according to the value(s) in the table below.
Standard Voltage:
Tester Connection | Switch Condition | Specified Condition |
|---|---|---|
B34-1 - Body ground |
Ignition switch ON |
11 to 14 V |
*a |
Front view of wire harness connector (to Purge VSV) |
HINT:
- Jiggle the wire harness and connector to increase the likelihood of detecting malfunctions that do not always occur.
- Make sure there is not an excessive amount of force applied to the wire harness.
| NG | | REPAIR OR REPLACE HARNESS OR CONNECTOR (PURGE VSV - EFI MAIN RELAY) |
|
CHECK HARNESS AND CONNECTOR (PURGE VSV - ECM)
(a) Check harness and connector.
HINT:
- Refer to EVAP System inspection procedure (See page ).
- Jiggle the wire harness and connector to increase the likelihood of detecting malfunctions that do not always occur.
- Make sure there is not an excessive amount of force applied to the wire harness.
| NG | | REPAIR OR REPLACE HARNESS OR CONNECTOR |
|
CLEAR DTC
(a) Connect the Techstream to the DLC3.
(b) Turn the ignition switch to ON.
(c) Turn the Techstream on.
(d) Clear the DTCs (See page ).
|
READ VALUE USING TECHSTREAM (EVAP (PURGE) VSV)
(a) Connect the Techstream to the DLC3.
(b) Start the engine and warm it up until the engine coolant temperature stabilizes.
HINT:
The A/C switch and all accessory switches should be off.
(c) Idle the engine for 15 minutes or more.
(d) Using the Techstream, read the value of EVAP (Purge) VSV in the Data List.
Standard:
Data List | Specified Condition |
|---|---|
EVAP (Purge) VSV |
Value other than 0% is displayed |
Result | Proceed to |
|---|---|
Abnormal |
A |
Normal |
B |
| B | | CHECK FOR INTERMITTENT PROBLEMS |
|
PERFORM ACTIVE TEST USING TECHSTREAM (ACTIVATE THE VSV FOR EVAP CONTROL)
(a) Disconnect the purge hose (on the canister side) of the purge VSV. Text in Illustration
|
|
(b) Connect the Techstream to the DLC3.
(c) Turn the ignition switch to ON.
(d) Start the engine.
(e) Enter the following menus: Powertrain / Engine / Active Test / Activate the VSV for Evap Control.
(f) Operate the purge VSV and check the air flow.
OK:
Activate the VSV for Evap Control | Specified Condition |
|---|---|
ON |
Air flows |
OFF |
Air does not flow |
Result | Proceed to |
|---|---|
NG |
A |
OK |
B |
HINT:
Jiggle the wire harness and connector to increase the likelihood of detecting malfunctions that do not always occur.
| B | | CHECK FOR INTERMITTENT PROBLEMS |
|
CHECK CONNECTOR CONNECTION CONDITION (ECM)
(a) Check the ECM connector connection condition.
HINT:
- Jiggle the wire harness and connector to increase the likelihood of detecting malfunctions that do not always occur.
- Make sure there is not an excessive amount of force applied to the wire harness.
| OK | | REPLACE ECM |
| NG | | RECONNECT CONNECTOR CORRECTLY |
PERFORM ACTIVE TEST USING TECHSTREAM (CONTROL THE FUEL PUMP / SPEED)
(a) Connect the Techstream to the DLC3.
(b) Turn the ignition switch to ON.
(c) Turn the Techstream on.
(d) Enter the following menus: Powertrain / Engine / Active Test / Control the Fuel Pump / Speed.
(e) Check whether the fuel pump operating sound occurs when performing the Active Test on the Techstream.
Standard:
Techstream Operation | Specified Condition |
|---|---|
ON |
Operating sound heard |
OFF |
Operating sound not heard |
Result | Proceed to |
|---|---|
Abnormal |
A |
Normal |
B |
HINT:
- Jiggle the wire harness and connector to increase the likelihood of detecting malfunctions that do not always occur.
- While performing the Active Test, make sure that there is no fuel leakage from the pipes, no signs that fuel has leaked, and no fuel smell.
- If the fuel pump operating noise is abnormal, proceed to step 34.
| B | | GO TO STEP 35 |
|
INSPECT FUEL PUMP
(a) Inspect the fuel pump (See page ).
HINT:
Perform "Inspection After Repair" after replacing the fuel pump (See page ).
| OK | | CHECK FUEL PUMP CONTROL CIRCUIT |
| NG | | REPLACE FUEL PUMP |
CHECK FUEL SYSTEM
(a) Check the fuel system.
- Check the fuel pump operation.
- Check the fuel leaks.
- Check the fuel pressure.
- Perform the Active Test [Control the All Cylinders Fuel Cut].
HINT:
For the fuel system On-vehicle Inspection, refer to the following procedures (See page ).
Result
Result | Proceed to |
|---|---|
Abnormal |
A |
Normal |
B |
| B | | CHECK FOR INTERMITTENT PROBLEMS |
|
CHECK FUEL SYSTEM
(a) Check for foreign matter such as iron particles around the fuel pump (fuel pump, fuel pump filter and inside the fuel tank), and for signs that the fuel pump was stuck.
ResultResult | Proceed to |
|---|---|
There is no foreign matter and no signs that fuel pump was stuck |
A |
There is foreign matter or signs that fuel pump was stuck |
B |
HINT:
If there is foreign matter such as iron particles on the fuel pump, fuel filter or fuel tank, remove the foreign matter.
| B | | REPAIR OR REPLACE FUEL SYSTEM |
|
CHECK FUEL SYSTEM
(a) Check the fuel system.
- Check the fuel pump operation.
- Check the fuel leaks.
- Check the fuel pressure.
- Perform the Active Test [Control the All Cylinders Fuel Cut].
HINT:
- For the fuel system On-vehicle Inspection, refer to the following procedures (See page ).
- Perform "Inspection After Repair" after replacing the fuel pump (See page ).
| OK | | END |
| NG | | REPAIR OR REPLACE MALFUNCTIONING PARTS, COMPONENT AND AREA |
CHECK IGNITION SYSTEM
(a) Perform ignition system On-vehicle Inspection (See page ).
HINT:
Perform "Inspection After Repair" after repairing or replacing the ignition system (See page ).
| NG | | REPAIR OR REPLACE MALFUNCTIONING PARTS, COMPONENT AND AREA |
|
READ FREEZE FRAME DATA
(a) Connect the Techstream to the DLC3.
(b) Turn the ignition switch to ON.
(c) Using the Techstream, confirm the vehicle conditions recorded in the freeze frame data which were present when the DTC was stored (See page ).
Result
Freeze Frame Data Item for DTC P1605 | Result | Suspected Area | Proceed to |
|---|---|---|---|
Calculate Load |
110% or more of the current value of the vehicle*1 |
Mass air flow meter sub-assembly |
A |
AFS Voltage B1S1 |
Below 3.3 V*2 |
|
B |
Both freeze frame data items listed above |
Values are other than above |
- |
C |
HINT:
- *1: If the mass air flow meter sub-assembly is malfunctioning and incorrectly measures the intake air volume to be higher than the actual volume of air flowing through the intake air surge tank assembly, the freeze frame data will show a high engine load value.
- *2: As the air fuel ratio sensor output is low before the sensor warms up, the value at that time cannot be used for diagnosis. If the air fuel ratio sensor is malfunctioning and constantly outputs a value indicating the air fuel ratio is rich, the actual air fuel ratio will become lean and the engine may stall.
| B | | GO TO STEP 43 |
| C | | GO TO STEP 46 |
|
CHECK MASS AIR FLOW METER SUB-ASSEMBLY
(a) Remove the mass air flow meter sub-assembly (See page ).
(b) Check for foreign matter in the air flow passage of the mass air flow meter sub-assembly.
ResultResult | Proceed to |
|---|---|
Visible foreign matter is not present |
A |
Visible foreign matter is present |
B |
HINT:
Perform "Inspection After Repair" after replacing the mass air flow meter sub-assembly (See page ).
| B | | REPLACE MASS AIR FLOW METER SUB-ASSEMBLY |
|
CHECK HARNESS AND CONNECTOR (MASS AIR FLOW METER SUB-ASSEMBLY - ECM)
(a) Check the harnesses and connectors, referring to DTC P0102 inspection procedure (See page ).
HINT:
- Jiggle the wire harness and connector to increase the likelihood of detecting malfunctions that do not always occur.
- Make sure there is not an excessive amount of force applied to the wire harness.
| NG | | REPAIR OR REPLACE HARNESS OR CONNECTOR |
|
PERFORM DRIVE TEST
(a) Connect the Techstream to the DLC3.
(b) Start the engine and warm it up until the engine coolant temperature stabilizes.
HINT:
The A/C switch and all accessory switches should be off.
(c) Idle the engine.
(d) Using the Techstream, read the value of Calculate Load in the Data List.
Standard:
Data List | Specified Condition |
|---|---|
Calculate Load |
90 to 110% of the current value of the vehicle |
HINT:
Perform "Inspection After Repair" after replacing the mass air flow meter sub-assembly (See page ).
| NG | | REPLACE MASS AIR FLOW METER SUB-ASSEMBLY |
|
PERFORM ACTIVE TEST USING TECHSTREAM (CONTROL THE INJECTION VOLUME FOR A/F SENSOR)
(a) Connect the Techstream to the DLC3. |
|
(b) Start the engine, turn off all accessory switches and warm up the engine until the engine coolant temperature stabilizes.
(c) Idle the engine.
(d) Turn the Techstream on.
(e) Enter the following menus: Powertrain / Engine / Active Test / Control the Injection Volume for A/F Sensor / AFS Voltage B1S1.
(f) Read the output voltage from the air fuel ratio sensor when increasing and decreasing the fuel injection volume.
Standard:
Techstream Display | Specified Condition |
|---|---|
Control the Injection Volume for A/F Sensor (+12.5%) |
Air fuel ratio sensor output voltage is below 3.1 V |
Control the Injection Volume for A/F Sensor (-12.5%) |
Air fuel ratio sensor output voltage is higher than 3.4 V |
HINT:
The air fuel ratio sensor has an output delay of a few seconds and the heated oxygen sensor has a maximum output delay of approximately 20 seconds.
ResultResult | Proceed to |
|---|---|
Abnormal |
A |
Normal |
B |
| B | | GO TO STEP 46 |
|
CHECK TERMINAL VOLTAGE (POWER SOURCE OF AIR FUEL RATIO SENSOR)
(a) Check the harnesses and connectors, referring to DTC P0031 inspection procedure (See page ).
HINT:
- Jiggle the wire harness and connector to increase the likelihood of detecting malfunctions that do not always occur.
- Make sure there is not an excessive amount of force applied to the wire harness.
| NG | | REPAIR AIR FUEL RATIO SENSOR POWER SOURCE CIRCUIT |
|
CHECK HARNESS AND CONNECTOR (AIR FUEL RATIO SENSOR - ECM)
(a) Check the harnesses and connectors, referring to DTC P2237 inspection procedure (See page ).
HINT:
- Jiggle the wire harness and connector to increase the likelihood of detecting malfunctions that do not always occur.
- Make sure there is not an excessive amount of force applied to the wire harness.
| NG | | REPAIR OR REPLACE HARNESS OR CONNECTOR |
|
READ FREEZE FRAME DATA
(a) Connect the Techstream to the DLC3.
(b) Turn the ignition switch to ON.
(c) Using the Techstream, confirm the vehicle conditions recorded in the freeze frame data which were present when the DTC was stored (See page ).
Result
Freeze Frame Data Item for DTC P1605 | Result | Proceed to |
|---|---|---|
Initial Engine Coolant Temp, Ambient Temp for A/C, Initial Intake Air Temp |
Difference in temperature between each item is less than 10 °C*1 |
A |
Difference in temperature between each item is 10 °C or more*2 |
B |
HINT:
- *1: A long time had elapsed after stopping the engine.
- *2: A long time had not elapsed after stopping the engine.
| B | | GO TO STEP 49 |
|
READ FREEZE FRAME DATA
(a) Connect the Techstream to the DLC3.
(b) Turn the ignition switch to ON.
(c) Using the Techstream, confirm the vehicle conditions recorded in the freeze frame data which were present when the DTC was stored (See page ).
Result Freeze Frame Data Item for DTC P1605 | Result | Suspected Area | Proceed to |
|---|---|---|---|
Initial Engine Coolant Temp, Coolant Temp, Engine Run Time |
Range A |
|
A |
Range B |
Engine coolant temperature |
B |
|
Range C |
- |
C |
HINT:
This step is not directly related to engine stall.
| B | | GO TO STEP 50 |
| C | | GO TO STEP 78 |
|
INSPECT THERMOSTAT
(a) Inspect the thermostat (See page ).
Result
Result | Proceed to |
|---|---|
Abnormal |
A |
Normal |
B |
HINT:
This step is not directly related to engine stall.
| A | | REPLACE THERMOSTAT |
| B | | GO TO STEP 50 |
READ FREEZE FRAME DATA
(a) Connect the Techstream to the DLC3.
(b) Turn the ignition switch to ON.
(c) Using the Techstream, confirm the vehicle conditions recorded in the freeze frame data which were present when the DTC was stored (See page ).
Result
Freeze Frame Data Item for DTC P1605 | Result | Suspected Area | Proceed to |
|---|---|---|---|
Coolant Temp |
120 °C or higher |
Engine coolant temperature sensor |
A |
Engine coolant temperature is lower than outside temperature* by 15 °C or more |
Engine coolant temperature sensor |
||
Values are other than above |
- |
B |
HINT:
*: Use an actual outside temperature estimated from the Initial Intake Air, Ambient Temp for A/C, and (if possible) the weather when the DTC was detected.
| B | | GO TO STEP 81 |
|
INSPECT ENGINE COOLANT TEMPERATURE SENSOR
(a) Inspect the engine coolant temperature sensor (See page ).
HINT:
Perform "Inspection After Repair" after replacing the engine coolant temperature sensor (See page ).
| NG | | REPLACE ENGINE COOLANT TEMPERATURE SENSOR |
|
CHECK HARNESS AND CONNECTOR (ECM - ENGINE COOLANT TEMPERATURE SENSOR)
(a) Disconnect the ECM connector.
(b) Disconnect the engine coolant temperature sensor connector.
(c) Measure the resistance according to the value(s) in the table below.
Standard Resistance:
Tester Connection | Condition | Specified Condition |
|---|---|---|
B58-64 (THW) - B6-2 |
Always |
Below 1 Ω |
B58-65 (ETHW) - B6-1 |
Always |
Below 1 Ω |
B58-64 (THW) or B6-2 - Body ground |
Always |
10 kΩ or higher |
HINT:
- Jiggle the wire harness and connector to increase the likelihood of detecting malfunctions that do not always occur.
- Make sure there is not an excessive amount of force applied to the wire harness.
| OK | | CHECK FOR INTERMITTENT PROBLEMS |
| NG | | REPAIR OR REPLACE HARNESS OR CONNECTOR |
CHECK IGNITION SYSTEM
(a) Perform ignition system On-vehicle Inspection (See page ).
HINT:
Perform "Inspection After Repair" after repairing or replacing the ignition system (See page ).
| NG | | REPAIR OR REPLACE MALFUNCTIONING PARTS, COMPONENT AND AREA |
|
READ FREEZE FRAME DATA
(a) Connect the Techstream to the DLC3.
(b) Turn the ignition switch to ON.
(c) Using the Techstream, confirm the vehicle conditions recorded in the freeze frame data which were present when the DTC was stored (See page ).
Result
Freeze Frame Data Item for DTC P1605 | Result | Suspected Area | Proceed to |
|---|---|---|---|
Total of ISC Learning Value and ISC Feedback Value |
Below 80% of the current value of the vehicle |
Intake air volume insufficient |
A |
80% or more of the current value of the vehicle |
B |
| B | | GO TO STEP 56 |
|
CHECK INTAKE SYSTEM
(a) Check for air leakage in the intake system [vacuum hose disconnection, cracks, damaged gaskets, etc.] (See page ).
HINT:
- If the accelerator pedal is released after racing the engine, the inspection is easier to perform because the vacuum inside the intake pipes increases and the air suction noise becomes louder.
- If Short FT and Long FT are largely different from the normal values when idling (the intake air volume is small) and almost the same as the normal values when racing the engine (the intake air volume is high), air leakage may be present.
OK:
There is no air leakage.
HINT:
Perform "Inspection After Repair" after repairing or replacing the intake system (See page ).
| NG | | REPAIR OR REPLACE INTAKE SYSTEM |
|
CHECK INTAKE SYSTEM
(a) Check the intake system.
- Inspect the brake booster assembly (See page ).
- Inspect the mass air flow meter sub-assembly (See page ).
- Check the PCV hose (See page ).
- Inspect the PCV valve (See page ).
- Inspect the purge VSV (See page ).
Result | Proceed to |
|---|---|
Abnormal |
A |
Normal |
B |
HINT:
Perform "Inspection After Repair" after replacing the mass air flow meter sub-assembly (See page ).
| A | | REPAIR OR REPLACE MALFUNCTIONING PARTS, COMPONENT AND AREA |
| B | | GO TO STEP 60 |
PERFORM ACTIVE TEST USING TECHSTREAM (CONTROL THE VVT LINEAR)
(a) Perform the Active Test, referring to DTC P0011 inspection procedure (See page ).
HINT:
- Jiggle the wire harness and connector to increase the likelihood of detecting malfunctions that do not always occur.
- When the results of the inspection using the Active Test are normal but the valve operating noise is abnormal, check the valve for any signs of problems.
- If the camshaft timing oil control valve is stuck on, the valve overlap increases and combustion worsens due to the internal EGR which may cause rough idle or cause the engine to stall.
| NG | | REPLACE CAMSHAFT TIMING OIL CONTROL VALVE ASSEMBLY (FOR INTAKE CAMSHAFT) |
|
CHECK HARNESS AND CONNECTOR (CAMSHAFT TIMING OIL CONTROL VALVE ASSEMBLY (FOR INTAKE CAMSHAFT) - ECM)
(a) Check the harnesses and connectors, referring to DTC P0010 inspection procedure (See page ).
HINT:
- Jiggle the wire harness and connector to increase the likelihood of detecting malfunctions that do not always occur.
- Make sure there is not an excessive amount of force applied to the wire harness.
| NG | | REPAIR OR REPLACE HARNESS OR CONNECTOR |
|
PERFORM ACTIVE TEST USING TECHSTREAM (CONTROL THE VVT EXHAUST LINEAR)
(a) Perform the Active Test, referring to DTC P0014 inspection procedure (See page ).
HINT:
- Jiggle the wire harness and connector to increase the likelihood of detecting malfunctions that do not always occur.
- When the results of the inspection using the Active Test are normal but the valve operating noise is abnormal, check the valve for any signs of problems.
- If the camshaft timing oil control valve is stuck on, the valve overlap increases and combustion worsens due to the internal EGR which may cause rough idle or cause the engine to stall.
| NG | | REPLACE CAMSHAFT TIMING OIL CONTROL VALVE ASSEMBLY (FOR EXHAUST CAMSHAFT) |
|
CHECK HARNESS AND CONNECTOR (CAMSHAFT TIMING OIL CONTROL VALVE ASSEMBLY (FOR EXHAUST CAMSHAFT) - ECM)
(a) Check the harnesses and connectors, referring to DTC P0013 inspection procedure (See page ).
HINT:
- Jiggle the wire harness and connector to increase the likelihood of detecting malfunctions that do not always occur.
- Make sure there is not an excessive amount of force applied to the wire harness.
| NG | | REPAIR OR REPLACE HARNESS OR CONNECTOR |
|
READ FREEZE FRAME DATA
(a) Connect the Techstream to the DLC3.
(b) Turn the ignition switch to ON.
(c) Using the Techstream, confirm the vehicle conditions recorded in the freeze frame data which were present when the DTC was stored (See page ).
Result
Freeze Frame Data Item for DTC P1605 | Suspected Area | Proceed to |
|
|---|---|---|---|
IGN Advance | Knock Correct Learn Value |
||
Differs from the current value of the vehicle by 10 deg or more |
Less than 3 deg(CA) |
|
A |
3 deg(CA) or more |
- |
B |
|
Differs from the current value of the vehicle by less than 10 deg |
- |
- |
|
| B | | CHECK FOR INTERMITTENT PROBLEMS |
|
INSPECT ENGINE COOLANT TEMPERATURE SENSOR
(a) Inspect the engine coolant temperature sensor (See page ).
HINT:
Perform "Inspection After Repair" after replacing the engine coolant temperature sensor (See page ).
| NG | | REPLACE ENGINE COOLANT TEMPERATURE SENSOR |
|
CHECK HARNESS AND CONNECTOR (ECM - ENGINE COOLANT TEMPERATURE SENSOR)
(a) Disconnect the ECM connector.
(b) Disconnect the engine coolant temperature sensor connector.
(c) Measure the resistance according to the value(s) in the table below.
Standard Resistance:
Tester Connection | Condition | Specified Condition |
|---|---|---|
B58-64 (THW) - B6-2 |
Always |
Below 1 Ω |
B58-65 (ETHW) - B6-1 |
Always |
Below 1 Ω |
B58-64 (THW) or B6-2 - Body ground |
Always |
10 kΩ or higher |
HINT:
- Jiggle the wire harness and connector to increase the likelihood of detecting malfunctions that do not always occur.
- Make sure there is not an excessive amount of force applied to the wire harness.
| NG | | REPAIR OR REPLACE HARNESS OR CONNECTOR |
|
INSPECT MASS AIR FLOW METER SUB-ASSEMBLY (INTAKE AIR TEMPERATURE SENSOR)
(a) Inspect the mass air flow meter sub-assembly (intake air temperature sensor) (See page ).
HINT:
- If the intake air temperature sent to the ECM is higher than the standard due to the mass air flow meter sub-assembly (intake air temperature sensor) malfunctioning, the ignition timing may become delayed.
- Perform "Inspection After Repair" after replacing the mass air flow meter sub-assembly (See page ).
| NG | | REPLACE MASS AIR FLOW METER SUB-ASSEMBLY |
|
READ VALUE USING TECHSTREAM (IGN ADVANCE AND KNOCK CORRECT LEARN VALUE)
(a) Connect the Techstream to the DLC3.
(b) Start the engine and warm it up until the engine coolant temperature stabilizes.
HINT:
The A/C switch and all accessory switches should be off.
(c) Idle the engine.
(d) Using the Techstream, read the value of IGN Advance and Knock Correct Learn Value in the Data List.
ResultFreeze Frame Data Item for DTC P1605 | Proceed to |
|
|---|---|---|
IGN Advance | Knock Correct Learn Value |
|
Differs from the current value of the vehicle by 10 deg or more |
Less than 3 deg(CA) |
A |
3 deg(CA) or more |
B |
|
Differs from the current value of the vehicle by less than 10 deg |
- |
|
HINT:
If the results of the checks performed in steps 56 to 64 were all normal and the sum of ISC Feedback Value and ISC Learning Value in the Data List is 120% of the normal value or more, check for carbon deposits in the throttle body assembly. If there are carbon deposits, clean them off to finish the troubleshooting procedure.
| A | | CHECK KNOCK SENSOR CIRCUIT |
| B | | END |
CHECK TERMINAL VOLTAGE (POWER SOURCE OF FUEL INJECTOR ASSEMBLY)
(a) Check the harness and connectors, referring to Fuel Injector Circuit inspection procedure (See page ).
HINT:
- Jiggle the wire harness and connector to increase the likelihood of detecting malfunctions that do not always occur.
- Make sure there is not an excessive amount of force applied to the wire harness.
- A rapid decrease in engine speed may have been caused by a malfunction in all or multiple cylinders. (There may be an electrical malfunction in the wiring shared by all the cylinders.)
| NG | | REPAIR FUEL INJECTOR ASSEMBLY POWER SOURCE CIRCUIT |
|
CHECK IGNITION SYSTEM
(a) Perform ignition system On-vehicle Inspection (See page ).
HINT:
Perform "Inspection After Repair" after repairing or replacing the ignition system (See page ).
| NG | | REPAIR OR REPLACE MALFUNCTIONING PARTS, COMPONENT AND AREA |
|
CHECK FREEZE FRAME DATA
(a) Connect the Techstream to the DLC3.
(b) Turn the ignition switch to ON.
(c) Using the Techstream, confirm the vehicle conditions recorded in the freeze frame data which were present when the DTC was stored (See page ).
Result
Freeze Frame Data Item for DTC P1605 | Suspected Area | Proceed to |
||
|---|---|---|---|---|
A/C Signal | Air Conditioner FB Val | Power Steering Signal |
||
A/C Signal display does not change from OFF |
Value displayed for Air Conditioner FB Val does not increase |
Changes from OFF to ON |
Power steering system |
A |
Does not change from OFF |
- |
|||
A/C Signal display changes from OFF to ON*1 |
Value displayed for Air Conditioner FB Val increases |
Changes from OFF to ON |
Power steering system |
|
Does not change from OFF |
A/C system |
B |
||
HINT:
- *1: Check not only the ON/OFF state of the air conditioner but also the change in air conditioner load.
- The normal value for the ISC learned value is engine displacement (liters) x 0.9.
- Even if the results are normal, the power steering system or A/C system may have been malfunctioning. If there are no problems with other parts, inspect the power steering system or A/C system.
| B | | CHECK AIR CONDITIONING SYSTEM |
|
CHECK FREEZE FRAME DATA
(a) Connect the Techstream to the DLC3.
(b) Turn the ignition switch to ON.
(c) Using the Techstream, confirm the vehicle conditions recorded in the freeze frame data which were present when the DTC was stored (See page ).
Result
Freeze Frame Data Item for DTC P1605 | Suspected Area | Proceed to |
|||
|---|---|---|---|---|---|
Electrical Load Signal 1 (2 and 3) or Electric Load Feedback Val | Electric Load Feedback Val | Difference between Engine Speed and SPD (NT) | Vehicle Speed |
||
Electrical Load Signal 1 (2 and 3) display changes from OFF to ON*3, or value displayed for Electric Load Feedback Val increases*3 |
Value displayed for Electric Load Val changes |
- |
- |
Electrical load signal circuit |
D |
Value displayed for Electric Load Val does not change |
At least 1 of the 5 sets of freeze frame data is less than 100 rpm |
Less than 20 km/h |
A/T system |
B*1 C*2 |
|
20 km/h or more |
- |
A |
|||
All 5 sets of freeze frame data are 100 rpm or more |
- |
- |
A |
||
Electrical Load Signal 1 (2 and 3) display does not change from OFF, or value displayed for Electric Load Feedback Val does not increase |
- |
At least 1 of the 5 sets of freeze frame data is less than 100 rpm |
Less than 20 km/h |
A/T system |
B*1 C*2 |
20 km/h or more |
- |
A |
|||
All 5 sets of freeze frame data are 100 rpm or more |
- |
- |
A |
||
- *1: for U760E
- *2: for U760F
HINT:
- *3: If the Electrical Load Signal 1 (2 and 3) display changes from OFF to ON, or the "Electric Load Feedback Val" increases, it probably is a malfunction due to a change in electrical load. Check the generator and the continuity and connections between the generator and ECM.
- If the vehicle speed is 20 km/h or less and the difference between Engine Speed and SPD (NT) is 100 rpm or less, inspect the automatic transmission. (Depending on the rate of vehicle deceleration, the engine speed may have decreased due to the A/T lock-up release being late.)
- The normal value for the ISC learned value is engine displacement (liters) x 0.9.
- Even if the results are normal, the electrical load signal system and/or A/T system may have been malfunctioning. If there are no problems with other parts, inspect the electrical load system and/or A/T system.
| B | | CHECK AUTOMATIC TRANSMISSION SYSTEM |
| C | | CHECK AUTOMATIC TRANSMISSION SYSTEM |
| D | | CHECK GENERATOR CIRCUIT |
|
CHECK FREEZE FRAME DATA
(a) Connect the Techstream to the DLC3.
(b) Turn the ignition switch to ON.
(c) Using the Techstream, confirm the vehicle conditions recorded in the freeze frame data which were present when the DTC was stored (See page ).
Result
Freeze Frame Data Item for DTC P1605 | Suspected Area | Proceed to |
|
|---|---|---|---|
Shift SW Status (P Range) Shift SW Status (N Range) | Neutral Position SW Signal |
||
P and N position are both OFF in at least one data set |
ON when shift lever in D or R |
Park/Neutral position switch assembly |
A*1 B*2 |
OFF when shift lever in D or R |
A/T system |
C*1 D*2 |
|
All 5 sets of freeze frame data are ON |
- |
- |
E |
- *1: for U760E
- *2: for U760F
HINT:
Even if the results are normal, the park/neutral position switch assembly and/or A/T system may have been malfunctioning. If there are no problems with other parts, inspect the park/neutral position switch assembly and/or A/T system.
| A | | INSPECT PARK/NEUTRAL POSITION SWITCH |
| B | | INSPECT PARK/NEUTRAL POSITION SWITCH |
| C | | CHECK AUTOMATIC TRANSMISSION SYSTEM |
| D | | CHECK AUTOMATIC TRANSMISSION SYSTEM |
| E | | CHECK FOR INTERMITTENT PROBLEMS |
CHECK FREEZE FRAME DATA
(a) Connect the Techstream to the DLC3.
(b) Turn the ignition switch to ON.
(c) Using the Techstream, confirm the vehicle conditions recorded in the freeze frame data which were present when the DTC was stored (See page ).
Result
Freeze Frame Data Item | Result | Suspected Area | Proceed to |
|---|---|---|---|
Throttle Sensor Position, Calculate Load |
Calculate Load decreases while Throttle Sensor Position increases |
Mass air flow meter sub-assembly |
A |
Calculate Load does not decrease while Throttle Sensor Position increases |
- |
B |
| B | | GO TO STEP 74 |
|
CHECK MASS AIR FLOW METER SUB-ASSEMBLY
(a) Remove the mass air flow meter sub-assembly (See page ).
(b) Check for foreign matter in the air flow passage of the mass air flow meter sub-assembly.
ResultResult | Proceed to |
|---|---|
Visible foreign matter is not present |
A |
Visible foreign matter is present |
B |
HINT:
Perform "Inspection After Repair" after replacing the mass air flow meter sub-assembly (See page ).
| B | | REPLACE MASS AIR FLOW METER SUB-ASSEMBLY |
|
CHECK HARNESS AND CONNECTOR (MASS AIR FLOW METER SUB-ASSEMBLY - ECM)
(a) Check the harnesses and connectors, referring to DTC P0102 inspection procedure (See page ).
HINT:
- Jiggle the wire harness and connector to increase the likelihood of detecting malfunctions that do not always occur.
- Make sure there is not an excessive amount of force applied to the wire harness.
| NG | | REPAIR OR REPLACE HARNESS OR CONNECTOR |
|
PERFORM DRIVE TEST
(a) Connect the Techstream to the DLC3.
(b) Start the engine and warm it up until the engine coolant temperature stabilizes.
HINT:
The A/C switch and all accessory switches should be off.
(c) Idle the engine.
(d) Using the Techstream, read the value of Calculate Load in the Data List.
Standard:
Data List | Specified Condition |
|---|---|
Calculate Load |
90 to 110% of the current value of the vehicle |
HINT:
Perform "Inspection After Repair" after replacing the mass air flow meter sub-assembly (See page ).
| NG | | REPLACE MASS AIR FLOW METER SUB-ASSEMBLY |
|
CHECK TERMINAL VOLTAGE (POWER SOURCE OF FUEL INJECTOR ASSEMBLY)
(a) Check the harness and connectors, referring to Fuel Injector Circuit inspection procedure (See page ).
HINT:
- Jiggle the wire harness and connector to increase the likelihood of detecting malfunctions that do not always occur.
- Make sure there is not an excessive amount of force applied to the wire harness.
- A rapid decrease in engine speed may have been caused by a malfunction in all or multiple cylinders. (There may be an electrical malfunction in the wiring shared by all the cylinders.)
| NG | | REPAIR FUEL INJECTOR ASSEMBLY POWER SOURCE CIRCUIT |
|
CHECK IGNITION SYSTEM
(a) Perform ignition system On-vehicle Inspection (See page ).
HINT:
Perform "Inspection After Repair" after repairing or replacing the ignition system (See page ).
| NG | | REPAIR OR REPLACE MALFUNCTIONING PARTS, COMPONENT AND AREA |
|
PERFORM ACTIVE TEST USING TECHSTREAM (CONTROL THE FUEL PUMP / SPEED)
(a) Connect the Techstream to the DLC3.
(b) Turn the ignition switch to ON.
(c) Turn the Techstream on.
(d) Enter the following menus: Powertrain / Engine / Active Test / Control the Fuel Pump / Speed.
(e) Check whether the fuel pump operating sound occurs when performing the Active Test on the Techstream.
Standard:
Techstream Operation | Specified Condition |
|---|---|
ON |
Operating sound heard |
OFF |
Operating sound not heard |
Result | Proceed to |
|---|---|
Abnormal |
A |
Normal |
B |
HINT:
- Jiggle the wire harness and connector to increase the likelihood of detecting malfunctions that do not always occur.
- While performing the Active Test, make sure that there is no fuel leakage from the pipes, no signs that fuel has leaked, and no fuel smell.
- If the fuel pump operating noise is abnormal, proceed to step 77.
| B | | GO TO STEP 78 |
|
INSPECT FUEL PUMP
(a) Inspect the fuel pump (See page ).
HINT:
Perform "Inspection After Repair" after replacing the fuel pump (See page ).
| OK | | CHECK FUEL PUMP CONTROL CIRCUIT |
| NG | | REPLACE FUEL PUMP |
CHECK FUEL SYSTEM
(a) Check the fuel system.
- Check the fuel pump operation.
- Check the fuel leaks.
- Check the fuel pressure.
- Perform the Active Test [Control the All Cylinder Fuel Cut].
HINT:
For the fuel system On-vehicle Inspection, refer to the following procedures (See page ).
Result
Result | Proceed to |
|---|---|
Abnormal |
A |
Normal |
B |
| B | | CHECK FOR INTERMITTENT PROBLEMS |
|
CHECK FUEL SYSTEM
(a) Check for foreign matter such as iron particles around the fuel pump (fuel pump, fuel pump filter and inside the fuel tank), and for signs that the fuel pump was stuck.
ResultResult | Proceed to |
|---|---|
There is no foreign matter and no signs that fuel pump was stuck |
A |
There is foreign matter or signs that fuel pump was stuck |
B |
HINT:
If there is foreign matter such as iron particles on the fuel pump, fuel filter or fuel tank, remove the foreign matter.
| B | | REPAIR OR REPLACE FUEL SYSTEM |
|
CHECK FUEL SYSTEM
(a) Check the fuel system.
- Check the fuel pump operation.
- Check the fuel leaks.
- Check the fuel pressure.
- Perform the Active Test [Control the All Cylinder Fuel Cut].
HINT:
- For the fuel system On-vehicle Inspection, refer to the following procedures (See page ).
- Perform "Inspection After Repair" after replacing the fuel pump (See page ).
| OK | | END |
| NG | | REPAIR OR REPLACE MALFUNCTIONING PARTS, COMPONENT AND AREA |
CLEAR DTC
(a) Connect the Techstream to the DLC3.
(b) Turn the ignition switch to ON.
(c) Turn the Techstream on.
(d) Clear the DTCs (See page ).
| NEXT | | END |
Test yourself
A quick Toyota Venza quiz: every answer comes with an explanation and a link to the manual page.