Removing and installing transmission
Transmission tightening torques
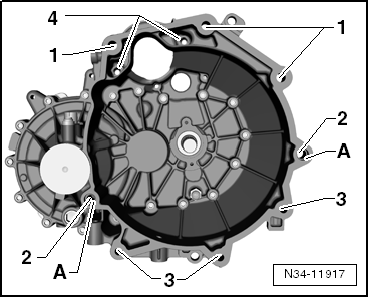
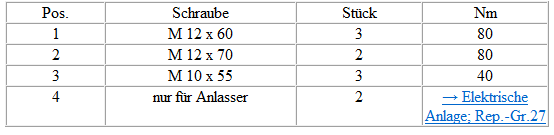
Item -A- for locating sleeves for centering.
Removing transmission
Removing transmission, up!

Required Special Tools, Test and Measuring Equipment and Auxiliary Items
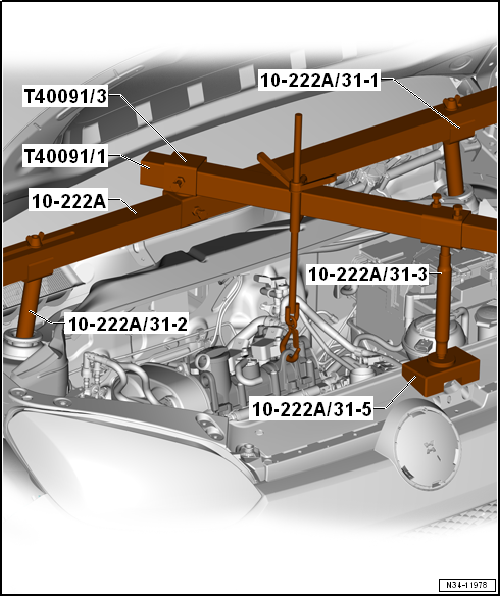
- Engine support fixture -10-222 A-
- Adapter -10 - 222 A /31-1-
- Adapter -10 - 222 A /31-2-
- Support -10 - 222 A /31-3-
- Adapter -10 - 222 A /31-5-
- Square tube -T40091/1-
- Connector -T40091/3-
- Transmission holder -3282-
- Adjusting plate -3282/63-
- Adapter -3282/64-
- Mounting elements for transmission (determine when placing adjusting plate on transmission holder)
- Sealing cap -T10381/1-

- Torque Wrench -V.A.G 1331-
- Torque Wrench -V.A.G 1332-
- Engine and Transmission Hoist -V.A.G 1383 A-
- or engine and transmission jack -VAS 6931-
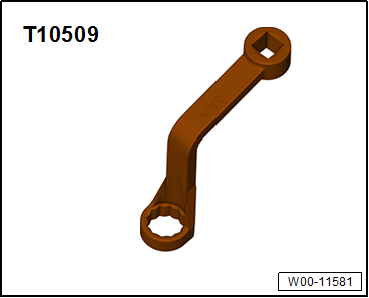
- Insert tool -T10509-
- Grease for clutch disc splines -G 000 100-
- Look up grease for shift mechanism in the → Electronic Parts Catalog (ETKA).
- If the safety support -10 - 222 A- does not yet have the hole marked with -arrow-, it must be added subsequently.
- Dimension -a- = 225 mm.
- Hole Ø = 12.5 mm.
- Disconnect the negative battery cable → Electrical System.
- Remove engine cover and air filter.
- Remove battery and battery carrier → Electrical system.

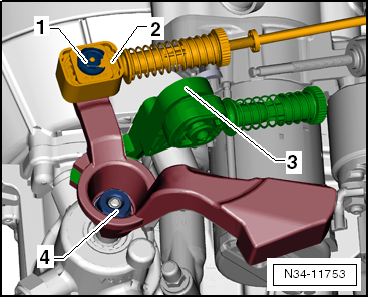
- Remove locking washer -1- for the shift cable -2- from the transmission shift lever.
- Pull the shift cable off the pin.
- Remove deflection lever -3- together with the cable retainer.
- Remove transmission shift lever by unscrewing nut -4-.

- Remove shift cable abutment from the transmission.
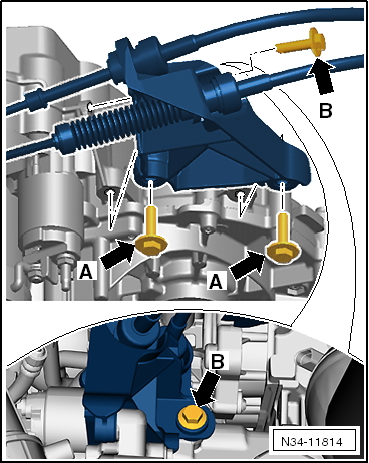
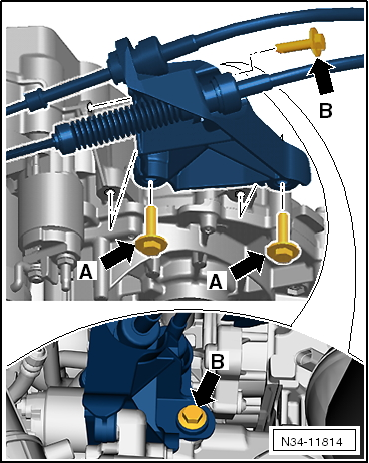
The screws -arrow A- are accessible from the engine compartment.
The screw -arrow B- is accessible from below the vehicle.
- Tie up shift cable and selector cable.
- Remove starter motor → Electrical system.
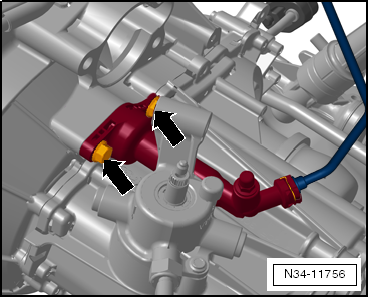
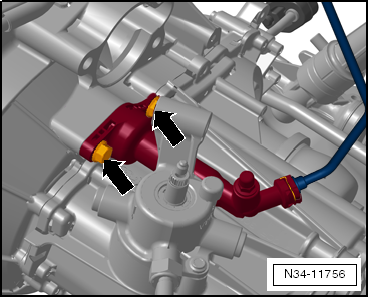
- Remove clutch slave cylinder -arrows- and set it aside to the side, secure it; do not open the line system.

Caution!
Do not operate clutch pedal any more.
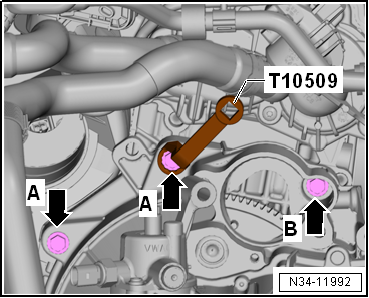
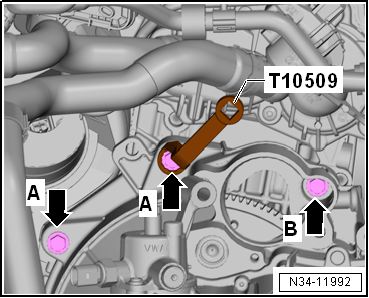
- Remove upper engine/transmission mounting bolts -arrows A- and -arrow B-.
- If necessary, loosen bolts -arrows A- using insert tool SW 18 -T10509-.
- Install safety support as follows:
Required:
- Adapter -10 - 222 A /31-1-
- Adapter -10 - 222 A /31-2-
- Connector -T40091/3-
- Square tube -T40091/1-
- Support -10 - 222 A /31-3-
- Adapter -10 - 222 A /31-5-
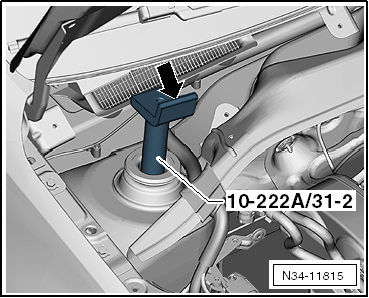
Place adapters -10 - 222 A /31-1- and -10 - 222 A /31-2- on the strut mounts below the cowl cover.
Therefore remove the following components:
- Windshield wiper arms → Electrical System.
- Cowl cover → Body Assembly Work, Exterior.
- Place adapter -10 - 222 A /31-1- and adapter -10 - 222 A /31-2- on the strut holders.
The webs -arrow- point toward the engine compartment.
- If fitted, pull hood seal off lock carrier.
- Place holder -10 - 222 A /31-5- above the tailgate lock.
It is located between 2 webs -arrow-.

- Slide connector -T40091/3- onto support device -10-222 A-.
- Bolt support device -10-222 A- to adapter -10 - 222 A /31-1- and adapter -10 - 222 A /31-2-.
- Connect square tube -T40091/1- to support device -10-222 A-.
- Place the square tube over support -10 - 222 A /31-3- onto adapter -10 - 222 A /31-5-.
- Then hook the spindle into the front lifting eye of the engine.
- Lightly preload engine/transmission unit using the spindle.
The driveshafts must be removed in the later work sequence.
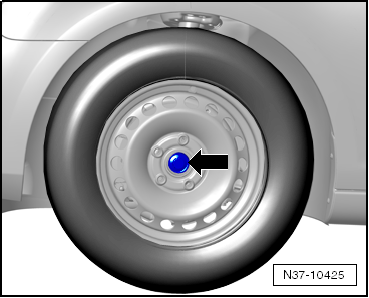
- Loosen the fastening nuts -arrows- for the driveshafts → Suspension, Axles, Steering.
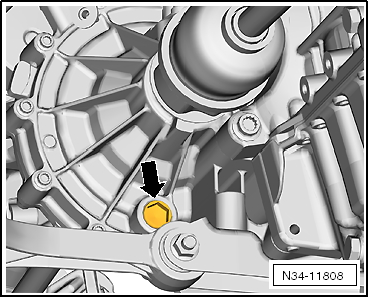
- Drain the transmission oil -arrow-.
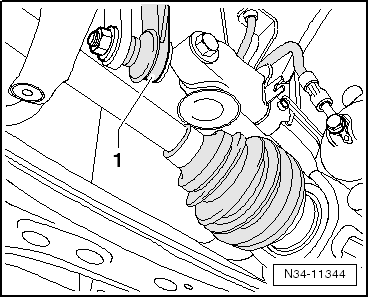
- On both sides, remove stabilizer link -1- from the stabilizer bar → Suspension, Axles, Steering.
- Press stabilizer bar upward.
- Remove driveshafts → Suspension, Axles, Steering.
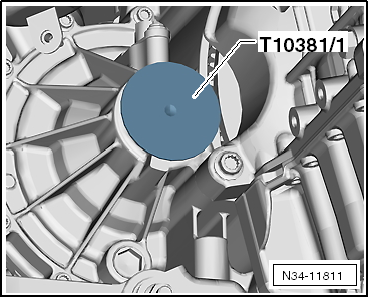
- Insert sealing caps into the transmission.
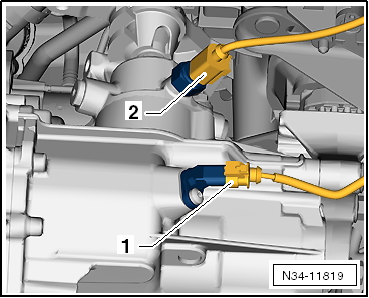
- If equipped: disconnect connector -1- from transmission neutral position sensor -G701-.
- Disconnect connector -2- from reversing light switch -F4-.

- Remove engine torque strut.
- Unhook the exhaust system.

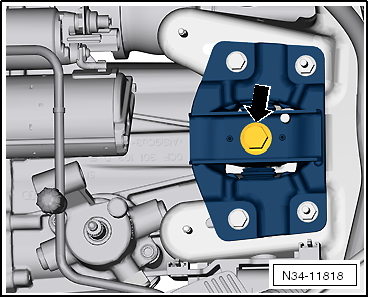
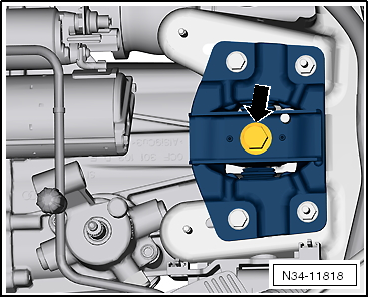
- Remove hex bolt -arrow- of the left unit mount from the transmission mount.
- Tilt the engine/transmission unit into an inclined position.
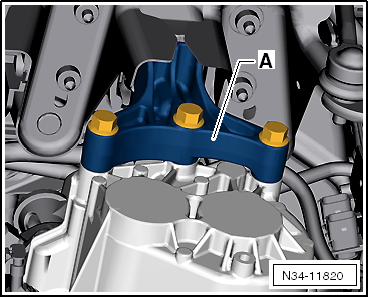
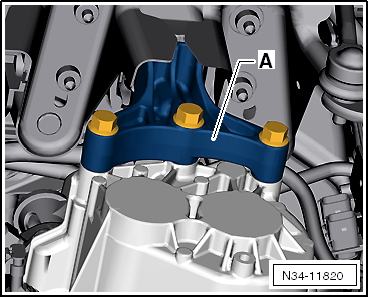
- The mounting bolts for the transmission bracket -A- must be accessible.
- Remove transmission bracket -A-.
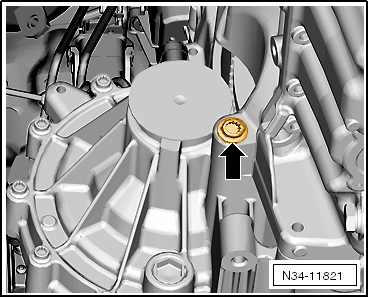
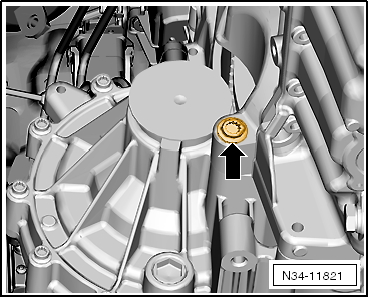
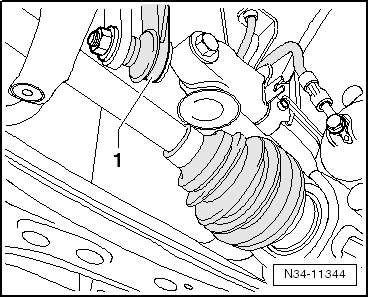
- Unscrew engine/transmission connecting bolt -arrow- in the area of the seal for the right driveshaft.
To remove the transmission, set up transmission holder -3282- with adjusting plate -3282/63-.
- Insert transmission holder -3282- into engine and transmission jack.
- Align arms of the transmission holder according to the holes in the adjusting plate.
- Screw in mounting elements -A- as shown on the adjusting plate.
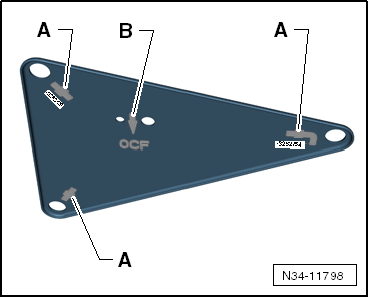
- Position engine and transmission jack under vehicle; arrow symbol -B- on adjusting plate points in direction of travel/vehicle.
- Align adjusting plate parallel to the transmission.
- Then screw bolt -3282/29- into the rear hole for the torque strut mounting bolt on the transmission.
- Secure transmission with adapter -3282/64-.
- Remove lower engine/transmission connecting bolts.
- Carefully press transmission off the locating sleeves.
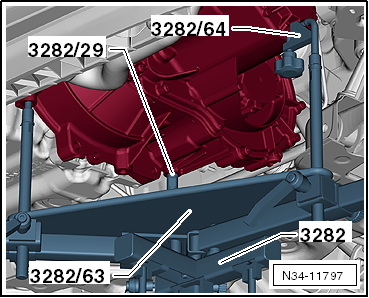
- Lower transmission alternately via the spindles of transmission holder -3282- in the area of 5th gear (-arrow A-) and in the area of the differential (-arrow B-).
- Change position of transmission while lowering via the spindles of transmission holder -3282-.

Note
When moving the engine/transmission unit, observe connecting lines, hoses and radiator.
"Installing transmission, up!"

Installing transmission
Installing transmission, up!

Note
For the required special tools, refer to the "Removing transmission" work sequence.
- If the transmission is being replaced, the transmission shift lever and deflection lever must be converted.
- Carefully clean all threaded holes into which self-locking bolts are installed with a thread tap to remove residual locking compound.
- Clean the serrated profile of the input shaft and lightly lubricate it with grease for clutch disc splines -G 000 100-.
The clutch disc must slide easily back and forth on the input shaft.
- If no locating sleeves for centering the engine/transmission are present in the cylinder block, install them.
If locating sleeves are missing, shifting difficulties, clutch problems and possibly transmission noise (idler gear rattle) may occur.
Set up the transmission jack -3282- with alignment plate -3282/63- for installing the transmission.
- Insert transmission holder -3282- into engine and transmission jack.
- Align arms of the transmission holder according to the holes in the adjusting plate.
- Screw in mounting elements -A- as shown on the adjusting plate.

- Align the transmission parallel to the alignment plate and place it on the engine and transmission jack.
- Then screw bolt -3282/29- into the rear hole for the torque strut mounting bolt on the transmission.
- Secure transmission with adapter -3282/64-.
- Position engine and transmission jack under vehicle; arrow symbol -B- on adjusting plate points in direction of travel/vehicle.
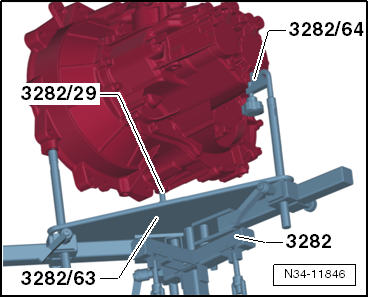
The 5th gear area -A- and the differential area -B- of the transmission must face downward.
- Then carefully lift the transmission and guide it past the subframe.

Note
Observe all lines when installing the transmission.
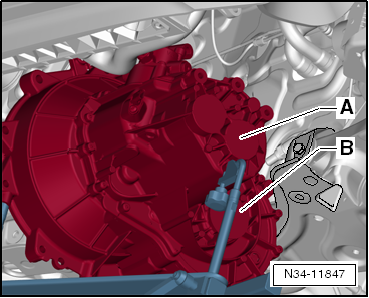
- Align the transmission in installation position and insert it.
- Screw in the engine/transmission connecting bolt, -arrow- in the area of the right driveshaft seal.
- Screw in the engine/transmission mounting bolts at the bottom.
- After the transmission is bolted to the engine, remove the engine and transmission jack from the transmission.
- Install the transmission bracket -A- with new bolts.
- Align the engine/transmission in installation position.
- Install the new bolt -arrow- of the left engine mount into the transmission mount.
- When all bolts of the engine mount are tightened to the specified torque, remove the engine and transmission jack -V.A.G 1383 A-.
- If removed, press the hood seal onto the front panel carrier.
- Screw in the engine/transmission mounting bolts at the top -arrows A- and -arrow B-.
- The bolts -arrows A- can be tightened with insert tool SW 18 -T10509-.
- If applicable, install the ground strap.
- Install the torque strut with new bolts.
- Install the exhaust system.
- Install the driveshafts → Suspension, Axles, Steering.

- On both sides, attach the connecting rod -1- to the stabilizer bar → Suspension, Axles, Steering.
- If equipped: connect connector -1- to the transmission neutral position sensor -G701-.
- Connect connector -2- to the reversing light switch -F4-.
- Install the clutch slave cylinder -arrows-.
- Install starter motor → Electrical System.
- Install the cable support bracket on the transmission.
The screws -arrow A- are accessible from the engine compartment.
The screw -arrow B- is accessible from below the vehicle.
- Install the transmission shift lever and tighten hex nut -4- to the specified torque.
- Install deflection lever -3- together with the cable lock.
- Apply a small amount of grease to the pin of the transmission shift lever.
Assign grease via → Electronic Parts Catalog (ETKA).
- Connect shift cable -2- to the transmission shift lever.
- Install a new clip -1-.
- Adjust gear shift linkage.
- Top up the transmission oil.
- Install battery → Electrical System.
- Connect the battery and observe the work steps after connecting the battery → Electrical System.
- Install the engine cover and air filter.