Interior Trim
Installation Locations Overview - Interior Trim

- Firewall Insulation, Interior
- under the instrument panel
- serves to reduce road noise in the interior
- Remove and install
- Floor Covering
- Remove and install
- Floor Insulation
- under the floor covering
- serves to reduce road noise in the interior
- Remove and install
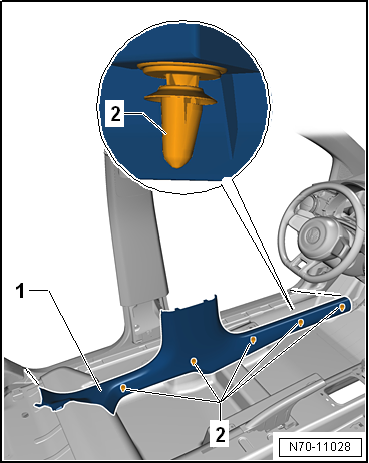
Installation Overview - Door Sill Trim

Note
The illustration shows the door sill trim on the left side. The right side is mirror-symmetrical.
- Door sill trim, 2-door
- Door sill trim, 4-door
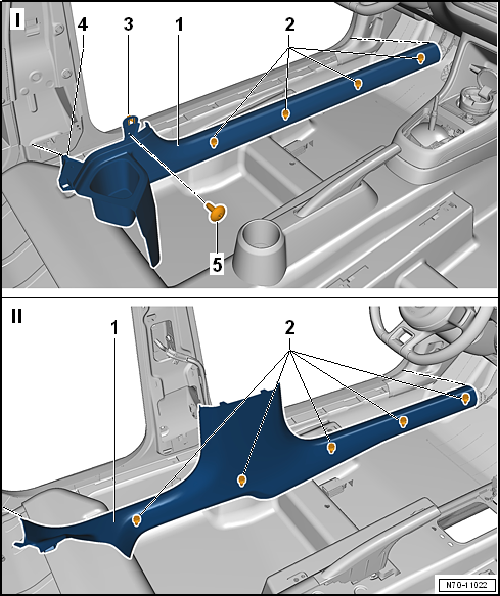
- Door sill trim
- Remove and install
- Retaining clip
- Retaining clip
- Retaining hook
- Bolt
- 2 N·m
Installation Overview - A-Pillar Trim

Note
The illustration shows the A-pillar trim on the left side. The right side is mirror-symmetrical.
- A-pillar trim, upper
- A-pillar trim, lower

- A-pillar trim, upper
- Remove and install
- Retaining clip
- Bonnet release lever
- always installed on the driver side
- Remove and install → Body Assembly Work, Exterior.
- Cover cap
- Expanding rivet
- Retaining clip
- A-pillar trim, lower
- Remove and install
Installation Overview - B-Pillar Trim

Note
The illustration shows the B-pillar trim on the left side. The right side is mirror-symmetrical.
- B-pillar trim, 2-door
- B-pillar trim, 4-door
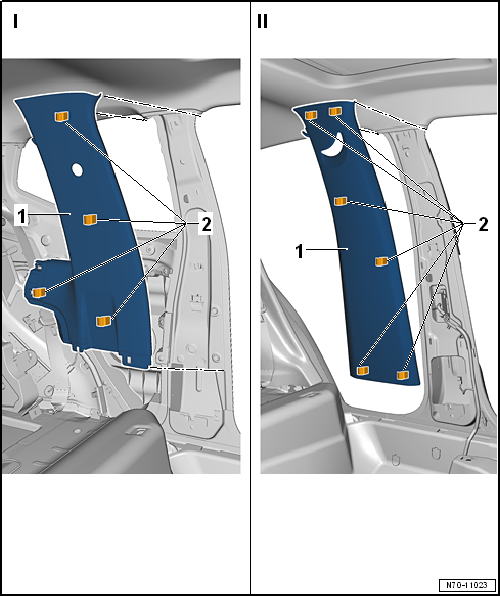
- B-pillar trim
- Remove and install
- Retaining clip
Installation Overview - C-Pillar Trim
Installation Overview - C-Pillar Trim

Note
The illustration shows the C-pillar trim on the left side. The right side is mirror-symmetrical.
- C-pillar trim, 2-door
- C-pillar trim, 4-door
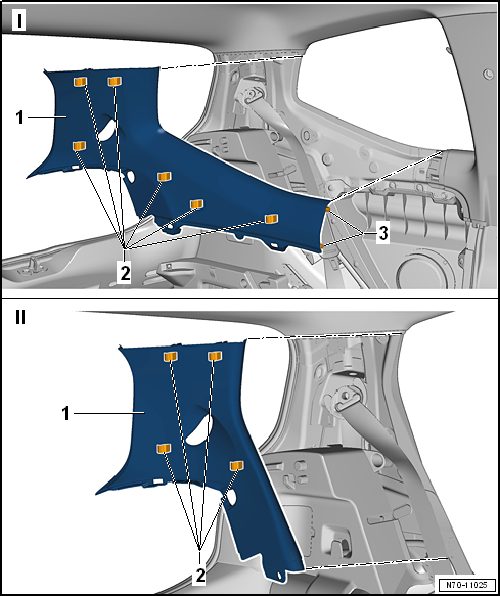
- C-pillar trim
- Remove and install
- Retaining clip
- 2-door 6x
- 4-door 4x
- Locking tabs
- Connection to B-pillar trim transition
Installation Overview - C-Pillar Trim, load up!

Note
The illustration shows the C-pillar trim on the left side. The right side is mirror-symmetrical.
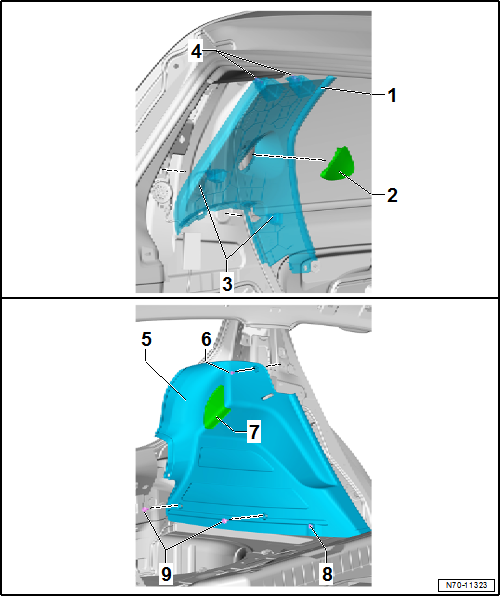
- C-pillar trim, upper
- Remove and install
- Seat belt guide cover
- Retaining clip, lower
- 2 pieces
- Retaining clip, upper
- 2 pieces
- Luggage compartment side trim
- Remove and install
- Bolt
- 1 N·m
- Service flap
- Retaining clip
- Retaining clip
- 2 pieces
Installation Overview - Partition, load-up!

- Headliner bracket
- 2 pieces
- Partition
- Remove and install
- Bolt
- 2 pieces
- 20 N·m
- Bolt
- 2 pieces
- 17 N·m
- Partition bracket, right
- Partition floor bracket
- Bolt
- 2 pieces
- 10 N·m
- Partition bracket, left
Remove and install door sill trim
Remove and install door sill trim, 2-door
Required Special Tools, Test and Measuring Equipment and Auxiliary Items
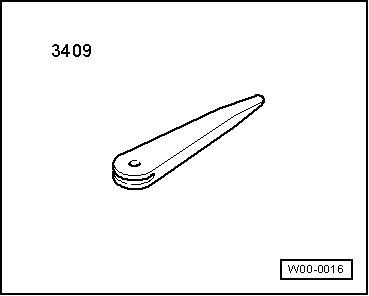
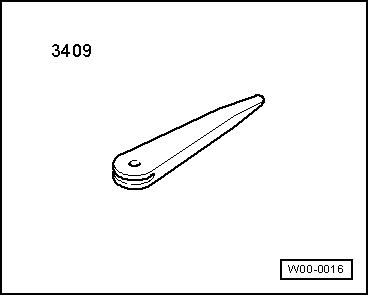
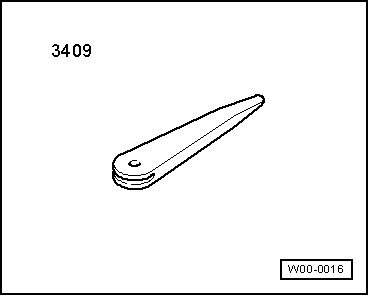
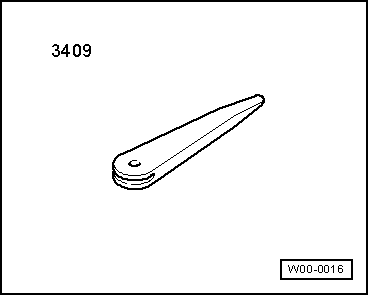
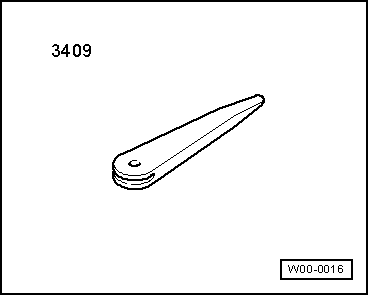
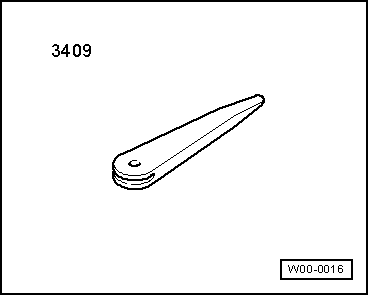
- Release Wedge -3409-
- Torque wrench -V.A.G 1783-

Note
The removal and installation are described for the left side of the vehicle. Removal and installation of the right side is performed accordingly.
Removing
- Remove side trim panel.

- Unscrew bolt -1-.
- Using release wedge -3409-, release door sill trim -2- from the sill and the door seal lip.
- Remove door sill trim -2- upward.
Installing

Note
- Before installation, check all fasteners for damage and replace them if necessary.
- After installation, make sure the door sill trim is located in the door seal lip.
Installation is carried out in the reverse order of removal, observing the following:

- Hook retaining hook -1- into the receptacle.

Remove and install door sill trim, 4-door
Required Special Tools, Test and Measuring Equipment and Auxiliary Items
- Release Wedge -3409-

Note
The removal and installation are described for the left side of the vehicle. Removal and installation of the right side is performed accordingly.
Removing
- Using release wedge -3409-, release door sill trim -1- from the front sill and the door seal lip.
- Release door sill trim -1- from the B-pillar trim.
- Using release wedge -3409-, release door sill trim -1- from the rear sill and the door seal lip.
- Remove door sill trim -1-.
Installing
If the door sill trim is replaced on an e-up! 2014►, apply sound insulation to the side of the new door sill trim facing the body. Take the dimensions for cutting the sound insulation from the old part.

Note
- Before installation, check all fasteners for damage and replace them if necessary.
- After installation, make sure the door sill trim is located in the door seal lip.
Installation is performed in the reverse order.
Remove and install A-pillar trim
Remove and install A-pillar trim, upper
Required Special Tools, Test and Measuring Equipment and Auxiliary Items
- Release Wedge -3409-

Note
The removal and installation are described for the left side of the vehicle. Removal and installation of the right side is performed accordingly.
Removing
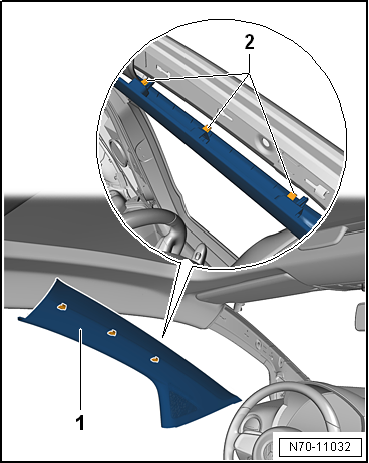
- Release upper A-pillar trim -1- from the door seal lip.
- Release upper A-pillar trim panel -1- from the mounting points using removal wedge -3409- in the area of retaining clips -2-.
- Remove upper A-pillar trim panel -1-.
- Depending on vehicle equipment, disconnect any existing electrical connectors.
Installing
If the upper A-pillar trim panel is replaced on an e-up! 2014►, apply sound damping material to the side of the new upper A-pillar trim panel that faces the body. Take the dimensions for cutting the sound damping material from the old part.

Note
- Before installation, check all fasteners for damage and replace them if necessary.
- Make sure that the upper A-pillar trim panel is located in the door seal lip after installation.
- Installation is performed in the reverse order.
Removing and installing lower A-pillar trim panel, driver side
Required Special Tools, Test and Measuring Equipment and Auxiliary Items
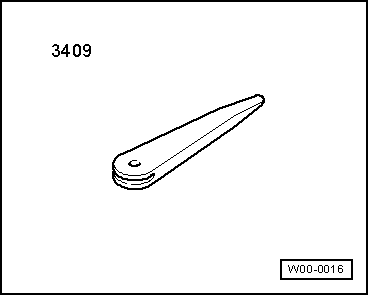
- Release Wedge -3409-
Removing
- Release door sill trim strip at the transition to lower A-pillar trim panel.
- Remove hood release lever. → Body assembly work, exterior.
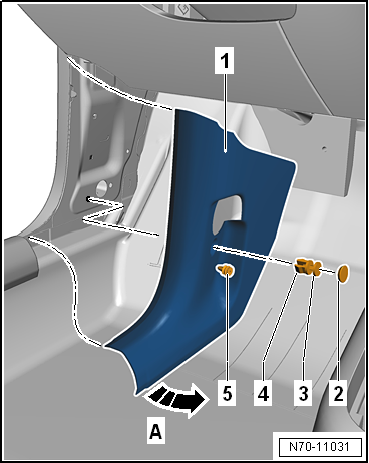
- Release lower A-pillar trim panel -1- from the door seal lip.
- Remove cover cap -2-.
- Loosen bolt -3- of expanding rivet -4-.
- Remove expanding rivet -4-.
- Release lower A-pillar trim panel -1- from clip connection -5- using removal wedge -3409-.
- Remove lower A-pillar trim panel -1- in direction of arrow A.
Installing

Note
- Before installation, check all fasteners for damage and replace them if necessary.
- Make sure that the lower A-pillar trim panel is located in the door seal lip after installation.
- Installation is performed in the reverse order.
Removing and installing lower A-pillar trim panel, passenger side
Required Special Tools, Test and Measuring Equipment and Auxiliary Items
- Release Wedge -3409-
Removing
- Release door sill trim strip at the transition to lower A-pillar trim panel.
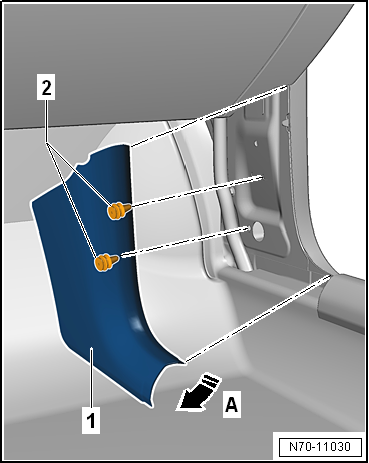
- Release lower A-pillar trim panel -1- from the door seal lip.
- Release lower A-pillar trim panel -1- from clip connections -2- using removal wedge -3409-.
- Remove lower A-pillar trim panel -1- in direction of arrow A.
Installing

Note
- Before installation, check all fasteners for damage and replace them if necessary.
- Make sure that the A-pillar trim panel is located in the door seal lip after installation.
- Installation is performed in the reverse order.
Removing and installing B-pillar trim panel
Removing and installing B-pillar trim panel, 2-door
Required Special Tools, Test and Measuring Equipment and Auxiliary Items
- Release Wedge -3409-

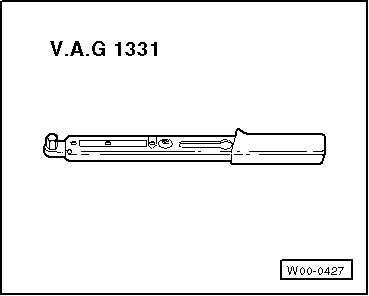
- Torque Wrench -V.A.G 1331-

Note
The removal and installation are described for the left side of the vehicle. Removal and installation of the right side is performed accordingly.
Removing
- Open cap -1- -arrow- and unscrew bolt -3- (40 N·m).
- Remove belt guide fitting -2- with belt webbing.
- Release C-pillar trim panel at the transition to B-pillar trim panel.
- Release side trim panel at the transition to B-pillar trim panel.

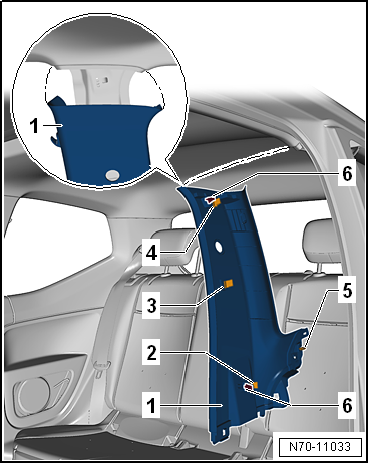
- Release B-pillar trim panel -1- from the door seal lip.
- Release B-pillar trim panel -1- from the mounting points using removal wedge -3409- in the area of retaining clips -2-, -3-, -4- and -5-.
- Carefully lift off C-pillar trim panel at the transition to B-pillar trim panel.
- Carefully lift off side trim panel at the transition to B-pillar trim panel.
- Remove B-pillar trim panel -1-.
Installing

Note
- Before installation, check all fasteners for damage and replace them if necessary.
- Make sure that the B-pillar trim panel is located in the door seal lip after installation.
Installation is carried out in the reverse order of removal, observing the following:
- Insert locating pins -6- into the mounting points.
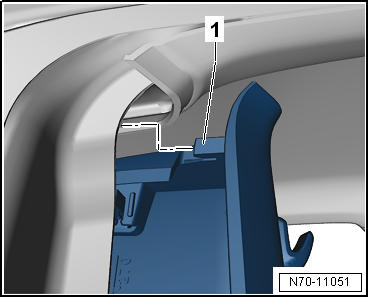
- Hook locking hook -1- into the sheet metal edge of the B-pillar.
Removing and installing B-pillar trim panel, 4-door
Required Special Tools, Test and Measuring Equipment and Auxiliary Items
- Release Wedge -3409-

Note
The removal and installation are described for the left side of the vehicle. Removal and installation of the right side is performed accordingly.
Removing
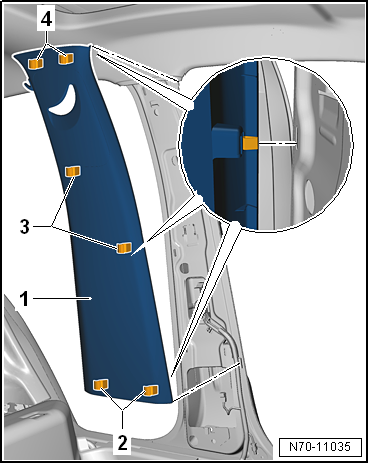
- Release B-pillar trim panel -1- from the door seal lip.
- Release B-pillar trim panel -1- from the mounting points using removal wedge -3409- in the area of retaining clips -2-, -3- and -4-.
- Remove front belt anchor.
- Thread seat belt end fitting with seat belt through the opening in B-pillar trim panel -1-.
- Remove B-pillar trim panel -1-.
Installing

Note
- Before installation, check all fasteners for damage and replace them if necessary.
- Make sure that the B-pillar trim panel is located in the door seal lip after installation.
- Installation is performed in the reverse order.
Removing and installing C-pillar trim panel
Removing and installing C-pillar trim panel, 2-door
Required Special Tools, Test and Measuring Equipment and Auxiliary Items
- Release Wedge -3409-

Note
The removal and installation are described for the left side of the vehicle. Removal and installation of the right side is performed accordingly.
Removing
- Remove side trim panel.
- Remove luggage compartment side trim.

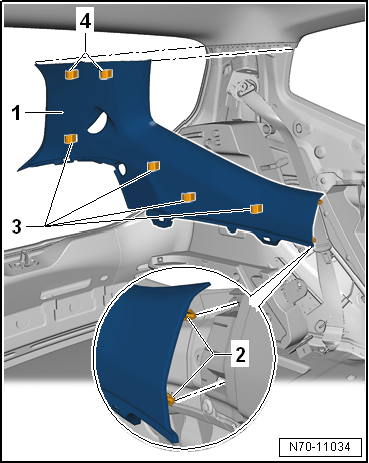
- Release C-pillar trim panel -1- from the mounting points at the transition to B-pillar trim panel -2-.
- Release C-pillar trim panel -1- from the mounting points using removal wedge -3409- in the area of retaining clips -3-.
- Release C-pillar trim panel -1- from the tailgate seal lip.
- Release C-pillar trim panel -1- from the mounting points using removal wedge -3409- in the area of retaining clips -4-.
- Remove rear outer belt end fitting.
- Thread outer rear seat belt end fitting with seat belt through the opening in the C-pillar trim panel.
- Remove C-pillar trim panel.
Installing

Note
- Before installation, check all fasteners for damage and replace them if necessary.
- Make sure that the C-pillar trim panel is located in the tailgate seal lip after installation.
- Installation is performed in the reverse order.
Removing and installing lower C-pillar trim panel, 4-door
Required Special Tools, Test and Measuring Equipment and Auxiliary Items
- Release Wedge -3409-

Note
The removal and installation are described for the left side of the vehicle. Removal and installation of the right side is performed accordingly.
Removing
- Remove rear seat bench / individual seats.
- Remove rear seat backrest.
- Release door sill trim strip, 4-door, in the rear area.
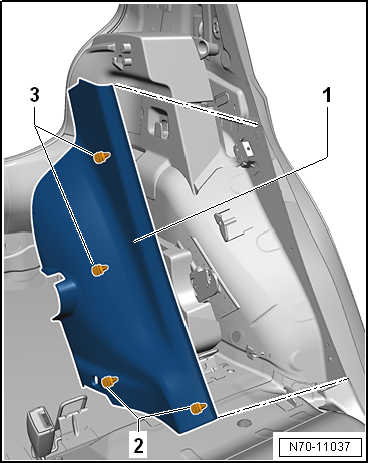
- Release lower C-pillar trim panel -1- from the door seal lip.
- Release lower C-pillar trim panel -1- from the mounting points using removal wedge -3409- in the area of clip connections -2-.
- Release lower C-pillar trim panel -1- from the mounting points using removal wedge -3409- in the area of clip connections -3-.
- Remove lower C-pillar trim panel -1-.
Installing
If the lower C-pillar trim panel is replaced on an e-up! 2014►, apply sound damping material to the side of the new lower C-pillar trim panel that faces the body. Take the dimensions for cutting the sound damping material from the old part.

Note
- Before installation, check all fasteners for damage and replace them if necessary.
- Make sure that the lower C-pillar trim panel is located in the door seal lip after installation.
- Installation is performed in the reverse order.
Removing and installing upper C-pillar trim panel, 4-door
Required Special Tools, Test and Measuring Equipment and Auxiliary Items
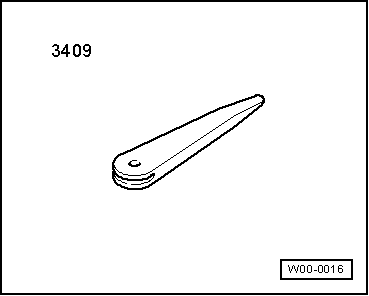
- Release Wedge -3409-

Note
The removal and installation are described for the left side of the vehicle. Removal and installation of the right side is performed accordingly.
Removing
- Remove lower C-pillar trim panel.
- Remove luggage compartment side trim.
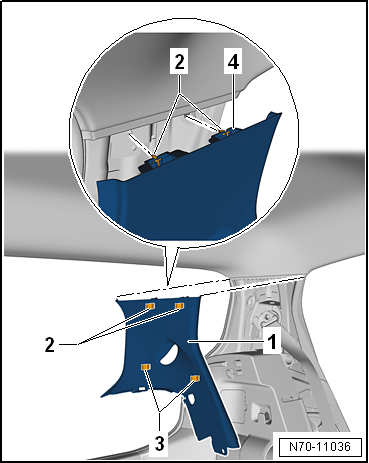
- Release upper C-pillar trim panel -1- from the tailgate seal lip.
- Release upper C-pillar trim panel -1- from the mounting points using removal wedge -3409- in the area of retaining clips -3-.
- Release upper C-pillar trim panel -1- from the mounting points using removal wedge -3409- in the area of retaining clips -2-.
- Remove rear outer belt end fitting.
- Thread outer rear seat belt end fitting with seat belt through the opening in upper C-pillar trim panel -1-.
- Remove upper C-pillar trim panel -1-.
Installing
If the upper C-pillar trim panel is replaced on an e-up! 2014►, apply sound damping material to the side of the new upper C-pillar trim panel that faces the body. Take the dimensions for cutting the sound damping material from the old part.

Note
- Before installation, check all fasteners for damage and replace them if necessary.
- Make sure that the upper C-pillar trim panel is located in the tailgate seal lip after installation.
Installation is carried out in the reverse order of removal, observing the following:
- Insert locating pin -4- into the mounting point.
Removing and installing upper C-pillar trim panel, load-up!
Required Special Tools, Test and Measuring Equipment and Auxiliary Items
- Release Wedge -3409-

Note
The removal and installation are described for the left side of the vehicle. Removal and installation of the right side is performed accordingly.

Removing
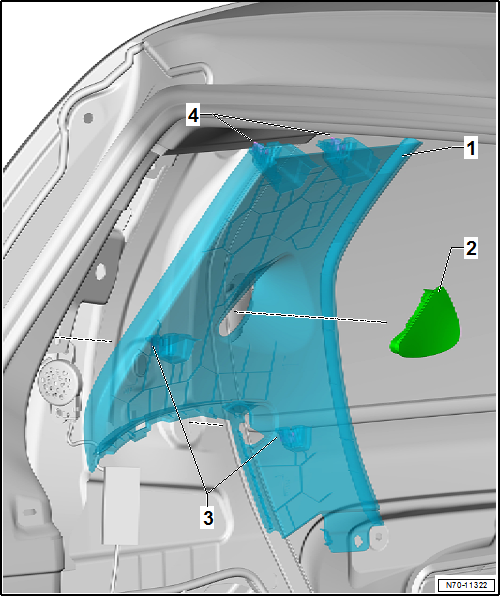
- Remove luggage compartment side trim.
- Release upper C-pillar trim panel -1- from the tailgate seal lip.
- Release upper C-pillar trim panel -1- from the mounting points using removal wedge -3409- in the area of retaining clips -3-.
- Release upper C-pillar trim panel -1- from the mounting points using removal wedge -3409- in the area of retaining clips -4-.
- Leave belt guide cover -2- in the C-pillar trim panel.
- Remove upper C-pillar trim panel -1-.
Installing

Note
- Before installation, check all fasteners for damage and replace them if necessary.
- Make sure that the upper C-pillar trim panel is located in the tailgate seal lip after installation.
Installation is carried out in the reverse order of removal, observing the following:
- When replacing upper C-pillar trim panel -1-, first install belt guide cover -2-.
Removing and installing side trim panel
Required Special Tools, Test and Measuring Equipment and Auxiliary Items
- Release Wedge -3409-

Note
The removal and installation are described for the left side of the vehicle. Removal and installation of the right side is performed accordingly.
Removing
- Remove rear seat bench / individual seats.
- Remove rear seat backrest.

- Release side trim panel -2- from the door seal lip.
- Release side trim panel -2- from the mounting point using removal wedge -3409- in the area of locking lug -4-.
- Release side trim panel -2- from the mounting points using removal wedge -3409- in the area of clip connections -3-.
- Pull side trim panel -2- upward until locating pin -1- is exposed.
- Remove side trim panel -2-.
Installing

Note
- Before installation, check all fasteners for damage and replace them if necessary.
- Make sure that the side trim panel is located in the door seal lip after installation.
Installation is carried out in the reverse order of removal, observing the following:
- Insert centering pin -1- into the receptacle.

Remove and install footrest
Required Special Tools, Test and Measuring Equipment and Auxiliary Items
- Torque wrench -V.A.G 1783-
Removing
- Remove driver side lower A-pillar trim.
- Fold floor covering back over the footrest.
- Fold floor damping back over the footrest.
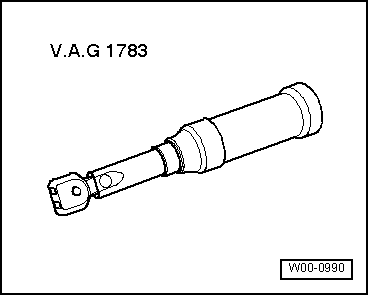
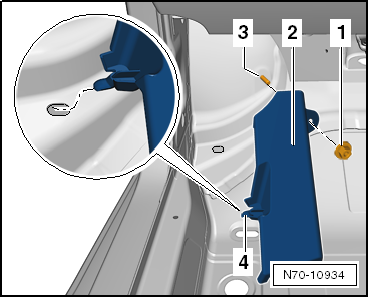
- Unscrew nut -1- (2 N·m).
- Remove footrest -2- from body stud bolt -3-.
- Swing centering pin -4- of footrest -2- out of the receptacle.
- Remove footrest -2-.
Installing

Note
Before installation, check all fasteners for damage and replace them if necessary.
Installation is carried out in the reverse order of removal, observing the following:
- Insert locating pin -4- into the mounting point.
Remove and install floor covering
Removing
- Remove center console lower section.
- Remove handbrake lever trim
- Remove sill trim, left and right.
- Remove driver side lower A-pillar trim.
- Remove passenger side lower A-pillar trim.
- Remove B-pillar trim, left and right.
- Remove driver and front passenger seats.
- Remove rear seat bench / individual seats.
2-door
- Remove side trim, left and right.
4-door
- Remove lower C-pillar trim, left and right.
load-up!
- Remove lower C-pillar trim, left and right.
Continuation for all vehicles
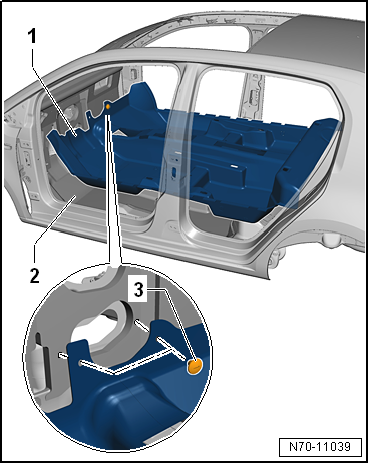
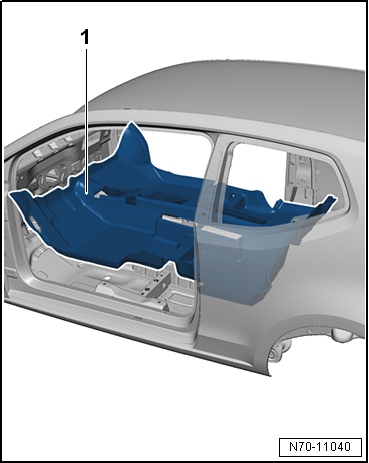
- Unscrew clip nuts -3-.
- Release floor covering -1- all around.
- Lift floor covering -1- and, with a second technician, remove it from vehicle -2- (folded lengthwise).
Installing

Note
- Perform a visual check of correct installed position. Holes and fasteners, e.g. seat mounting brackets, must line up.
- Before installation, check all fasteners for damage and replace them if necessary.
Installation is carried out in the reverse order of removal, observing the following:
- Pre-position floor covering -1-, folded lengthwise, in vehicle -2-.
- Unfold and lay out floor covering -1- in vehicle -2-.
Remove and install floor damping
Removing
- Remove floor covering.
- Release floor damping -1- all around.
- Lift floor damping -1- and, with a second technician, remove it from the vehicle (folded lengthwise).
Installing

Note
Perform a visual check of correct installed position, e.g. seat mounting brackets must line up.
Installation is carried out in the reverse order of removal, observing the following:
- Pre-position floor damping -1-, folded lengthwise, in vehicle.
- Unfold and lay out floor damping -1- in vehicle.
Remove and install inner bulkhead damping

Note
Removal and installation are described for left-hand drive. Right-hand drive is performed accordingly.
Removing
- Remove dashboard center tube.
- Remove heating and A/C unit.
Vehicles with 5-speed manual transmission 0CF
- Remove bearing bracket with clutch pedal.
Continuation for all vehicles
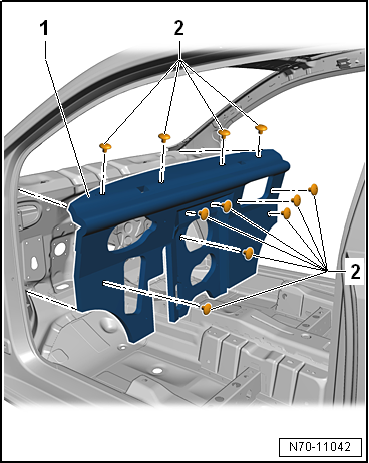
- Unscrew clip nuts -2-.
- Remove inner bulkhead damping -1-.
Installing

Note
- Perform a visual check of correct installed position.
- Before installation, check all fasteners for damage and replace them if necessary.
- Installation is performed in the reverse order.
Remove and install partition
Removing
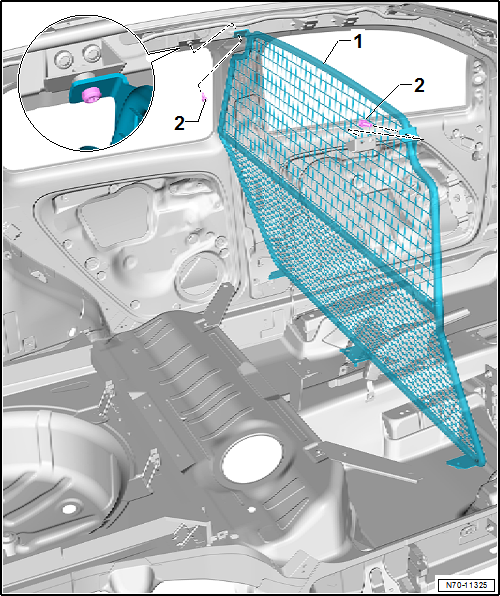
- Remove load floor.
- Unscrew headliner screws, top right and left -2-, from partition bracket.
- Remove partition -1- rearward out of the luggage compartment.
Installing

Note
Before installation, check all fasteners for damage and replace them if necessary.
- Installation is performed in the reverse order.
Tightening torques
- "Installation overview partition, load-up!"
Remove and install parcel shelf
Removing
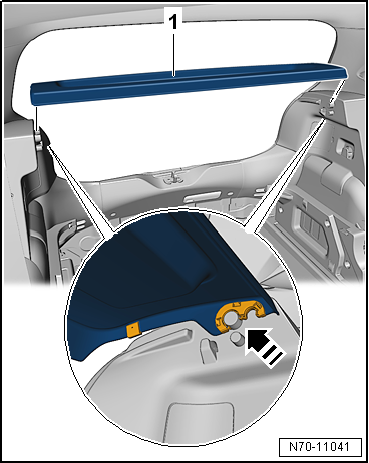
- Unhook parcel shelf -1- from the mounts / fasteners, arrow, right and left.
- Remove parcel shelf -1- through the luggage compartment opening.
Installing
If the parcel shelf is replaced on an e-up! from 2014►, a noise damper must be adhered to the underside of the new parcel shelf. Take the dimensions for cutting the noise damper from the old part.

Note
Before installation, check all fasteners for damage and replace them if necessary.
- Installation is performed in the reverse order.