Brake System Bleeding
GENERAL INFORMATION
After repairs to the brake system that involve opening it, air may enter the system. In this case, air must be bled from the brake system. If braking force is insufficient after pressing the brake pedal, this also indicates air in the system. In this case, eliminate the leak and bleed air from the system.
At a workshop, air is bled from the brake system and the system is filled with fluid, usually using special equipment.
CAUTION
When using this device, the system filling pressure must not exceed 1 bar.Air can also be bled from the system without using these devices. In this case, air is bled from the system by pumping the brake pedal. An assistant is required for this.
If air must be bled from the entire system, bleed it separately from each wheel cylinder. This is required if air has entered every brake cylinder. If only one caliper is being replaced or repaired, it is sufficient to bleed air from the corresponding cylinder.
CAUTION
If the brake fluid reservoir runs completely empty (for example, due to a leak in the system or as a result of bleeding air when fluid was not added to the empty reservoir), air enters the ABS pump. In this case, for safety reasons, air must be bled from the system at a workshop using special equipment. If EDS is fitted, additional adjustment with a tester must be performed. When installing a new brake hose, air must also be bled from the system using special equipment.The bleeding sequence is as follows:
1. Right rear caliper,
2. Left rear caliper,
3. Right front caliper,
4. Left front caliper.
CAUTION
Open the bleeder screws carefully to avoid rounding them off. It is recommended to spray the bleeder screws with rust penetrant 2 hours before loosening. If the bleeder screws cannot be opened, contact a workshop. During bleeding, monitor the fluid level in the reservoir. The level must not drop significantly; otherwise air may enter the system. Always fill the system only with new brake fluid!PROCEDURE
1. Remove the cap from the bleeder screw on the caliper. Clean the bleeder screw and attach a clean hose. Place the other end of the hose into a container half filled with fluid.
2. Have an assistant press the brake pedal as many times as necessary to build pressure in the system, which is felt as resistance in the pedal.
3. When pressure is built up, hold the pedal down to the floor and do not release it.
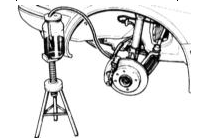
4. Using a flare nut wrench, loosen the bleeder screw on the caliper by approximately half a turn. Collect the escaping fluid in the container. When the system is opened, pedal pressure decreases.
5. As soon as fluid pressure drops, close the bleeder screw.
6. Press the brake pedal several more times to restore fluid pressure. Hold the pedal down. Do not release the pedal. Keep the bleeder screw open until pressure begins to drop. Close the bleeder screw.
7. Repeat the above procedure until the fluid flowing from the system into the container contains no air bubbles.
8. After completing the procedure, remove the hose from the bleeder screw and install the cap.
9. Bleed air from the other wheel cylinders in the same way, following the correct sequence.
10. After bleeding air, top up the brake fluid in the reservoir to the Max mark.
CAUTION
Check the following for security:– Are the brake hose mounting bolts securely tightened? – Is the brake hose secured in its bracket? – Are the bleeder screws tightened? – Is there enough brake fluid in the reservoir? – With the engine running, check the system for leaks. To do this, press the brake pedal with a force of 200 – 300 N (20 – 30 kg) for 10 s. The pedal must not sink. Check all connections for leaks.
11. Finally, check the brake system operation on a road with light traffic. Perform at least one hard braking with ABS (felt as pulsation of the brake pedal).
CAUTION
Carefully watch traffic behind you. Brake fluid must be disposed of properly. Never dispose of it with household waste. Local authorities inform drivers of locations where hazardous materials can be disposed of.Test yourself
A quick Audi A3 quiz: every answer comes with an explanation and a link to the manual page.