Replacing Front Brake Pads
 Front brake assembly FS– III 1 – Phillips screw 2 – brake disc. Replace only as a set for the entire axle. Disconnect the caliper before removal. 3 – brake pads. All 4 pads of one axle must always be replaced. 4 – caliper 5 – guide pin, 30 N•m 6 – cover 7 – O-ring. Always replace. 8 – brake hose. Do not unscrew for pad replacement. 9 – banjo bolt, 35 N•m 10 – dust shield 11 – bolt, 7 N•m 12 – wheel bearing housing 13 – hex socket screw, 8 N•m 14 – ABS wheel speed sensor. Before installation, clean the mounting bore and lubricate with AUDI– G000650 grease. 15 – wheel bearing 16 – retaining ring 17 – hub with rotor. Note: All externally located bolts have an anti-corrosion coating. Therefore, use only original replacement mounting bolts.
 Front brake assembly. Caliper FN– 3 1 – Phillips screw 2 – brake disc. Replace only as a set for the axle. Disconnect the caliper before removal. 3 – brake pads. The outer brake pad has an adhesive film on the back side. Remove the film after installing the pad. Replace only as a set for the entire axle. Note: Before installing new pads, thoroughly clean the calipers of dirt (degrease). Pay particular
CAUTION
to remove residual film from the contact surfaces of the outer pads. 4 – retainer. Insert into both holes of the caliper housing. 5 – guide pin. Replace damaged caps. The repair kit contains a pad of lubricant. Use it to lubricate the guide pins. 6 – caliper housing 7 – guide pin, 30 N·m 8 – cap 9 – sealing ring. Always replace. 10 – brake hose. Do not unscrew for pad replacement. 11 – hollow bolt, 35 N·m 12 – ribbed bolt, 125 N·m. Clean the mating surface and threads before installation. 13 – bolt, 7 N·m 14 – dust shield 15 – wheel bearing housing 16 – internal hex head screw, 8 N·m 17 – ABS speed sensor. Clean the receiving hole before installation and lubricate with AUDI G000650 grease 18 – wheel bearing 19 – snap ring 20 – hub with rotor. Note: All externally located bolts have an anti-corrosion coating. Therefore, only original replacement fastening bolts must be used.Caliper FS– III
CAUTION
All externally located bolts have an anti-corrosion coating. Therefore, only original replacement bolts must be used. Two different versions of the front wheel brake are available. Therefore, use the illustration to determine which version is installed on your vehicle.REMOVAL
CAUTION
Brake pads are subject to the General Operating Permit (ABE) requirements. In addition, they are designed by the manufacturer for installation on a specific vehicle model. Therefore, it is recommended to use only brake pads approved by the manufacturer.PROCEDURE
1. Mark the position of the respective front wheel relative to the hub with paint. This allows the balanced wheel to be reinstalled in its original position. Loosen the wheel bolts while the vehicle is on the ground. Raise the front of the vehicle, support it on stands, and remove the front wheel.
CAUTION
If the brake pads are to be reinstalled, mark them before removal. Do not swap the brake pads from inside to outside or vice versa, or from the left wheel to the right wheel. Always replace all front wheel pads at the same time, even if only one of them has reached the wear limit.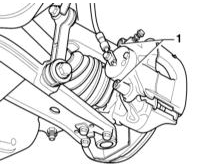
2. Remove covers – 1 – from both guide pins. Unscrew both guide pins using a socket wrench.
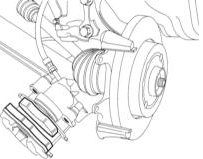
3. Secure the caliper to the suspension with wire.
CAUTION
Do not let the caliper hang down, as this may cause the brake hose to stretch.4. Remove the brake pads. INSTALLATION
CAUTION
Do not depress the brake pedal with the pads removed. Otherwise, the piston will be pushed out of the housing. In this case, remove the caliper assembly and reinstall it at a service station.5. Clean the guide surfaces and pad seats in the carrier with a rag and alcohol. Do not use solvents containing mineral oils or tools with sharp edges.
CAUTION
Use only alcohol to clean the brake.6. Before installing the pads, inspect the brake disc by running your fingers over it. If scoring is present, the brake disc can be turned on a lathe (service station work) if it still has sufficient thickness.
7. Measure the disc thickness; refer to the subsection Brake Disc Thickness Check.
8. Check the dust boot of the piston for cracks. If the boot is damaged, replace it immediately, since dirt that penetrates will quickly cause the caliper to lose its sealing. The caliper must be disassembled for this (workshop job).
CAUTION
If the brake pads are significantly worn, check the piston for ease of movement. To do this, insert a wooden block into the caliper and have an assistant slowly depress the brake pedal. The piston should move freely in both directions. For testing, install another caliper. Take careCAUTION
not to push the piston out completely. If the piston moves with difficulty, the caliper must be repaired (service station work).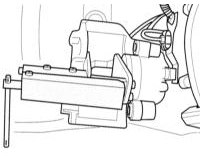
9. Using the tool, push the piston back. This can also be done with a block of hardwood (hammer handle). Make sure the piston does not tilt and that the piston and dust boot surfaces are not damaged.
CAUTION
When the piston is pushed back, brake fluid is forced into the reservoir. Monitor the fluid level in the reservoir. If necessary, remove the excess. Use a plastic bottle reserved only for this purpose to extract brake fluid. Do not use a bottle intended for drinking liquids! Brake fluid is toxic. Never siphon brake fluid by mouth through a hose. Use a syringe for this purpose. After replacing the brake pads, the fluid level in the reservoir must not exceed the MAX mark on the reservoir, as brake fluid expands when heated. Leaking fluid runs down the brake cylinder, damaging the coating and causing corrosion.10. Insert the brake pads into the caliper guides.

11. Install the caliper, first at the bottom (arrow in the illustration).
CAUTION
The caliper guide pin (arrow) must be positioned behind the wheel bearing housing guide.12. Secure the caliper with both guide pins to the wheel bearing housing, torque 30 N·m.
13. Install both pin caps.
14. Install both front wheels so that the marks made during removal line up. Tighten the wheel bolts. Lower the vehicle onto the wheels and tighten the wheel bolts in a crisscross pattern to 120 N·m.
CAUTION
Depress the brake pedal several times firmly until a distinct resistance is felt. This seats the pads against the brake disc and positions them correctly.15. Check the brake fluid level in the reservoir. If necessary, top up to the MAX mark.
16. Carefully bed in the new brake pads. To do this, brake the vehicle several times from 80 to 40 km/h, applying the pedal lightly. Allow the brakes to cool between applications.
CAUTION
After installing new pads, they must be bedded in. For the first 200 km, avoid unnecessary hard braking. In some regions, brake pads must be disposed of as special waste. Local authorities must inform drivers of approved disposal sites. Check for secure fit:– Are the brake hose mounting bolts securely tightened? – Is the brake hose secured in its bracket? – Are the bleeder screws tightened? – Is there enough brake fluid in the reservoir? – With the engine running, check the system for leaks. To do this, press the brake pedal with a force of 200 – 300 N (20 – 30 kg) for 10 s. The pedal must not sink. Check all connections for leaks.
Caliper FN-3 REMOVAL
CAUTION
Brake pads are subject to the General Operating Permit (ABE) requirements. In addition, they are designed by the manufacturer for installation on a specific vehicle model. Therefore, it is recommended to use only brake pads approved by the manufacturer.17. Mark the position of the respective front wheel relative to the hub with paint. This allows the balanced wheel to be returned to its original position during installation. Loosen the wheel bolts while the vehicle is on the ground. Raise the front of the vehicle, support it on stands, and remove the front wheel.
CAUTION
If the brake pads are to be reinstalled, mark them before removal. Do not swap the brake pads from inside to outside or vice versa, or from the left wheel to the right wheel. Always replace all front wheel pads at the same time, even if only one of them has reached the wear limit.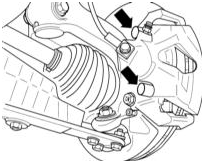
18. Remove the caps – 1 – from both guide pins. Unscrew both guide pins using an internal hex key.
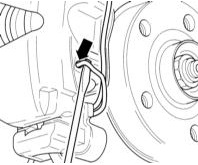
19. Pry out and remove the brake pad retainers with a screwdriver.
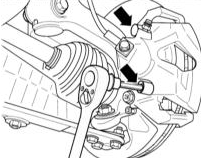
20. Unscrew both guide pins from the caliper.
21. Remove the caliper and tie it to the body with wire.
CAUTION
Do not let the caliper hang down, as this may cause the brake hose to stretch.22. Remove the outer pad from the brake carrier.
23. Remove the inner pad (with retainer) from the piston. INSTALLATION
CAUTION
Do not depress the brake pedal with the pads removed. Otherwise, the piston will be pushed out of the housing. In this case, remove the caliper assembly and reinstall it at a service station.24. Clean the guide surfaces and pad seats in the carrier with a cloth and alcohol. Do not use solvents containing mineral oils or tools with sharp edges.
CAUTION
Use only alcohol to clean the brake.25. Before installing the pads, check the brake disc by running your fingers over it. If there are scores, the brake disc can be turned (workshop job), provided it still has sufficient thickness.
26. Measure the disc thickness. Refer to the subsection Checking Brake Disc Thickness.
27. Check the dust boot of the piston for cracks. If the boot is damaged, replace it immediately, since dirt that penetrates will quickly cause the caliper to lose its sealing. The caliper must be disassembled for this (workshop job).
CAUTION
If the brake pads are significantly worn, check the piston for ease of movement. To do this, insert a wooden block into the caliper and have an assistant slowly depress the brake pedal. The piston should move freely in both directions. For testing, install another caliper. Take careCAUTION
not to push the piston out completely. If the piston moves with difficulty, the caliper must be repaired (service station work).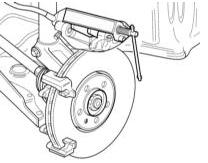
28. Using the tool, press the piston in. This can also be done with a block of hardwood (hammer handle). Make sure the piston does not tilt and that the piston and dust boot surfaces are not damaged.
CAUTION
When the piston is pressed back, brake fluid is forced into the reservoir. Monitor the fluid level in the reservoir. If necessary, remove the excess. Use a plastic bottle reserved only for this purpose to extract brake fluid. Do not use a bottle intended for drinking liquids! Brake fluid is toxic. Never siphon brake fluid by mouth through a hose. Use a syringe for this purpose. After replacing the brake pads, the fluid level in the reservoir must not exceed the MAX mark on the reservoir, as brake fluid expands when heated. Leaking fluid runs down the brake cylinder, damaging the coating and causing corrosion.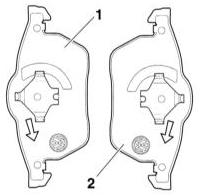
29. Insert the inner brake pad (with retainer) into the brake piston.
CAUTION
The inner brake pad (with retainer) has an arrow; refer to the accompanying illustration. The arrow must point in the direction of brake disc rotation when the vehicle moves forward. Incorrect installation (on the opposite side of the vehicle) may cause noise.30. Install the outer brake pad on the guide.
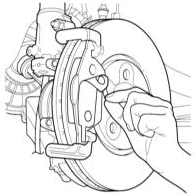
31. Remove the protective film from the backing plate of the outer brake pad.
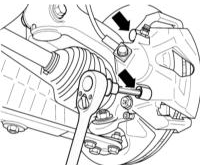
32. Install the caliper and secure it to the guide with both guide pins, torque 30 N·m.
33. Install both pin caps.
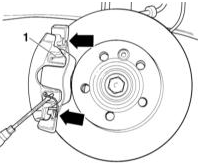
34. Insert retainer – 1 – into the caliper.
CAUTION
After installation, the retainer must be pressed under the guide into both holes. If installed incorrectly, the outer pad will not fit despite wear, which increases pedal travel.35. Install both front wheels so that the marks made during removal line up. Tighten the wheel bolts. Lower the vehicle onto the wheels and tighten the wheel bolts in a crisscross pattern to 120 N·m.
CAUTION
Depress the brake pedal several times firmly until a distinct resistance is felt. This seats the pads against the brake disc and positions them correctly.36. Check the brake fluid level in the reservoir. If necessary, top up to the MAX mark.
37. Carefully bed in the new brake pads. To do this, brake the vehicle several times from 80 to 40 km/h, applying the pedal lightly. Allow the brakes to cool between applications.
CAUTION
After installing new pads, they must be bedded in. For the first 200 km, avoid unnecessary hard braking. In some regions, brake pads must be disposed of as special waste. Local authorities must inform drivers of approved disposal sites. Check for secure fit:– Are the brake hose mounting bolts securely tightened? – Is the brake hose secured in its bracket? – Are the bleeder screws tightened? – Is there enough brake fluid in the reservoir? – With the engine running, check the system for leaks. To do this, press the brake pedal with a force of 200 – 300 N (20 – 30 kg) for 10 s. The pedal must not sink. Check all connections for leaks.
Test yourself
A quick Audi A3 quiz: every answer comes with an explanation and a link to the manual page.