Compression Test
Compression test provides information on the condition of the engine, namely the degree of wear of the valves and pistons (piston rings). In addition, based on the data obtained from the compression test, it is possible to judge whether the engine needs to be replaced or repaired.
A compression tester is required to perform the test.
* For a diesel engine, a compression tester with a high measurement range is required.
The main indicator of compression is the difference in pressure between individual cylinders. The pressure difference between individual cylinders must not exceed 1.5 bar. If this value exceeds 1.5 bar, this indicates damage to the valves, wear of the piston rings or cylinder surface. When the wear limit is reached, the engine must be repaired or replaced.
On gasoline engines, remove the spark plugs. It is recommended to combine this with scheduled spark plug replacement. On diesel engines, remove the glow plugs for the compression test.
The compression pressure value is of secondary importance, since it depends, among other things, on the compression tester used. For gasoline engines, the pressure must be at least 10 bar; for diesel engines, at least 20 bar.
The battery must be fully charged before the test.
For the compression test, a gasoline engine must be warmed up; a diesel engine may be cold.
Gasoline engine
PROCEDURE
1. Start and warm up the engine. The coolant temperature gauge must show the specified temperature. Stop the engine and switch off the ignition.
2. Remove the air filter housing on the right side of the engine compartment, facing in the direction of travel, to gain access to the electronics box.
3. Unscrew the fixing screws and remove the electronics box cover (1). Refer to the accompanying illustration.
4. Remove the DME (Digital Motor Electronics) main relay (1) so that fuel injection does not occur during the test. (2 - engine fuses for DME). Refer to the accompanying illustration.
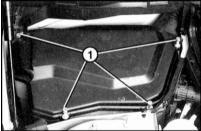
3. Unscrew the fixing screws and remove the electronics box cover (1). Refer to the accompanying illustration.
4. Remove the DME (Digital Motor Electronics) main relay (1) so that fuel injection does not occur during the test. (2 - engine fuses for DME). Refer to the accompanying illustration.
5. Remove all spark plugs.
* Place the manual transmission in neutral and apply the parking brake. Crank the engine several times with the starter to remove combustion residue and soot from the engine.

6. Press or screw the compression tester into the spark plug hole in accordance with its operating instructions.
7. Ask an assistant to depress the accelerator pedal and hold it during the test.
8. Crank the engine for approximately eight revolutions until the gauge no longer shows a pressure increase.
9. Check all cylinders in sequence and compare the readings with the specified value.
10. After completing the test, reinstall the spark plugs. Refer to Spark Plugs Inspection and Replacement.
11. Install the main relay and close the fuse box.
12. Install the air filter housing.
Diesel engine
PROCEDURE
1. Remove the air filter housing on the right side of the engine compartment, facing in the direction of travel, to gain access to the electronics box.
2. Unscrew the fixing screws and remove the electronics box cover (1).
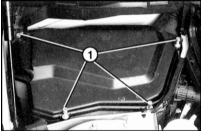
3. Disconnect the glow plug relay. For its operating position, refer to Glow Plugs Inspection, Removal and Installation.
4. Disconnect the electrical cables from the glow plugs and remove the glow plugs with the appropriate socket.
5. Screw the compression tester into the glow plug holes in place of the glow plugs.
6. Press and hold the starter until the pressure on the compression tester stops rising. Record the pressure value. Measure the compression pressure on all cylinders in sequence.
7. After the test, reinstall the glow plugs, tightening them to a torque of 25 N·m. Lubricate the threads beforehand with high-temperature “CRC” paste.
8. Secure the cables on the glow plugs to a torque of 5 N·m.
9. Install the glow plug relay.
10. Close the electronics box. Install the air filter housing.
Test yourself
A quick BMW 1 quiz: every answer comes with an explanation and a link to the manual page.