Removal and Installation of Camshaft
Models 520i, 523i, 528i
Removal and installation of the camshaft requires special service tools. It is recommended that this work be performed at a BMW authorized service workshop. This procedure describes camshaft removal with the cylinder head removed. The operation can also be performed with the cylinder head installed. In this case, perform the preliminary work as described in the Cylinder Head Removal and Installation section.
Measure the camshafts. The axial and radial clearances must correspond to the values given in the Specifications.
REMOVAL
1. Remove the cylinder head. Refer to Cylinder Head Removal and Installation.
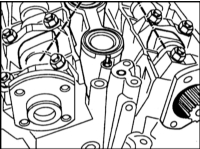
2. Unscrew the studs. Refer to the accompanying illustration.
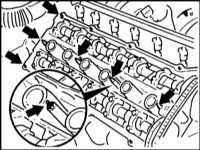
3. To remove the camshafts, special tool BMW 113260 is required. The tool holds the camshaft bearings in their working position while the bearing caps are removed. Removal of both camshafts is performed in the same way. The sequence does not matter. Refer to the accompanying illustration.
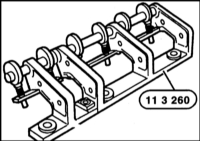
4. Remove the spark plugs.
5. Install the tool and secure it in the spark plug threaded holes of cylinders 1 and 4 with a torque of 25 N·m.
6. Turn the eccentric shaft of the tool to clamp the bearing caps. Refer to the accompanying illustration.

7. Unscrew all bearing cap retaining bolts.
* The first bearing cap of the intake camshaft is centered by a locating sleeve. To prevent the camshaft from cocking, unscrew the retaining bolts of the first cap and remove it. Refer to the accompanying illustration.
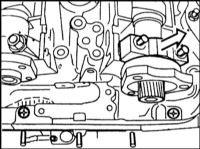
7. Unscrew all bearing cap retaining bolts.
* The first bearing cap of the intake camshaft is centered by a locating sleeve. To prevent the camshaft from cocking, unscrew the retaining bolts of the first cap and remove it. Refer to the accompanying illustration.
8. Remove the tool.
9. Remove the bearing caps and the camshaft. Keep the caps in order. They must be installed in their original positions during assembly. The exhaust camshaft bearing caps are marked A1 through A7, and the intake camshaft bearing caps are marked E1 through E7. Refer to the accompanying illustration.
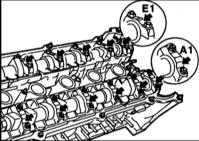
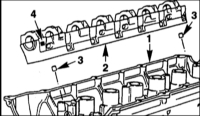
10. If necessary, for example if the valves must be removed, remove the bearing bar assembly (2) together with the tappets. Pay attention to the centering sleeves (3). The bars at point (4) are marked "A" for exhaust valves and "E" for intake valves. Refer to the accompanying illustration.
* Tappets may fall out of the bearing bar. To hold the tappets in place, use suction cups that are placed on top of the tappets to prevent them from falling out. Mark the tappets. They must be installed in their original positions.
Do not leave removed valve tappets on the cylinder head for more than 10 minutes. Otherwise, oil will begin to leak out of the tappets, which will cause the automatic valve clearance compensation to fail.
INSTALLATION
* If the camshaft has been removed, note the following. With no load, hydraulic tappets extend, and after installation some time is required for them to compress. As a result, the valves may remain open for a while in a position that does not correspond to the cam and may contact the pistons. Therefore, observe the following waiting time between installing the camshaft and the cylinder head: at a temperature of +20°C (room temperature) - 4 min, at +10°C - 11 min. After installing the cylinder head, wait another 30 min. Only after this may the engine be started.
If the camshaft was removed with the cylinder head installed, turn the crankshaft approximately 30° in the direction of engine rotation from TDC. In this position no piston will be at TDC and the valves will not contact the pistons. Install the camshafts and check the valve timing. Only after this turn the crankshaft back to TDC and install the chain. Refer to Cylinder Head Removal and Installation.
INSTALLATION
1. Check the tappets for wear (scoring) and replace them with new ones if necessary.
2. Lubricate the camshaft bearings with oil and install the camshafts so that the lobes of the intake and exhaust valves of cylinder 1 face each other. Refer to the accompanying illustration.
3. Install the bearing bar with the tappets inserted into the cylinder head. Do not forget the centering sleeves (3).

4. Insert the bearing shells according to their markings. They must be installed in their original positions.
5. Install the tool and clamp the bearing shells.
6. Tighten the bearing shells to a torque of 15 N·m.
7. Release the tool and remove it. Install the spark plugs.
8. Install the cylinder head. Refer to Cylinder Head Removal and Installation.
Model 525tds
Measure the axial and radial clearances of the camshafts. The required values are given in the Specifications.
REMOVAL
1. Remove the cylinder head. Refer to Cylinder Head Removal and Installation.
2. To remove the camshafts, special tool BMW 113260 is required. The tool holds the camshaft bearings in their working position while the bearing shells are removed. Install the tool and secure it with the cylinder head cover bolts. Refer to the accompanying illustration.
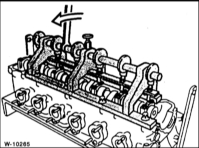
3. Turn the eccentric shaft of the tool to clamp the bearing caps.
4. Remove all bolts securing the bearing caps.
5. Remove the tool.
6. Remove the bearing caps and the camshaft. The caps are marked 1 through 7, which is visible from the exhaust side.
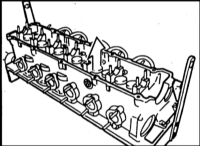
7. If necessary, for example to remove the valves, remove the tappets. To hold the tappets, the workshop uses suction cups which are installed on top of the tappets and prevent them from falling out. The tappets must be installed in their original positions. Refer to the accompanying illustration.
* Do not leave removed valve tappets on the cylinder head for more than 10 min. Otherwise oil will begin to leak out of the tappets, which will cause the automatic valve clearance compensation to fail.
Installation
* If the camshaft has been removed, note the following. Without load, hydraulic tappets extend, and after installation some time is required for them to compress. As a result, the valves may remain open for some time in a position that does not correspond to the cam and rest on the pistons. Therefore observe the following waiting times between installing the camshaft and the cylinder head: at a temperature of +20°C (room temperature) - 4 min, at +10°C - 11 min. After installing the cylinder head, wait another 30 min. Only after this may the engine be started.
If the camshaft was removed with the cylinder head installed, turn the crankshaft approximately 30° in the direction of engine rotation from TDC. In this position no piston will be at TDC and the valves will not rest on them. Install the camshafts and check the valve timing. Only after this turn the crankshaft back to TDC and install the chain; refer to the Cylinder Head Removal and Installation section.
INSTALLATION
1. Check the tappets for wear (scoring), and replace them with new ones if necessary. Install the tappets in their original positions.
2. Lubricate the camshaft bearings with oil and install the camshafts so that the lobes of the intake and exhaust valves of cylinder 1 point upward.
3. Insert the bearing shells according to their markings. They must be installed in their original positions.
4. Install the tool and clamp the bearing shells.
5. Tighten the bearing shells evenly in a crisscross pattern to a torque of 15 N·m.
6. Release and remove the tool. Install the spark plugs.
7. Install the cylinder head; refer to the Cylinder Head Removal and Installation section.
Test yourself
A quick BMW 1 quiz: every answer comes with an explanation and a link to the manual page.