Removal and Installation of Engine
Depending on the model year and vehicle equipment, the electrical wires, vacuum hoses and cooling system hoses may have different routing and connections in the engine compartment. It is not possible to describe the routing of all connections here. Therefore, before disassembly, it is recommended to mark the wires and hoses to ensure correct reassembly. The removal of the 6-cylinder engine is described below.
Before removing the engine, the manual transmission must be removed. The engine without the manual transmission is removed upward. The exhaust manifold and alternator are not removed from the engine. The intake manifold is removed. A workshop crane is required to remove the engine.
In addition, appropriate stands and a garage lift are required to disconnect connections from under the vehicle. Before installing the engine into the engine compartment, the fenders must be protected with appropriate covers.
REMOVAL
1. Disconnect the ground cable from the battery. The battery is located in the luggage compartment behind the right side trim.
* Disconnecting the battery erases data in electronic control module memories, such as the engine fault memory.
2. Remove the hood, refer to Hood Removal and Installation.
3. Remove the manual transmission, refer to Manual Transmission and Automatic Transmission Removal and Installation.
4. Lower the vehicle onto its wheels.
5. Remove the air cleaner with the mass air flow sensor, refer to Air Cleaner Housing and Mass Air Flow Sensor Removal and Installation.
6. Remove the fan, refer to Cooling Fan and Fan Clutch Removal and Installation.
7. Remove the drive belt, refer to Drive Belt Removal, Installation and Tensioning.
8. Drain the coolant, refer to Coolant Replacement. Coolant Freeze Protection Check. Visual Inspection of the Cooling System.
9. Remove the radiator, refer to Radiator Removal and Installation.
* If the coolant hoses are secured with band clamps, cut them with diagonal cutters and secure with screw-type clamps during installation.
10. Remove the spark plugs, refer to the corresponding section Spark Plug Inspection and Replacement.

11. Disconnect the coolant hoses from the heater control valve and heater, after releasing the clamps. Refer to the accompanying illustration.
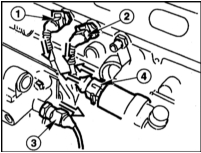
12. Disconnect the connector by pressing the wire clips. Refer to the accompanying illustration. 1 - coolant temperature sensor, 2 - remote temperature gauge sensor, 3 - oil pressure switch sensor, 4 - idle air control valve.
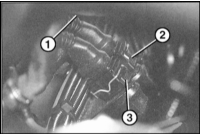
13. Disconnect the connector under the intake manifold. The connector locations, viewed from the front, are as follows (refer to the accompanying illustration): connector 1 - knock sensor (covered), 2 - crankshaft position sensor (pulse type), 3 - cylinder identification sensor.
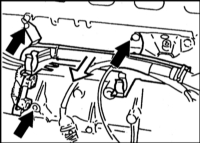
14. Disconnect the cable from the alternator and starter. Refer also to Alternator Removal and Installation and Starter Removal and Installation.
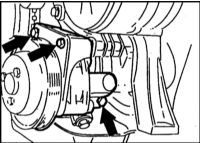
15. Disconnect the wiring harness from the cylinder block by removing the bolts, and move it aside. (Refer to the accompanying illustration)
16. Remove the mounting bolts, then remove the power steering pump and move it aside without disconnecting the hoses. Refer to the accompanying illustration.
* If the hydraulic lines are opened, after installation the air must be bled from the system. Refer to Power Steering Fluid Level Check.
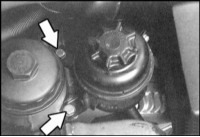
17. Remove the 2 bolts securing the power steering reservoir and secure it aside with wire. Refer to the accompanying illustration.
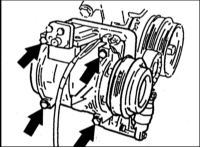
18. Vehicles with air conditioning: Remove the bolts securing the A/C compressor and move it aside with the hoses attached.
* Never open the A/C refrigerant circuit. The refrigerant is toxic and can cause frostbite if it contacts the skin. Refer to the accompanying illustration.
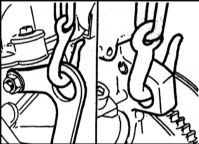
19. Attach the sling to the engine. To do this, secure a cable or chain to the engine lifting eyes. Lift the engine slightly with a workshop crane. Refer to the accompanying illustration.
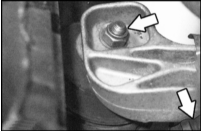
20. Loosen the nuts securing the left and right engine mounts, and disconnect the ground cable (right arrow in the accompanying illustration) from the engine at the right mount.
21. Check that all hoses and wires running from the engine to the body are disconnected. Then remove the engine with a shop crane.
* When lifting the engine, watch its orientation to avoid damage from contact with adjacent components.
22. Do not keep the removed engine upside down for more than 10 min, as oil will drain from the valve lash adjusters, which may cause them to fail. If the engine must be turned over, remove the valve lash adjusters first.
INSTALLATION
1. Check the engine mounts and the coolant and oil hoses for porosity and damage. Replace them if necessary.
2. Check that the radial ball bearings in the crankshaft and the clutch release bearing turn smoothly, and check the clutch release lever.
3. Check that the clutch disc friction linings are thick enough and in good condition. If the clutch has high mileage, it is advisable to replace it.
4. Carefully lower the engine into the engine compartment. Watch the engine orientation while lowering to avoid damaging the transmission input shaft, clutch and body.
5. Screw on the engine mount nuts without tightening them.
6. Raise the vehicle and support it on stands.
7. Install the manual transmission. Refer to Section Removal and Installation of Manual and Automatic Transmission.
8. Lower the vehicle to the wheels.
9. Rock the engine to let it seat itself. Then tighten the engine mount nuts to a torque of 45 N·m. Secure the ground cable to the right crossmember.
* Engine mounts and brackets are tightened to the following torques: M8 thread to 25 N·m, M10 thread to 45 N·m.
10. If the A/C compressor was removed, install it.
11. Install the power steering pump. Refer to Section Power Steering Pump Mounting.
12. Fit and tension the V-belt. Refer to Section Removal, Installation and Tensioning of V-Belt.
13. Connect the connectors of the cylinder identification sensor and the flywheel pulse sensor (DME). Connect the connectors of the temperature sensor, remote thermometer, oil pressure sensor and idle speed control valve. Refer to subsection “Removal”.
14. Install the intake manifold. Refer to Section Removal and Installation of Intake Manifold.
15. Connect all electrical wires, vacuum hoses, coolant hoses and fuel hoses to the cylinder head according to their markings. Secure the hoses and electrical wires with clamps.
16. Install the connector plate on the cylinder head and secure it.
17. Install the spark plugs.
18. Install the air intake cover and secure it with screws. Refer to Section Removal and Installation of Wiper Drive/Cover.
19. Connect the electrical wires to the alternator. Refer to Section Removal and Installation of Alternator.
20. Install the alternator cover.
21. Check the air filter element. If necessary, knock it out or replace it. Refer to Section Removal and Installation of Air Filter Housing and Mass Air Flow Meter.
22. Fit the coolant hoses onto the heater valve and secure them with clamps.
23. Install the radiator. Refer to Section Removal and Installation of Radiator.
24. Install the fan. Refer to Section Removal and Installation of Fan and Fan Clutch.
25. Install the hood. Refer to Section Removal and Installation of Hood.
26. Check the antifreeze concentration in the coolant and fill the system.
27. Check the engine and manual transmission oil levels. Top up the oil if necessary.
28. Connect the ground cable to the battery. Set the clock. Program the radio stations.
29. Start the engine and warm it up to operating temperature. Check the coolant level. Check all connections for leaks.
30. Secure the lower engine compartment cover.
Test yourself
A quick BMW 1 quiz: every answer comes with an explanation and a link to the manual page.