Wheel change
 Safety precautions in case of tire damage and wheel change:
Stop the vehicle as far as possible from moving traffic and on a firm surface. Switch on the hazard warning lights. Set the wheels straight ahead and lock the steering wheel. Apply the parking brake and engage first gear or reverse (on automatic transmission, position P). Ask all passengers to leave the vehicle and move them out of the danger zone (for example, behind a guardrail). Depending on the circumstances, place an emergency stop warning triangle or a warning light at an appropriate distance. Observe national requirements. Change the wheel only on a level, firm and non-slip surface. On a soft or slippery surface (snow, ice, ceramic tiles, etc.) the vehicle or jack may slip sideways.
Position the jack on a firm surface. Do not place anything under the jack, since insufficient height reduces its load capacity.
When the vehicle is raised, do not get under it and do not start the engine. This is life-threatening. Your BMW is equipped with a compact spare wheel, which may be used temporarily in an emergency, or a spare wheel of size 235/65 R 17. Note that these wheels are secured differently in the luggage compartment.

Required tools: To prevent tools from rattling while driving, store and secure them correctly in their original place after each use.
► Two wheel chocks: Open the upper and lower luggage compartment lids.
Lift the floor cover or the extendable loading floor in the luggage compartment. On vehicles with a compact spare wheel, remove the cover.
Remove the wheel chocks located next to the spare wheel.
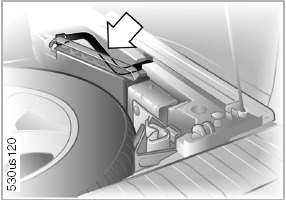
► Wheel wrench: It is located next to the spare wheel.
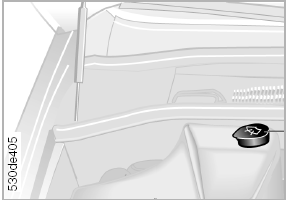
► Jack crank handle: Remove it from its holder.
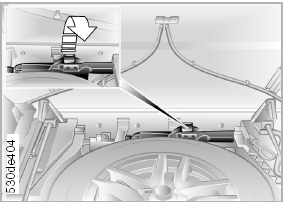
► Jack: Unhook the rubber strap, see arrow, and remove the jack.
After use, fully screw down the jack and secure its handle.
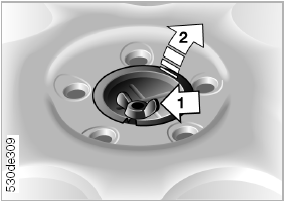
Compact spare wheel: Remove the cover located under the luggage compartment floor cover.
Vehicles with a sliding loading floor: the cover is secured at the rear with two latches.
1. Unscrew the wing nut 1.
2. Remove the plate 2.
3. Take out the wheel.
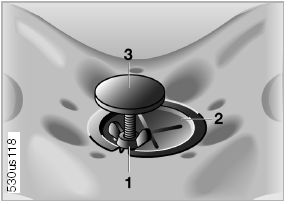
Spare wheel
1. Unscrew the wing nut 1.
2. Remove the plate 2.
3. Fully unscrew the stud 3.

Spare wheel lift: This device eliminates the need to remove the spare wheel from its well manually.
It is used to place the wheel on the lower luggage compartment cover, from where it is easy to take.
1. Close the lower luggage compartment cover again.
2. Grasp the lift handle with both hands and pull it up so that it protrudes above the luggage compartment cover, see arrow.
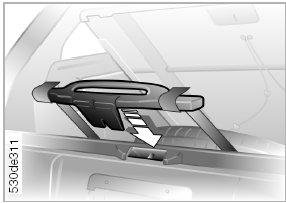
3. Hook both wedges onto the lock of the lower luggage compartment cover, see arrow – the cover will unlatch.
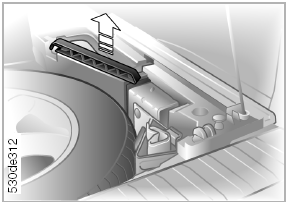
4. Remove the support strut from the holder.
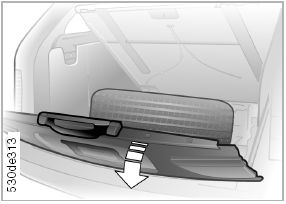
5. Lower the luggage compartment cover and hold it in this position.
The lift will place the spare wheel on the cover.
Firmly hold the lower luggage compartment cover in the open position, preventing it from closing: risk of damage and injury.
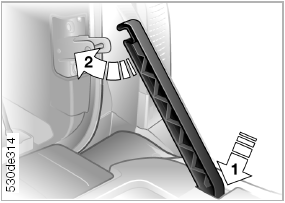
6. Insert the support strut into the lock of the lower luggage compartment cover and press it, see arrow 1, until it locks. Engage the strut hook on the lock bracket, see arrow 2.
Make sure the support strut is securely fastened so that the lower luggage compartment cover cannot close and cause damage or injury.
7. After securing the cover, release it and remove the spare wheel. Keep the cover in the secured position until you have replaced the wheel and placed the removed wheel on the lift.
Procedure: 1. Observe the safety instructions on page 169.
2. Prevent the vehicle from rolling: place wheel chocks under the wheels on the opposite side; on level ground, behind the wheels; on a downhill slope, in front of them. On a steep slope, take additional measures to prevent the vehicle from rolling.
3. Loosen the wheel bolts by half a turn.
4. Insert the crank handle into the jack, see illustration in the next column.
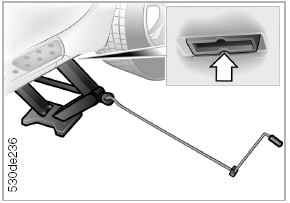
5. Position the jack under the nearest support point to the wheel. The jack base must be directly under the support point and rest fully on the ground. Turn the crank handle to engage the jack head in the rectangular recess of the support point, see callout in illustration.
6. Turn the handle to raise the vehicle until the wheel is clear of the ground.
7. Unscrew the wheel bolts and remove the wheel.
8. Clean dirt from the wheel hub and wheel bolts.
9. Install the new wheel (regular spare or compact) and screw in at least two diagonally opposite bolts.
10. Screw in the remaining bolts and tighten all bolts firmly in a crosswise sequence.
11. Lower the vehicle and remove the jack.
12. Tighten all wheel bolts in a crosswise sequence.
13. Check the tire pressure at the first opportunity and adjust it to the specified value.
After installing the spare wheel or adjusting tire pressure, initialize the tire damage indicator, see page 103.
Screw the cap onto the valve to protect it from dirt. A contaminated valve often causes gradual air leakage.
Use the jack only for changing wheels. To avoid property damage and injury, never use it to lift other vehicles or any loads.
For safety, have the wheel bolt torque checked with a calibrated torque wrench at an authorized service center at the first opportunity.
Tightening torque: 140 N·m.
Store the removed wheel and tools in their places in reverse order.
When removing the support strut, firmly hold the lower luggage compartment cover to prevent it from closing: risk of damage and injury.
After removing the support strut, carefully close the luggage compartment cover. Hold it until it is fully closed.
When installing non-BMW alloy wheels, use the wheel bolts supplied with them.
Have the damaged tire replaced and the wheel balanced at a service station as soon as possible.
Test yourself
A quick BMW X3 quiz: every answer comes with an explanation and a link to the manual page.