Front Steering Knuckle and Hub
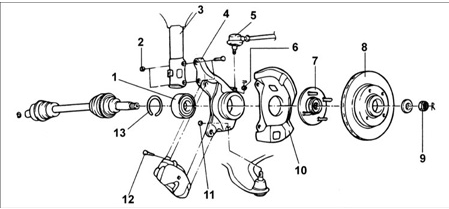
Front Steering Knuckle and Hub
1 – bearing;
2 – nut, 73–90 N•m;
3 – strut;
4 – steering knuckle;
5 – tie rod end;
6 – nut, 15–34 N•m;
7 – front wheel hub;
8 – brake disc;
9 – nut, 220–260 N•m;
10 – brake backing plate;
11 – nut, 60–72 N•m;
12 – bolt, 65–75 N•m;
13 – snap ring.
Removal
PROCEDURE
1. Raise the vehicle and remove the front wheel.
2. Remove the drive shaft nut.
3. Remove the caliper and secure it to the front strut with soft wire.
4. Remove the wheel speed sensor from the steering knuckle.
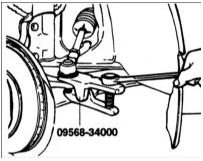
5. Remove the cotter pin and remove the nut securing the tie rod end ball stud to the steering knuckle. Using Special Service Tool 09568–34000, press the ball stud out of the steering knuckle.
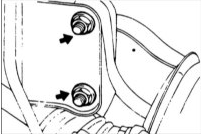
6. Make alignment marks and remove the bolts securing the lower front strut to the steering knuckle.
7. Using a nylon hammer, drive the drive shaft out of the front wheel hub. If the drive shaft is tight in the front wheel hub, spray penetrating solvent onto the splines, then reinstall the shoulder nut flush with the end of the shaft. Striking the nut with a brass hammer, drive the drive shaft out of the hub.
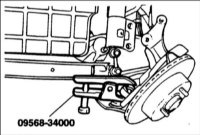
8. Using Special Service Tool 09568–34000, disconnect the lower control arm ball joint from the steering knuckle.
9. Remove the steering knuckle together with the front wheel hub.
10. Installation is performed in the reverse order of removal.
Disassembly
PROCEDURE
1. Remove the brake disc from the front wheel hub.
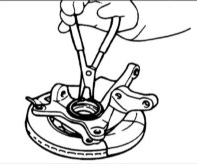
2. Remove the snap ring.
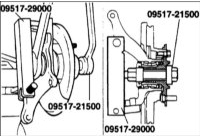
3. Install the special service tools as shown in the illustration.
4. While turning the special service tool, remove the front wheel hub from the steering knuckle.
5. Remove the special service tool and the dust seal ring.
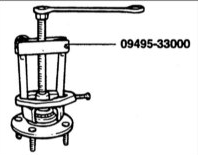
6. Using the special service tool, remove the inner bearing race from the hub.
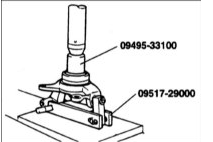
7. Using the special service tool, remove the outer bearing race from the steering knuckle.
Inspection
PROCEDURE
1. Inspect the hub for cracks and wear.
2. Inspect the brake disc for scoring and damage.
3. Inspect the joint for cracks.
4. Inspect the snap ring for cracks or damage.
Assembly
PROCEDURE
1. Apply a thin layer of multipurpose grease to the steering knuckle bore and the outer bearing race.
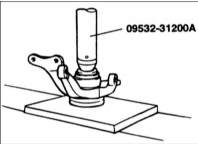
2. Using a press with a mandrel of the appropriate diameter, press in the new wheel bearing.
Do not apply press force to the inner bearing race.
3. Install the dust seal ring.
4. Using a press with a mandrel of the appropriate diameter, press the hub into the wheel bearing.
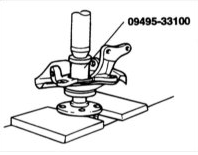
Do not apply press force to the outer bearing race.
5. Install the brake disc.
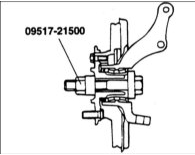
6. Using the special tool, secure the hub to the steering knuckle by tightening the tool bolt to 240 N•m.
7. Rotate the hub several times to seat the bearing components.
8. Measure the torque required to turn the bearing.
Turning torque: 1.3 N•m
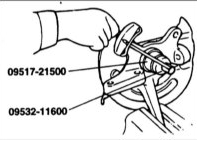
9. If the turning torque is 0 N•m, measure the axial play of the hub bearing.

10. If the turning torque exceeds the specified value, the bearing is incorrectly installed in the steering knuckle and hub. Disassemble the steering knuckle and reassemble it.
Bearing axial play: 0.08 mm
11. Remove the special service tool.
Test yourself
A quick Hyundai Accent quiz: every answer comes with an explanation and a link to the manual page.