Braking System
REAR DISC BRAKE Repair Procedures
In this manual: Braking System
36steps
~221min
5/5difficulty
1special tools
Done 0 of 36
DEPOSIT
- Remove the tire and rear wheel.
Tightening torque: 88.3 ~ 108 N·m
- Remove the clip (A).

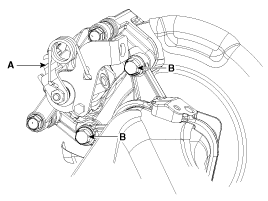
- Remove the spring (A), then the trailing arm support bolt (B).

- Disconnect the parking brake cable.
- Loosen the guide rod bolt (B), then remove the rear caliper body (A).
Tightening torque: 21.6 ~ 31 N·m
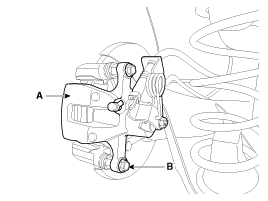
- Remove the pad return spring (A).
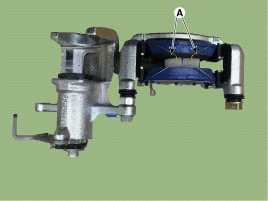
- Place the brake pads (B) into the caliper (A).
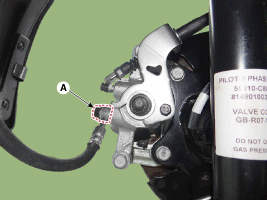
- Loosen the brake hose banjo bolt (A).
Tightening torque: 24.5 - 29 N·m
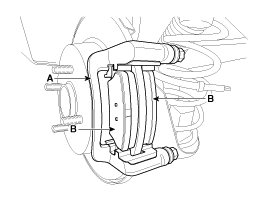
- Loosen the caliper mounting bolts (B), then remove the rear caliper assembly (A). Tightening torque: Caliper to bracket: 49.0 – 59 N·m
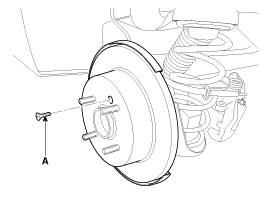
- Remove the rear brake disc by loosening the bolts (A).
REPLACEMENT
- Remove the tire and rear wheel.
Tightening torque: 88.3 ~ 108 N·m
- Loosen the guide rod bolt (B), then remove the rear caliper body (A).
Tightening torque: 21.6 ~ 31 N·m
- Remove the pad return spring (A).
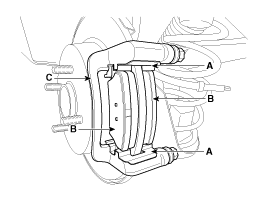
- Replace the pad retainers (A) and brake pads (B) in the caliper (C).
Inspection
BRAKE DISC THICKNESS INSPECTION, REAR BRAKE
- Check the brake pads for wear and discoloration.
- Inspect the brake disc for damage and cracks.
- Remove all rust and contamination from the surface, then measure the disc thickness at at least 8 points located simultaneously at a distance of (5 mm) from the outer edge of the brake disc. Brake disc thickness Standard value: 10 mm (0.394 in.) Service limit: 8.4 mm (0.331 in.) Variation: Less than 0.005 mm (0.0002 in.)
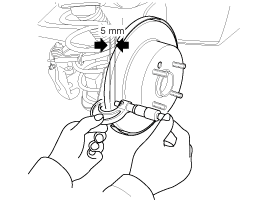
- If wear exceeds the limit, replace the disc/pad assembly of both the left and right sides of the vehicle.
REAR BRAKE PAD INSPECTION
- Check pad wear. Measure the lining thickness, and if the thickness is less than specified, replace the pads. Pad thickness Standard value: 10 mm (0.394 in.) Maintenance limit: 2.0 mm (0.0787 in.)
- Check the brake pad, backing plate, and grease contamination for damage.
REAR BRAKE DISC RUNOUT INSPECTION
- Place a dial indicator approximately 5 mm (0.2 in.) from the outer edge of the brake disc and measure the disc runout. Brake disc runout Limit: 0.04 mm (0.0016 in.) or less (new part)
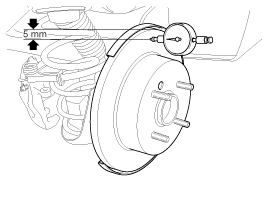
- If disc runout exceeds the maximum specified value, replace the disc, then measure the runout again.
- If the out-of-round condition does not exceed the usable limit, rotate the disc 180° and check the runout again.
- If changing the position does not eliminate the out-of-round condition of the brake disc, replace the brake disc.
REMEDY
- To install, perform the removal procedure in reverse order.
- Use the special service tool (09580-0U000) when installing the brake caliper.
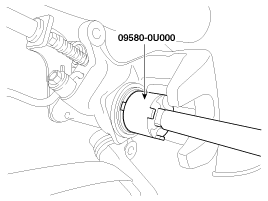
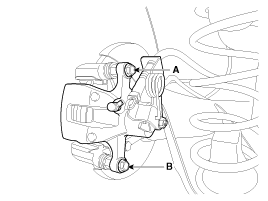
- After installation, bleed the brake system. (Refer to Brake System Bleeding)
Parking Brake Adjustment
- Lower the console to the floor to access the adjusting nut.
- Loosen the parking brake cable until both levers are in the fully released position.
- Bring the brake pads into operating position by depressing the brake pedal several times, until resistance is felt.
- Tighten the parking brake cable by turning the adjusting nut until the operating levers of both calipers lift from the stopper at distance (A) and (D) between the lever (B) and the stopper (C).
Distance (A+D): Max. 3 mm (0.12 in.)
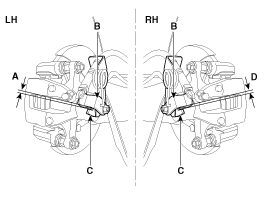
- Install the floor console.
- The parking brake lever must be released.
- If the parking brake cables have been replaced, apply the parking brake several times at maximum force to stretch the cables, and check the adjustment as described above.
- Check that the wheels operate correctly.
- Road test.
Test yourself
A quick Hyundai i20 quiz: every answer comes with an explanation and a link to the manual page.
Was this page helpful?