Cylinder head cover
Components and Component Location
Components
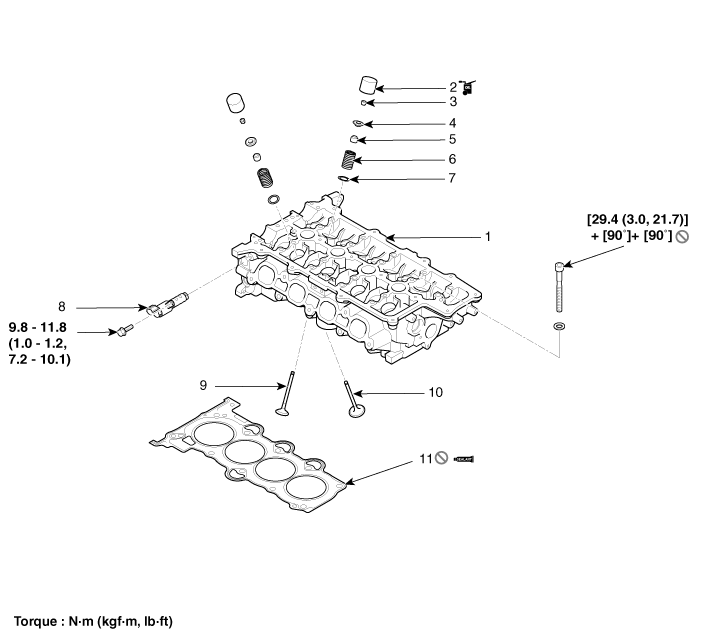
| 1. Cylinder head assembly 2. Mechanical lash adjuster (MLA) 3. Lock retainer 4. Retainer 5. Valve stem seal 6. Valve spring |
7. Valve spring seat 8. Oil control valve (OCV) 9. Exhaust valve 10. Intake valve 11. Cylinder head gasket |
Repair Procedures
Removal
Engine removal is not necessary for this procedure.
Remove the engine cover.
(See Engine and Transaxle Assembly - Engine Cover)
Disconnect the negative battery cable.
Remove the air duct and air cleaner assembly.
(See Intake and Exhaust System - Air Cleaner)
Remove the engine room cover.
(See Engine and Transaxle Assembly - Under Hood)
Drain the engine coolant.
(Refer to Cooling System - "Engine Coolant")
Remove the intake hose and intercooler pipe (A).
Tightening Torque
Hose clamp bolt:
4.9–6.9 N·m (0.5–0.7 kgf·m, 3.6–5.1 ft·lbf, 43.4–60.8 in·lbf)
(If equipped with a cap, tighten until the cap is removed.)
Pipe mounting bolt:
18,6–24 N·m
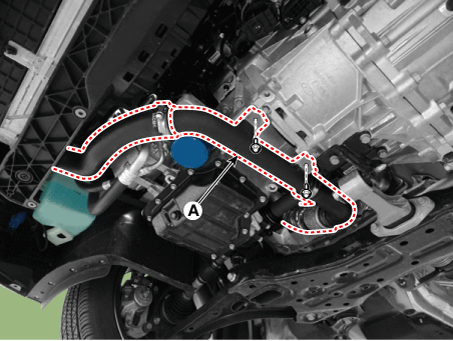
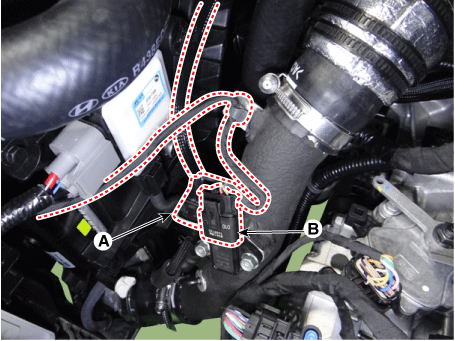
Disconnect the RCV solenoid valve connector (A) and the boost pressure sensor (BPS) connector (B).
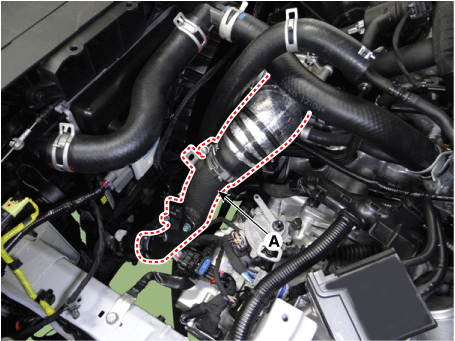
Disconnect the intercooler outlet hose (A).
Tightening torque: 4.9–6.8 N·m (0.5–0.7 kgf·m, 3.6–5.0 ft·lbf, 43.4–60.8 in·lbf)
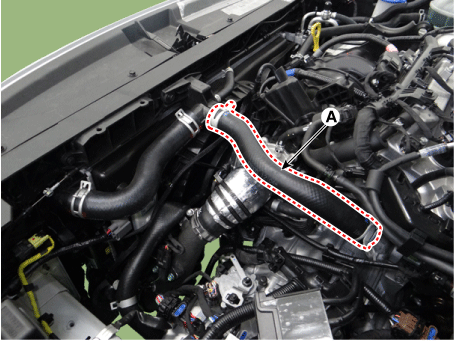
Disconnect the upper radiator hose (A).
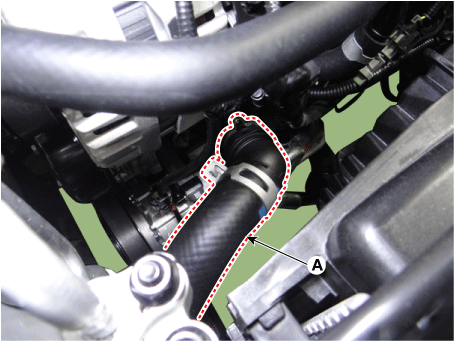
Disconnect the radiator lower hose (A).
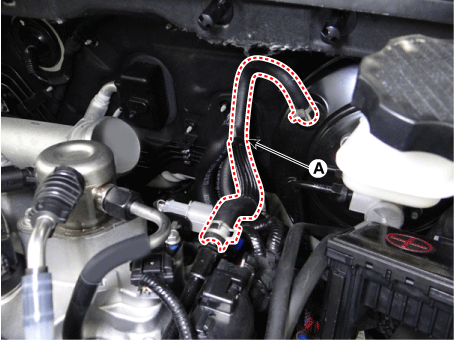
Disconnect the brake booster vacuum hose (A).
Remove the intake and exhaust CVVT oil control valves.
(See Engine Control/Fuel System - "CVVT Oil Control Valve (OCV)").
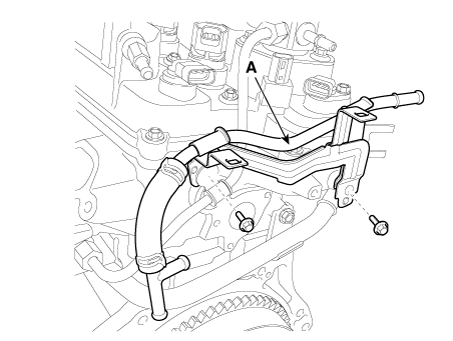
Remove the vacuum hose assembly (A).
Remove the intake manifold.
(See Intake and Exhaust System - Intake Manifold)
Remove the exhaust manifold module.
(See Intake and Exhaust System - Exhaust Manifold)
Remove the delivery pipe assembly.
(See Engine Control/Fuel System - "Delivery Pipe")
Disconnect the bypass hose, then remove the water temperature control assembly.
(See Cooling System - "Water Temperature Control Assembly")
Remove the water outlet pipe.
(See Cooling System - "Water Temperature Control Assembly")
Remove the cylinder head cover.
(Refer to Cylinder Head Assembly - "Cylinder Head Cover")
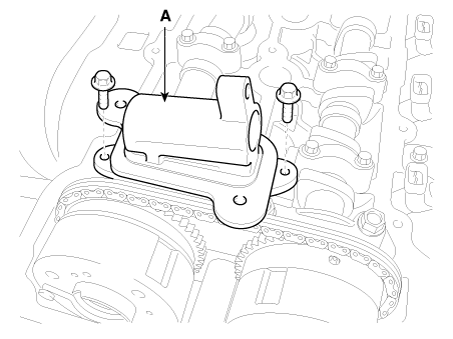
Remove the exhaust oil control valve (OCV) adapter (A).
Tightening Torque: 9.8–11.8 N·m
Remove the timing chain cover.
(See Valve Timing - "Timing Chain Cover")
Remove the timing chain.
(See Timing System - Timing Chain)
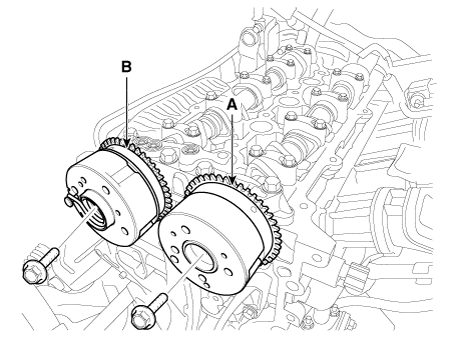
Remove the intake CVVT assembly (A) and the exhaust CVVT assembly (B).
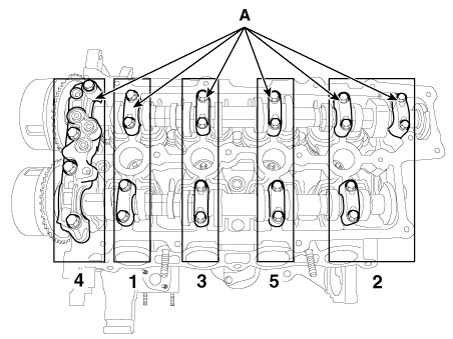
Remove the camshaft bearing caps (A) in the order shown in the illustration below.
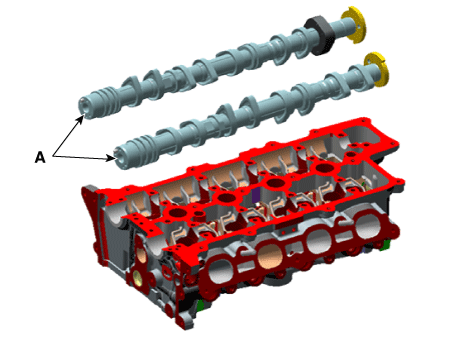
Remove the intake and exhaust camshafts (A).
Remove the rear suspension (A).
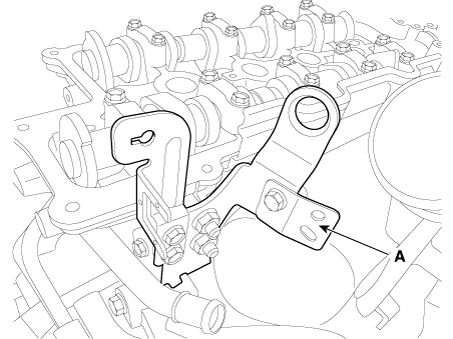
Remove the cylinder head cover heat insulator (A).
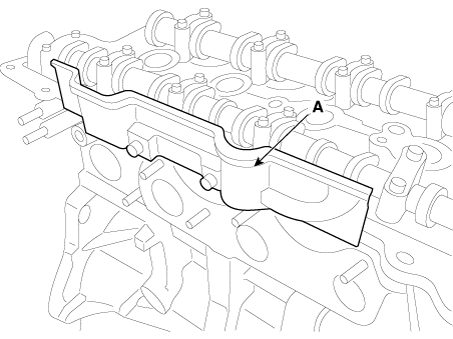
Remove the cylinder head bolts, then remove the cylinder head.
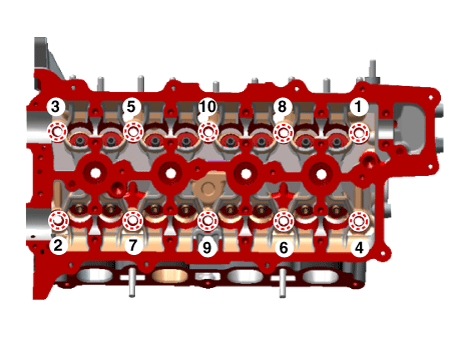
Loosen and remove the 10 cylinder head bolts evenly in several steps, in the order shown.
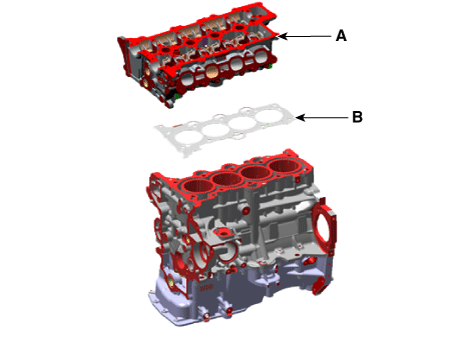
Lift the cylinder head off the cylinder block and place the cylinder head on wooden blocks.
Remove the cylinder head gasket (B).
Disassembly
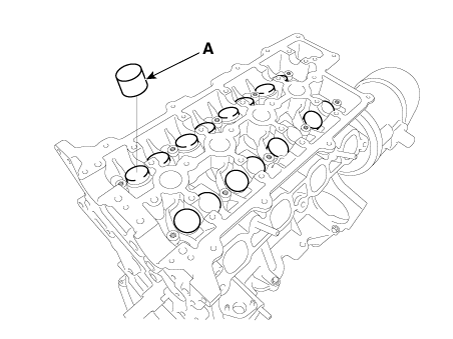
Remove the MLA (A).
Remove the valves.
Using SST (09222-3K000, 09222-3K100), compress the valve spring and remove the retainer lock.
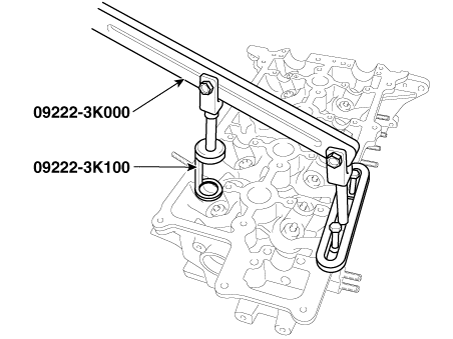
Remove the spring retainer.
Remove the spring.
Remove the valve.
Remove the valve stem seal.
Using a magnetic pick-up tool, remove the spring seat.
Inspection
Cylinder head cover
Inspect for flatness.
Using a precision straightedge and feeler gauge, measure the cylinder head and manifold contact surfaces for distortion.
If the flatness exceeds the maximum, replace the cylinder head.
Cylinder head gasket surface flatness
Standard:
Total area less than 0.05 mm (0.0020 in.)
Less than 0.02 mm (0.0008 in.) for a 100 mm (3.9370 in.) x 100 mm (3.9370 in.) section
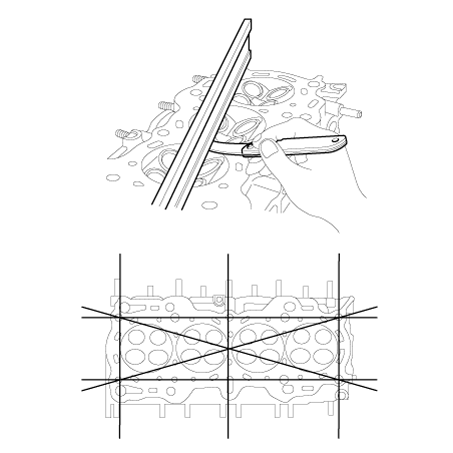
Inspect for cracks.
Check the combustion chamber, intake ports, exhaust ports and cylinder block surface for cracks. If any cracks are found, replace the cylinder head.
Valve and Valve Spring
Inspect the valve stems and valve guides.
Using a caliper gauge, measure the inside diameter of the valve guide.
For the valve guide inside diameter, measure at 5 points evenly spaced 2 mm (0.0787 in.) from each end of the valve guide.
Valve guide inside diameter: 5.500–5.512 mm (0.2165–0.2170 in.)
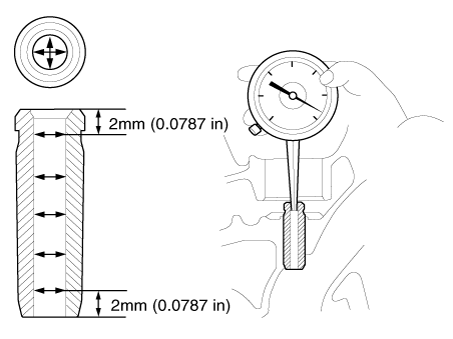
Using a micrometer, measure the outside diameter of the valve stem.
Valve stem outside diameter
Intake: 5.465–5.480 mm (0.2152–0.2157 in.)
Exhaust: 5.458–5.470 mm (0.2149–0.2154 in.)
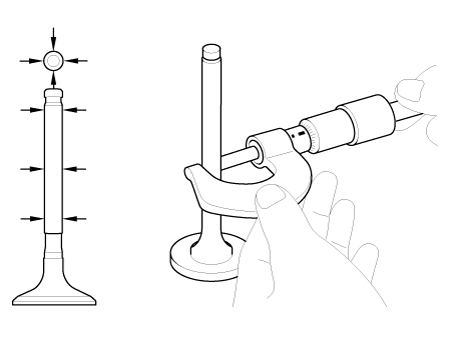
Subtract the valve stem outside diameter measurement from the valve guide inside diameter measurement.
Valve stem-to-guide clearance
Intake: 0.020–0.047 mm (0.0008–0.0019 in.)
Exhaust: 0.030–0.054 mm (0.0012–0.0021 in.)
If the clearance is greater than specified, replace the valve or cylinder head.
Inspect the valves.
Make sure the valve face is ground to the correct valve face angle.
Inspect the valve face for wear. If the valve face is worn, replace the valve.
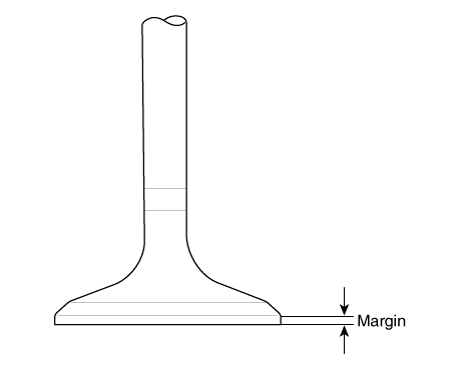
Check the valve head margin thickness.
If the margin thickness is less than the minimum, replace the valve.
Standard margin thickness — Intake: 1.10 mm (0.0433 in.) Exhaust: 1.26 mm (0.0496 in.)
Check the valve length.
Valve Length
Standard
Intake: 93.15 mm (3.6673 in.)
Exhaust: 92.60 mm (3.6457 in.)
Inspect the valve stem tip for wear. If the valve stem tip is worn, replace the valve.
Inspect the valve seats.
Inspect the valve seat for signs of overheating and improper contact with the valve face. If the valve seat is worn, replace the cylinder head.
Check the valve guide for wear. If the valve guide is worn, replace the cylinder head.
Inspect the valve springs.
Using a steel square, measure the valve spring out-of-square.
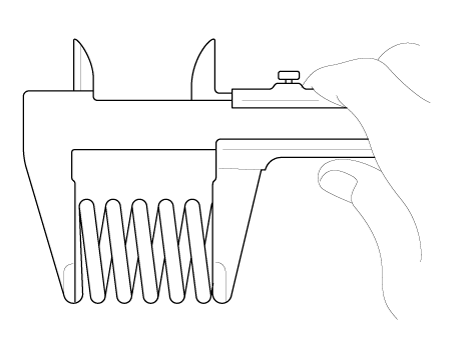
Using vernier calipers, measure the valve spring free length.
Valve Spring
Standard
Free length: 45.1 mm (1.7756 in.)
Out-of-square: less than 1.5°
Installation
Install the valves.
Install the spring seats.
Using SST (09222-2B100), install a new valve stem seal.
Install the valve, valve spring and retainer after applying engine oil to the end of each valve stem.
Using SST (09222-3K000, 09222-3K100), compress the spring and install the retainer locks.
After installing the valves, make sure the retainer locks are properly seated before releasing the valve spring compressor.
Lightly tap the end of each valve stem two or three times with the handle of a wooden hammer to ensure proper seating of the valve and retainer lock.
Install the MLA (Mechanical Lash Adjuster).
Make sure the MLA (A) rotates smoothly by hand.
Installation
Install the cylinder head assembly.
Before installation, remove hardened sealant from the cylinder block and cylinder head surfaces.
Before installing the cylinder head gasket, apply sealant to the upper surface of the cylinder block and install the gasket in place within five minutes.
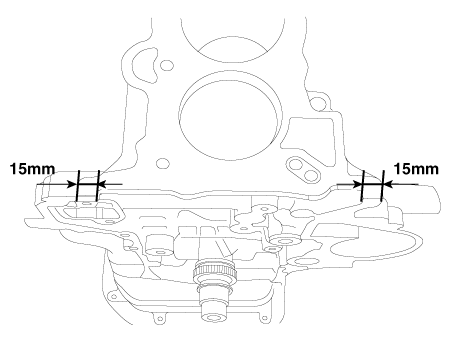
Width:
2.0–3.0 mm (0.0787–0.1181 in.)
Position:
1.0–1.5 mm (0.0394–0.0591 in.)
Specified sealant: TB 1217H or LOCTITE 5900H
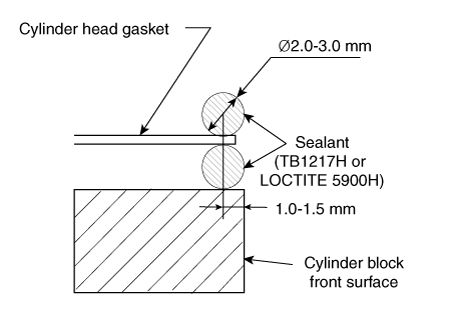
After installing the cylinder head gasket on the cylinder block, apply sealant to the upper surface of the cylinder head gasket and assemble within five minutes.
Carefully install the cylinder head so as not to damage the gasket.
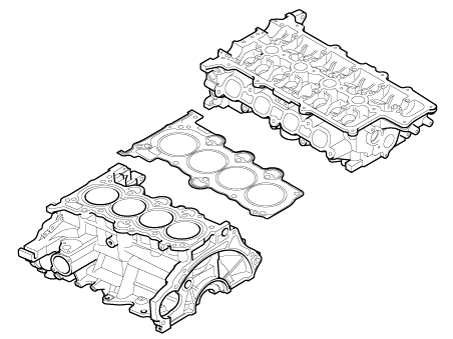
Install the cylinder head bolts with washers.
Tighten the 10 cylinder head bolts in several passes in the sequence shown.
Tightening torque: 29 N·m + 90° + 90°
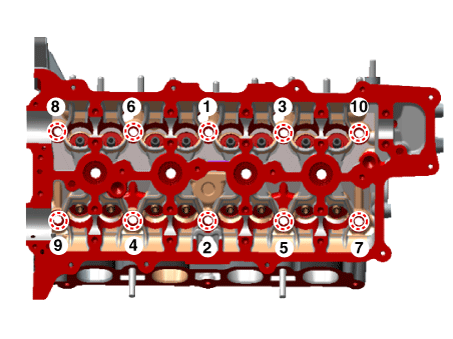
Before installing the camshaft, apply engine oil to the journals.
Install the intake and exhaust camshafts (A).
Install the camshaft bearing caps (A) in the order shown below.
Tightening Torque
M6 bolts:
11,8–13.7 N·m
M8 bolts:
18,6–23 N·m
Install the intake CVVT assembly (A) and exhaust CVVT assembly (B).
Tightening torque: 63.7–74 N·m
Install the cylinder head cover heat shield (A).
Tightening Torque: 9.8–11.8 N·m
Install the rear engine mount (A).
Tightening torque: 18.6 – 24 N·m
Install the timing chain.
(See Timing System - Timing Chain)
Install the remaining parts in the reverse order of removal.
Test yourself
A quick Kia Forte BD quiz: every answer comes with an explanation and a link to the manual page.