Engine Oil and Filter
Repair Procedures
Inspection
[Theta-II 2.0 T-GDI / Lambda-II 3.3 T-GDI]
Engine Oil Level
Warm up the engine, then stop it and wait 5 minutes.
Turn off the engine and wait several minutes (approximately 5 minutes) for the oil to return to the oil pan.
Pull out the dipstick, wipe it clean, and fully reinsert it.
Make sure the oil level is between the "L" mark and the "F" mark on the engine oil level dipstick.
If the level is low, check for leaks and add oil up to the "F" mark.
Engine Oil Appearance
Check the engine oil for white cloudiness or heavy contamination.
If the engine oil becomes cloudy and white, it is likely contaminated with engine coolant.
Repair or replace damaged parts.
[R 2.2]
Engine Oil Level
Warm up the engine, then stop it and wait 5 minutes.
Turn off the engine and wait several minutes (approximately 5 minutes) for the oil to return to the oil pan.
Pull out the dipstick, wipe it clean, and fully reinsert it.
Make sure the oil level is between the "L" and "F" marks on the engine oil level dipstick.
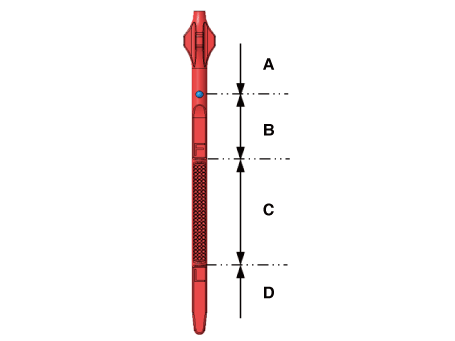
Figure Required action depending on the engine oil level Range (A) Replace with new engine oil. Range (B) Do not add oil. Range (C) Normal.
Add oil until the oil level exceeds range C.Range (D) Add oil until the oil level is approximately at the middle of range C.
Engine Oil Appearance
Check the engine oil for white cloudiness or heavy contamination.
If the engine oil becomes cloudy and white, it is likely contaminated with engine coolant.
Repair or replace damaged parts.
Engine Oil and Filter Change
[R 2.2]
Drain the engine oil.
Remove the oil filler cap (A).
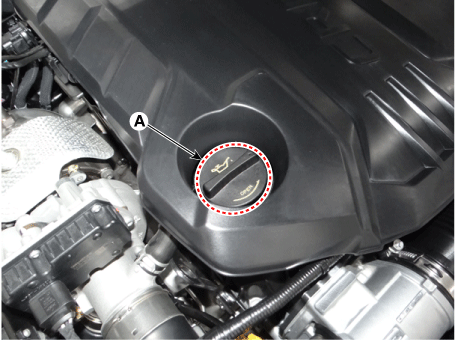
Remove the engine compartment under cover (front).
(Refer to Engine Mechanical System - "Engine Room Cover")
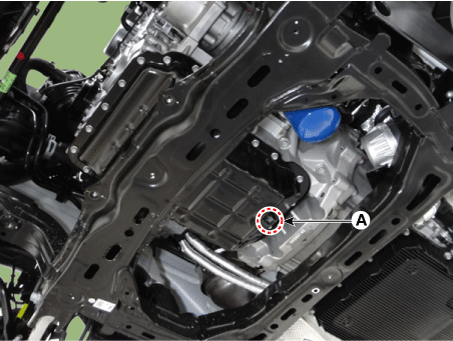
Remove the oil drain plug (A) and drain the oil into a container.
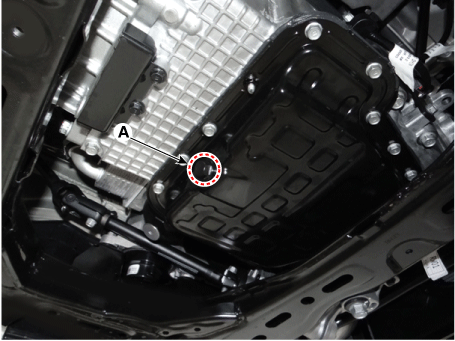
Replace the oil filter.
Remove the drain bolt (A) at the bottom of the oil filter cover and drain the oil into the oil filter.
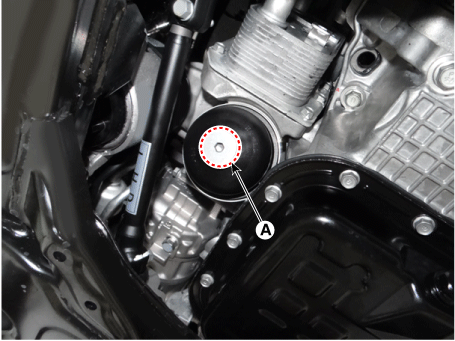
Remove the oil filter cover (A).
Install a new oil filter element (C).
Lightly screw the oil filter cover into place, and tighten it until the O-ring (B) contacts the seat. Finally, tighten it again to the specified torque.
Tightening torque: 31.5–38 N·m
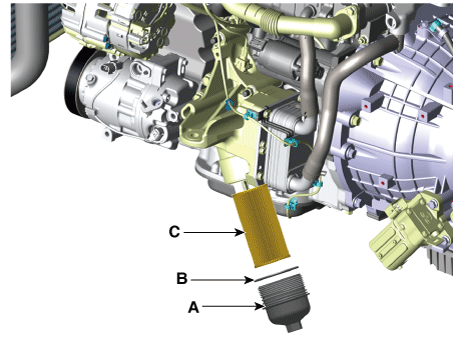
Replace the drain bolt (A) with a new one. Tighten the drain bolt (A) to the specified torque.
Tightening torque: 8.8–10.8 N·m
Fill the engine oil.
Clean and install the drain plug (A) with a new gasket.
Tightening torque: 34.3–44 N·m
Fill with fresh engine oil after removing the engine oil level gauge.
Capacity
2WD
Total:
7.2 L (1.90 US gal, 7.61 US qt, 6.33 Imp. qt)
Oil Pan:
5.6 L (1.48 US gal, 5.92 US qt, 4.93 liter qt)
Drain and refill, including oil filter:
6.3 L (1.66 US gal, 6.66 US qt, 5.54 liter qt)
All-wheel drive
Total:
7.2 L (2.03 US gal, 8.14 US qt, 6.77 Imp. qt)
Oil Pan:
6.1 L (1.61 US gal, 6.45 US qt, 5.36 liter qt)
Drain and refill, including oil filter:
6.8 L (1.82 US gal, 7.19 US qt, 5.98 liter qt)
Install the oil filler cap and the oil level gauge.
Start the engine and check for oil leaks.
Recheck the engine oil level.
To reset the service interval to the recommended mileage, refer to the service mode section in the owner's manual for the procedure (if applicable).
Install the front engine room lower cover.
(Refer to Engine Mechanical System - "Engine Room Cover")
[Theta-II 2.0 T-GDI]
Remove the front and rear engine under covers.
(Refer to Engine Mechanical System - "Engine Room Cover")
Drain the engine oil.
Remove the oil filler cap (A).
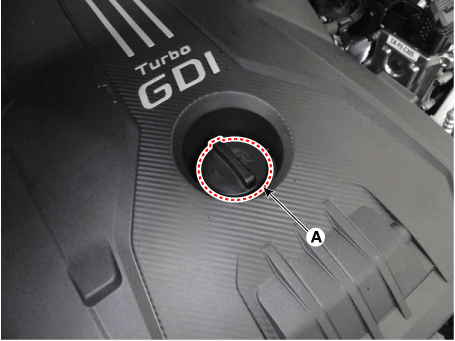
Remove the drain plug (A) and drain the oil into a container.
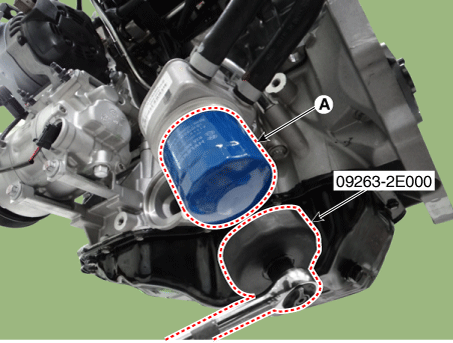
Remove the oil filter (A) using SST (09263-2E000, oil filter wrench).
Remove the oil filter.
Inspect and clean the oil filter installation surface.
Make sure the part number of the new oil filter is the same as the old one.
Apply clean engine oil to the gasket of the new oil filter.
Lightly screw the oil filter into place, then tighten it until the gasket contacts the seat.
Tighten it to the torque specified below.
Tightening torque: 11.8–15.7 N·m
Install the drain plug with a new gasket.
Tightening torque: 34.3–44 N·m
Fill with new engine oil after removing the engine oil level sensor.
Capacity
Total:
6.3 L (6.66 US qt, 5.54 Imp qt, 1.66 US gal)
Oil Pan:
5.3 L (5.60 US qt, 4.66 Imp qt, 1.40 US gal)
Drain and refill, including oil filter:
5.7 L (6.02 US qt, 5.01 Imp qt, 1.50 US gal)
Install the oil filler cap.
Start the engine and check for oil leaks, then check the oil level gauge or the oil pressure warning light.
Recheck the engine oil level.
To reset the service interval to the recommended mileage, refer to the service mode section in the owner's manual for the procedure (if applicable).
[Lambda-II 3.3 T-GDI]
Park the vehicle on a level surface.
Drain the engine oil.
Remove the oil filler cap (A).
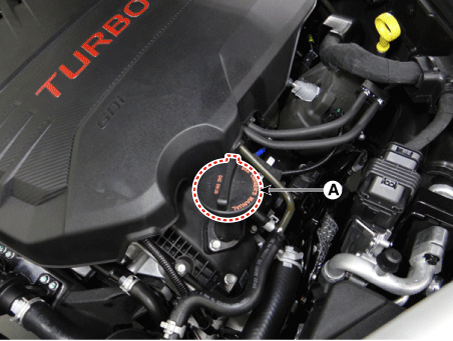
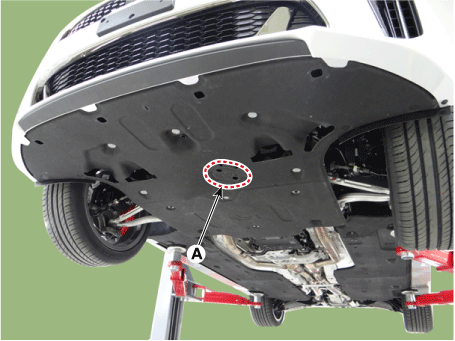
Remove the rear engine room under cover.
(Refer to Engine Mechanical System - "Engine Room Cover")
Remove the drain plug (A) and drain the oil into a container.
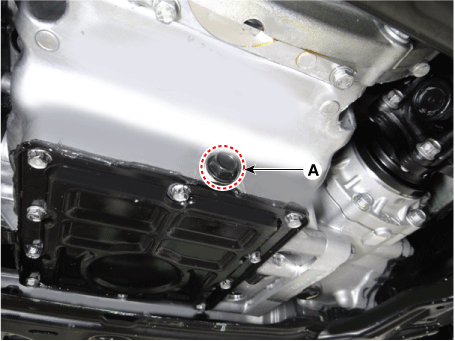
Replace the oil filter.
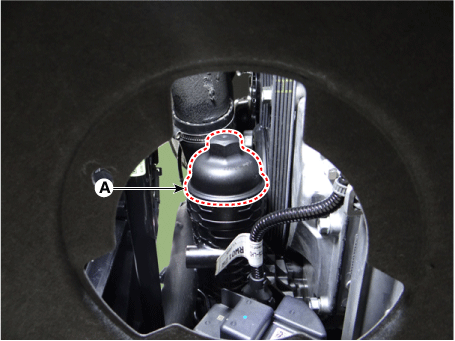
Remove the oil filter cover (A).
Remove the oil filter cover (A).
Replace the O-ring (A) of the oil filter cover with a new one.
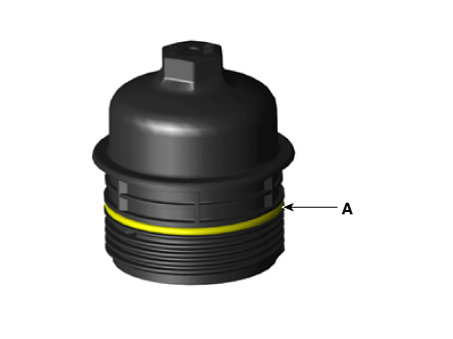
Install a new oil filter element (A).
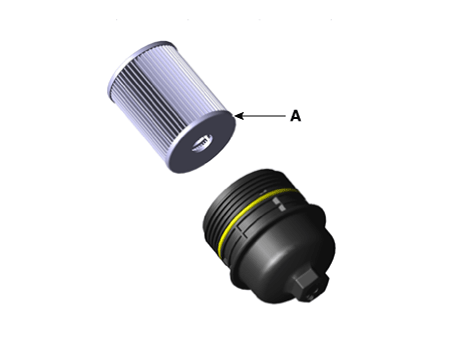
Inspect and clean the oil filter installation surface.
Apply clean engine oil to the new O-rings (A).
Lightly screw the oil filter cover into place, and tighten it until the O-ring contacts the seat.
Finally, retighten it to the specified torque.
Tightening torque: 35 N·m
Fill with new engine oil.
Install the drain plug (A) with a new gasket.
Tightening torque: 34.3–44 N·m
Install the rear lower engine compartment cover.
(Refer to Engine and Transaxle Assembly - Engine Compartment Under Cover)
Fill with new engine oil, checking the oil level on the oil level gauge.
Capacity
Total:
7.7 L (8.14 US qt, 6.77 liter qt, 2.03 US gal)
Oil Pan:
6.8 L (7.19 US qt, 5.98 liter qt, 1.80 US gal)
Drain and refill, including oil filter:
6.9 L (7.29 US qt, 6.07 liter qt, 1.82 US gal)
Install the oil filler cap (A) and the oil level gauge.
Start the engine and check that no oil leaks from the drain plug or the oil filter.
Recheck the engine oil level.
To reset the service interval to the recommended mileage, refer to the service mode section in the owner's manual for the procedure (if applicable).
Test yourself
A quick Kia Stinger CK quiz: every answer comes with an explanation and a link to the manual page.