Turbocharger and Exhaust Manifold
Components and Component Location
Components

| 1. Turbo Manifold Module 2. Turbo Manifold Module Gasket 3. Heat Shield 4. Warm-Up Catalytic Converter (WCC) Heat Shield 5. Oil Supply Pipe 6. Turbo Manifold Module Support |
7. Oil Drain Pipe 8. Turbocharger Oil Drain Pipe Gasket A 9. Turbocharger Oil Drain Pipe Gasket B 10. Warm-Up Catalytic Converter (WCC) 11. Warm-Up Catalytic Converter (WCC) Gasket |
Repair Procedures
Removal and Installation
Remove the engine cover.
(See Engine and Transaxle Assembly - Engine Cover)
Disconnect the negative battery cable.
Remove the engine compartment under cover (front).
(See Engine and Transaxle Assembly - Under Hood)
Remove the air intake hose.
(See Intake and Exhaust System - Air Cleaner)
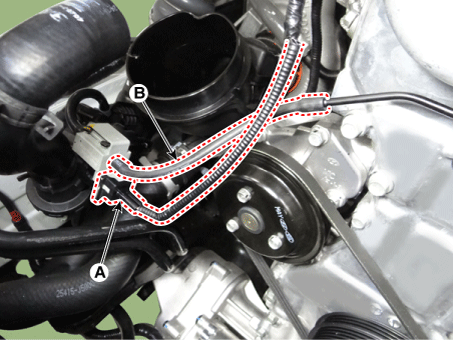
Disconnect the recirculation valve connector (A) and the vacuum hose (B).
Remove the intake hose and intercooler tube assembly (A).
Tightening Torque
Nuts (B):
14,7–19.6 N·m
Nut (C):
14,7–19.6 N·m

Remove the turbocharger intake hose (A).
Tightening torque:
4.9–6.9 N·m (0.5–0.7 kgf·m, 3.6–5.1 ft-lbf, 43.4–60.8 in-lbf)

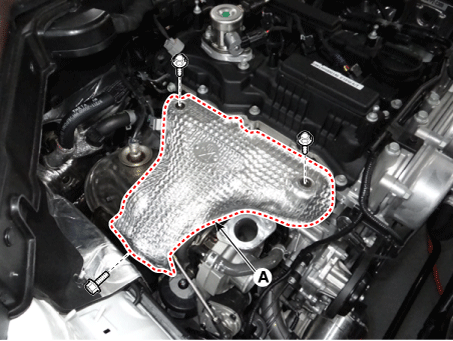
Remove the heat shield (A).
Tightening torque: 7.8–11.8 N·m
Remove the heated oxygen sensor.
(Refer to Engine Control/Fuel System - "Heated Oxygen Sensor (HO2S)").
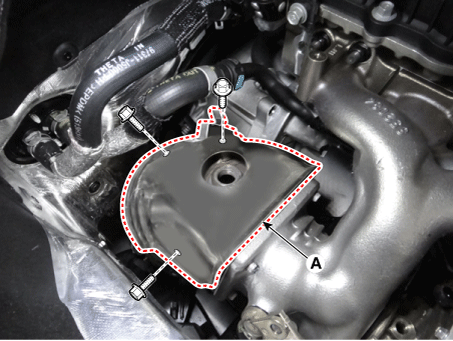
Remove the heat shield (A) of the warm-up catalytic converter (WCC).
Tightening torque: 18.6 – 24 N·m
Remove the front muffler.
(See Intake and Exhaust System - Muffler)
Remove the bracket (A) of the warm-up catalytic converter (WCC).
Tightening Torque
Bolts (B):
18,6–28 N·m
Bolts (C):
52,0–58 N·m

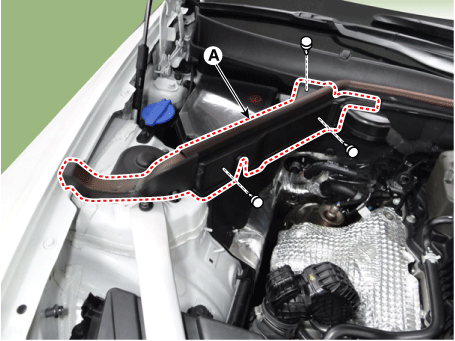
Remove the right hood seal cover (A).
Remove the warm-up catalytic converter (WCC) (A) and the gasket.
Tightening Torque: 49.0–54 N·m


Remove the turbocharger water supply pipe and hose (A).
Tightening Torque: 26.5–32 N·m

Remove the oil supply pipe (A).
Tightening torque: 11.8–17.6 N·m

Tightening torque: 7.8–11.8 N·m

Disconnect the water drain hose from the turbocharger (A).
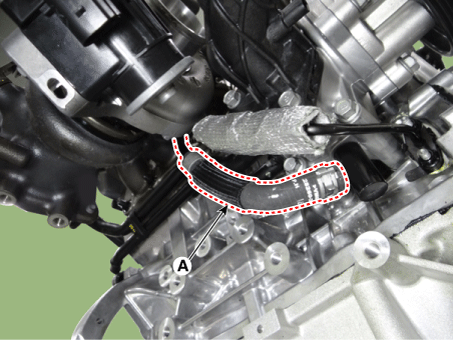
Remove the turbocharger oil drain tube (A).
Tightening torque: 7.8–11.8 N·m

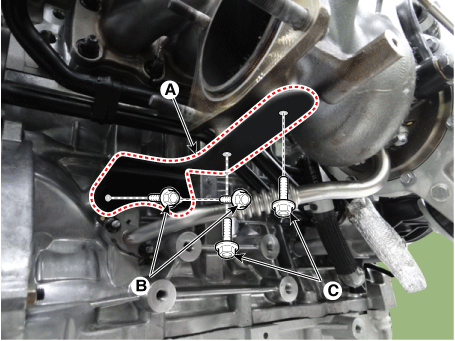
Remove the turbo manifold module support (A).
Tightening Torque
Bolts (B):
18,6–28 N·m
Bolts (C):
52,0–58 N·m
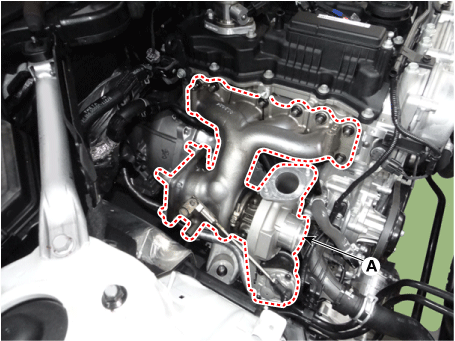
Remove the turbo manifold module (A).
Tightening Torque: 49.0–54 N·m
Inspection on Vehicle
Turbocharger Diagnostic Flow

If there are any problems related to the turbocharger, such as insufficient engine power, poor acceleration, abnormal engine noise, or oil leakage, inspect the turbocharger according to the following procedure.
Inspect the turbocharger and exhaust pipe assembly (or after-treatment).
Check that the gasket is installed.
Check that the mounting bolts (or nuts) are tightened correctly.
Check for gas leakage.
Check the parts for damage, such as cracks.
If gas leakage occurs because the gasket was not installed or the mounting bolts (or nuts) were tightened improperly, abnormal engine noise may occur.
If the cause of the problem is found, tighten the mounting bolts (or nuts) to the specified torque, or replace the gasket or damaged parts with new ones as necessary.
Check the exhaust manifold and cylinder head assembly.
Check that the gasket is installed.
Check that the mounting bolts (or nuts) are tightened correctly.
Check for gas leakage.
If gas leakage occurs because the gasket was not installed or the mounting bolts (or nuts) were tightened improperly, abnormal engine noise may occur.
If the cause of the problem is found, tighten the mounting bolts (or nuts) to the specified torque, or install a new gasket as necessary.
Check the turbocharger oil supply pipe and hose, and the oil drain pipe and hose.
Check that the gasket is installed.
Check that the mounting bolts are tightened correctly.
Check that the clamps are in place.
Check the oil lines and hoses for damage (kinks, crushing, tears or cracks).
If gas leakage occurs because the gasket was not installed or the mounting bolts were tightened improperly, oil leakage may occur.
If the oil supply pipe and hose are damaged, engine oil will not be supplied to the turbocharger in sufficient quantity, which may damage the turbocharger. If the oil drain pipe and hose are damaged or clogged, engine oil will drain unevenly, which may cause oil leakage from the turbocharger.
If the cause of the problem is found, tighten the mounting bolts (or nuts) to the specified torque, or replace the gasket or damaged parts with new ones as necessary.
Check for oil leakage between the center housing and the compressor housing.
Check that the mounting bolts are tightened correctly.
Check for oil leakage.
If the O-ring (gasket) between the center housing and the compressor housing is damaged, oil leakage may occur.
If oil leakage is found, replace the turbocharger with a new one.
Check the turbocharger actuator.
Electronic actuator: Check the actuator rod movement when the actuator is forcibly operated using KDS/GDS. (Refer to the Diagnostic Trouble Code manual)
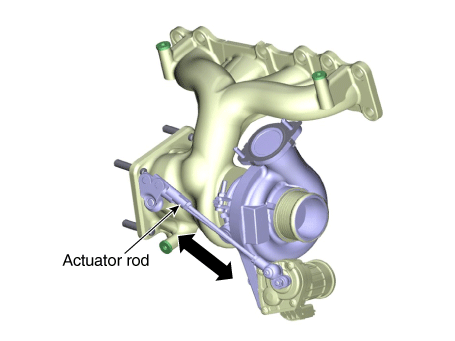
If the turbocharger actuator is damaged, it may cause loss of power and poor acceleration.
If the actuator rod does not move, replace the turbocharger with a new one.
Check the turbocharger compressor wheel.
Check that the compressor wheel is not damaged (bent or deformed).
Check that the compressor wheel rotates smoothly.
(Former)

If the compressor wheel is damaged, abnormal noise from the turbocharger and poor acceleration may occur.
If the compressor wheel is damaged or deformed, replace the turbocharger with a new one.
Check the turbocharger turbine wheel.
Check that the turbine wheel is not damaged.
Check that the turbine wheel rotates smoothly.
(Former)

If the turbine wheel is damaged, abnormal noise from the turbocharger and poor acceleration may occur.
If the turbine wheel is damaged or deformed, replace the turbocharger with a new one.
If no problem is found in the turbocharger, inspect the parts related to the turbocharger according to the following procedure.
Check the breather hose. (Refer to Group FL)
Check that the breather hose is not damaged (kinked or clogged).
Check whether the positive crankcase ventilation (PCV) valve is clogged.
If the breather hose is bent or clogged, internal pressure increases and engine oil is not supplied evenly to the turbocharger. This may damage the turbocharger and cause oil leakage.
If the cause of the problem is found, replace the breather hose or related parts with new ones.
Check the intake hose connected to the turbocharger.
Check whether the intake hose is damaged (bent, crushed, disconnected or torn).
If the cross-section of the intake hose decreases when the hose is bent or crushed, the air drawn into the turbocharger decreases and the pressure before the turbocharger drops. This may damage the turbocharger and cause oil leakage. If the intake hose is disconnected or torn, foreign material enters the turbocharger and causes damage.
If the intake hose is damaged, replace it with a new one.
Check the air cleaner.
Check the air cleaner filter for contamination.
Check the air cleaner filter for water intrusion.
Check the air cleaner cover for contamination.
Check whether the air cleaner filter is an genuine part.
If the air cleaner filter is excessively wet or dirty, or a non-genuine part is used, the air entering the turbocharger decreases and the pressure in front of the turbocharger drops. This may damage the turbocharger and cause oil leakage.
If the air cleaner filter is excessively wet or dirty, replace it with a new one.
Check the intercooler hoses and pipes.
Check that the charge air cooler hoses and pipes are connected correctly.
Check whether the intercooler hoses and pipes are damaged (bent, disconnected or torn).
Check the charge air cooler pipes for damage, such as cracks.
Check that the clamps are in place.
If the charge air cooler hoses and pipes are damaged or disconnected, oil may leak from the hoses and pipes, and the turbocharger may exceed the allowable speed, which may damage the turbocharger.
If the charge air cooler hoses and pipes are damaged, replace them with new ones.
Inspect the intercooler.
Check the intercooler hoses and tanks for damage (oil leakage or cracks).
If the charge air cooler is damaged, the turbocharger may exceed the allowable speed, which may damage the turbocharger.
If the charge air cooler is damaged, replace it with a new one.
Check the engine oil.
Check the engine oil level.
Check the engine oil for discoloration, water contamination, and degradation.
Check the engine oil grade.
If the engine oil level is low, the amount of engine oil supplied to the turbocharger decreases, and the bearings in the turbocharger may seize due to insufficient lubrication and cooling.
If the cause of the problem is found, add or replace the engine oil.
Check the engine oil pressure.
Engine oil pressure: check the oil pressure with a pressure gauge after removing the oil pressure sensor from the cylinder block.
Check the engine oil strainer in the oil pan if the engine oil level is low. Then check the nozzles for gas leakage if foreign material has accumulated on the oil strainer.
If the engine oil level is low, the amount of engine oil supplied to the turbocharger decreases, and the bearings in the turbocharger may seize due to insufficient lubrication and cooling.
If the cause of the problem is found, add or replace the engine oil. If foreign material has accumulated on the oil strainer, clean the oil strainer and replace the nozzle washer with a new one after checking the nozzles for gas leakage. Inspect engine parts related to lubrication, such as the oil pump, if necessary.
Check the injectors, sensors, etc. (Refer to Group FL).
Check that the injectors operate correctly.
Check that the sensors, such as the Mass Air Flow Sensor (MAFS), Intake Air Temperature Sensor (IATS), and Boost Pressure Sensor (BPS), operate properly.
If the injectors, sensors, etc. do not operate properly, it may cause a lack of engine power.
If the cause of the problem is found, replace the related parts with new ones.
Test yourself
A quick Kia Stinger CK quiz: every answer comes with an explanation and a link to the manual page.