Body Electrical System

Keyless Entry and Theft Alarm System

56steps
~336min
4/5difficulty
Done 0 of 56

Specifications

Specification

Item Specification
Operating Temperature 14–140°F (-10–60°C)
RF Modulation FSK
RF Frequency 433.92 MHz
LF Modulation REQUEST
LF Frequency 125 kHz
Function Lock
Door Unlock
Unlocking the Trunk
Remote Start

Components and Component Location

Component Location
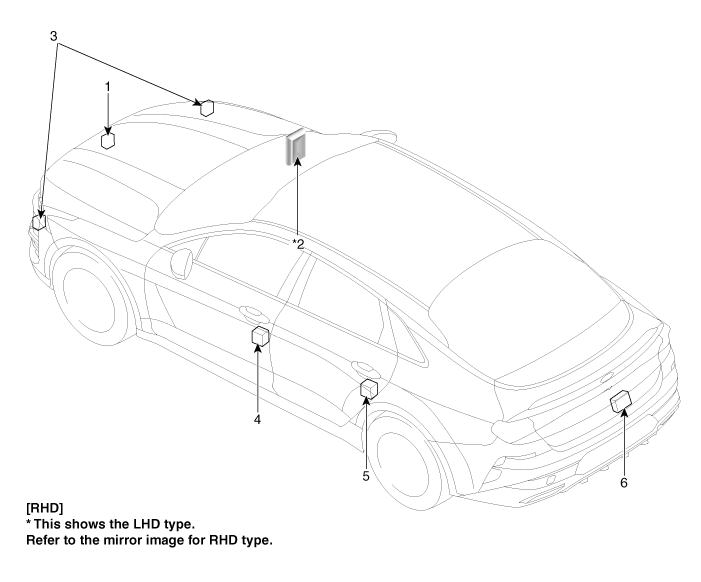
1. Hood Switch
2. Integrated Body Control Unit (IBU)
3. Horn
4. Front Door Actuator and Switch
5. Rear Door Actuator and Switch
6. Trunk Actuator and Switch

Description and Operation

Description

Anti-Theft Alarm Status [Alarm Status]

B/A Status Description
DISARM
  1. This is the state when the ARM mode is OFF.

  2. If all doors or the hood and tailgate are open, the alarm does not sound.

  3. The security indicator keeps flashing with the ignition off, and stays on in ACC ON.

PREPARATION
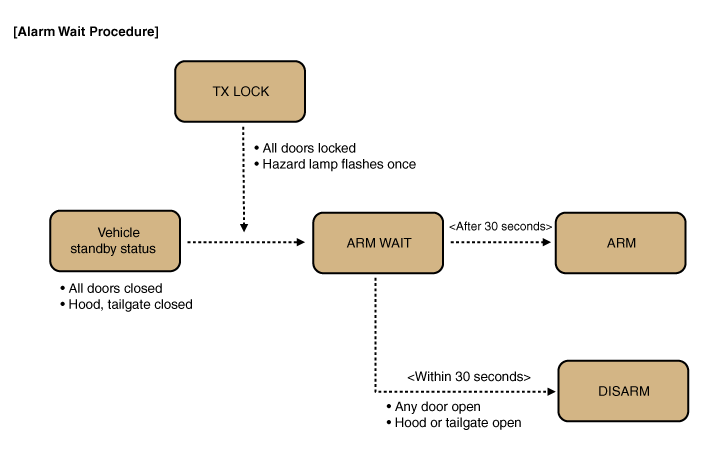
  1. If the IBU receives lock signals from the remote control or passive lock (smart key specification), or the driver's door lock with the key, under the "ARM WAIT" conditions, the IBU waits 30 seconds after outputting the "All Doors Locked" signal before entering the "ARM WAIT" mode.

  2. During the 30 seconds in the "ARM WAIT" mode, no alarm sounds and the "ARM" mode is canceled even if intrusion occurs.

  3. Under no circumstances can the "ARM" mode be entered directly without passing through the "ARM WAIT" mode.

  4. The security indicator remains on during the 30-second "ARM WAIT" mode.


※ Note: For a vehicle equipped with the Smart Key System, the same process applies to the passive door lock function.

B/A Status Description
AUTO LOCK TIMER 1
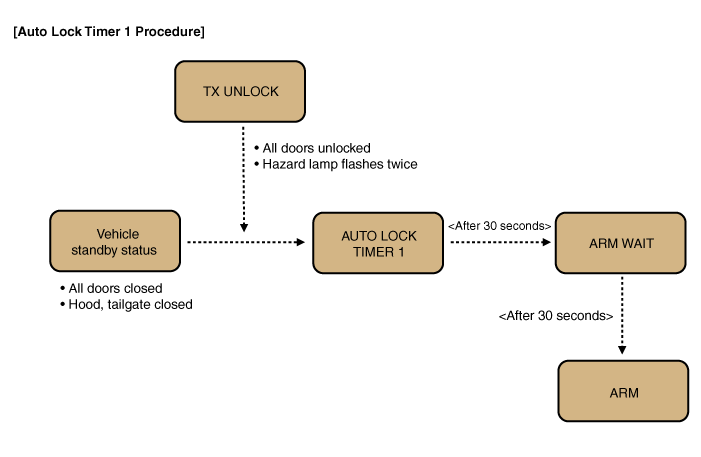
  1. This is a similar RELOCK (automatic relock) function after 30 seconds.

  2. If the UNLOCK button on the remote control is pressed while the "ARM WAIT" conditions are met, or in the "ARM" mode all doors are unlocked, then the timer is set to 30 seconds and starts operating.

  3. After 30 seconds, the IBU automatically cancels the all-door lock signal and enters the "ARM WAIT" mode.

  4. After the AUTO LOCK TIMER 1 (30 seconds) expires, the IBU automatically enters the "ARM" mode via the "ARM WAIT" mode (30 seconds).

  5. If the driver accidentally presses the UNLOCK button, this security function allows the vehicle to enter the "ARM" mode after 60 seconds.

  6. The security indicator continues to flash during the AUTO LOCK TIMER 1 process.


※ Note: For a vehicle equipped with the Smart Key System, the same process applies to the passive door lock function.

B/A Status Description
AUTO LOCK TIMER 2
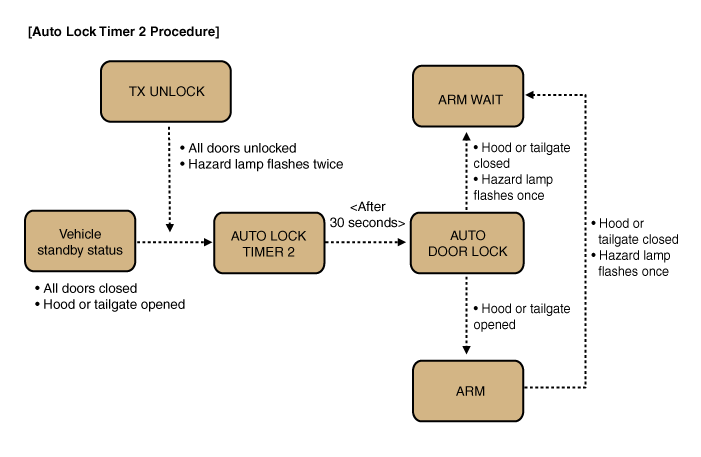
  1. This has the same purpose as AUTO LOCK TIMER 1, but the operating conditions are different.

  2. This function works if the UNLOCK button on the remote control is pressed when all doors are closed, except the hood or trunk. After 30 seconds, the vehicle automatically enters the door lock mode.

  3. However, after 30 seconds, it is not possible to transition to the "ARM WAIT" mode because the hood or tailgate is open (the "PRE ARM" mode is maintained).

  4. As soon as the hood or tailgate is closed, the vehicle automatically transitions to the "ARM" mode via "ARM WAIT".

  5. During AUTO LOCK TIMER 2, the security indicator keeps flashing.


※ Note: For a vehicle equipped with the Smart Key System, the same process applies to the passive door lock function.

B/A Status Description
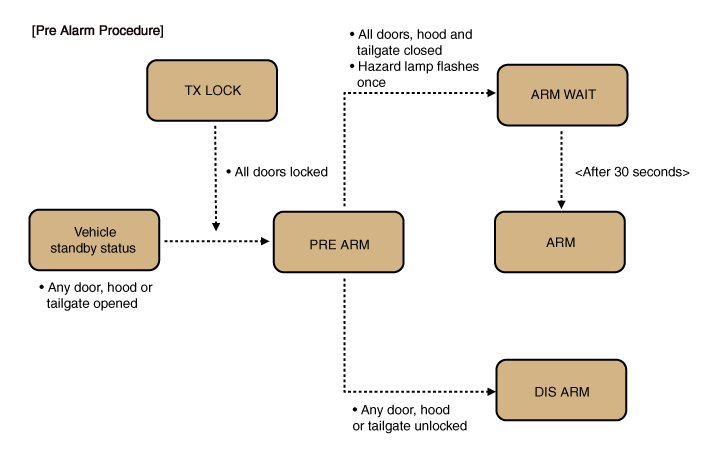
PREARM 1-1. This is the state immediately before entering the "ARM" mode after AUTO LOCK. Timer 2 is completed and all doors are closed.
1-2. If the driver closes the hood or the tailgate, the hazard lamps flash once and then the vehicle automatically enters the "ARM" mode through the "ARM WAIT" mode.
2-1. If the LOCK button is pressed when at least one of the doors, hood, or tailgate is open, the "PRE ARM" mode is activated.
2-2. Since the all-doors-lock signal is output but the "ARM WAIT" conditions are not met, the vehicle remains in standby and enters the "ARM" mode through the "ARM WAIT" mode as soon as the open door is closed.
2-3. If intrusion is detected in the PRE ARM mode, the alarm is activated and the vehicle enters the DISARM mode.
2-4. The security indicator continues to flash in the PRE ARM mode.

B/A Status Description
RE ARM
  1. In the "RE ARM" state, if an intrusion into the vehicle is detected, the alarm flashes and the horn is activated again, and the state changes to the ALARM mode.

  2. The security alarm state changes to the RE ARM mode after the 27-second timer has expired.

  3. The security indicator continues to flash.


B/A Status Description
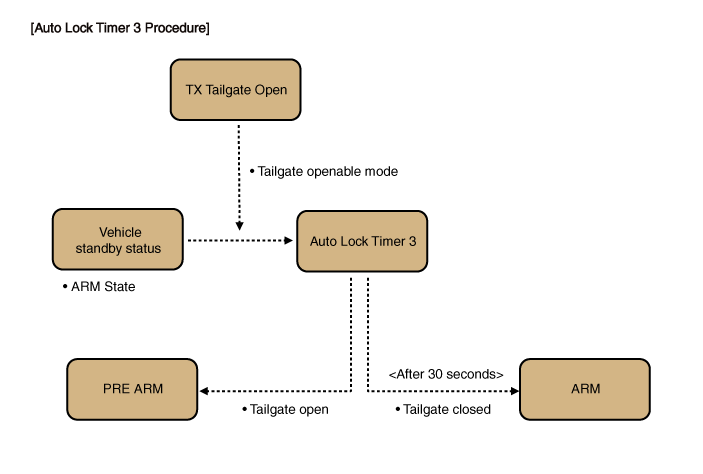
AUTO LOCK TIMER 3
  1. The B/A state changes to "AUTOLOCKTIMER3" when the TX-Tailgate command is operated.

  2. The B/A condition changes "AUTOLOCKTIMER3" to "ARMWAIT" when the "30 sec." timer expires, when all doors are locked and closed.

  3. The B/A state changes "AUTOLOCKTIMER3" to "DISARM" when any door is opened.

  4. In the "AUTOLOCKTIMER3" state, the "30 sec." timer is running. If this timer expires, the state transitions to "PREARM" with the tailgate open.

  5. In this state, the security indicator continues to flash.


B/A Status Description
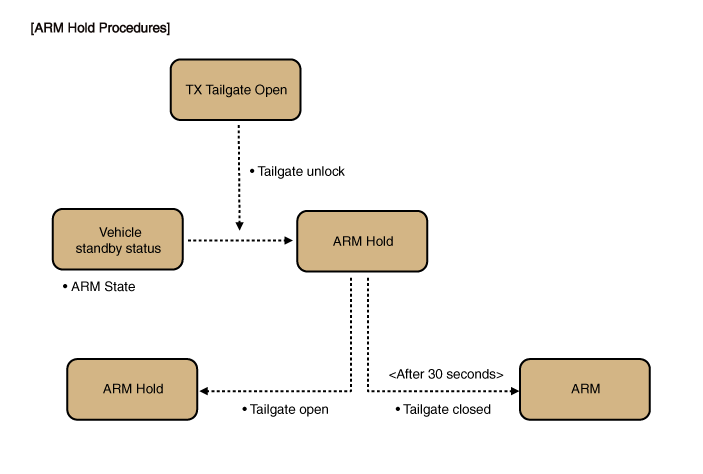
ARM HOLD
(Alarm Hold: Tailgate)
※ Non-PTL variant
  1. The "ARM HOLD" mode is similar to the existing trunk alarm hold mode.

  2. If the tailgate is opened using the remote control (including smart key) in ARM mode, the vehicle enters ARM HOLD mode, which holds the alarm only while the tailgate is open.

  3. While the tailgate is closed, ARM HOLD mode remains continuously.

  4. When the open tailgate is closed, the timer starts for 30 seconds. During these 30 seconds in ARM mode, the alarm does not turn off when the trunk is opened.

  5. After 30 seconds have passed since the tailgate was closed, the vehicle immediately enters ARM mode.

  6. During ARM, the ARM mode of the doors and hood is maintained. Therefore, if an intrusion is detected through any door or the hood, the security alarm is triggered. It does not turn off normally.

  7. The security indicator continues to flash in the ARM HOLD mode.


Note 1: ARM HOLD is a mode that delays activation of ARM mode for the tailgate only. In ARM HOLD mode, ARM mode applies to the doors and hood.

Note 2: When the ignition key is used to open the tailgate, the ARM HOLD function operates in the same way, provided that the "Key Alarm" function is enabled. If it is disabled, key-based ARM HOLD is disabled and the use of the key to open the trunk is detected as theft and the alarm is activated.
B/A Status Description
RE ARM
(ARM mode re-enabled)
  1. If the doors, hood, and tailgate are closed after the ALARM mode is canceled, this means the ARM mode is activated again.

  2. During this time, the drive state (door locking/unlocking) is ignored and the ARM mode is maintained until a remote control signal is received (normal ARM mode).

  3. In this mode, the security indicator continues to flash.

RESET
  1. When the battery is disconnected in the ALARM or RE ARM mode, the RESET mode is activated.

  2. When the battery is connected after a RESET, the anti-theft alarm operation resumes (for 27 seconds it cycles 3 times ON (10 seconds) / OFF).


B/A Status Description
KEY ON 30-second deactivation
(non-smart key version)
  1. For a vehicle without the smart key option, if it waits 30 seconds with the ignition on in ALARM mode, the vehicle enters the DISARM mode.

  2. Even before 30 seconds have passed, if the engine starts (generator "L" terminal voltage high: sent from the cluster module over CAN data), the anti-theft alarm is deactivated immediately. (Without ignition lock: The immobilizer system is applied as the primary function, so the ignition system is normally controlled by the registered immobilizer key during alarm.)

    ※ For a vehicle with an electronic key, the alarm is deactivated immediately after smart key authentication.

When ARM mode is activated, opening the tailgate and central unlocking of the doors are not permitted.
  1. From the moment the vehicle enters the ARM WAIT mode by activating the all doors lock with the remote control or smart key, the central door unlock switch, the trunk internal unlock switch, or the DDM & ADM (driver's and passenger's seat power window switches) are disabled. (Theft prevention)

    ※ This function applies equally to the ARM WAIT / ARM / ALARM / RE ARM modes.


Repair Procedures

Inspection

Front Door Lock Module

  1. Disconnect the negative battery cable.

  2. Remove the front door module.

    (Refer to Body - "Front Door Module")

  3. Disconnect the connector from the door lock actuator.
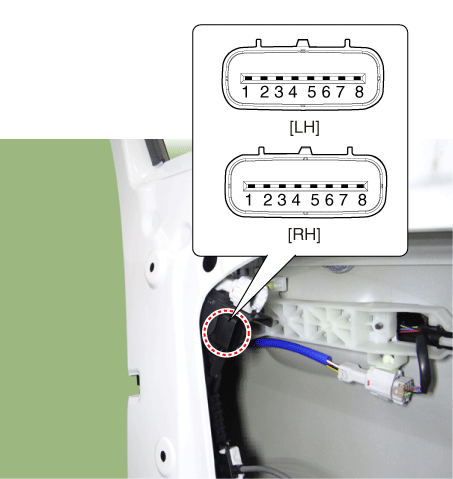
    Pin Function
    Left Right
    1 - M2
    2 - M3
    3 COM -
    4 Lock/Unlock Switch ADJUSTER
    5 ADJUSTER Lock/Unlock Switch
    6 - COM
    7 M3 -
    8 M2 -
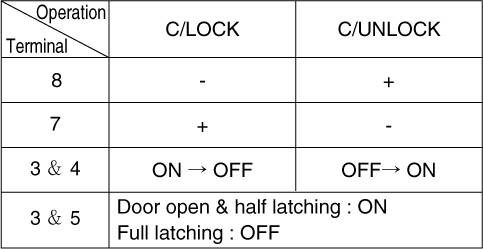
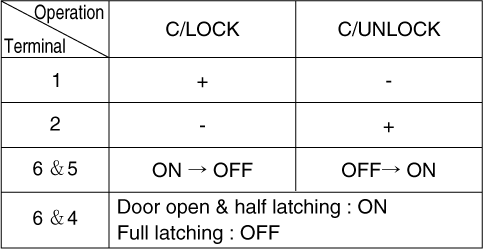
  4. Check the actuator operation by connecting power and ground as shown below. To avoid damaging the actuator, apply battery voltage only momentarily.
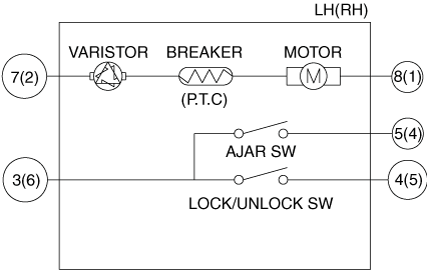
    [LH]
    [RH]
Rear Door Lock Module

  1. Disconnect the negative battery cable.

  2. Remove the rear door module.

    (Refer to Body - "Rear Door Module")

  3. Disconnect the connector from the door lock actuator.
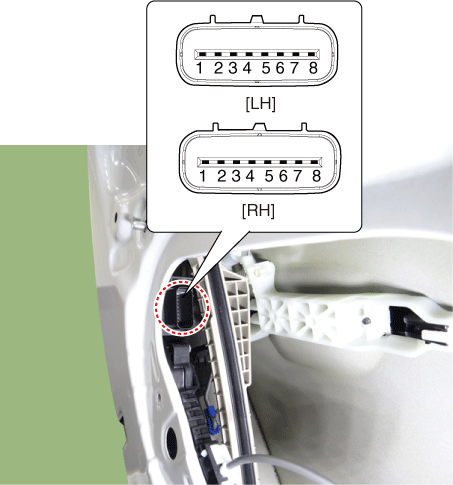
    Pin Function
    Left Right
    Central Locking Power Child Lock Central Locking Power Child Lock
    1 - Child Lock Power Switch M1 M2
    2 COM COM M2 M3
    3 Lock/Unlock Switch Lock/Unlock Switch - M1
    4 ADJUSTER ADJUSTER - M4
    5 - M4 ADJUSTER ADJUSTER
    6 - M1 Lock/Unlock Switch Lock/Unlock Switch
    7 M2 M3 COM COM
    8 M1 M2 - Child Lock Power Switch
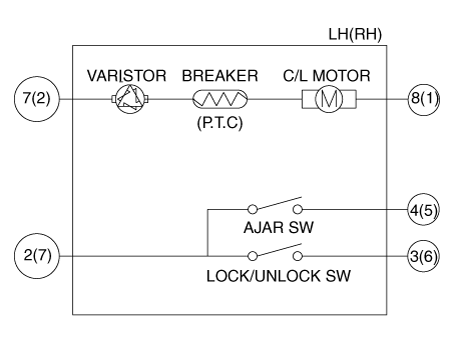
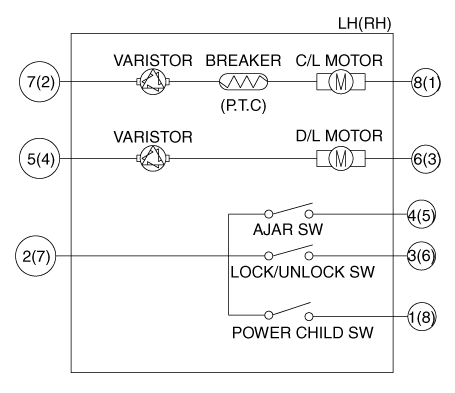
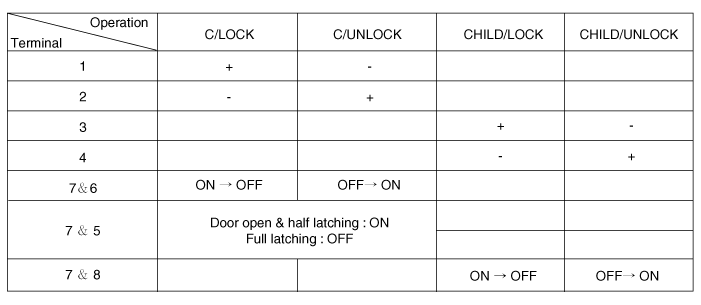
  4. Check the actuator operation by connecting power and ground as shown below. To avoid damaging the actuator, apply battery voltage only momentarily.

    [Central Locking]
    [Child Safety Lock]
    [LH]
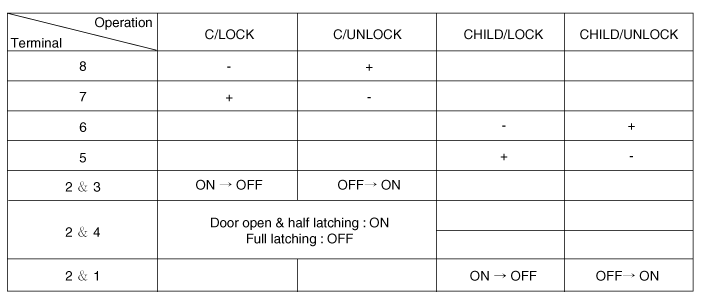
    [RH]
Trunk Lock Module

  1. Disconnect the negative battery cable.

  2. Remove the trunk lid trim.

    (Refer to Body - "Trunk Lid Trim")

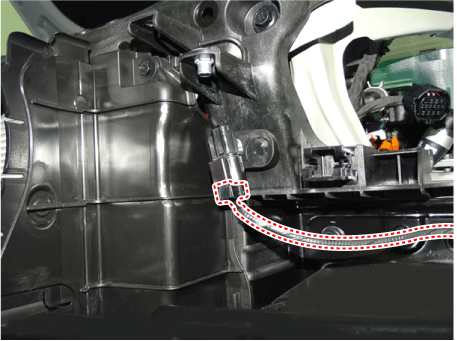
  3. Disconnect the connector of the trunk lock module.
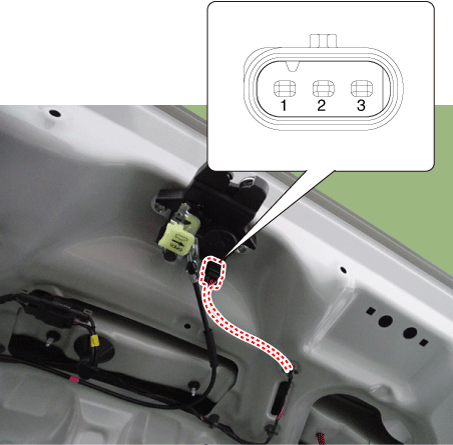
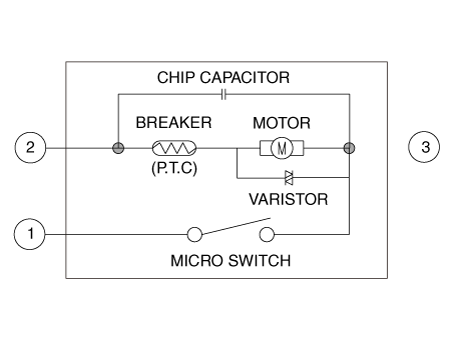
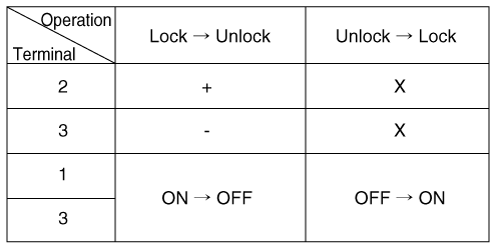
  4. Check the actuator operation by connecting power and ground as shown below. To avoid damaging the actuator, apply battery voltage only momentarily.
Hood Lock Module

  1. Disconnect the negative battery cable.

  2. Remove the left headlamp.

    (Refer to Lighting System - "Headlamps")

  3. Disconnect the hood switch connector.

  4. Check the circuit between the terminals for continuity.
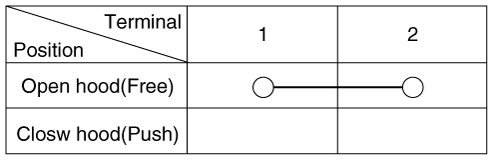
Removal

Front Door Lock Module

  1. Remove the front door latch.

    (Refer to Body - "Front Door Latch")

Rear Door Lock Module

  1. Remove the liftgate latch.

    (Refer to Body - "Rear Door Latch")

Trunk Lock Module

  1. Remove the trunk lid lock.

    (Refer to Body - "Trunk Lid Latch")

Hood Lock Module

  1. Remove the hood latch.

    (Refer to Body - "Hood Latch")

Installation

  1. Install in the reverse order of removal.

Test yourself

A quick Kia Optima DL3 quiz: every answer comes with an explanation and a link to the manual page.