Smart Key Unit
Circuit Diagrams
Connector and Terminal Function
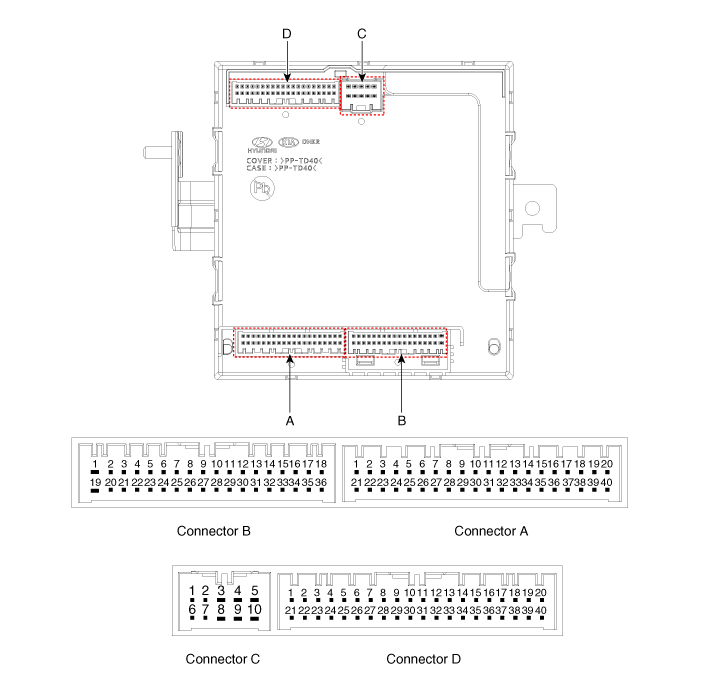
| Pin | Function | |||
| Connector A | Connector B | Connector C | Connector D | |
| 1 | - | Front Washer Switch (Output) | - | Driver Outside Handle Switch (Input) |
| 2 | Rear Seat Belt Indicator_Left (Output) | - | ESCL Enable (Output) | Outside Handle Auxiliary Switch (Input) |
| 3 | - | - | ESCL - (Output) | - |
| 4 | - | - | - | - |
| 5 | External Buzzer (Output) | - | - | RPM (Input) |
| 6 | Rear Seat Belt Indicator_Center (Output) | Wiper Park Switch (Input) | - | SSB Symbol Illumination (+) (Output) |
| 7 | Puddle Lamp (Output) | - | ESCL Unlock Switch (Input) | ACC Relay (Output) |
| 8 | Rear Seat Belt Indicator_Right (Output) | Brake Switch (Input) | - | IGN1 Relay (Output) |
| 9 | - | - | - | IGN2 Relay (Output) |
| 10 | High Beam Headlamp Switch (Input) | Front Wiper Volume Switch (Input) | ESCL + (Output) | Starter Relay (Output) |
| 11 | - | - | Outside Handle Auxiliary Antenna (+) (Output) | |
| 12 | - | LIN4 (Security System ECU) | Interior Antenna 2 (+) (Output) | |
| 13 | Reverse Switch (Input) | PAS Option (Input) | Trunk Interior Antenna 3 (+) (Output) | |
| 14 | - | - | Interior Antenna 1 (+) (Output) | |
| 15 | FRAS Power (Output) | B-CAN (Low) | Bumper Antenna (+) (Output) | |
| 16 | PAS/RPAS Power (Output) | B-CAN (High) | Driver Outside Handle Antenna (+) (Output) | |
| 17 | PAS/RPAS Power (Input) | - | - | |
| 18 | - | Ground (Power) | - | |
| 19 | - | - | - | |
| 20 | Ground (ECU) | Immobilizer Power (Output) | - | |
| 21 | - | Immobilizer Ground (Output) | SSB Switch 1 (Input) | |
| 22 | K-Line_Immobilizer | - | SSB Switch 2 (Input) | |
| 23 | - | PAS/RPAS Switch Indicator (Output) | Clutch IGN Interlock Switch | |
| 24 | - | Front Wiper Switch (Input) | ESCL COM | |
| 25 | Sunroof Status (Input) | - | Wheel Speed Sensor (Input) | |
| 26 | PAS/RPAS Switch (Input) | Multifunction Switch Ground (Input) | - | |
| 27 | ATM Solenoid (Output) | Wiper Power Relay (Output) | - | |
| 28 | LIN3 (Rain Sensor) | Auto Light Sensor Ground (Output) | - | |
| 29 | LIN2 (ROA) | Auto Light Sensor Signal (Input) | - | |
| 30 | LIN1 (PDW-F or PDW-R) | Auto Light Sensor Power (Output) | Start Feedback (Input) | |
| 31 | Door Unlock Signal (for IFU) EMS (Output) | - | Outside Handle Auxiliary Antenna (-) (Output) | |
| 32 | Light Switch (Input) | Front Wiper High Relay (Output) | Interior Antenna 2 (-) (Output) | |
| 33 | Fog Switch (Input) | Front Wiper Low Relay (Output) | Trunk Interior Antenna 3 (-) (Output) | |
| 34 | IGN2 (Input) | Front Wiper Low Reserve Switch (Input) | Interior Antenna 1 (-) (Output) | |
| 35 | IGN1 (Input) | P-CAN (Low) | Bumper Antenna (-) (Output) | |
| 36 | ACC (Input) | P-CAN (High) | Driver Outside Handle Antenna (-) (Output) | |
| 37 | Battery + (ECU) | - | ||
| 38 | Battery + (Power) | - | ||
| 39 | - | - | ||
| 40 | Heated Injector (Output) | "P" Position (Input) | ||
Repair Procedures
Removal
Integrated Body Control Unit (BCM)
Remove the IBU.
(Refer to Body Electrical System - "Integrated Body Control Unit")
Outside Door Handle
Remove the front door outside handle.
(Refer to Body - "Front Door Outside Handle")
Trunk Opener Switch
Remove the center rear combination lamp.
(Refer to Lighting System - "Rear Combination Light")
Disconnect the trunk opener switch connector (A).
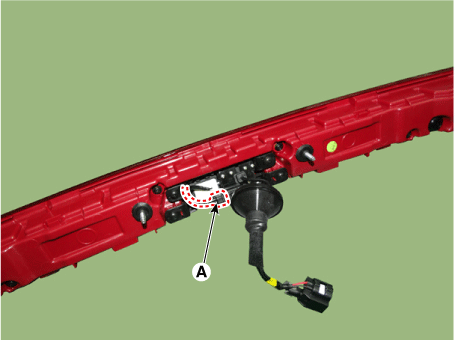
Remove the rear view camera (A) by loosening the mounting screws.
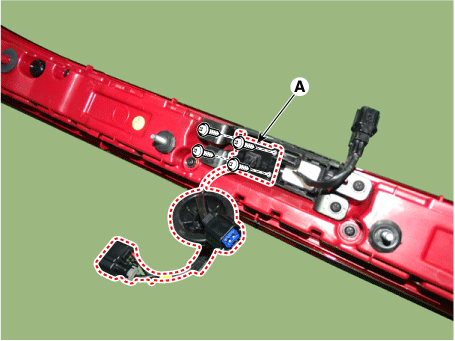
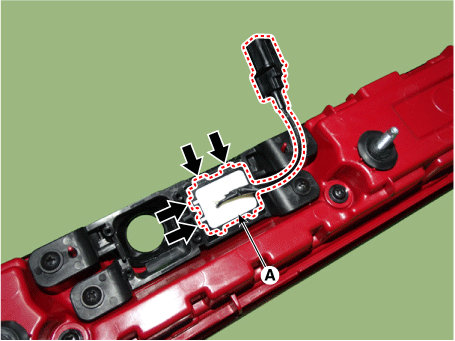
Remove the trunk opener switch (A) by pressing the hooks.
Buzzer
Disconnect the negative battery cable.
Remove the front bumper assembly.
(Refer to Body - "Front Bumper Assembly")
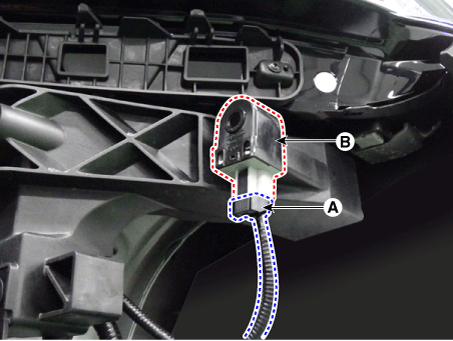
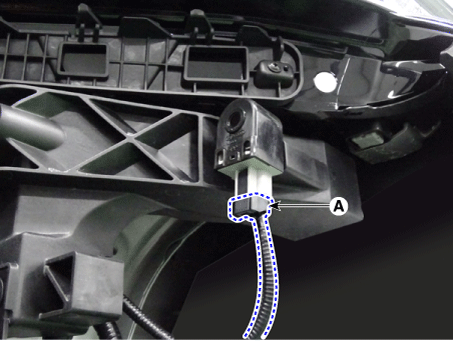
Remove the buzzer (B) after disconnecting the connector (A).
Installation
Install in the reverse order of removal.
Inspection
Integrated Body Control Unit (BCM)
Check the IBU using the KDS.
(Refer to Smart Key System - Smart Key Diagnosis)
Outside Door Handle
Remove the front door outside handle.
(Refer to Body - "Front Door Outside Handle")
Disconnect the front door outside handle connector and check the continuity between terminals No. 3 and No. 6.
Pin Function 1 Power (Antenna) 2 Battery (+) (Flashlight) 3 Switch) 4 Ground (Antenna) 5 Ground (Pocket Lamp) 6 Ground (Switch)
Trunk Opener Switch
Disconnect the negative battery cable.
Remove the trunk lid trim.
(Refer to Body - "Trunk Lid Trim")
Check the circuit between the terminals for continuity.
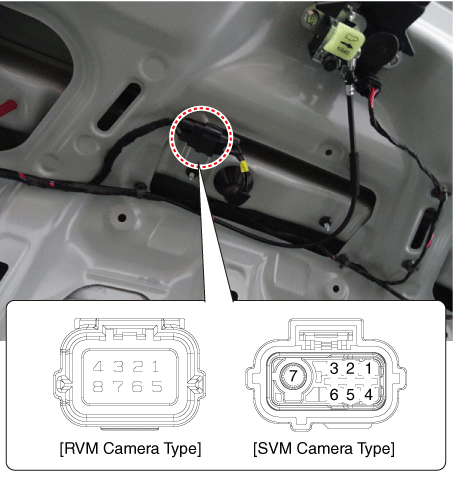
[RVM Camera Type]
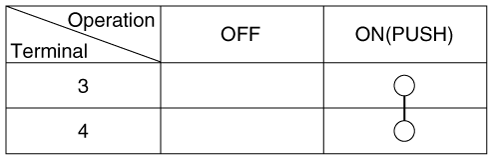
[SVM Camera Type]
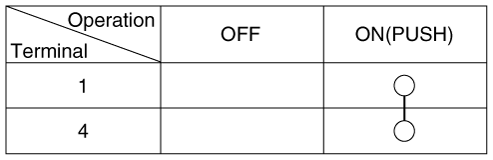
Buzzer
Disconnect the negative battery cable.
Remove the front bumper assembly.
(Refer to Body - "Front Bumper Assembly")
Disconnect the buzzer connector (A).
Check the buzzer by connecting battery power to terminal 2 and ground to terminal 1.
Test yourself
A quick Kia Optima DL3 quiz: every answer comes with an explanation and a link to the manual page.