Charging System
Components and Component Location
Components
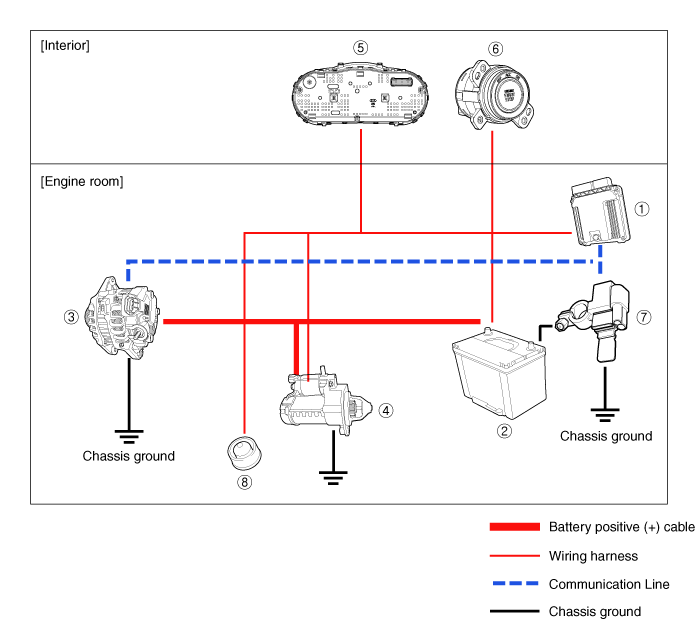
① ECU
② Battery
③ Generator
④ Starter
⑤ Instrument cluster
⑥ Ignition switch or Start/Stop button
⑦ Battery sensor
⑧ Hood switch
Description and Operation
Description
The charging system consists of the battery, the generator with built-in regulator, the charge warning light, and wiring.
The AC generator has eight built-in diodes, each of which converts alternating current to direct current.
Therefore, direct current appears at the generator "B" terminal.
In addition, the charging voltage of this generator is controlled by the battery voltage sensing system.
The generator is controlled by the battery voltage sensing system. The main components of the generator are the rotor, stator, rectifier, capacitor, brushes, bearings, and pulley with poly-V belt. The brush holder contains a built-in electronic voltage regulator.
Generator Control System
The generator control system adjusts the charging voltage setpoint to improve fuel economy, manage generator load under various operating conditions, keep the battery charged, and protect the battery from overcharging. The engine control module controls generator voltage by duty cycle (charge control, discharge control, normal control) depending on battery condition and vehicle operating conditions.
The system performs discharge control during vehicle acceleration. The vehicle reduces generator load and draws electrical power from the battery.
The system performs charge control during vehicle deceleration. The vehicle increases generator load and charges the battery.
Circuit Diagrams
Wiring Diagram
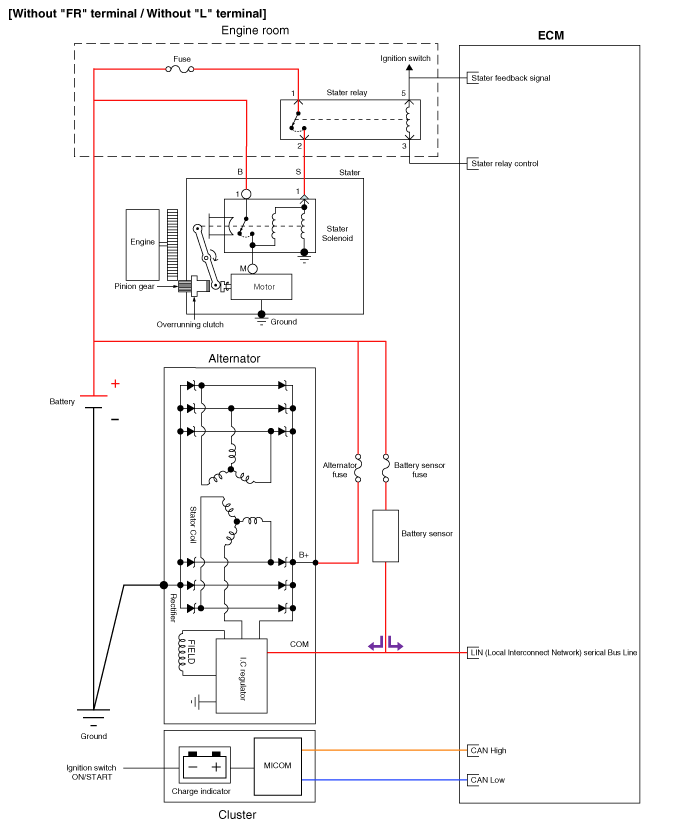
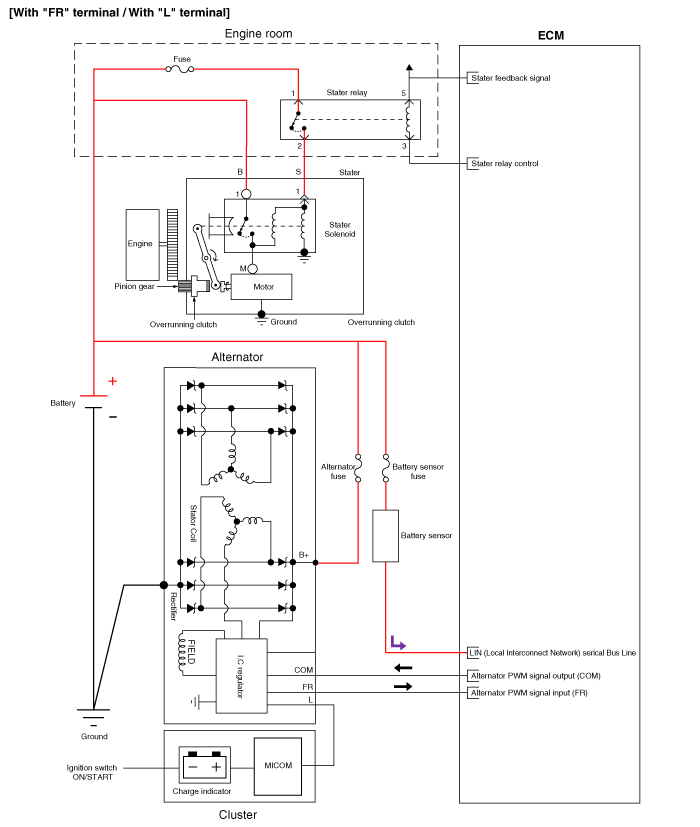
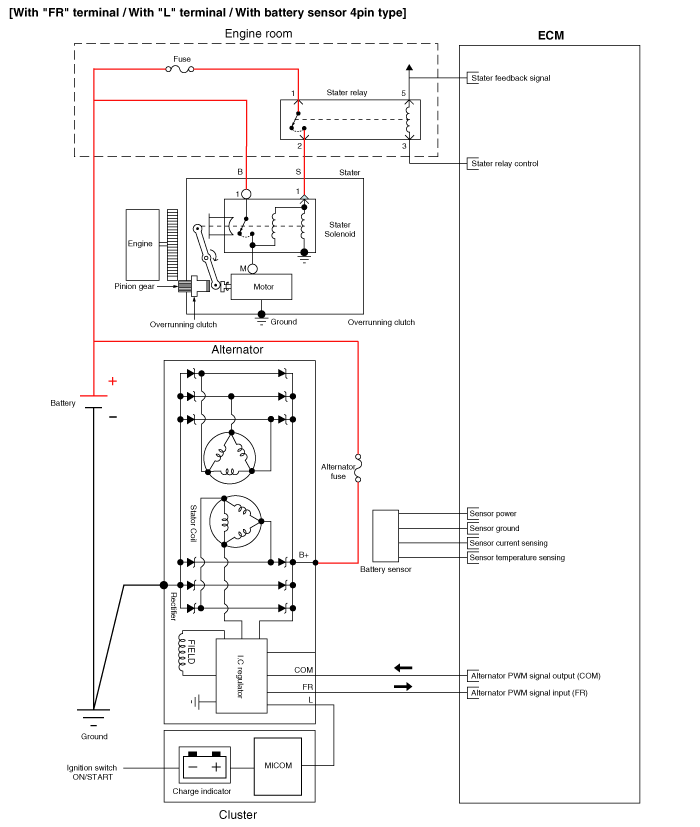
Repair Procedures
Inspection
Inspection Item
Battery Performance Check
Battery Voltage Check
Charging Voltage Check
General Inspection
Terminal Tightness Check
Engine / Transmission Condition Check
Wiring Harness Ground Condition Check
Specified Electrical Value Check
Vehicle Parasitic Current Check
Battery Capacity Check
Battery Efficiency Inspection
Battery Voltage Check
After driving the vehicle, if 20 minutes have not elapsed after engine shutdown, turn the ignition on and operate electrical loads (headlights, blower motor, rear window defroster, etc.) for 60 seconds to remove the surface charge.
Turn the ignition OFF and turn off the electrical systems.
Measure the battery voltage between the battery negative (-) and positive (+) terminals.
Standard voltage: approximately 12.5–12.9 V [20 °C]
If the voltage is below the specified value, charge the battery.
General Inspection
Make sure the battery terminals are not loose or corroded.
(Refer to Charging System - "Battery")
Check the fuses for continuity.
Generator fuse
Check the generator fuse (A) for continuity.
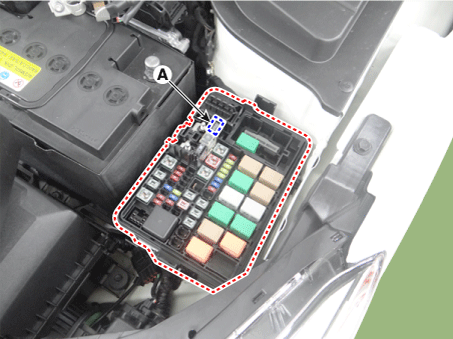
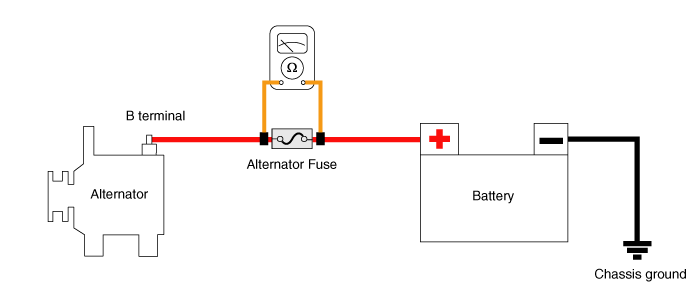
Measure the voltage as shown in the illustration below.
Standard value: Approximately 0 V
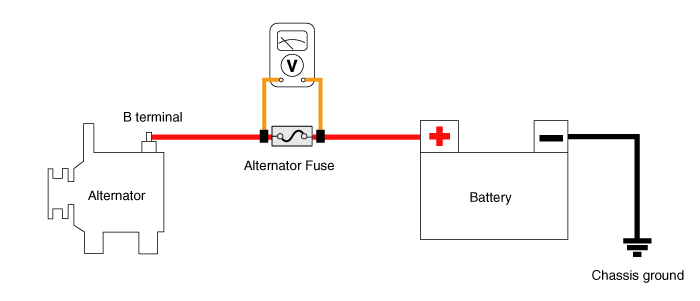
If the alternator fuse is blown, replace it according to the procedure below:
a. Turn the ignition off and disconnect the negative (-) battery terminal.
b. Remove the nuts securing the battery positive (+) cable (A).
b. Replace the regular alternator fuse or the battery cable.
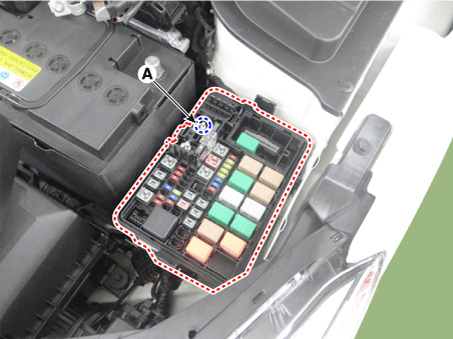
d. Install in the reverse order of removal.
Inspect the drive belt
Visually inspect the belt for excessive wear, frayed cords, etc.
If any defect is found, replace the drive belt.
Measure and adjust the drive belt tension.
(Refer to Engine Mechanical System - "Drive Belt")
Visually inspect the alternator wiring and listen for abnormal noise.
Make sure the wiring is in good condition.
Make sure there is no abnormal noise from the generator while the engine is running.
Check the charge warning lamp circuit.
Warm up the engine, then turn it off.
Turn off all accessories.
Turn the ignition switch ON. Make sure the charge warning light illuminates.
Start the engine. Check that the warning light illuminates.
If the light does not turn off as specified, repair the charge warning light circuit.
Terminal Tightening Inspection
Location of check component
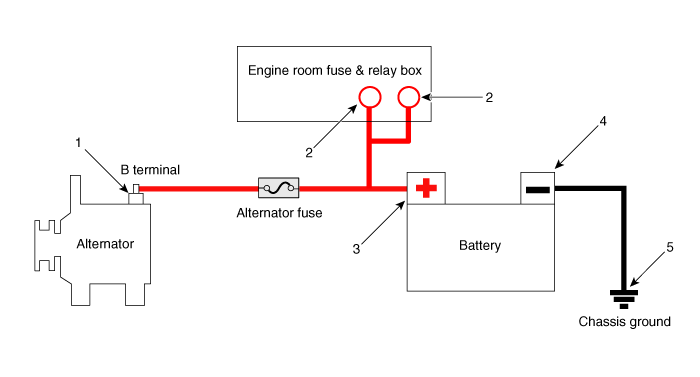
| 1. Alternator B+ terminal 2. Engine compartment fuse and relay block positive (+) terminal 3. Battery positive (+) terminal |
4. Battery negative (-) terminal 5. Body ground |
Engine/Transaxle Inspection
Wire Harness Ground Inspection
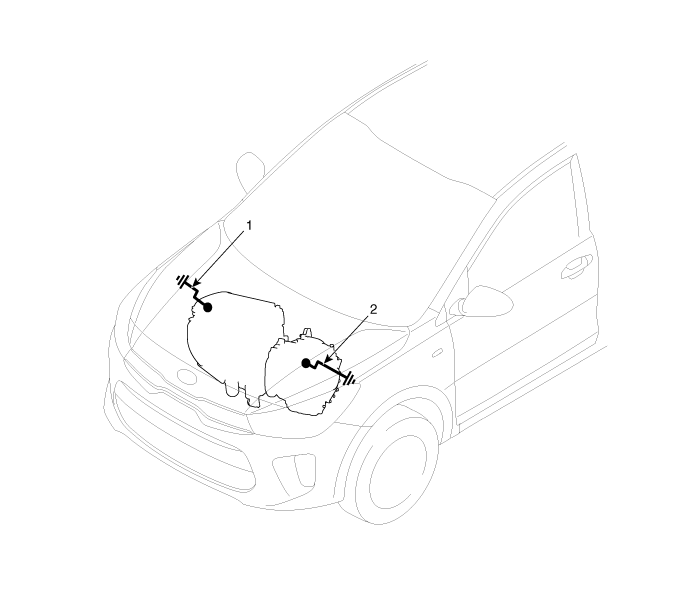
| 1. Engine ground (engine ↔ body) 2. Transmission ground (transmission ↔ body) |
Electrical Specifications Value Check (Using Voltmeter and Ammeter)
Generator Output Wire Voltage Drop Test
This test determines whether the wiring between the generator "B" terminal and the battery (+) terminal is in good condition using the voltage drop method.
Preparation
a. Turn the ignition switch to the OFF position.
b. Disconnect the output wire from the generator "B" terminal. Connect the (+) lead of the ammeter to the generator "B" terminal and the (-) lead of the ammeter to the output wire. Connect the (+) lead of the voltmeter to the generator "B" terminal and the (-) lead of the voltmeter to the battery (+) terminal.
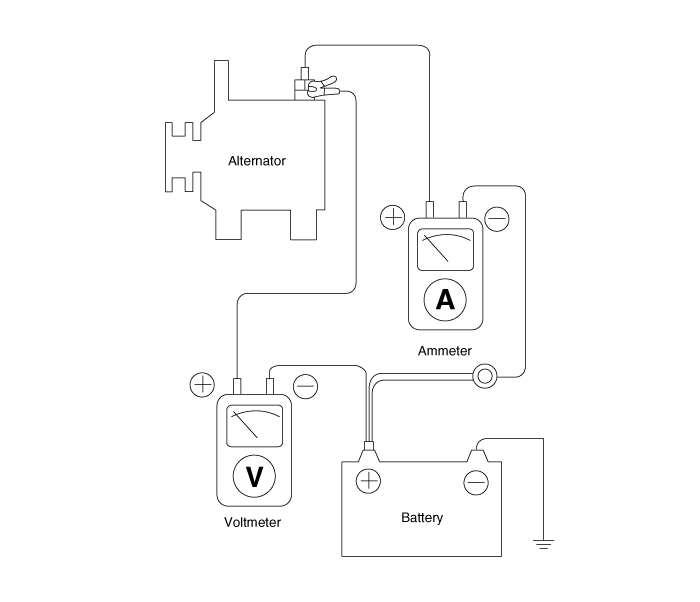
Test
a. Start the engine.
b. Turn on the headlights and blower motor, adjust the engine speed until the ammeter shows 20 A, and read the voltmeter.
Result
a. The voltmeter may show the standard value.
Standard value: 0.2 V max.
b. If the voltmeter reading is higher than expected (more than 0.2 V maximum), suspect a wiring fault. In this case, inspect the wiring from the generator "B" terminal to the battery (+) terminal. Check for loose connections, discoloration due to harness overheating, etc. Repair them before retesting.
b. After the inspection is completed, set the engine speed to idle. Turn off the headlights, blower motor and ignition switch.
Output Current Test
This test determines whether the generator produces output current equivalent to normal output.
Preparation
a. Before testing, check the following items and correct as necessary.
Check the battery installed in the vehicle to make sure it is in good condition. Refer to "Battery" for battery inspection.
The battery used for the output current test must be partially discharged.
If the battery is fully charged, the test may not be performed correctly due to insufficient load.
Check the generator drive belt tension. Refer to "Inspect Drive Belt" for belt tension inspection.
b. Turn the ignition off.
b. Disconnect the battery ground cable.
d. Disconnect the generator output wire from generator terminal "B".
e. Connect a DC ammeter (0 to 150 A) in series between the generator "B" terminal and the disconnected output wire. Be sure to connect the (-) lead of the ammeter to the disconnected output wire.
f. Connect a voltmeter (0 to 20 V) between the "B" terminal and ground. Connect the (+) lead to the alternator "B" terminal and the (-) lead to ground.
g. Connect the battery ground cable.
h. Leave the engine hood open.
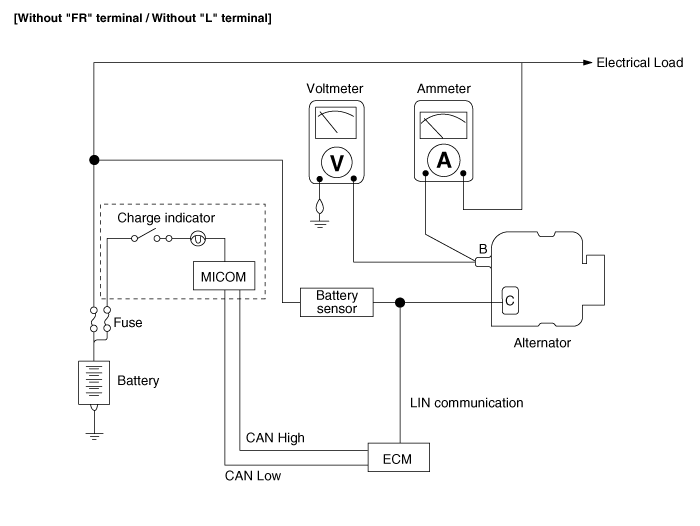
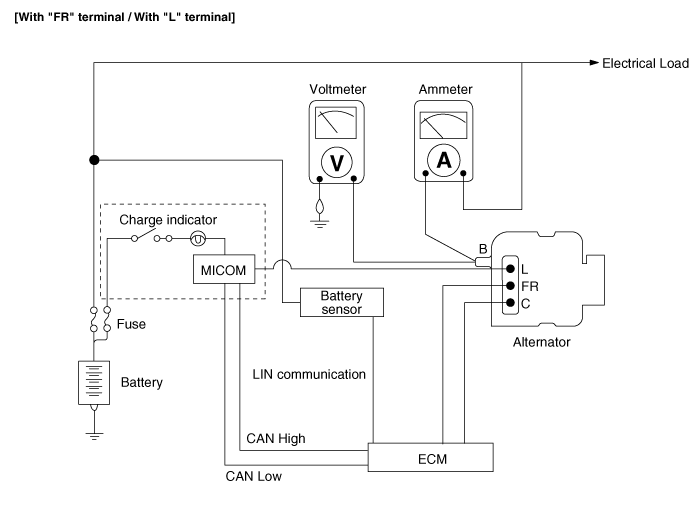
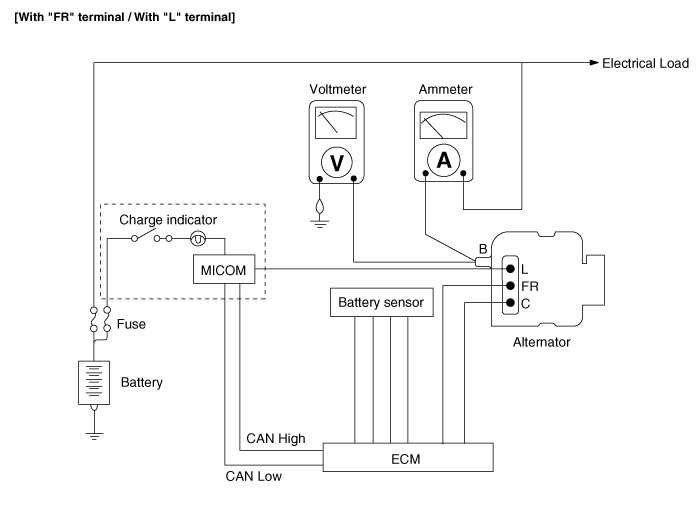
Test
a. Make sure the voltmeter shows the same value as the battery voltage. If the voltmeter shows 0 V, there is an open circuit in the wire between generator terminal "B" and the battery (+) terminal, or a poor ground connection.
b. Start the engine and turn on the headlights.
b. Turn the headlights to high beam and the blower fan switch to HIGH. Quickly increase engine speed to 2500 rpm and read the maximum output current value on the ammeter.
Result
a. The ammeter reading must be above the specified limit. If it is below, even though the generator output wire is in good condition, remove the generator from the vehicle and inspect it.
Limit value: 60% of the voltage standard
b. After completing the output current test, reduce the engine speed to idle and turn the ignition switch OFF.
b. Disconnect the negative (-) battery terminal.
d. Remove the ammeter, voltmeter and engine tachometer.
e. Connect the generator output wire to the generator B terminal.
f. Connect the negative (-) battery terminal.
Regulated Voltage Test
The purpose of this test is to check that the electronic voltage regulator correctly regulates voltage.
Preparation
a. Before testing, check the following items and correct if necessary.
Make sure the battery installed in the vehicle is fully charged. Refer to "Battery" for battery inspection.
Check the generator drive belt tension. Refer to "Inspect Drive Belt" for belt tension inspection.
b. Turn the ignition switch to the OFF position.
b. Disconnect the negative (-) battery terminal.
d. Connect a digital voltmeter between the generator "B" terminal and ground. Connect the voltmeter (+) lead to the generator "B" terminal. Connect the voltmeter (-) lead to a good ground or to the battery (-) terminal.
e. Disconnect the generator output wire from generator terminal "B".
f. Connect a DC ammeter (0 to 150 A) in series between the "B" terminal and the disconnected output wire. Connect the ammeter (-) lead to the disconnected output wire.
g. Connect the negative (-) battery terminal.
Test
a. Turn the ignition switch ON and check that the voltmeter shows the following value.
Voltage: Battery voltage
If it indicates 0 V, there is an open circuit in the wire between the generator "B" terminal and the battery, or in the battery (-) terminal connection.
b. Start the engine. Turn off all lights and accessories.
b. Run the engine at approximately 2500 rpm and read the voltmeter when the generator output current drops to 10 A or less.
Result
a. If the voltmeter reading does not meet the standard value, the voltage regulator or the generator is faulty.
Regulated voltage: 11.7–15.3 V
b. If the voltmeter reading does not meet the standard value, the voltage regulator or the generator is faulty.
b. Disconnect the negative (-) battery terminal.
d. Remove the voltmeter and ammeter.
e. Connect the generator output wire to the generator B terminal.
f. Connect the negative (-) battery terminal.
Electrical Specifications Value Check (Using Voltmeter and Clamp-Type Ammeter)
Generator Output Wire Voltage Drop Test
This test determines whether the wiring between the generator "B" terminal and the battery (+) terminal is in good condition using the voltage drop method.
Preparation
a. Turn the ignition switch to the OFF position.
b. Install a clamp-type ammeter around the positive (+) wire between the battery and the generator B terminal.
b. Connect the voltmeter (+) lead to the generator "B" terminal and the voltmeter (-) lead to the battery (+) terminal.
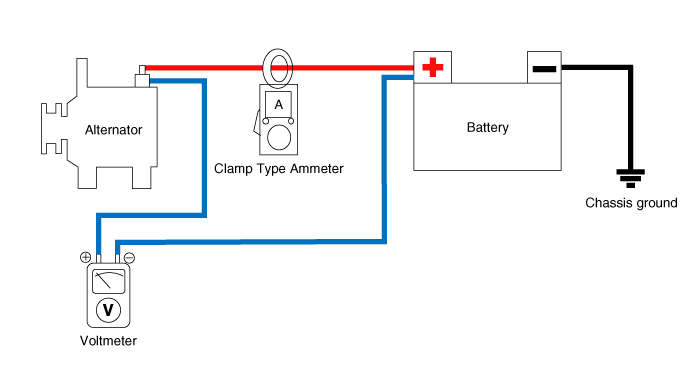
Test
a. Start the engine.
b. Turn on the headlights and blower motor, adjust the engine speed until the ammeter shows 20 A, and read the voltmeter.
Result
a. The voltmeter may show the standard value.
Standard value: 0.2 V max.
b. If the voltmeter reading is higher than expected (more than 0.2 V maximum), suspect a wiring fault. In this case, inspect the wiring from the generator "B" terminal to the battery (+) terminal. Check for loose connections, discoloration due to harness overheating, etc. Repair them before retesting.
b. After the inspection is completed, set the engine speed to idle. Turn off the headlights, blower motor and ignition switch.
Output Current Test
This test determines whether the generator produces output current equivalent to normal output.
Preparation
a. Before testing, check the following items and correct as necessary.
Check the battery installed in the vehicle to make sure it is in good condition. Refer to "Battery" for battery inspection.
The battery used for the output current test must be partially discharged.
If the battery is fully charged, the test may not be performed correctly due to insufficient load.
Check the generator drive belt tension. Refer to "Inspect Drive Belt" for belt tension inspection.
b. Turn the ignition off.
b. Disconnect the negative (-) battery terminal.
d. Install a clamp-type ammeter around the positive (+) wire between the battery and the generator B terminal.
e. Connect a DC ammeter (0 to 150 A) in series between the generator "B" terminal and the disconnected output wire. Be sure to connect the (-) lead of the ammeter to the disconnected output wire.
f. Connect a voltmeter (0 to 20 V) between the "B" terminal and ground. Connect the (+) lead to the alternator "B" terminal and the (-) lead to ground.
g. Connect the negative (-) battery terminal.
h. Leave the engine hood open.
Test
a. Make sure the voltmeter shows the same value as the battery voltage. If the voltmeter shows 0 V, there is an open circuit in the wire between generator terminal "B" and the battery (+) terminal, or a poor ground connection.
b. Start the engine and turn on the headlights.
b. Turn the headlights to high beam and the blower fan switch to HIGH. Quickly increase engine speed to 2500 rpm and read the maximum output current value on the ammeter.
Result
a. The ammeter reading must be above the specified limit. If it is below, even though the generator output wire is in good condition, remove the generator from the vehicle and inspect it.
Limit value: 60% of the voltage standard
b. After completing the output current test, reduce the engine speed to idle and turn the ignition switch OFF.
b. Disconnect the negative (-) battery terminal.
d. Remove the ammeter, voltmeter and engine tachometer.
e. Connect the generator output wire to the generator B terminal.
f. Connect the negative (-) battery terminal.
Regulated Voltage Test
The purpose of this test is to check that the electronic voltage regulator correctly regulates voltage.
Preparation
a. Before testing, check the following items and correct if necessary.
Make sure the battery installed in the vehicle is fully charged. Refer to "Battery" for battery inspection.
Check the generator drive belt tension. Refer to "Inspect Drive Belt" for belt tension inspection.
b. Turn the ignition switch to the OFF position.
b. Disconnect the negative (-) battery terminal.
d. Connect a digital voltmeter between the generator "B" terminal and ground. Connect the voltmeter (+) lead to the generator "B" terminal. Connect the voltmeter (-) lead to a good ground or to the battery (-) terminal.
e. Disconnect the generator output wire from generator terminal "B".
f. Connect a DC ammeter (0 to 150 A) in series between the "B" terminal and the disconnected output wire. Connect the (-) lead of the ammeter to the disconnected output wire.
g. Connect the negative (-) battery terminal.
Test
a. Turn the ignition switch ON and check that the voltmeter shows the following value.
Voltage: Battery voltage
If it indicates 0 V, there is an open circuit in the wire between the generator "B" terminal and the battery, or in the battery (-) terminal connection.
b. Start the engine. Turn off all lights and accessories.
b. Run the engine at approximately 2500 rpm and read the voltmeter when the generator output current drops to 10 A or less.
Result
a. If the voltmeter reading does not meet the standard value, the voltage regulator or the generator is faulty.
Regulated voltage: 11.7–15.3 V
b. If the voltmeter reading does not meet the standard value, the voltage regulator or the generator is faulty.
b. Disconnect the negative (-) battery terminal.
d. Remove the voltmeter and ammeter.
e. Connect the generator output wire to the generator B terminal.
f. Connect the negative (-) battery terminal.
Vehicle Parasitic Current Inspection
[Using an Ammeter]
Turn off all electrical devices, then turn the ignition OFF.
Close all doors except the hood, then lock all doors.
Disconnect the hood switch connector.
Close the liftgate.
Close the doors or remove the door switches.
Wait several minutes until the vehicle's electrical systems enter sleep mode.
Connect the ammeter in series between the negative (-) battery terminal and the ground cable, then slowly disconnect the clamp from the negative (-) battery terminal.
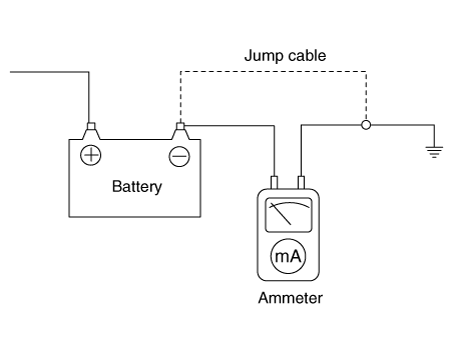
Read the ammeter current value.
If the parasitic current exceeds the limit value, search for the abnormal circuit by removing the fuses one at a time and checking the parasitic current.
Install only the fuse suspected of parasitic current and search for the faulty unit by disconnecting the components connected to the circuit one at a time until the parasitic draw drops below the limit value.
Limit value (after 10–20 min.): below 50 mA.
[Using a Clamp-Type Ammeter]
Turn off all electrical devices, then turn the ignition OFF.
Close all doors except the hood, then lock all doors.
Disconnect the hood switch connector.
Close the liftgate.
Close the doors or remove the door switches.
Wait several minutes until the vehicle's electrical systems enter sleep mode.
Install the clamp-type ammeter on the negative (-) battery terminal.
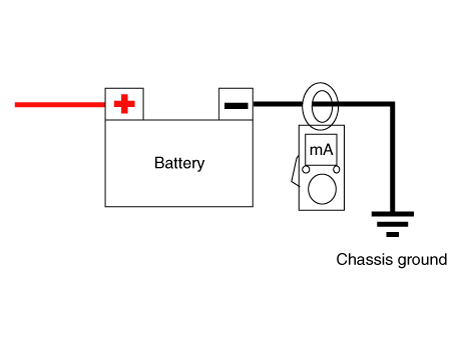
Read the ammeter current value.
If the parasitic current exceeds the limit value, search for the abnormal circuit by removing the fuses one at a time and checking the parasitic current.
Install only the fuse suspected of parasitic current and search for the faulty unit by disconnecting the components connected to the circuit one at a time until the parasitic draw drops below the limit value.
Limit value (after 10–20 min.): below 50 mA.
Troubleshooting
Troubleshooting
| Symptom | Suspect area | Remedy |
| Charge warning indicator does not illuminate with ignition switch "ON" and engine stopped. |
Blown fuse | Check fuses |
| Bulb burnt out | Replace bulb | |
| Loose wiring connection | Tighten loose connection | |
| Electronic voltage regulator | If indicator goes off, replace voltage regulator. | |
| Charge warning indicator does not go off with engine running. (Battery requires frequent recharging) |
Drive belt loose or worn | Adjust belt tension or replace belt |
| Battery cable loose, corroded or worn | Inspect cable connection, repair or replace cable | |
| Electronic voltage regulator or alternator | If indicator goes off, replace voltage regulator or alternator. | |
| Wiring | Repair or replace wiring | |
| Overcharging | Electronic voltage regulator | If indicator goes off, replace voltage regulator. |
| Voltage sensor wire | Repair or replace wiring | |
| Dismiss | Drive belt loose or worn | Adjust belt tension or replace belt |
| Wiring connection loose or short circuit | Check wiring connection, repair or replace wiring | |
| Electronic voltage regulator or alternator | If indicator goes off, replace voltage regulator or alternator. | |
| Poor ground | Inspect ground or repair | |
| Worn battery | Replace battery |
Test yourself
A quick Kia Rio YB quiz: every answer comes with an explanation and a link to the manual page.