Diesel engines
Removing and installing the timing chain
In this manual: Diesel engines
28steps
~168min
4/5difficulty
Done 0 of 28
REQUIRED TOOLS
- [1]. Guide tool (ref. 604 589 01 40 00) (Fig.20).
- [2]. Link opening tool (ref. 602 589 02 33 00) (Fig.21).
- [3]. Ejector pin (ref. 602 589 05 63 00) (Fig.21).
- [4]. Installation link set (ref. 640 589 02 63 00) (Fig.22).
- [5]. Riveting tool (ref. 602 589 00 39 00) (Fig.25).
- [6]. Guide (ref. 640 589 01 63 00) (Fig.25).
- [7]. Pressure piece (ref. 602 589 03 63 00) (Fig.25).
- [8]. Camshaft locking pin (ref. 111 589 03 15 00) (Fig.29).
ACCESS TO THE CHAIN
- Remove:
- the front right wheel,
- the engine undertray,
- the right wheel arch liner,
- the air filter housing,
- the pre-catalytic converter,
- the turbocharger (see relevant operation),
- the injection rail (see relevant operation),
- the injectors (see relevant operation).
- Remove the cylinder head cover in the reverse of the order shown (Fig.18).
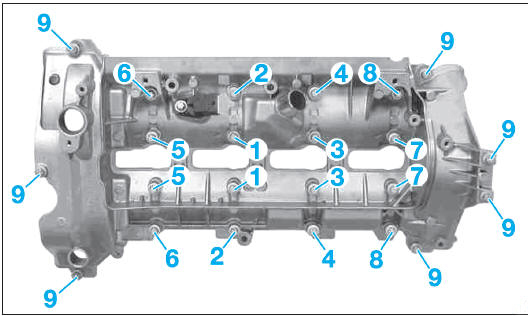
Fig. 18
 Cover the openings left exposed by removing the cylinder head cover with a clean cloth, especially the timing case opening and the injector openings.
CHAIN REPLACEMENT
- Turn the crankshaft to bring cylinder no. 1 to TDC. The mark (1) on the crankshaft pulley must line up with the one on the lower timing case (2) (Fig.19).
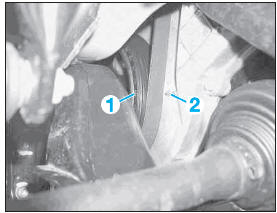
Fig. 19
- Make sure the marks (3) are in the correct position.
These marks on the camshaft sprockets must be facing each other (Fig.20).
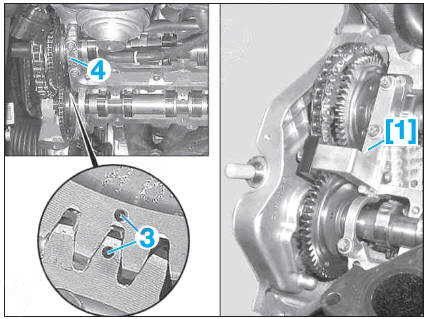
Fig. 20
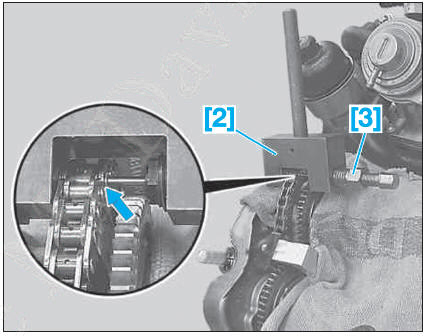
Fig. 21
 If the camshaft timing marks do not line up, turn the crankshaft 2 additional full turns in the normal direction of engine rotation.
- Remove the camshaft bearing cap (4) and fit tool [1].
- Secure the timing chain to the camshaft sprocket with a plastic cable tie.
- Assemble the link opening tool [2] with the ejector pin [3] (Fig.21).
- Fit the link opening tool [2] onto the timing chain.
Make sure the ejector pin rests on a pin of a chain link (arrow).- Screw in the ejector pin [3] and open the chain.
 Take care not to drop the pin of the open link into the timing case.
If the pin has fallen into the timing case, the case must be removed to recover it, otherwise there is a risk of serious engine damage.
- Remove tools [2] and [3].
- Connect the new timing chain (5) to the old timing chain (6) using the installation link set [4] (Fig.22).
The oil holes (arrow) must be visible after installation (facing outward).- Remove the plastic cable tie.
- Slowly turn the crankshaft in the direction of engine rotation until the ends of the new chain can be joined.
Pull firmly on the end of the old timing chain so that the new chain engages without skipping teeth (arrows) (Fig.23).Make sure the chain does not skip teeth on the camshaft sprocket.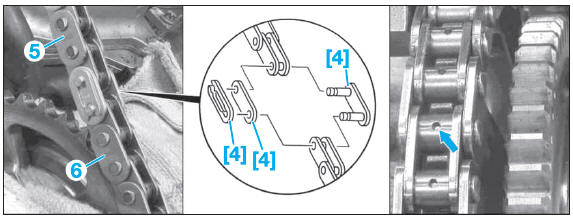
Fig. 22
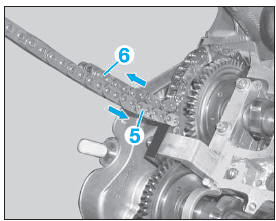
Fig. 23
- Secure the new timing chain to the camshaft sprocket with a plastic cable tie.
- Remove the installation tool [4].
 The installation aid tool [4] must be removed before starting the engine.
- Join the ends of the chain (5) with a new riveting link (7) (Fig.24).
 Insert the riveting link (7) from the rear.
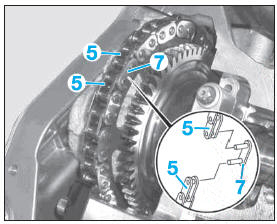
Fig. 24
- Fit the riveting heads [6] (marked F6) and [7] (marked D8) to the riveting tool [5] (Fig.25).
- Place the new outer link plate (8) on tool [7].
- Position the riveting tool [5] so that the support (arrow) rests on the rollers of the riveting link (Fig.26).
- Screw in the pressure spindle of tool [5] until strong resistance is felt.
During this step, make sure the pins of the riveting link properly enter the holes of the outer link plate.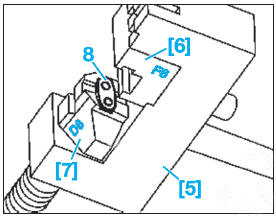
Fig. 25
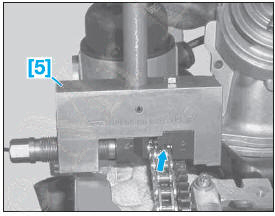
Fig. 26
Remove the riveting tool [5].
Turn tool [7] over on the riveting tool [5] (Fig.27).
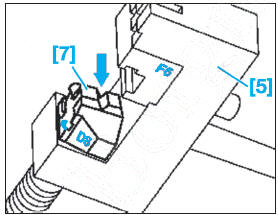
Fig. 27
- Position the riveting tool [5] precisely above the centre of the pin (arrow) (Fig.28).
Rivet each pin of the link separately.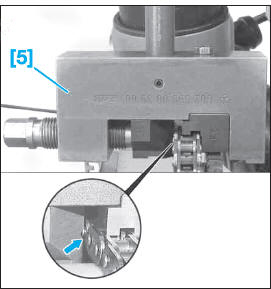
Fig. 28
- Unscrew the pressure spindle and remove tool [5].
- Check the riveting and repeat the operation if necessary.
- Remove tool [1].
- Refit the camshaft bearing cap (4).
- Check the timing setting (Fig.29).
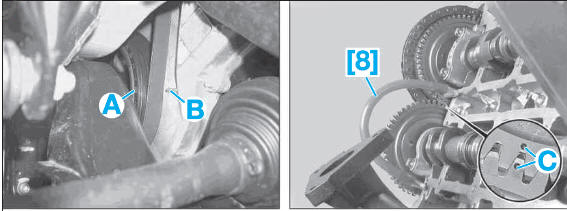
Fig. 29
- TDC mark on the pulley
- Mark on the lower timing case
- Camshaft alignment mark
[8]. Camshaft locking pin.
- Refit the removed components.
- Start the engine and check that it runs correctly.
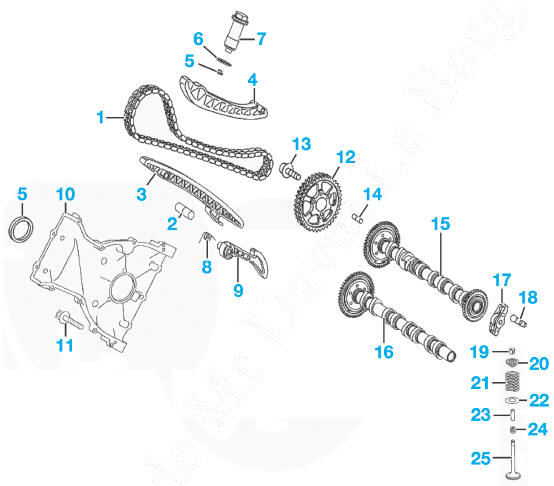
Timing/valves/camshafts
- Timing chain
- Pin
- Guide shoe
- Tensioner shoe
- Sealing ring
- Washer
- Tensioner: 8 daN.m
- Spring
- Locating bracket
- Timing cover
- Bolt (M6): 1 daN.m
- Timing chain drive sprocket
- Bolt: 1.8 daN.m
- Dowel pin
- Intake camshaft
- Exhaust camshaft
- Rocker arm
- Hydraulic lash adjuster
- Half key
- Upper spring seat
- Valve spring
- Lower spring seat
- Valve guide
- Valve stem seal
- Valve.
Test yourself
A quick Mercedes-Benz B-Class quiz: every answer comes with an explanation and a link to the manual page.
Was this page helpful?