Back Door Assembly
Removal and Installation
REMOVAL
Remove roof rear garnish. Refer toRemoval and Installation .
Disconnect LH side harness connectors  , and then disengage harness fixing clips.
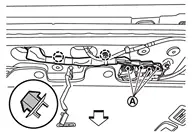
 |
: Clip |
| : vehicle front |
Remove harness grommet from body panel, and then pull out back door harness from vehicle body.
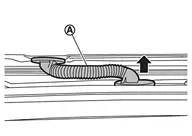
Disconnect rear washer tube B. Refer to Removal and Installation.
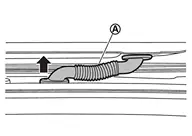
Remove washer tube grommet from body panel, and then pull out back door harness from vehicle body.
Support back door assembly with the proper material to prevent it from falling.
Remove spindle unit from spindle unit bracket lower (with automatic back door models). Refer to Removal and Installation.
Remove back door stay from back door stay lower bracket (without automatic back door models). Refer to Removal and Installation.
Remove back door hinge mounting nuts, and then remove back door assembly.
INSTALLATION
Note the following items, and then install in the reverse order of removal.
Inspection
Open and close the back door. Check that back door hinge rotation portion moves smoothly.
Check back door hinge rotating part for lubrication condition. Apply body grease if necessary.

 |
: Body grease |
Adjustment
FITTING ADJUSTMENT
Fitting Adjustment Standard Dimension

 |
Roof panel |  |
Rear combination lamp |  |
Rear bumper fascia |
 |
Back door panel |  |
Back door striker |  |
TORX bolt |
 |
Back door bumper rubber upper |  |
Back door hinge | ||
 |
: Always replace after every disassembly. | ||||
 |
: N·m (kg-m, ft-lb) | ||||
|
: Body grease | ||||
Unit: mm [in]
| Portion | Standard | Tolerance | Difference (LH/RH, MAX) | Parallel | ||||
|---|---|---|---|---|---|---|---|---|
| Roof panel – Back door panel | – |
H | Clearance | 6.5 [0.256] |
+ 1.5 [+ 0.059] - 1.0 [- 0.039] |
< 3.0 [0.118] | < 2.0 [0.079] | |
| I | Surface height | 1.0 [0.039] |
± 1.0 [± 0.039] |
— | < 1.5 [0.059] | |||
| Back door panel – Rear combination lamp |  – |
J | Clearance | 5.0 [0.197] |
± 2.1 [± 0.083] |
< 2.9 [0.114] | < 2.0 [0.079] | |
| K | Surface height | 1.0 - 4.4 [0.039 - 0.173] |
± 2.0 [± 0.079] |
< 2.0 [0.079] | < 2.0 [0.079] | |||
| Back door panel – Rear bumper fascia |  – |
L | Clearance | 5.0 - 5.3 [0.197 - 0.209] |
± 2.0 [± 0.079] |
< 3.0 [0.118] | < 2.0 [0.079] | |
| M | Surface height | 0.5 - 0.7 [0.020 - 0.028] |
± 2.0 [± 0.079] |
< 2.0 [0.079] | < 2.0 [0.079] | |||
 – |
N | Clearance | 6.0 [0.236] |
± 2.0 [± 0.079] |
— | < 2.1 [0.083] | ||
| O | Surface height | 0.5 - 1.0 [0.020 - 0.039] |
± 2.0 [± 0.079] |
— | < 2.0 [0.079] | |||
Check the clearance and the surface height between back door and each part by seeing and touching.
If the clearance and the surface height are out of specification, adjust them according to the procedures shown below.
Fitting Adjustment Procedure
Remove back door striker. Refer to Removal and Installation.
Loosen back door hinge mounting bolts of back door side.
Temporarily install back door striker.
Adjust the clearance and surface height of back door according to the fitting standard dimension by moving back door assembly and adjusting back door bumper rubber upper.
Tighten rear door hinge mounting nuts to the specified torque.
Position back door lock assembly and engage back door striker. Check back door lock assembly and back door striker for looseness.
Tighten back door striker mounting TORX bolts to the specified torque.
Install luggage rear plate. Refer to Removal and Installation.
BACK DOOR STRIKER ADJUSTMENT
Adjust back door striker so that it becomes parallel with back door lock insertion direction.