P1572 ASCD brake switch
DTC Logic
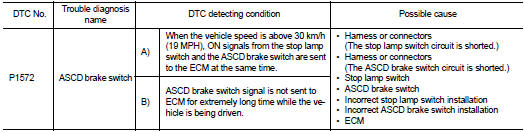
DTC DETECTION LOGIC
NOTE:• If DTC P1572 is displayed with DTC P0605, first perform the trouble diagnosis for DTC P0605. Refer to EC-683, "DTC Logic".
• This self-diagnosis has the one trip detection logic. When malfunction A is detected, DTC is not stored in ECM memory. And in that case, 1st trip DTC and 1st trip freeze frame data are displayed.
1st trip DTC is erased when ignition switch is turned OFF. And even when malfunction A is detected in two consecutive trips, DTC is not stored in ECM memory.
DTC CONFIRMATION PROCEDURE
1.PRECONDITIONINGIf DTC Confirmation Procedure has been previously conducted, always turn ignition switch OFF and wait at least 10 seconds before conducting the next page.
NOTE: The procedure for malfunction B is not described. It takes an extremely long time to complete the procedure for malfunction B. By performing the procedure for malfunction A, the condition that causes malfunction B can be detected.
>> GO TO 2.
2.PERFORM DTC CONFIRMATION PROCEDURE-I 1. Start engine (ESP switch OFF). 2. Select “ENGINE” using CONSULT-III. 3. Select “DATA MONITOR” mode. 4. Press MAIN switch and make sure that CRUISE lamp illuminates.5. Drive the vehicle for at least 5 consecutive seconds under the following conditions.
CAUTION:Always drive vehicle at a safe speed. NOTE:
This procedure may be conducted with the drive wheels lifted in the shop or by driving the vehicle.
If a road test is expected to be easier, it is unnecessary to lift the vehicle.

6. Check DTC.
Is DTC detected? YES >> Go to EC-718, "Diagnosis Procedure".
NO >> GO TO 3.
3.PERFORM DTC CONFIRMATION PROCEDURE-II1. Drive the vehicle for at least 5 consecutive seconds under the following conditions.
CAUTION:Always drive vehicle at a safe speed. NOTE:
This procedure may be conducted with the drive wheels lifted in the shop or by driving the vehicle.
If a road test is expected to be easier, it is unnecessary to lift the vehicle.
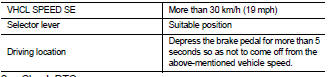
2. Check DTC.
Is DTC detected? YES >> Go to EC-718, "Diagnosis Procedure".
NO >> INSPECTION END
Diagnosis Procedure
1.CHECK OVERALL FUNCTION-I With CONSULT-III
1. Turn ignition switch ON. 2. Select “ENGINE” using CONSULT-III. 3. Select “BRAKE SW1” in “DATA MONITOR” mode.
4. Check “BRAKE SW1” indication under the following conditions.

 Without CONSULT-III
1. Turn ignition switch ON.
2. Check the voltage between ECM harness connector terminals as follows.

Is the inspection result normal? YES >> GO TO 2.
NO >> GO TO 3.
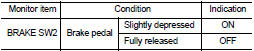
2.CHECK OVERALL FUNCTION-II With CONSULT-III
Select “BRAKE SW2” and check indication under the following conditions.
 Without CONSULT-III
Check the voltage between ECM harness connector terminals under the following conditions.

Is the inspection result normal? YES >> GO TO 11.
NO >> GO TO 7.
3.CHECK ASCD BRAKE SWITCH POWER SUPPLY CIRCUIT 1. Turn ignition switch OFF. 2. Disconnect ASCD brake switch harness connector. 3. Turn ignition switch ON.4. Check the voltage between ASCD brake switch harness connector and ground.
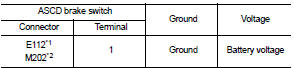
*1: LHD models or RHD models with CVT *2: RHD models with M/T
Is the inspection result normal? YES >> GO TO 5.
NO >> GO TO 4.
4.DETECT MALFUNCTIONING PARTCheck the following.
• Harness connectors E105, M77 (LHD models or RHD models with CVT) • Harness connectors M84, M201 (RHD models with M/T) • 10 A fuse (No. 3)
• Harness for open or short between ASCD brake switch and fuse
>> Repair open circuit, short to ground or short to power in harness or connectors.
5.CHECK ASCD BRAKE SWITCH INPUT SIGNAL CIRCUIT FOR OPEN AND SHORT 1. Turn ignition switch OFF. 2. Disconnect ECM harness connector.3. Check the continuity between ASCD brake switch harness connector and ECM harness connector.
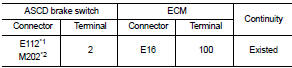
*1: LHD models or RHD models with CVT *2: RHD models with M/T
4. Also check harness for short to ground and short to power.
Is the inspection result normal? YES >> GO TO 6.
NO >> Repair open circuit, short to ground or short to power in harness or connectors.
6.CHECK ASCD BRAKE SWITCHRefer to EC-721, "Component Inspection (ASCD Brake Switch)"
Is the inspection result normal? YES >> GO TO 11.
NO >> Replace ASCD brake switch.
7.CHECK STOP LAMP SWITCH POWER SUPPLY CIRCUIT 1. Turn ignition switch OFF. 2. Disconnect stop lamp switch harness connector.3. Check the voltage between stop lamp switch harness connector and ground.
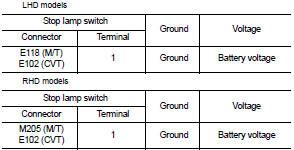
Is the inspection result normal? YES >> GO TO 9.
NO >> GO TO 8.
8.DETECT MALFUNCTIONING PARTCheck the following.
• Harness connectors E105, M77, M84, M201 (RHD models with M/T) • 10 A fuse (No. 38)
• Harness for open or short between stop lamp switch and battery
>> Repair open circuit, short to ground or short to power in harness or connectors.
9.CHECK STOP LAMP SWITCH INPUT SIGNAL CIRCUIT FOR OPEN AND SHORT 1. Disconnect ECM harness connector.2. Check the continuity between stop lamp switch harness connector and ECM harness connector.
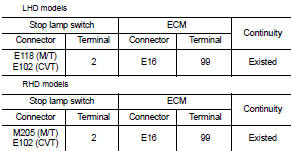
3. Also check harness for short to ground and short to power.
Is the inspection result normal? YES >> GO TO 10.
NO >> Repair open circuit, short to ground or short to power in harness or connectors.
10.CHECK STOP LAMP SWITCHRefer to EC-721, "Component Inspection (Stop Lamp Switch)".
Is the inspection result normal? YES >> GO TO 11.
NO >> Replace stop lamp switch.
11.CHECK INTERMITTENT INCIDENTRefer to GI-42, "Intermittent Incident".
>> INSPECTION END
Component Inspection (ASCD Brake Switch)
1.CHECK ASCD BRAKE SWITCH-I 1. Turn ignition switch OFF. 2. Disconnect ASCD brake switch harness connector.3. Check the continuity between ASCD brake switch terminals under the following conditions.
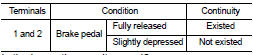
Is the inspection result normal? YES >> INSPECTION END
NO >> GO TO 2.
2.CHECK ASCD BRAKE SWITCH-II 1. Adjust ASCD brake switch installation. Refer to BR-22, "Inspection and Adjustment" (LHD models) or BR- 90, "Inspection and Adjustment" (RHD models).2. Check the continuity between ASCD brake switch terminals under the following conditions.
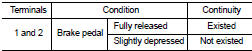
Is the inspection result normal? YES >> INSPECTION END
NO >> Replace ASCD brake switch.
Component Inspection (Stop Lamp Switch)
1.CHECK STOP LAMP SWITCH-I 1. Turn ignition switch OFF. 2. Disconnect stop lamp switch harness connector.3. Check the continuity between stop lamp switch terminals under the following conditions.
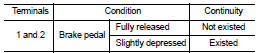
Is the inspection result normal? YES >> INSPECTION END
NO >> GO TO 2.
2.CHECK STOP LAMP SWITCH-II1. Adjust stop lamp switch installation. Refer to BR-22, "Inspection and Adjustment" (LHD models) or BR-90, "Inspection and Adjustment" (RHD models).Is the inspection result normal? YES >> INSPECTION END NO >> GO TO 2.
2.CHECK STOP LAMP SWITCH-II 1. Adjust stop lamp switch installation. Refer to BR-22, "Inspection and Adjustment" (LHD models) or BR-90, "Inspection and Adjustment" (RHD models).
2. Check the continuity between stop lamp switch terminals under the following conditions.
2. Check the continuity between stop lamp switch terminals under the following conditions.

Is the inspection result normal? YES >> INSPECTION END
NO >> Replace stop lamp switch.