P2A00 A/F sensor 1
DTC Logic
DTC DETECTION LOGIC
To judge the malfunction, the A/F signal computed by ECM from the A/F sensor 1 signal is monitored so it will not shift to LEAN side or RICH side.

DTC CONFIRMATION PROCEDURE
1.PRECONDITIONINGIf DTC Confirmation Procedure has been previously conducted, always turn ignition switch OFF and wait at least 10 seconds before conducting the next test.
TESTING CONDITION:Before performing the following procedure, confirm that battery voltage is more than 11 V at idle
.
>> GO TO 2.
2.PERFORM DTC CONFIRMATION PROCEDURE 1. Clear the mixture ratio self-learning value. Refer to EC-546, "Work Procedure". 2. Turn ignition switch OFF and wait at least 10 seconds. 3. Restart engine and keep the engine speed between 3,500 and 4,000 rpm for 1 minute under no load. 4. Let engine idle for 1 minute. 5. Keep engine speed between 2,500 and 3,000 rpm for 20 minutes.6. Check 1st trip DTC.
Is 1st trip DTC detected? YES >> Go to EC-762, "Diagnosis Procedure".
NO >> INSPECTION END
Diagnosis Procedure
1.CHECK GROUND CONNECTION 1. Turn ignition switch OFF.2. Check ground connection E21 and E38. Refer to Ground Inspection in GI-44, "Circuit Inspection".
Is the inspection result normal? YES >> GO TO 2.
NO >> Repair or replace ground connection.
2.RETIGHTEN A/F SENSOR 11. Loosen and retighten the A/F sensor 1. Refer to EM-166, "Exploded View".
>> GO TO 3.
3.CHECK FOR INTAKE AIR LEAK 1. Start engine and run it at idle.2. Listen for an intake air leak after the mass air flow sensor.
Is intake air leak detected? YES >> Repair or replace.
NO >> GO TO 4.
4.CLEAR THE MIXTURE RATIO SELF-LEARNING VALUE 1. Clear the mixture ratio self-learning value. Refer to EC-546, "Work Procedure".2. Run engine for at least 10 minutes at idle speed.
Is the 1st trip DTC P0171 or P0172 detected? Is it difficult to start engine? YES >> Perform trouble diagnosis for DTC P0171 or P0172. Refer to EC-636, "Diagnosis Procedure" or EC-640, "Diagnosis Procedure".
NO >> GO TO 5.
5.CHECK HARNESS CONNECTOR 1. Turn ignition switch OFF. 2. Disconnect A/F sensor 1 harness connector.3. Check harness connector for water.
Water should not exit.
Is the inspection result normal? YES >> GO TO 6.
NO >> Repair or replace harness connector.
6.CHECK A/F SENSOR 1 POWER SUPPLY CIRCUIT 1. Turn ignition switch ON.2. Check the voltage between A/F sensor 1 harness connector and ground.

Is the inspection result normal? YES >> GO TO 8.
NO >> GO TO 7.
7.DETECT MALFUNCTIONING PARTCheck the following.
• Harness connectors E8, F1 • IPDM E/R harness connector E14 • 20A fuse (No. 43)
• Harness for open or short between A/F sensor 1 and fuse
>> Repair or replace harness or connectors.
8.CHECK A/F SENSOR 1 INPUT SIGNAL CIRCUIT FOR OPEN AND SHORT 1. Turn ignition switch OFF. 2. Disconnect ECM harness connector.3. Check the continuity between A/F sensor 1 harness connector and ECM harness connector.
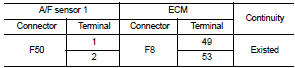
4. Check the continuity between A/F sensor 1 harness connector and ground or ECM harness connector and ground.

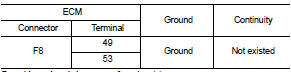
5. Also check harness for short to power.
Is the inspection result normal? YES >> GO TO 9.
NO >> Repair open circuit, short to ground or short to power in harness or connectors.
9.CHECK A/F SENSOR 1 HEATERRefer to EC-578, "Component Inspection".
Is the inspection result normal? YES >> GO TO 10.
NO >> GO TO 11.
10.CHECK INTERMITTENT INCIDENTPerform GI-42, "Intermittent Incident".
Is the inspection result normal? YES >> GO TO 11.
NO >> Repair or replace.
11.REPLACE AIR FUEL RATIO (A/F) SENSOR 1Replace air fuel ratio (A/F) sensor 1.
CAUTION:• Discard any A/F sensor which has been dropped from a height of more than 0.5 m (19.7 in) onto a hard surface such as a concrete floor; use a new one.
• Before installing new A/F sensor, clean exhaust system threads using Oxygen Sensor Thread Cleaner (commercial service tool) and approved anti-seize lubricant (commercial service tool).
>> GO TO 12.
12.CLEAR THE MIXTURE RATIO SELF-LEARNING VALUEClear the mixture ratio self-learning value. Refer to EC-546, "Work Procedure".
>> INSPECTION END