Engine and peripherals
Exhaust manifold
In this manual: Engine and peripherals
~4min read
F4R or K4J or K4M
Essential special tools |
|
| Tool 1495-01 | 24 mm socket for removing / refitting oxygen sensors - 1/2" square drive and 24 mm external hex |
Tightening torques |
|
| manifold nuts (K4J and K4M engines) | 2.3 +/- 0.3 daN.m |
| manifold nuts (F4R engine) | 1.8 daN.m |
| heat shield bolt | 1 daN.m |
| oxygen sensors | 4.5 daN.m |
| exhaust line mounting bracket bolts to body | 2.1 daN.m |
| bracket bolt to exhaust manifold | 0.8 daN.m |
| exhaust manifold bracket nut to gearbox | 2.1 daN.m |
| exhaust flange nuts | 2 daN.m |

REMOVAL
- Position the vehicle on a two-post lift.
- Disconnect the battery
K4J
- Remove the air filter housing (Fuel Metering chapter, Air Filter Housing, page 12A-14).
F4R or K4M
- Remove the intake manifold (Fuel Metering chapter, Intake Manifold, page 12A-26).
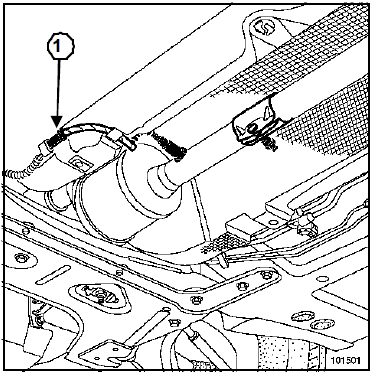
- Disconnect the downstream oxygen sensor (1).
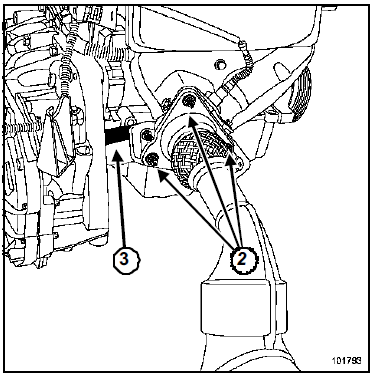
- Remove the exhaust flange fasteners (2).
- Remove the bracket (3) from the exhaust manifold.
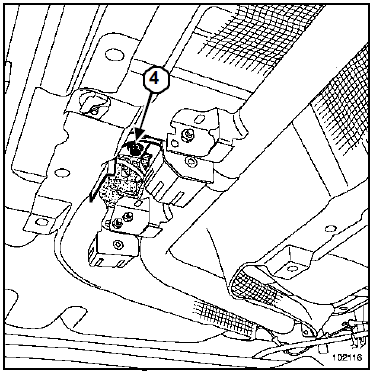
- Remove the bolt (4) securing the exhaust line rubber mount bracket to the body.
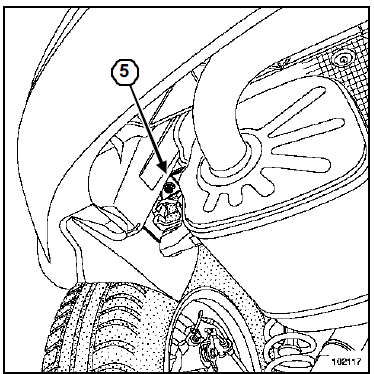
- Remove the bolt (5) securing the silencer rubber mount bracket to the body.
- Move the exhaust line rearward.
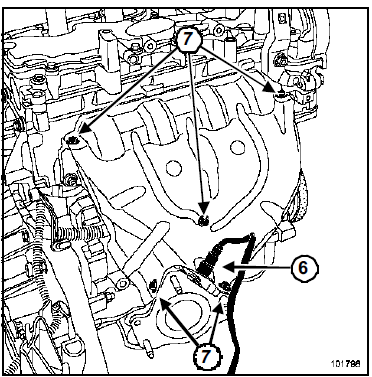
- Remove the oxygen sensor (6) using tool (Mot. 1495-01).
- Remove the upper heat shield (7) from the exhaust manifold.
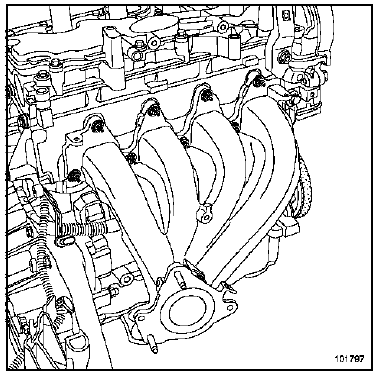
- Remove:
- the nine new exhaust manifold mounting nuts,
- the exhaust manifold.
ON WORKBENCH
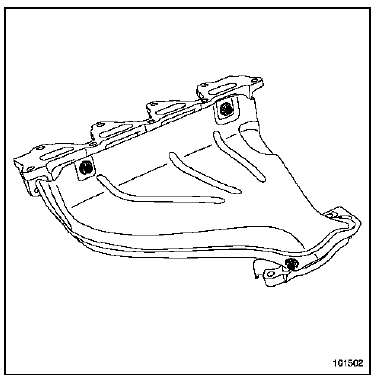
- Remove the lower heat shield.
INSTALLATION
- Always replace:
- the manifold gaskets,
- the exhaust flange gaskets,
- the manifold nuts.
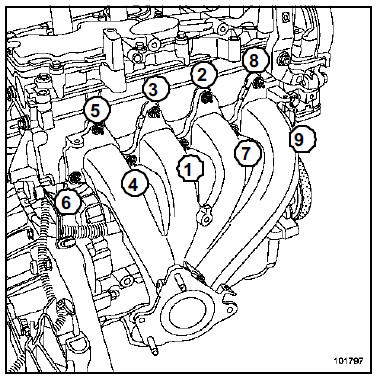
- Refit in the reverse order of removal.
- Tighten in the following order and to the following torques:
- manifold nuts (K4J and K4M engines) (2.3 +/- 0.3 daN.m),
- manifold nuts (F4R engine) (1.8 daN.m),
- the heat shield bolt (1 daN.m),
- the oxygen sensors (4.5 daN.m),
- the exhaust line rubber mount bracket bolts to body (2.1 daN.m),
- the bracket bolt to exhaust manifold (0.8 daN.m),
- the exhaust manifold bracket nut to gearbox (2.1 daN.m) (F4R engine only),
- the exhaust flange nuts (2 daN.m).
Connect the battery; carry out the necessary re-learns (see Electrical Equipment chapter).
K9K
Essential special tools |
|
| Mot. 1567 | Remote pliers for EGR clamps |
Tightening torques |
|
| exhaust manifold studs | 0.9 daN.m |
| exhaust manifold mounting nuts | 2.6 daN.m |
| EGR housing mounting bolts | 2.1 daN.m |
| lifting ring | 2.1 daN.m |

REMOVAL
- Position the vehicle on a two-post lift.
- Disconnect the battery.
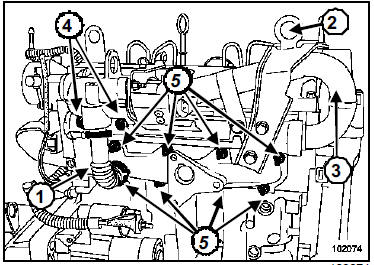
- Remove:
- the turbocharger (see Turbocharging chapter),
- the metal EGR tube (1),
- the lifting ring (2),
- the metal air intake tube (3),
- the two EGR housing mounting bolts (4),
- the EGR housing,
- the eight manifold mounting nuts (5),
- the manifold.
INSTALLATION
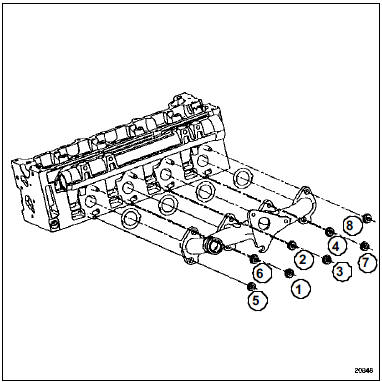
- Replace the manifold gasket.
- Refit the manifold.
- Tighten the exhaust manifold studs to torque (0.9 daN.m).
- Tighten the exhaust manifold mounting nuts to torque in sequence (2.6 daN.m).
- Refit:
- the EGR housing,
- the new EGR housing tube,
- the two new clamps on the new housing tube.
- Tighten the new clamps using tool (Mot. 1567).
- Tighten the EGR housing mounting bolts to torque (2.1 daN.m).
- Tighten the lifting ring to torque (2.1 daN.m).
- Refit in the reverse order of removal.
- Refit the turbocharger (Turbocharging chapter, Turbocharger, page 12B-4).
Connect the battery; carry out the necessary re-learns (see Electrical Equipment chapter).
Test yourself
A quick Renault Megane quiz: every answer comes with an explanation and a link to the manual page.
Was this page helpful?