Speaker Circuit
- If there is a short in a speaker circuit, the stereo component amplifier assembly detects it and stops output to the speakers.
- Thus sound cannot be heard from the speakers even if there is no malfunction in the stereo component amplifier assembly, DCM (telematics transceiver)*1 or speakers.
- If a short is detected in a speaker circuit, no sound can be heard from the speakers.
- *1: w/ Manual (SOS) Switch
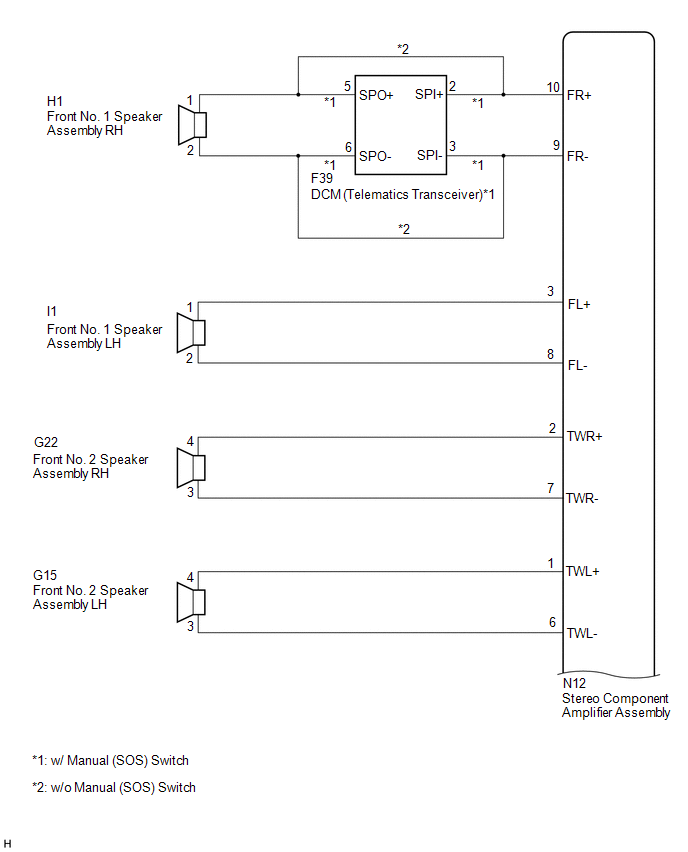
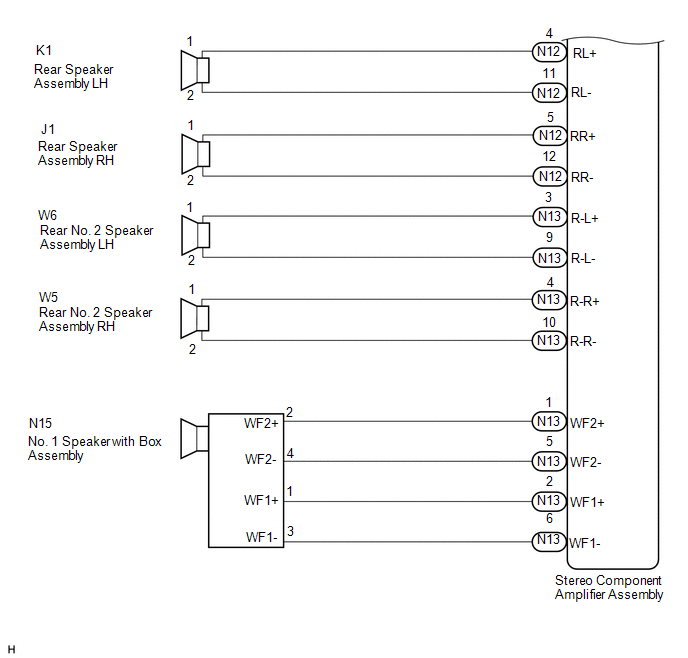
1. for 9 Speakers
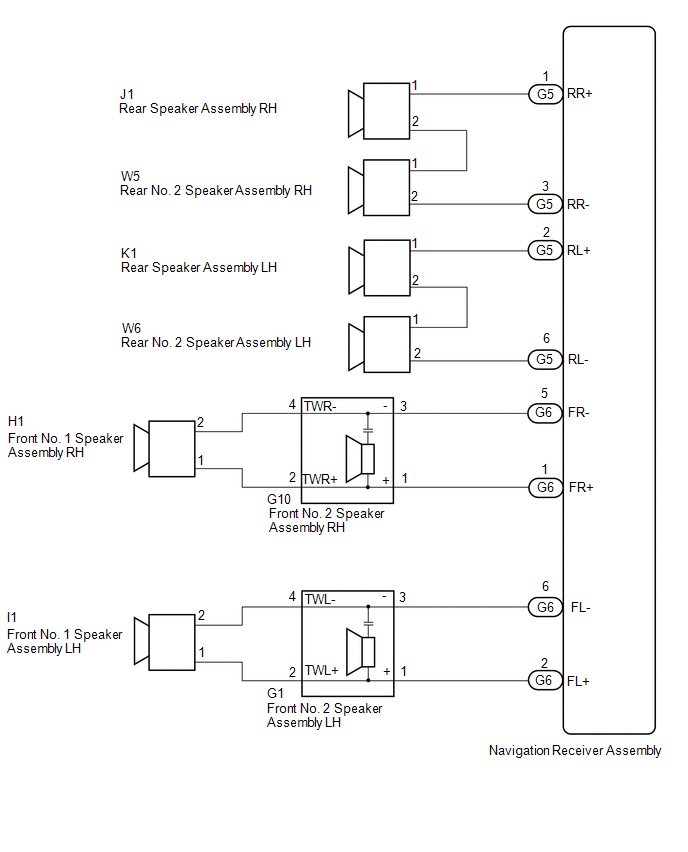
2. for 8 Speakers
PROCEDURE
CONFIRM MODEL
(a) Choose the model to be inspected.
Model | Proceed to |
|---|---|
for 9 Speakers |
A |
for 8 Speakers |
B |
| B |  | GO TO STEP 9 |
|

CHECK HARNESS AND CONNECTOR (for 9 Speakers)
(a) Disconnect the connectors from the N12 and N13 stereo component amplifier assembly, F39 DCM (telematics transceiver)*1 and speakers.
- *1: w/ Manual (SOS) Switch
(b) w/ Manual (SOS) Switch
(1) Measure the resistance between the stereo component amplifier assembly and the DCM (telematics transceiver) to check for an open circuit in the wire harness.
Standard Resistance:
Tester Connection | Condition | Specified Condition |
|---|---|---|
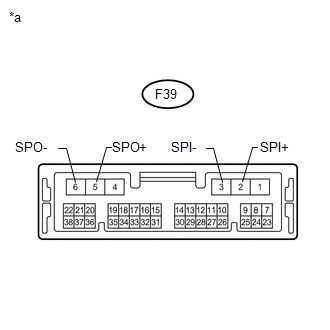
N12-10 (FR+) - F39-2 (SPI+) |
Always |
Below 1 Ω |
N12-9 (FR-) - F39-3 (SPI-) |
Always |
Below 1 Ω |
(2) Measure the resistance between the front No. 1 speaker assembly RH and the DCM (telematics transceiver) to check for an open circuit in the wire harness.
Standard Resistance:
Tester Connection | Condition | Specified Condition |
|---|---|---|
H1-1 - F39-5 (SPO+) |
Always |
Below 1 Ω |
H1-2 - F39-6 (SPO-) |
Always |
Below 1 Ω |
(c) w/o Manual (SOS) Switch
(1) Measure the resistance between the front No. 1 speaker assembly RH and the stereo component amplifier assembly to check for an open circuit in the wire harness.
Standard Resistance:
Tester Connection | Condition | Specified Condition |
|---|---|---|
N12-10 (FR+) - H1-1 |
Always |
Below 1 Ω |
N12-9 (FR-) - H1-2 |
Always |
Below 1 Ω |
(d) Measure the resistance between the front No. 1 speaker assembly LH and the stereo component amplifier assembly to check for an open circuit in the wire harness.
Standard Resistance:
Tester Connection | Condition | Specified Condition |
|---|---|---|
N12-3 (FL+) - I1-1 |
Always |
Below 1 Ω |
N12-8 (FL-) - I1-2 |
Always |
Below 1 Ω |
(e) Measure the resistance between each of the front No. 2 speaker assemblies and the stereo component amplifier assembly to check for an open circuit in the wire harness.
Standard Resistance:
Tester Connection | Condition | Specified Condition |
|---|---|---|
N12-2 (TWR+) - G22-4 |
Always |
Below 1 Ω |
N12-7 (TWR-) - G22-3 |
Always |
Below 1 Ω |
N12-1 (TWL+) - G15-4 |
Always |
Below 1 Ω |
N12-6 (TWL-) - G15-3 |
Always |
Below 1 Ω |
(f) Measure the resistance between the rear speaker assemblies and the stereo component amplifier assembly to check for an open circuit in the wire harness.
Standard Resistance:
Tester Connection | Condition | Specified Condition |
|---|---|---|
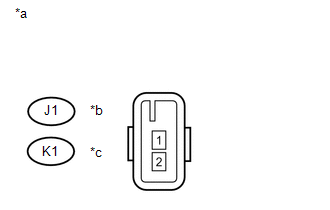
N12-5 (RR+) - J1-1 |
Always |
Below 1 Ω |
N12-12 (RR-) - J1-2 |
Always |
Below 1 Ω |
N12-4 (RL+) - K1-1 |
Always |
Below 1 Ω |
N12-11 (RL-) - K1-2 |
Always |
Below 1 Ω |
(g) Measure the resistance between each of the rear No. 2 speaker assemblies and the stereo component amplifier assembly to check for an open circuit in the wire harness.
Standard Resistance:
Tester Connection | Condition | Specified Condition |
|---|---|---|
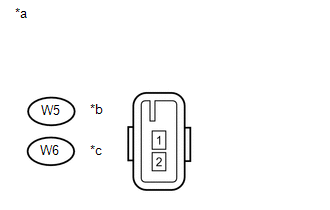
N13-4 (R-R+) - W5-1 |
Always |
Below 1 Ω |
N13-10 (R-R-) - W5-2 |
Always |
Below 1 Ω |
N13-3 (R-L+) - W6-1 |
Always |
Below 1 Ω |
N13-9 (R-L-) - W6-2 |
Always |
Below 1 Ω |
(h) Measure the resistance between the No. 1 speaker with box assembly and the stereo component amplifier assembly to check for an open circuit in the wire harness.
Standard Resistance:
Tester Connection | Condition | Specified Condition |
|---|---|---|
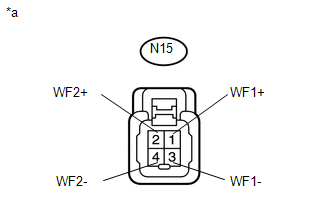
N13-1 (WF2+) - N15-2 (WF2+) |
Always |
Below 1 Ω |
N13-5 (WF2-) - N15-4 (WF2-) |
Always |
Below 1 Ω |
N13-2 (WF1+) - N15-1 (WF1+) |
Always |
Below 1 Ω |
N13-6 (WF1-) - N15-3 (WF1-) |
Always |
Below 1 Ω |
(i) Measure the resistance between the stereo component amplifier assembly and body ground to check for a short circuit in the wire harness.
Standard Resistance:
Tester Connection | Condition | Specified Condition |
|---|---|---|
N12-10 (FR+) - Body ground |
Always |
10 kΩ or higher |
N12-9 (FR-) - Body ground |
Always |
10 kΩ or higher |
N12-3 (FL+) - Body ground |
Always |
10 kΩ or higher |
N12-8 (FL-) - Body ground |
Always |
10 kΩ or higher |
N12-2 (TWR+) - Body ground |
Always |
10 kΩ or higher |
N12-7 (TWR-) - Body ground |
Always |
10 kΩ or higher |
N12-1 (TWL+) - Body ground |
Always |
10 kΩ or higher |
N12-6 (TWL-) - Body ground |
Always |
10 kΩ or higher |
N12-4 (RL+) - Body ground |
Always |
10 kΩ or higher |
N12-11 (RL-) - Body ground |
Always |
10 kΩ or higher |
N12-5 (RR+) - Body ground |
Always |
10 kΩ or higher |
N12-12 (RR-) - Body ground |
Always |
10 kΩ or higher |
N13-3 (R-L+) - Body ground |
Always |
10 kΩ or higher |
N13-9 (R-L-) - Body ground |
Always |
10 kΩ or higher |
N13-4 (R-R+) - Body ground |
Always |
10 kΩ or higher |
N13-10 (R-R-) - Body ground |
Always |
10 kΩ or higher |
N13-1 (WF2+) - Body ground |
Always |
10 kΩ or higher |
N13-5 (WF2-) - Body ground |
Always |
10 kΩ or higher |
N13-2 (WF1+) - Body ground |
Always |
10 kΩ or higher |
N13-6 (WF1-) - Body ground |
Always |
10 kΩ or higher |
(j) w/ Manual (SOS) Switch
Measure the resistance between the DCM (telematics transceiver) and body ground to check for a short circuit in the wire harness.
Standard Resistance:
Tester Connection | Condition | Specified Condition |
|---|---|---|
F39-5 (SPO+) - Body ground |
Always |
10 kΩ or higher |
F39-6 (SPO-) - Body ground |
Always |
10 kΩ or higher |
| NG | | REPAIR OR REPLACE HARNESS OR CONNECTOR |
|
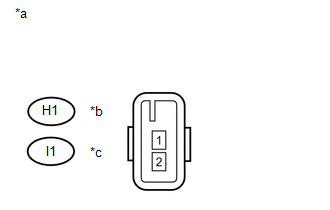
INSPECT FRONT NO. 1 SPEAKER ASSEMBLY (for 9 Speakers)
(a) Measure the resistance according to the value(s) in the table below. Standard Resistance:
|
 |
| NG | | REPLACE FRONT NO. 1 SPEAKER ASSEMBLY |
|
REPLACE FRONT NO. 2 SPEAKER ASSEMBLY (for 9 Speakers)
(a) Replace the front No. 2 speaker assembly with a known good one (See page  ).
(b) Check that the malfunction disappears.
OK:
Malfunction disappears.
HINT:
- Connect all the connectors to the front No. 2 speaker assemblies.
- If there is a possibility that either the right or left front speaker is defective, inspect by interchanging the right one with the left one.
- Perform the above inspection on both LH and RH sides.
| OK | | END |
|
REPLACE REAR SPEAKER ASSEMBLY (for 9 Speakers)
(a) Replace the rear speaker assembly with a known good one (See page ).
(b) Check that the malfunction disappears.
OK:
Malfunction disappears.
HINT:
- Connect all the connectors to the rear speaker assemblies.
- If there is a possibility that either the right or left front speaker is defective, inspect by interchanging the right one with the left one.
- Perform the above inspection on both LH and RH sides.
| OK | | END |
|
REPLACE REAR NO. 2 SPEAKER ASSEMBLY (for 9 Speakers)
(a) Replace the rear No. 2 speaker assembly with a known good one (See page ).
(b) Check that the malfunction disappears.
OK:
Malfunction disappears.
HINT:
- Connect all the connectors to the rear No. 2 speaker assemblies.
- If there is a possibility that either the right or left front speaker is defective, inspect by interchanging the right one with the left one.
- Perform the above inspection on both LH and RH sides.
| OK | | END |
|
INSPECT NO. 1 SPEAKER WITH BOX ASSEMBLY (for 9 Speakers)
(a) Measure the resistance according to the value(s) in the table below. Standard Resistance:
|
 |
Condition | Proceed to |
|---|---|
OK (w/ Manual (SOS) Switch) |
A |
OK (w/o Manual (SOS) Switch) |
B |
NG |
C |
| B | | PROCEED TO NEXT SUSPECTED AREA SHOWN IN PROBLEM SYMPTOMS TABLE |
| C | | REPLACE NO. 1 SPEAKER WITH BOX ASSEMBLY |
|
INSPECT DCM (TELEMATICS TRANSCEIVER)
(a) Disconnect the F39 DCM (Telematics transceiver) connector.
(b) Measure the resistance according to the value(s) in the table below. Standard Resistance:
|
 |
| OK | | PROCEED TO NEXT SUSPECTED AREA SHOWN IN PROBLEM SYMPTOMS TABLE |
| NG | | REPLACE DCM (TELEMATICS TRANSCEIVER) |
CHECK HARNESS AND CONNECTOR (for 8 Speakers)
(a) Disconnect the connectors from the G6 and G5 navigation receiver assembly and speakers.
(b) Measure the resistance between the navigation receiver assembly and the front No. 2 speaker assembles to check for an open circuit in the wire harness.
Standard Resistance:
Tester Connection | Condition | Specified Condition |
|---|---|---|
G6-1 (FR+) - G10-1 (+) |
Always |
Below 1 Ω |
G6-5 (FR-) - G10-3 (-) |
Always |
Below 1 Ω |
G6-2 (FL+) - G1-1 (+) |
Always |
Below 1 Ω |
G6-6 (FL-) - G1-3 (-) |
Always |
Below 1 Ω |
(c) Measure the resistance between the front No. 1 speaker assembles and the front No. 2 speaker assembles to check for an open circuit in the wire harness.
Standard Resistance:
Tester Connection | Condition | Specified Condition |
|---|---|---|
H1-1 - G10-2 (TWR+) |
Always |
Below 1 Ω |
H1-2 - G10-4 (TWR-) |
Always |
Below 1 Ω |
I1-1 - G1-2 (TWL+) |
Always |
Below 1 Ω |
I1-2 - G1-4 (TWL-) |
Always |
Below 1 Ω |
(d) Measure the resistance between the navigation receiver assembly, rear speaker assembly RH and rear No. 2 speaker assembly RH to check for an open circuit in the wire harness.
Standard Resistance:
Tester Connection | Condition | Specified Condition |
|---|---|---|
G5-1 (RR+) - J1-1 |
Always |
Below 1 Ω |
G5-3 (RR-) - W5-2 |
Always |
Below 1 Ω |
W5-1 - J1-2 |
Always |
Below 1 Ω |
(e) Measure the resistance between the navigation receiver assembly, rear speaker assembly LH and rear No. 2 speaker assembly LH to check for an open circuit in the wire harness.
Standard Resistance:
Tester Connection | Condition | Specified Condition |
|---|---|---|
G5-2 (RL+) - K1-1 |
Always |
Below 1 Ω |
G5-6 (RL-) - W6-2 |
Always |
Below 1 Ω |
W6-1 - K1-2 |
Always |
Below 1 Ω |
(f) Measure the resistance between the navigation receiver assembly, speaker assembly and body ground to check for a short circuit in the wire harness.
Standard Resistance:
Tester Connection | Condition | Specified Condition |
|---|---|---|
G6-1 (FR+) - Body ground |
Always |
10 kΩ or higher |
G6-5 (FR-) - Body ground |
Always |
10 kΩ or higher |
G6-2 (FL+) - Body ground |
Always |
10 kΩ or higher |
G6-6 (FL-) - Body ground |
Always |
10 kΩ or higher |
G5-1 (RR+) - Body ground |
Always |
10 kΩ or higher |
G5-3 (RR-) - Body ground |
Always |
10 kΩ or higher |
G5-2 (RL+) - Body ground |
Always |
10 kΩ or higher |
G5-6 (RL-) - Body ground |
Always |
10 kΩ or higher |
G10-2 (TWR+) - Body ground |
Always |
10 kΩ or higher |
G10-4 (TWR-) - Body ground |
Always |
10 kΩ or higher |
G1-2 (TWL+) - Body ground |
Always |
10 kΩ or higher |
G1-4 (TWR-) - Body ground |
Always |
10 kΩ or higher |
W6-1 - Body ground |
Always |
10 kΩ or higher |
W5-1 - Body ground |
Always |
10 kΩ or higher |
| NG | | REPAIR OR REPLACE HARNESS OR CONNECTOR |
|
INSPECT FRONT NO. 1 SPEAKER ASSEMBLY (for 8 Speakers)
(a) Measure the resistance according to the value(s) in the table below. Standard Resistance:
|
|
| NG | | REPLACE FRONT NO. 1 SPEAKER ASSEMBLY |
|
REPLACE FRONT NO. 2 SPEAKER ASSEMBLY (for 8 Speakers)
(a) Replace the front No. 2 speaker assembly with a known good one (See page ).
(b) Check that the malfunction disappears.
OK:
Malfunction disappears.
HINT:
- Connect all the connectors to the front No. 2 speaker assemblies.
- If there is a possibility that either the right or left front speaker is defective, inspect by interchanging the right one with the left one.
- Perform the above inspection on both LH and RH sides.
| OK | | END |
|
INSPECT REAR SPEAKER ASSEMBLY (for 8 Speakers)
(a) Measure the resistance according to the value(s) in the table below. Standard Resistance:
|
 |
| NG | | REPLACE REAR SPEAKER ASSEMBLY |
|
INSPECT REAR NO. 2 SPEAKER ASSEMBLY (for 8 Speakers)
(a) Measure the resistance according to the value(s) in the table below. Standard Resistance:
|
 |
| OK | | PROCEED TO NEXT SUSPECTED AREA SHOWN IN PROBLEM SYMPTOMS TABLE |
| NG | | REPLACE REAR NO. 2 SPEAKER ASSEMBLY |
Test yourself
A quick Toyota 4Runner quiz: every answer comes with an explanation and a link to the manual page.