Bulbs
You can replace the following bulbs yourself. The difficulty of replacing a bulb depends on the bulb. Since there is a risk of damaging parts, we recommend having the replacement performed by a Toyota dealer, a Toyota-approved repairer, or any reliable repairer.
Preparing to Replace a Bulb
Check the wattage (W) of the bulb to be replaced.
Bulb Locations
■ Front
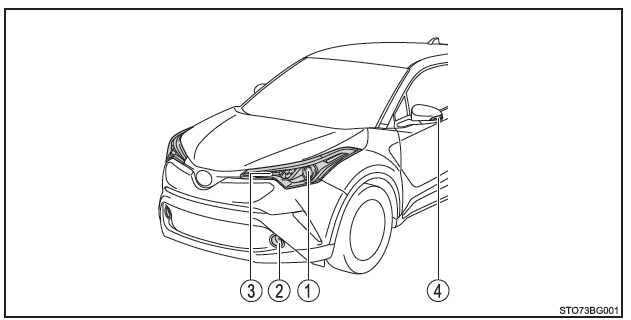
- Headlights (halogen bulb type)
- Fog lights (bulb type, if equipped)
- Front turn signal lights (bulb type)
- Side turn signal lights
■ Rear
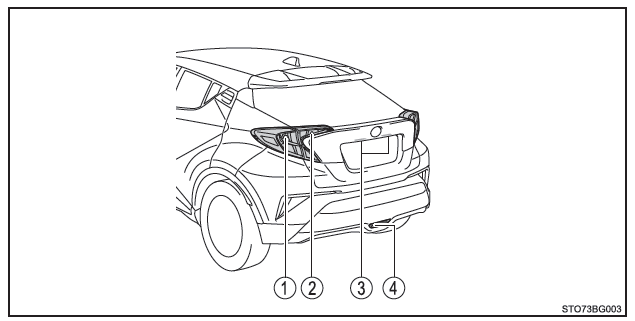
- Rear turn signal lights (bulb type)
- Back-up lights (bulb type)
- License plate lights
- Rear fog light
Replacing Bulbs
■ Headlights (halogen bulb type)
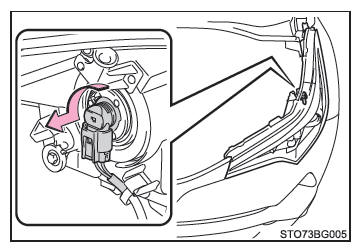
1. Turn the bulb socket counterclockwise.
2. Press the lock tab and disconnect the connector.
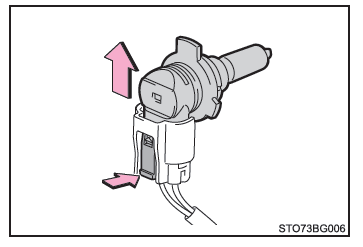
3. Replace the bulb, and reinstall the socket.
Align the 3 tabs of the bulb with the holder, and push it in.
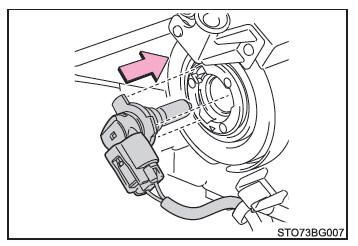
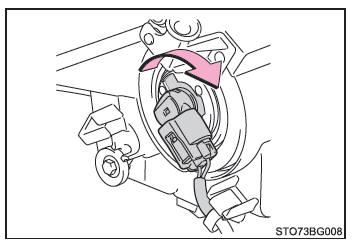
4. Turn the bulb socket clockwise to lock it in place.
Gently wiggle the bulb socket to check that it is securely installed, turn the headlights on once, and visually confirm that no light leaks through the holder.
■ Fog lights (bulb type, if equipped)
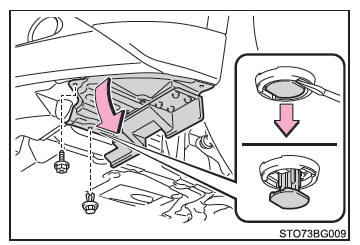
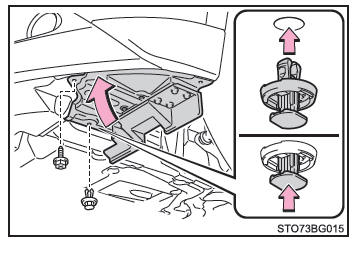
1. Remove the screw and clip, then partially remove the fender liner.
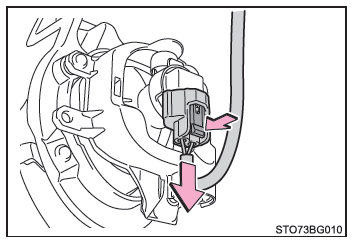
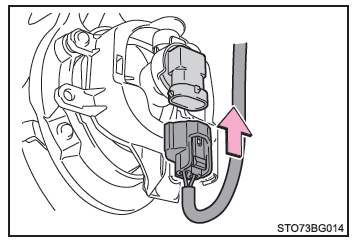
2. Press the lock tab and disconnect the connector.
3. Turn the bulb socket counterclockwise, then remove it.
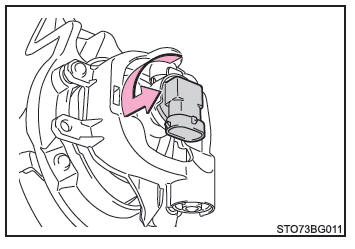
4. Install a new bulb.
Align the 3 tabs of the bulb with the holder, and push it in.
Turn clockwise and lock the bulb socket in place.
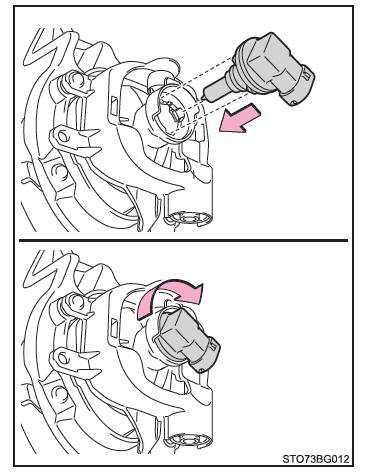
5. Reconnect the connector.
Gently wiggle the bulb socket to check that it is securely installed, turn the fog lights on once, and visually confirm that no light leaks through the holder.
6. Reinstall the fender liner, and reinstall the screw and clip.
Make sure the fender liner is securely attached to the inside of the bumper.
■ Front turn signal lights (bulb type)
1. Turn the bulb socket counterclockwise.
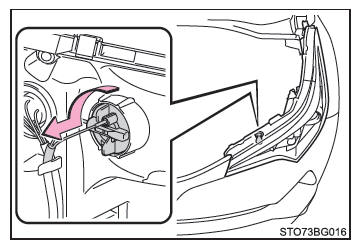
2. Remove the bulb.
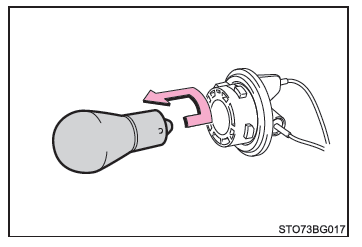
3. To reinstall, follow the steps above in reverse order.
■ Rear turn signal lights (bulb type)
1. Open the liftgate and remove the cover.
To avoid damaging the vehicle, wrap the flat-blade screwdriver with tape.
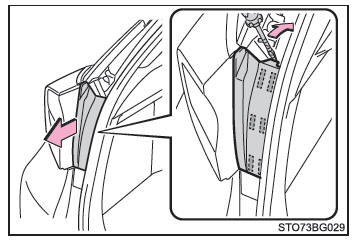
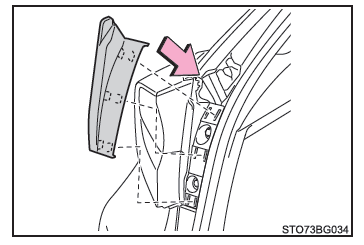
2. Remove the 2 screws and pull the lamp assembly toward the rear of the vehicle to remove it.
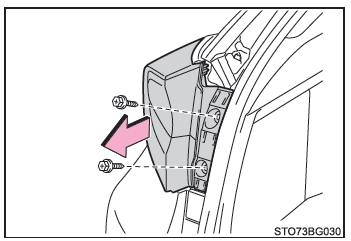
3. Turn the bulb socket counterclockwise.
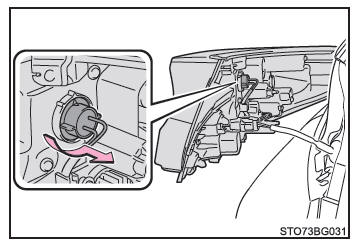
4. Remove the bulb.
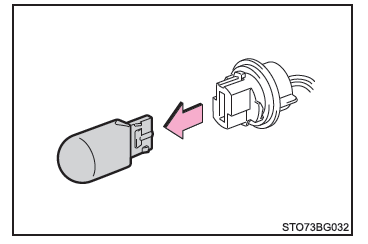
5. To install the bulb, follow steps 3 and 4 in reverse order.
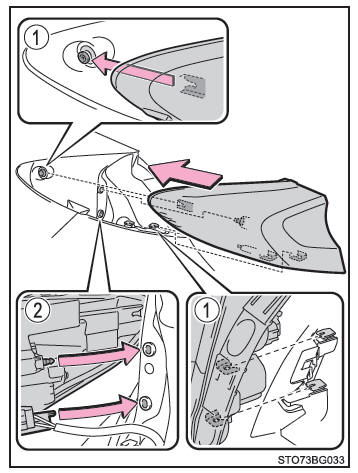
6. Reinstall the lamp assembly.
Align the guides ( 1) and pins ( 2) of the lamp assembly with the holder to reinstall it.
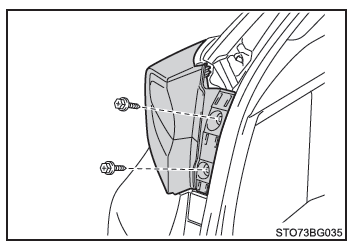
7. Install the 2 screws.
8. Reinstall the cover.
■ Reversing lights (bulb type)
1. Open the liftgate and remove the cover.
To avoid damaging the vehicle, wrap the flat-blade screwdriver with tape.
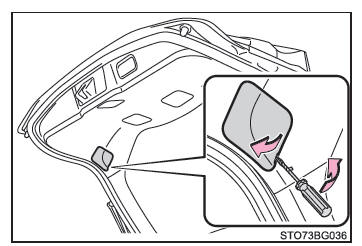
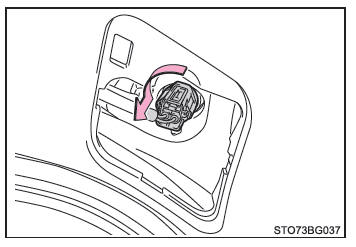
2. Turn the bulb socket counterclockwise.
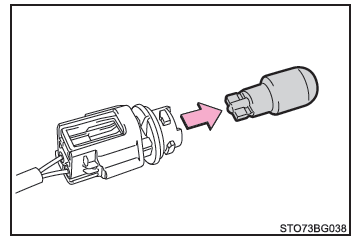
3. Remove the bulb.
4. To reinstall, perform the steps in the reverse order.
■ License plate lights
1. Open the liftgate and remove the cover.
To avoid damaging the vehicle, wrap the flat-blade screwdriver with tape.
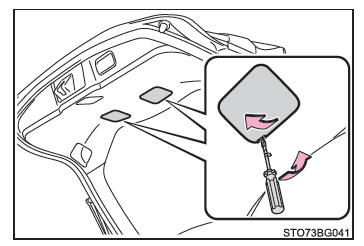
2. Turn the bulb socket counterclockwise.
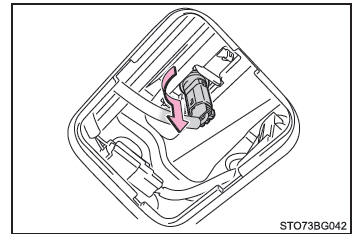
3. Remove the bulb.
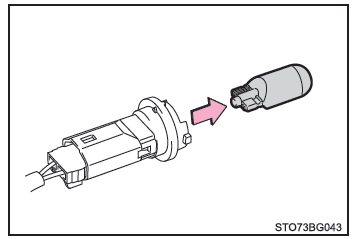
4. To reinstall, perform the steps in the reverse order.
■ Rear fog light
1. Turn the bulb socket counterclockwise.
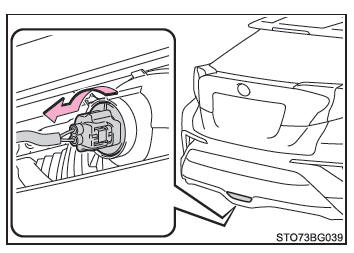
2. Remove the bulb.
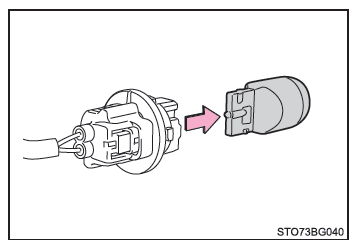
3. To reinstall, follow the steps above in reverse order.
■ Side turn signal lights
1. Insert a flat-blade screwdriver and unclip the tab from the outer mirror cover.
To avoid damaging the vehicle, wrap the flat-blade screwdriver with tape.
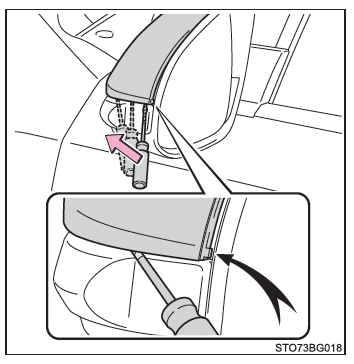
2. Unclip the cover tab around the entire perimeter.
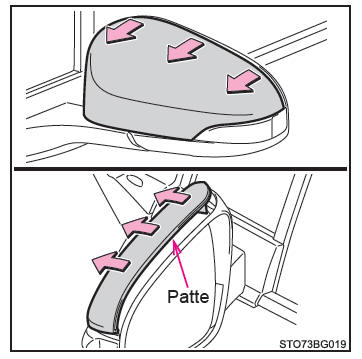
3. Unclip the tab at the bottom of the cover, then remove the cover.
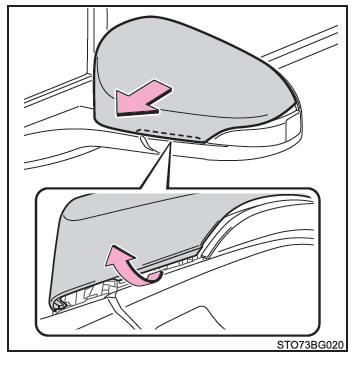
4. Insert a flat-blade screwdriver and remove the lens by prying outward.
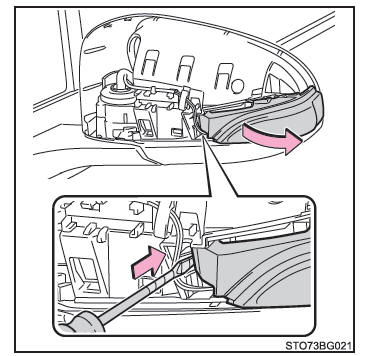
5. Remove the socket from the side turn signal light housing.
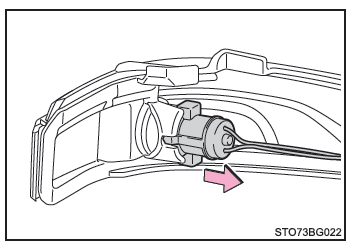
6. Remove the bulb.
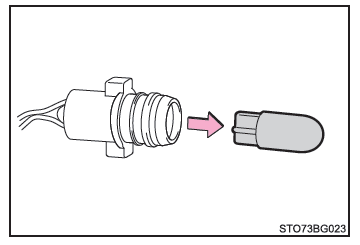
7. Replace the bulb and reinstall the socket in the side turn signal light housing.
Align the grooves of the socket with the side turn signal light housing.
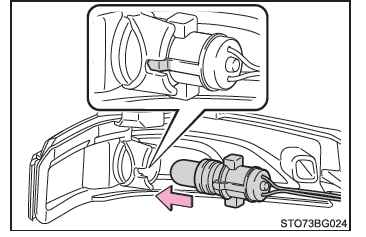
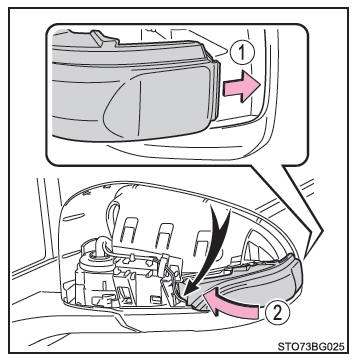
8. Reinstall the lens.
- Insert the lens tab.
- Secure the lens.
Route the wire harness behind the lens.
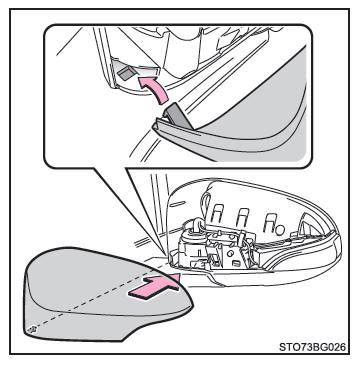
9. Insert the cover tab.
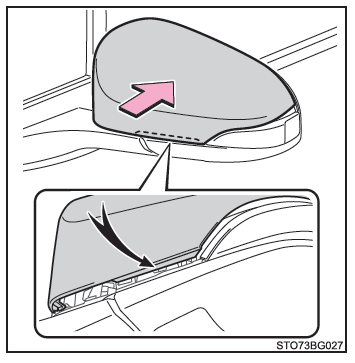
10. Clip the tab at the bottom of the cover.
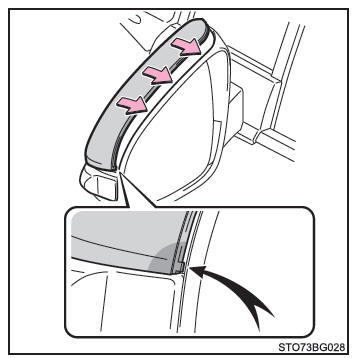
11. Clip the cover tab around the entire perimeter.
Finally, confirm that the outer tab is securely clipped.
■ Replacing the following bulbs If any of the bulbs listed below has burned out, have it replaced by a Toyota dealer, a Toyota-approved repairer, or any reliable repairer.
- Headlights (vehicles with LED type)
- Front position lights/daytime running lights
- Front turn signal lights (vehicles with LED type)
- Fog lights (vehicles with LED type)
- Stop/tail lights
- Rear turn signal lights (vehicles with LED type)
- Reversing lights (vehicles with LED type)
- Third stop light
- Outer mirror light (on models so equipped)
■ LED bulbs The following lights consist of a number of light-emitting diodes (LEDs). If any of the LEDs fails, have your vehicle inspected by a Toyota dealer, a Toyota-approved repairer, or any reliable repairer.
- Headlights (vehicles with LED type)
- Front position lights/daytime running lights
- Front turn signal lights (vehicles with LED type)
- Fog lights (vehicles with LED type)
- Third stop light
- Stop/tail lights
- Rear turn signal lights (vehicles with LED type)
- Reversing lights (vehicles with LED type)
- Outer mirror light (on models so equipped)
■ Condensation inside the lens Temporary condensation inside the headlight lenses does not necessarily indicate a malfunction.
Contact a Toyota dealer, a Toyota-approved repairer, or any reliable repairer for further information in the following situations:
- Large water droplets form on the inner surface of the lens.
- Water accumulates inside the headlight.
■ When replacing bulbs
WARNING■ Replacing bulbs
- Turn off the lights. Do not attempt to replace the bulb immediately after turning off the lights.
Bulbs are very hot and may cause burns.
- Do not touch the glass of the bulb with bare hands. If you have no choice but to hold the bulb by the glass, use a clean, dry cloth to avoid leaving moisture or oil marks on it.
Also, if you scratch the bulb or drop it on the floor, it may break.
- Reinstall the bulbs and all parts needed to secure them carefully. Follow this recommendation to avoid the risk of overheating, fire, or water entering the lens. This may damage the headlights or cause condensation to form on the inner surface of the lens.
- Do not attempt to repair or disassemble the bulbs, connectors, electrical circuits, or components.
You may receive an electric shock, resulting in serious injury or death.
■ To prevent damage or fire
- Make sure the bulbs are correctly installed and fully locked in place.
- Check the wattage (in watts) of the bulb before installing it to prevent overheating.