Check / Clear DTCs
CHECK / CLEAR DTCs
DTC CHECK (USING SST CHECK WIRE)
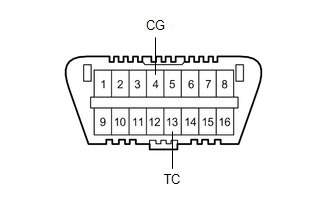
(a) Check the DTCs (current DTCs).
(1) Turn the ignition switch ON and wait for at least 60 seconds.
(2) Using the SST, connect terminals TC and CG of the DLC3.
SST: 09843-18040
NOTICE:
Connect the correct terminals to avoid malfunctions.
(b) Check the DTCs (history DTCs).
(1) Turn the ignition switch OFF.
(2) Using the SST, connect terminals TC and CG of the DLC3.
SST: 09843-18040
NOTICE:
Connect the correct terminals to avoid malfunctions.
(3) Turn the ignition switch ON and wait for at least 60 seconds.
(c) Read the DTCs.
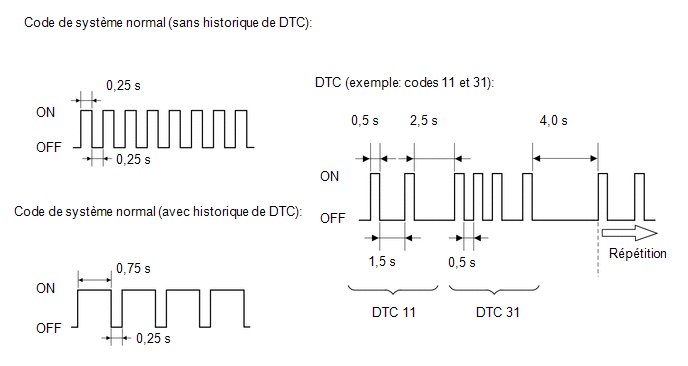
(1) Read the DTC blink patterns. The illustration shows, as an example, the blink patterns for the normal system code and for DTCs 11 and 31.
- Normal System Code Indication (without history DTCs)
The indicator blinks twice per second.
- Normal System Code Indication (with history DTCs)
When a DTC listed in the history is stored in the airbag sensor assembly, the indicator blinks only once per second.
- DTC Indication
The first blink(s) indicate the first digit of the DTC. The second blink(s) indicate the second digit of the DTC and appear after a pause of 1.5 seconds.
NOTICE:
When a DTC includes a letter (for example DTC 8A), the indicator blinks 8 times, then blinks 10 times to indicate the letter A after a pause of 1.5 seconds.
Comparison TableNumber of Blinks | Letter Indicated |
|---|---|
10 |
A |
11 |
B |
12 |
C |
13 |
D |
14 |
E |
15 |
F |
If more than one code is output, a pause of 2.5 seconds separates the output of each code. After all codes have been output, a pause of 4.0 seconds follows, after which all codes are output again.
HINT:
- If two or more malfunctions are detected, the indication starts with the lowest numerical code.
- If DTCs are indicated without the terminals connected, refer to the TC and CG terminal circuit.
Click here

CLEARING DTCs (USING SST CHECK WIRE)
(a) Clear the DTCs.
(1) The DTCs are erased when the ignition switch is turned to OFF.
HINT:
Depending on the DTC detected, turning the ignition switch to OFF may not be sufficient to erase the code. In this case, proceed to the next step.
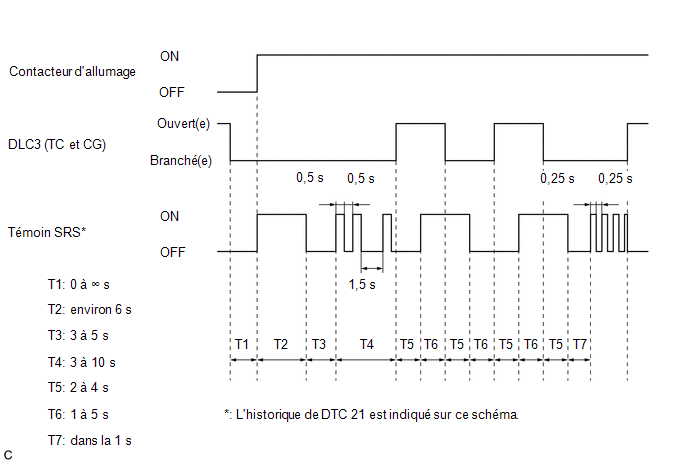
(2) Using the SST, connect terminals TS and CG of the DLC3, and turn the ignition switch to ON.
SST: 09843-18040
(3) Disconnect terminal TC of the DLC3 within 3 to 10 seconds after the DTCs are output, and check whether the SRS warning light comes on after 3 seconds.
(4) Within 2 to 4 seconds after the SRS warning light comes on, connect terminals TC and CG of the DLC3.
(5) The SRS warning light goes off within 2 to 4 seconds after terminals TC and CG of the DLC3 are connected. Disconnect terminal TC within 2 to 4 seconds after the SRS warning light goes off.
(6) The SRS warning light comes on again within 2 to 4 seconds after terminal TC is disconnected. Reconnect terminals TC and CG within 2 to 4 seconds after the SRS warning light comes on.
(7) Check whether the SRS warning light goes off within 2 to 4 seconds after terminals TC and CG of the DLC3 are connected. Also check whether the normal code is output within 1 second after the SRS warning light goes off.
If the DTCs are not erased, repeat this procedure until they are erased.
CHECKING DTCs (USING TECHSTREAM)
(a) Turn the ignition switch OFF.
(b) Connect the Techstream to the DLC3.
(c) Turn the ignition switch to ON and wait at least 60 seconds.
(d) Turn on the Techstream.
(e) Select the following menu items: Body Electrical / SRS Airbag / Trouble Codes.
Body Electrical > SRS Airbag > Trouble Codes(f) Check the DTCs by following the instructions displayed on the Techstream screen.
HINT:
Refer to the Techstream operator's manual for more information.
ERASING DTCs (USING TECHSTREAM)
(a) Turn the ignition switch OFF.
(b) Connect the Techstream to the DLC3.
(c) Turn the ignition switch to ON and wait at least 60 seconds.
(d) Turn on the Techstream.
(e) Select the following menu items: Body Electrical / SRS Airbag / Trouble Codes.
Body Electrical > SRS Airbag > Clear DTCs(f) Erase the DTCs by following the instructions displayed on the Techstream screen.
HINT:
Refer to the Techstream operator's manual for more information.