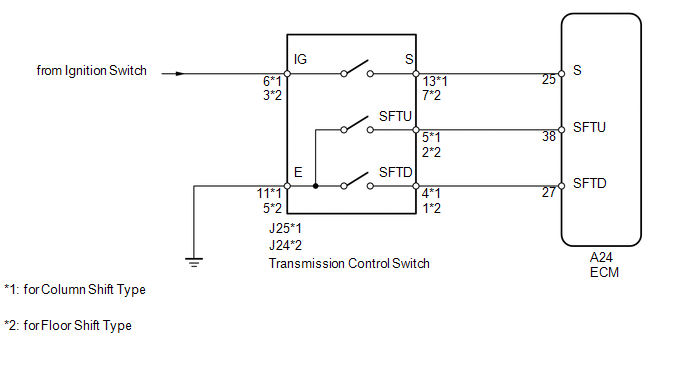
After moving the shift lever to S, it is possible to switch the shift range between "1" (S1 range) and "6" (S6 range) using the transmission control switch.
Shifting to "+" once raises the shift range by one, and shifting to "-" once lowers the shift range by one.
WIRING DIAGRAM
PROCEDURE
INSPECT TRANSMISSION CONTROL SWITCH
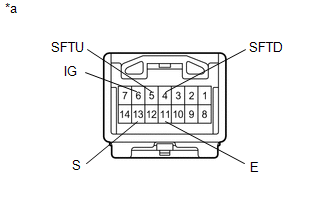
(a) for Column Shift Type:
(1) Disconnect the J25 transmission control switch connector.
(2) Measure the resistance according to the value(s) in the table below.
Standard Resistance:
Tester Connection
Condition
Specified Condition
6 (IG) - 13 (S)
Shift lever in S, "+" or "-"
Below 1 Ω
5 (SFTU) - 11 (E)
Shift lever held in "+"
(Up-shift)
Below 1 Ω
4 (SFTD) - 11 (E)
Shift lever held in "-"
(Down-shift)
Below 1 Ω
6 (IG) - 13 (S)
Shift lever not in S, "+" or "-"
10 kΩ or higher
5 (SFTU) - 11 (E)
Shift lever in S
10 kΩ or higher
4 (SFTD) - 11 (E)
Shift lever in S
10 kΩ or higher
Text in Illustration
*a
Component without harness connected
(Transmission Control Switch)
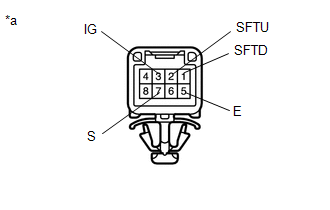
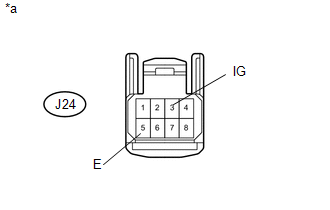
(b) for Floor Shift Type:
(1) Disconnect the J24 transmission control switch connector.
(2) Measure the resistance according to the value(s) in the table below.
Standard Resistance:
Tester Connection
Condition
Specified Condition
3 (IG) - 7 (S)
Shift lever in S, "+" or "-"
Below 1 Ω
2 (SFTU) - 5 (E)
Shift lever held in "+"
(Up-shift)
Below 1 Ω
1 (SFTD) - 5 (E)
Shift lever held in "-"
(Down-shift)
Below 1 Ω
3 (IG) - 7 (S)
Shift lever not in S, "+" or "-"
10 kΩ or higher
2 (SFTU) - 5 (E)
Shift lever in S
10 kΩ or higher
1 (SFTD) - 5 (E)
Shift lever in S
10 kΩ or higher
Text in Illustration
*a
Component without harness connected
(Transmission Control Switch)
Result
Result
Proceed to
OK
A
NG (for Column Shift Type)
B
NG (for Floor Shift Type)
C
B
REPLACE TRANSMISSION CONTROL SWITCH (COLUMN SHIFT SHIFT LEVER SUB-ASSEMBLY)
C
REPLACE TRANSMISSION CONTROL SWITCH (TRANSMISSION FLOOR SHIFT ASSEMBLY)
A
CHECK HARNESS AND CONNECTOR (TRANSMISSION CONTROL SWITCH - BATTERY, BODY GROUND)
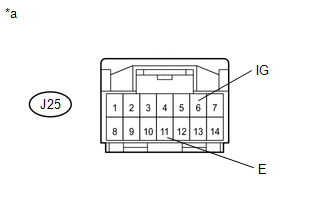
(a) for Column Shift Type:
(1) Disconnect the J25 transmission control switch connector.
(2) Measure the voltage according to the value(s) in the table below.
Standard Voltage:
Tester Connection
Switch Condition
Specified Condition
J25-6 (IG) - Body ground
Ignition switch ON
11 to 14 V
J25-6 (IG) - Body ground
Ignition switch off
Below 1 V
(3) Measure the resistance according to the value(s) in the table below.
Standard Resistance:
Tester Connection
Condition
Specified Condition
J25-11 (E) - Body ground
Always
Below 1 Ω
Text in Illustration
*a
Front view of wire harness connector
(to Transmission Control Switch)
(b) for Floor Shift Type:
(1) Disconnect the J24 transmission control switch connector.
(2) Measure the voltage according to the value(s) in the table below.
Standard Voltage:
Tester Connection
Switch Condition
Specified Condition
J24-3 (IG) - Body ground
Ignition switch ON
11 to 14 V
J24-3 (IG) - Body ground
Ignition switch off
Below 1 V
(3) Measure the resistance according to the value(s) in the table below.
Standard Resistance:
Tester Connection
Condition
Specified Condition
J24-5 (E) - Body ground
Always
Below 1 Ω
Text in Illustration
*a
Front view of wire harness connector
(to Transmission Control Switch)
NG
REPAIR OR REPLACE HARNESS OR CONNECTOR
OK
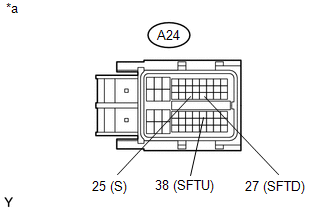
CHECK HARNESS AND CONNECTOR (TRANSMISSION CONTROL SWITCH - ECM)
(a) Disconnect the A24 ECM connector.
(b) Measure the voltage according to the value(s) in the table below.
Standard Voltage:
Tester Connection
Condition
Specified Condition
A24-25 (S) - Body ground
Ignition switch ON
Shift lever in S, "+" or "-"
11 to 14 V
A24-25 (S) - Body ground
Ignition switch ON
Shift lever not in S, "+" or "-"
Below 1 V
(c) Turn the ignition switch off.
(d) Measure the resistance according to the value(s) in the table below.
Standard Resistance:
Tester Connection
Condition
Specified Condition
A24-38 (SFTU) - Body ground
Shift lever held in "+"
(Up-shift)
Below 1 Ω
A24-27 (SFTD) - Body ground
Shift lever held in "-"
(Down-shift)
Below 1 Ω
A24-38 (SFTU) - Body ground
Shift lever in S
10 kΩ or higher
A24-27 (SFTD) - Body ground
Shift lever in S
10 kΩ or higher
Text in Illustration
*a
Front view of wire harness connector
(to ECM)
OK
PROCEED TO NEXT SUSPECTED AREA SHOWN IN PROBLEM SYMPTOMS TABLE