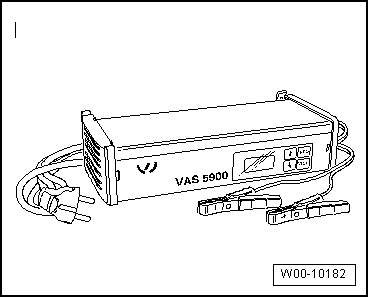
Battery Charger -VAS 5900-

WARNING!
Risk of injury! Observe the warnings and safety regulations!

WARNING!
Batteries where the magic eye shows light yellow must not be tested or charged. Do not give jump-start!
Risk of explosion when testing, charging or jump starting.
These batteries must be replaced.
This chapter describes the basic functions of the Battery Charger -VAS 5900-. For further information, refer to the → Operating Instructions for Battery Charger VAS 5900.

Note
- On this device, the effective charging current can be read directly on the charger.
- Observe the → Operating Instructions for Battery Charger VAS 5900.
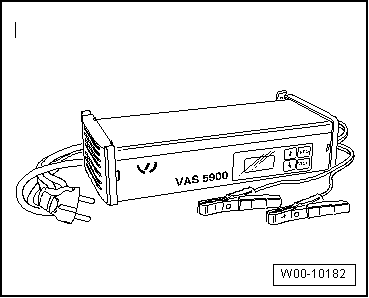
Battery Charger -VAS 5900- Device Description
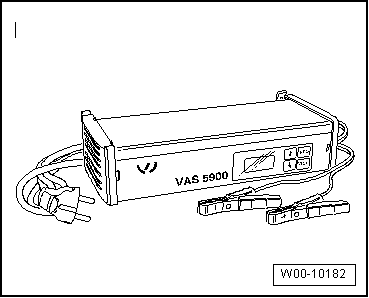
The Battery Charger -VAS 5900- is suitable for charging all 12 V batteries in the Volkswagen Group.
Battery Charger -VAS 5900-
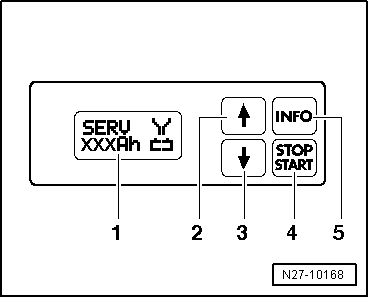
- Display
- Adjustment button "Up"↑
- Adjustment button "Down"↓
- START / STOP
- INFO
Charging a Battery with the Battery Charger -VAS 5900-

WARNING!
Risk of injury! Observe the warnings and safety regulations!

WARNING!
Batteries where the magic eye shows light yellow must not be tested or charged. Do not give jump-start!
Risk of explosion when testing, charging or jump starting.
These batteries must be replaced.
Required Special Tools, Test and Measuring Equipment and Auxiliary Items
- Battery Charger -VAS 5900-

Note
The battery must have a temperature of at least 10 ºC.
- Switch off the ignition and all electrical consumers.
- Plug the charger's power plug into the socket. The last selected battery type is shown on the display.
- Use INFO to set the operating mode that matches the battery.
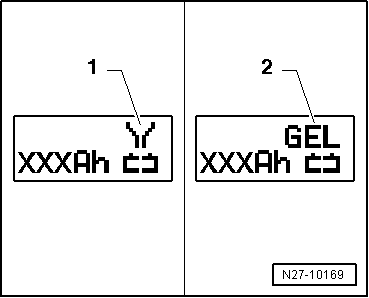
The display shows symbol -1- for "Standard charge of wet batteries" or symbol -2- for "Standard charge of gel/AGM batteries".
- Set the battery capacity (Ah) of the battery to be charged using the "Up"↑ or "Down"↓ button.
- Connect the red charging clamp "+" to the positive terminal of the battery.

Note
On vehicles with start/stop function and an installed battery monitor control module with battery sensor -J367-, the black charging clamp - must be connected to the vehicle body ground. Connecting it to the negative terminal of the battery causes start/stop system malfunctions.
- Connect the black charging clamp "-" to the negative connection point.
The charger detects the nominal voltage of the connected battery (6 V, 12 V or 24 V) and starts charging automatically.

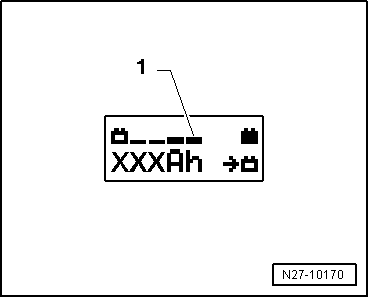
At a state of charge of approx. 80 - 85 %, the charger switches to the "final charge". The display shows 4 bars -1-. The battery is now ready for use.
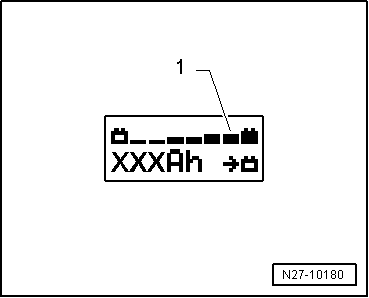
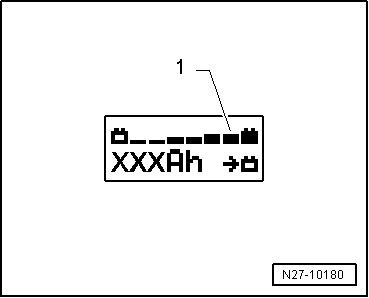
At a state of charge of 100 %, all bars are shown on the display.

Note
- With the battery type "Standard charge", consumers can be operated in parallel during charging. This extends the charging time.
- Depending on the battery type, the charger switches to maintenance charge after approx. 1-7 hours. To reach a 100 % state of charge, the battery should remain connected to the charger for this period.
Possible faults and fault remedies:
1 - Displayed battery voltage does not match the nominal voltage:
- Press and hold the corresponding "Up"↑ or "Down"↓ button until charging starts.
2 - Displayed battery voltage does not match the nominal voltage - charging has already started:
- Press START / STOP twice.
- Press and hold the corresponding "Up"↑ or "Down"↓ button until charging starts again.
3 - The charger does not detect a battery if the battery voltage is less than 2 V:
The display remains unchanged.
The selected battery type and the ampere-hours (Ah) are shown.
Ending battery charging:
- Press START / STOP.
- Disconnect the black charging clamp "-" of the charger from the negative connection point.
- Disconnect the red charging clamp "+" of the charger from the positive terminal of the battery.
- Unplug the charger's mains plug.
Service Charge with the Battery Charger -VAS 5900-

WARNING!
Risk of injury! Observe the warnings and safety regulations!

Caution!
The "Service charge" operating mode is not permitted on Volkswagen vehicles, as voltage peaks can damage the on-board electronics.
If the "Service charge" operating mode is used anyway, the battery must be disconnected from the vehicle electrical system.

WARNING!
Batteries where the magic eye shows light yellow must not be tested or charged. Do not give jump-start!
Risk of explosion when testing, charging or jump starting.
These batteries must be replaced.

Caution!
Always set the operating mode that matches the battery when charging → Operating Instructions for Battery Charger VAS 5900!
The "Service charge" is suitable for:
Wet batteries where the magic eye indicates that charging is required (magic eye black or green).
The "Service charge (SERV)" operating mode is only used for sulfated batteries. The battery is charged with voltages > 14.4 V. This can partially break down the sulfate layer. After charging, always check the color indicator of the magic eye before using the battery further.
Required Special Tools, Test and Measuring Equipment and Auxiliary Items
- Battery Charger -VAS 5900-

Note
The battery must have a temperature of at least 10 ºC.
- Switch off the ignition and all electrical consumers.
- Plug the charger's power plug into the socket. The last selected operating mode is shown on the display.
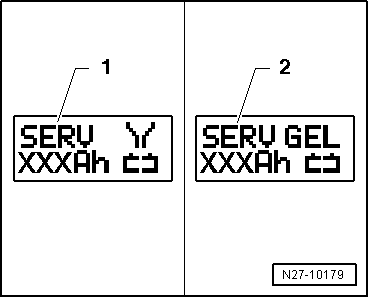
- Use INFO to set the battery type that matches the battery.
The display shows symbol -1- for "Service charge of wet batteries" or symbol -2- for "Service charge of gel/AGM batteries".
- Set the battery capacity (Ah) of the battery to be charged using the "Up"↑ or "Down"↓ button.
- Connect the red charging clamp "+" to the positive terminal of the battery.

Note
On vehicles with start/stop function and a battery monitoring control module with battery sensor -J367-, connect the black charging clamp "-" to body ground. Connecting it to the negative battery terminal causes start/stop system malfunctions.
- Connect the black charging clamp "-" to the negative connection point.
The charger detects the nominal voltage of the connected battery (6 V, 12 V or 24 V) and starts charging automatically.
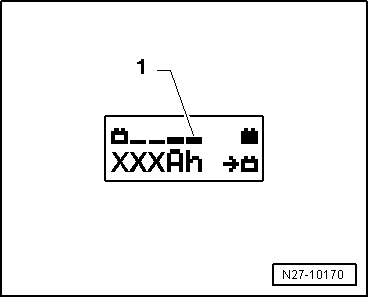
At a battery voltage state of charge of approx. 80 - 85 %, the charger switches to the "final charge". The display shows 4 bars -1-. The battery is now ready for use.

Note
The success of the "Service charge" depends on the degree of sulfation of the battery.
Possible faults and fault remedies:
1 - Displayed battery voltage does not match the nominal voltage:
- Press and hold the corresponding "Up"↑ or "Down"↓ button until charging starts.
2 - Displayed battery voltage does not match the nominal voltage - charging has already started:
- Press START / STOP twice.
- Press and hold the corresponding "Up"↑ or "Down"↓ button until charging starts.
3 - The charger does not detect a battery if the battery voltage is less than 2 V:
The display remains unchanged.
The selected operating mode and the ampere-hours (Ah) are shown.
Ending battery charging:
- Press START / STOP.
- Disconnect the black charging clamp "-" of the charger from the negative connection point.
- Disconnect the red charging clamp "+" of the charger from the positive terminal of the battery.
- Unplug the charger's mains plug.
Charging Deeply Discharged Batteries with the Battery Charger -VAS 5900-

WARNING!
Risk of injury! Observe the warnings and safety regulations!

WARNING!
Batteries where the magic eye shows light yellow must not be tested or charged. Do not give jump-start!
Risk of explosion when testing, charging or jump starting.
These batteries must be replaced.

Caution!
- The charging clamp reverse-polarity protection is not active in the "Charging deeply discharged batteries / support mode" operating mode. Connect the charging clamps with the correct polarity to the battery terminals!
- Always set the operating mode that matches the battery when charging → Operating Instructions for Battery Charger VAS 5900!
- The deeply discharged battery is not detected by the charger.
- Do not press START / STOP if the charging clamps are connected incorrectly! The charger may be damaged.
For batteries with a voltage below 2 V, the Battery Charger -VAS 5900- cannot detect the battery automatically.
Required Special Tools, Test and Measuring Equipment and Auxiliary Items
- Battery Charger -VAS 5900-

Note
- Observe the notes in the chapter.
- Deeply discharged batteries in vehicles before registration must be replaced before delivery. Prior damage cannot be ruled out.
- The battery must have a temperature of at least 10 ºC.
- Switch off the ignition and all electrical consumers.
- Plug the charger's power plug into the socket. The last selected operating mode is shown on the display.
- Use INFO to set the battery type that matches the battery.
The display shows symbol -1- for "Service charge of wet batteries" or symbol -2- for "Service charge of gel/AGM batteries".
- Set the battery capacity (Ah) of the battery to be charged using the corresponding "Up"↑ or "Down"↓ button.
- Connect the red charging clamp "+" to the positive terminal of the battery.

Note
On vehicles with start/stop function and an installed battery monitor control module with battery sensor -J367-, the black charging clamp - must be connected to the vehicle body ground. Connecting it to the negative terminal of the battery causes start/stop system malfunctions.
- Connect the black charging clamp "-" to the negative connection point.
- Press and hold START / STOP for approx. 5 seconds. The menu item "Charging deeply discharged batteries/ buffer operation" is activated.
- Press the corresponding "Up"↑ or "Down"↓ button to set the battery voltage (6 V, 12 V or 24 V).

Note
If no button is pressed within 5 seconds, the charger returns to the main menu (select operating mode).
- Confirm the selected battery voltage with START / STOP.
The charger then asks to confirm that the charging clamps are connected with the correct polarity.
- Check that the charging clamps are connected with the correct polarity.
- Confirm that the charging clamps are connected with the correct polarity using START / STOP.
The charger starts charging the deeply discharged battery.
Ending battery charging:
- Press START / STOP.
- Disconnect the black charging clamp "-" of the charger from the negative connection point.
- Disconnect the red charging clamp "+" of the charger from the positive terminal of the battery.
- Unplug the charger's mains plug.
Buffer Operation with the Battery Charger -VAS 5900-
General notes:
Support mode supplies voltage to the vehicle electrical system when the battery is removed or disconnected.
For further information, refer to the → Operating Instructions VAS 5900.
Support mode is suitable for the following applications:
- Supplying vehicle electrical systems without an installed battery
- Maintaining voltage during battery replacement
- Component testing without a battery

WARNING!
Risk of injury! Observe the warnings and safety regulations!

WARNING!
Batteries where the magic eye shows light yellow must not be tested or charged. Do not give jump-start!
Risk of explosion when testing, charging or jump starting.
These batteries must be replaced.
- Switch off the ignition and all electrical consumers.

Caution!
- The charging clamp reverse-polarity protection is not active in the "Charging deeply discharged batteries / support mode" operating mode. Connect the charging clamps with the correct polarity to the battery terminals!
- A short circuit may cause sparks.
- This creates a risk of explosion.
- Make sure the charging clamps are securely attached.
- Do not press START / STOP if the charging clamps are connected incorrectly! The charger may be damaged.
- Remove the battery.
- Plug the charger's power plug into the socket. The last selected operating mode is shown on the display.

Caution!
When the battery is removed, be sure to prevent the charging clamp connected to the positive terminal from contacting body ground. Also make sure the battery terminals cannot contact each other.
- Connect the red charging clamp "+" to the positive terminal of the vehicle.

Note
On vehicles with start/stop function and an installed battery monitor control module with battery sensor -J367-, the black charging clamp - must be connected to the vehicle body ground. Connecting it to the negative terminal of the battery causes start/stop system malfunctions.
- Connect the black charging clamp "-" to the negative terminal of the vehicle.
- Press and hold START / STOP for approx. 5 seconds. The menu item "Charging deeply discharged batteries/ buffer operation" is activated.
- Press the corresponding "Up"↑ or "Down"↓ button to set the battery voltage (6 V, 12 V or 24 V).

Note
If no button is pressed within 5 seconds, the charger returns to the main menu (select operating mode).
- Confirm the selected battery voltage with START / STOP.
The charger then asks to confirm that the charging clamps are connected with the correct polarity.
- Check that the charging clamps are connected with the correct polarity.
- Confirm that the charging clamps are connected with the correct polarity using START / STOP.
The charger starts battery buffer operation.
To end battery support mode:
- Press START / STOP.
- Disconnect the black charging clamp "-" of the charger from the negative vehicle terminal.
- Disconnect the red charging clamp "+" of the charger from the positive vehicle terminal.
- Unplug the charger's mains plug.
Maintenance Charge with the Battery Charger -VAS 5900-

Note
- If the battery is discharged by an electrical consumer during maintenance charging, the Battery Charger -VAS 5900- automatically provides the appropriate charging.
- Maintenance charging can be carried out for an unlimited time.
- The battery is always ready for use.
- Also observe the battery manufacturer's maintenance instructions.

WARNING!
Risk of injury! Observe the warnings and safety regulations!

WARNING!
Batteries where the magic eye shows light yellow must not be tested or charged. Do not give jump-start!
Risk of explosion when testing, charging or jump starting.
These batteries must be replaced.
Once the battery is fully charged, the Battery Charger -VAS 5900- switches to maintenance charging.
- Proceed as for charging the battery.
At a state of charge of 100 %, all bars are shown on the display.