Removing the Fuel Pump
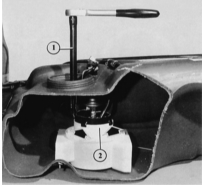
The opened fuel tank shown here illustrates how the fuel pump is removed. However, this requires special tool (1), which turns the inner part of the housing (fuel strainer 2) slightly to the left. The tool's tabs (arrows) must engage the recesses on the inner part.
To install the fuel pump (1) with the inner part of the fuel strainer housing (2) into the outer part (3), observe the correct installation position: on front-wheel-drive Audi models, the mark on the inner part of the strainer housing must be aligned with the mark on the outer part (arrows in left illustration). On the all-wheel-drive Audi model, the double mark on the inner part of the strainer housing must be aligned with the mark on the outer part (arrows in right illustration).
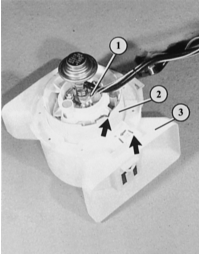
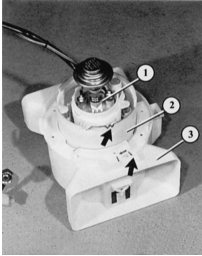
This work should be performed by a workshop, because the fuel pump is removed together with the inner part of the fuel strainer housing, which can only be removed from the outer part of the strainer using special tool 3307. Anyone who can rent such a tool should proceed as follows:
PROCEDURE
Remove the multi-pin connector.
Squeeze the retaining tabs on the return line fitting and remove the hose.
Unscrew the supply fuel line.
Unscrew the plastic union nut. As a rule, it is very tight. Therefore, use the bluntest possible screwdriver, place it against one of the flats of the nut and loosen the nut by lightly tapping the screwdriver handle with a hammer. Repeat on other flats if necessary.
Now the fuel tank sending unit flange can be lifted slightly.
On the inside of the sending unit flange (as well as on the outside), squeeze the retaining tabs on the return line fitting and pull the hose downward.
Disconnect the connector from the fuel level sender.
Fit special tool 3307 on the inside of the strainer housing and turn it to the left until it stops.
Remove the fuel pump with the inner part and the sending unit flange from the tank.
Carefully note (mark) the installation position of the pump, lines, wires and wire ties, because during installation all components must be reassembled in exactly the same way.
After disconnecting the pressure line (note installation position), the fuel pump can be separated from the inner part of the strainer housing. This differs depending on the pump version:
60 mm pump: turn the screen at the bottom of the inner side of the strainer housing to the left and remove the fuel pump. During installation, the side projection on the pump must engage the slot. Take care with the O-ring.
40 mm pump: squeeze the locking clip at the top of the inner part of the strainer housing and remove the pump. During installation, the pump can only be fitted in one position.
Note: on front-wheel drive Audi 80 models, the mark on the outer side must align with the single notch (mark) on the inner side. On all-wheel drive (quattro) models, it must align with the double notch.
Retighten the inner part using wrench 3307. Install the remaining components.
Protective flange position during installation: the arrow on the flange must align with the mark on the fuel tank.
Test yourself
A quick Audi 80 quiz: every answer comes with an explanation and a link to the manual page.