Assembly - Transmission
Special Service Tools / General Equipment
 |
204-029 Drift |
 |
205-153 (T80T-4000-W) Handle |
 |
307-541 Installer, Transfer Gear Bearing TKIT-2005D1-F |
 |
307-591 Calibration Plate, Differential/Transfer Gear Bearing TKIT-2006UF-FLM TKIT-2006UF-RYAD |
 |
307-672 Installer, Input Guide and Seal TKIT-2010D-FLM TKIT-2010D-RYAD |
 |
307-680 Table Assembly (DPS6) TKIT-2010D-FLM TKIT-2010D-RYAD |
 |
307-741 Spring Compressor, Clutch F |
 |
307-758 Installer, Axle Seal - FWD |
 |
307-759 Installer, Axle Shaft Seal - AWD |
 |
307-792 Gauge, Differential Preload |
 |
307-793 Installer, Bearing Cup |
 |
307-794 Tool for Pre-Loading Transfer Gear Shims |
 |
307-795 Installer, Bearing Cup |
 |
307-821 Motor Rotor Remover/Installer |
| Feeler gauge | |
| Hydraulic Press | |
Materials
| Name | Specification |
|---|---|
| Motorcraft® MERCON® ULV Automatic Transmission Fluid XT-12-QULV |
WSS-M2C949-A, MERCON® ULV |
| Motorcraft® Ultra Silicone Sealant TA-29 |
WSS-M4G323-A8 |
All vehicles
- Install the park lock actuator guide and the park pawl.
- Install the park lock actuator guide bolts.
Torque: 89 lb-in (10 N·m)
- Install the park pawl shaft.
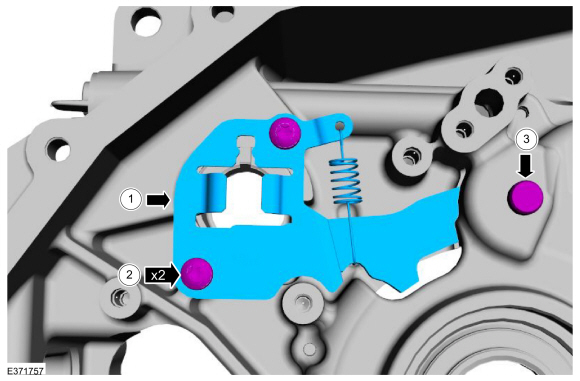
- Install the fluid pump and filter assembly.
Torque: 89 lb-in (10 N·m)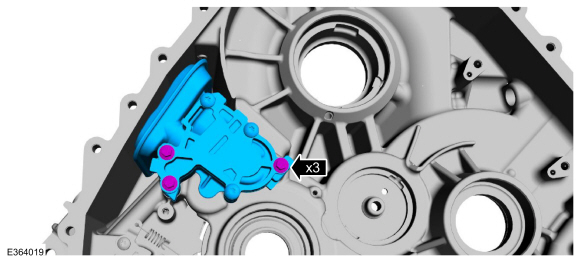
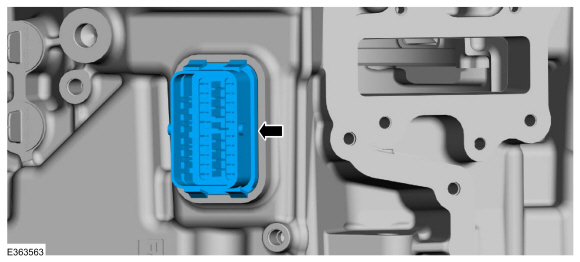
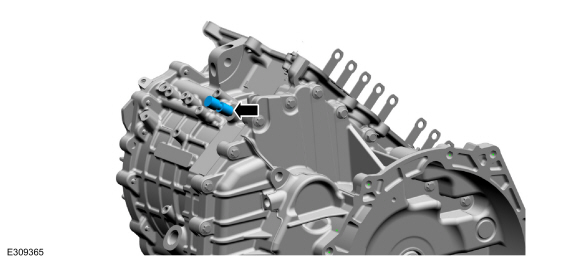
- Install the wiring harness bulkhead connector into the transmission case.
- Install the wiring harness bolts.
Torque: 89 lb-in (10 N·m)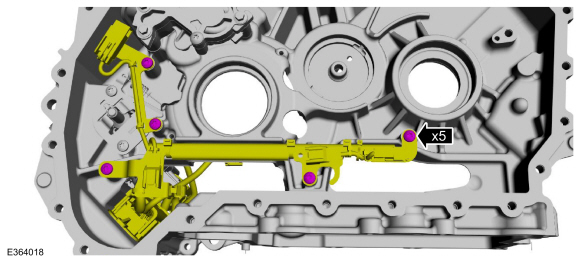
- Install the transmission onto wooden blocks.
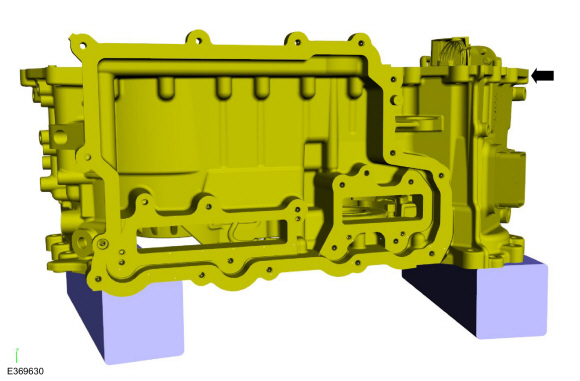
- Install the park lock actuator and bolts.
Torque: 97 lb-in (11 N·m)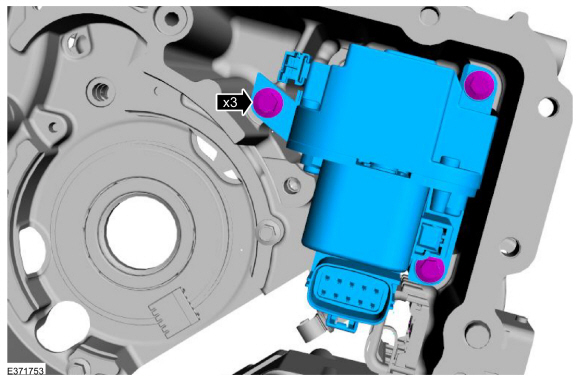
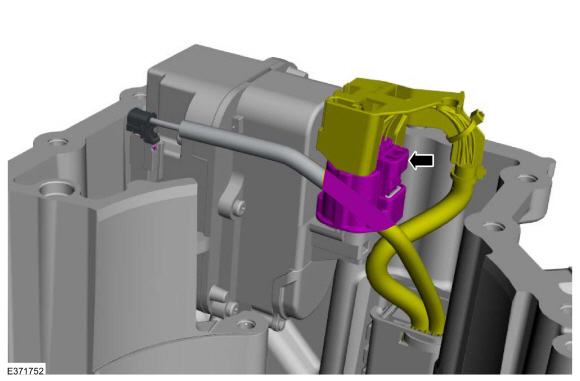
- Connect the park lock actuator electrical connector.
- If removed during disassembly, connect and install the traction motor resolver.
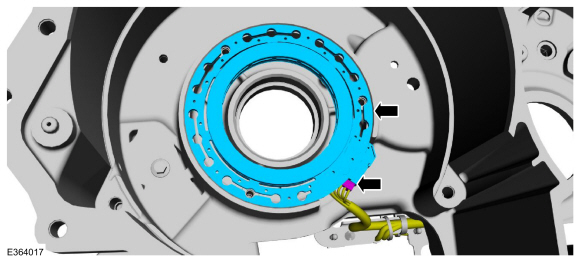
NOTICE: Resolver setup is critical to transmission calibration and operation.
Install the traction motor resolver bolts and align the marks made during removal.
Torque: 71 lb-in (8 N·m)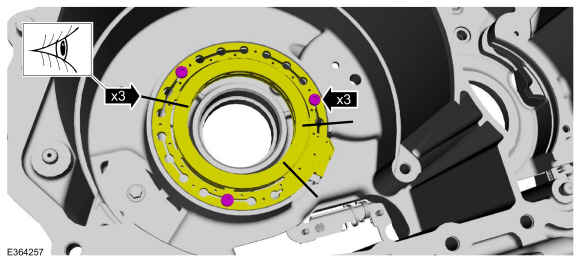
- Install the special tools into the traction motor stator bolt holes.
Use Special Service Tool: 307-680 Table Assembly (DPS6).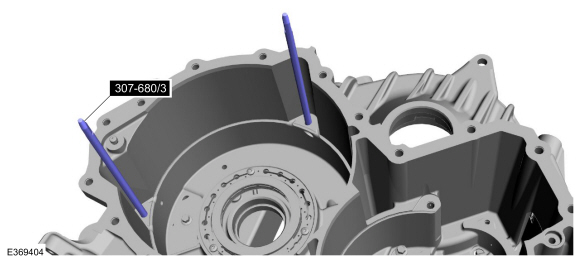
NOTICE: When installing the stator, take care not to bend or break the stator wires.
Place the traction motor stator onto the special tools and install the stator.
Use Special Service Tool: 307-680 Table Assembly (DPS6).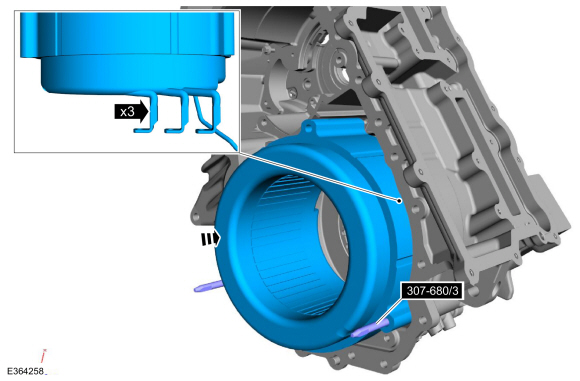
- Place the transmission case back onto the wooden blocks and remove the special tools.
Use Special Service Tool: 307-680 Table Assembly (DPS6).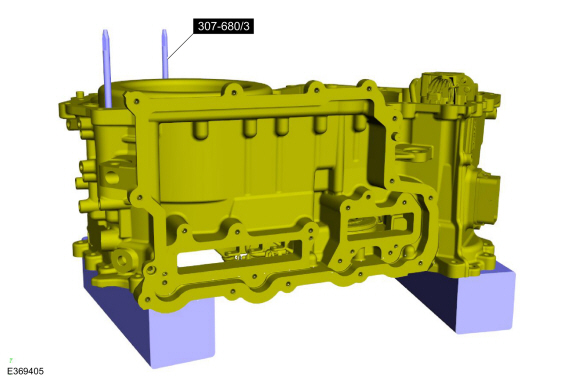
- Install the ring gear and bearing.
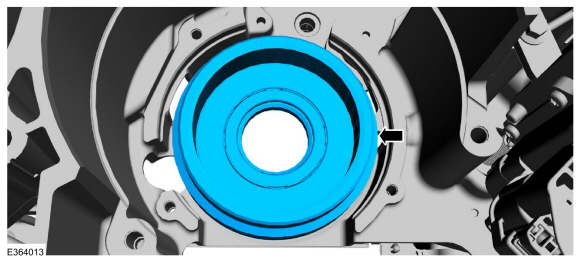
- Install the planetary carrier assembly.

- Install the sun gear thrust bearing.
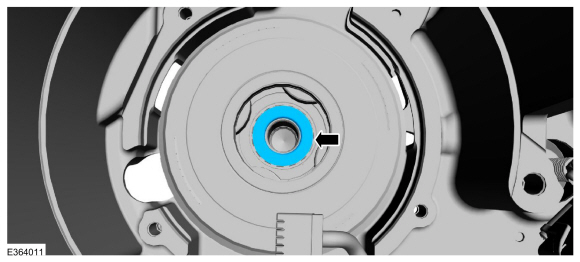
- Install the sun gear.
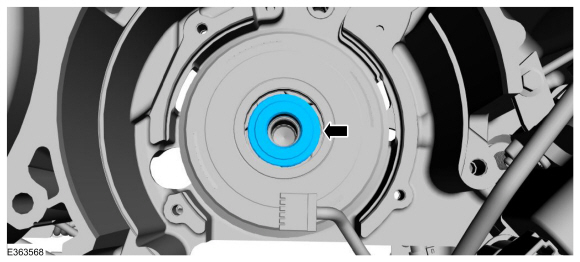
- Install the pump drive gear.
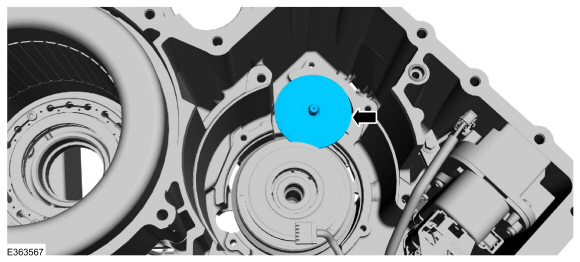
- Install the thrust washer onto the planetary carrier support cover.
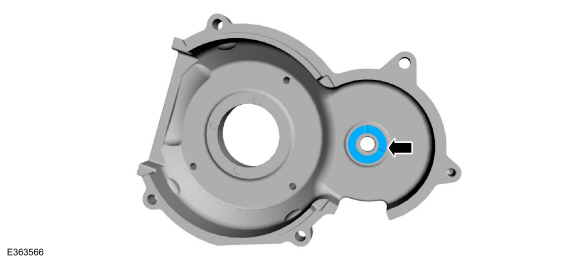
- Connect the generator/starter resolver, install the planetary carrier support cover and bolts.
Torque: 97 lb-in (11 N·m)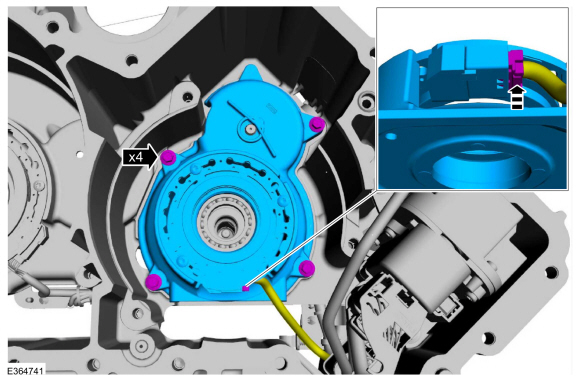
- Install the special tools into the generator/starter stator bolt holes.
Use Special Service Tool: 307-680 Table Assembly (DPS6).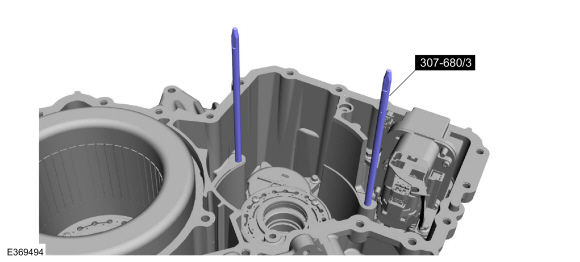
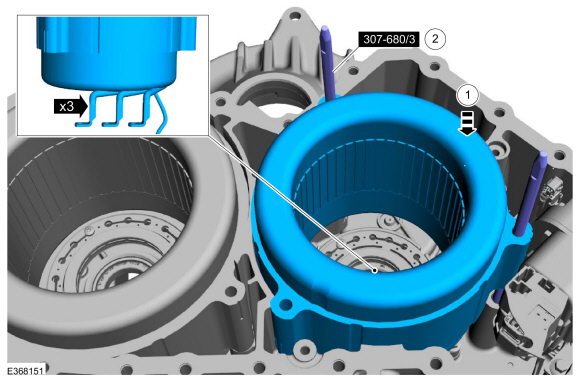
NOTICE: When installing the stator, take care not to bend or break the stator wires.
- Place the generator/starter stator on the special tools and install the stator.
- Remove the special tools.
Use the special service tool: 307-680 Table, Assembly (DPS6).
- Install the special tool to the generator/starter stator windings.
Use special service tool: 307-821 Motor Rotor Remover/Installer.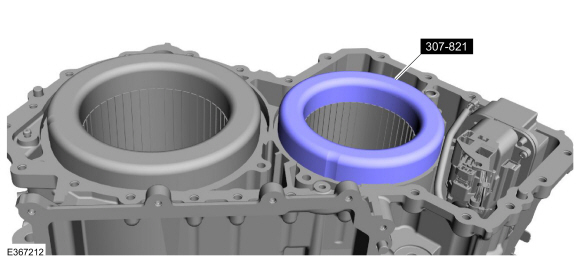
- Inspect the generator/starter rotor surface for raised metal caused by scratches and wear. Remove all raised metal with very fine-grit sandpaper.
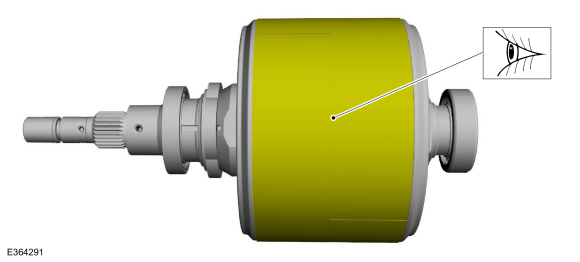
- Lubricate the generator/starter bearing surface.
Material: Motorcraft® MERCON® ULV Automatic Transmission Fluid. / XT-12-QULV (WSS-M2C949-A, ) (MERCON® ULV)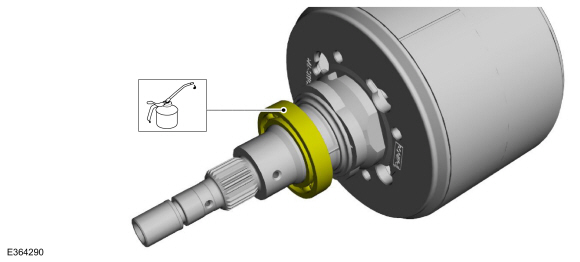
Using the special tools, install the generator/starter rotor.- Turn the nut on the tie rod counterclockwise while holding the tie rod so that it does not come out of the rotor.
- When the rotor no longer lowers, remove the special tool 307-741.
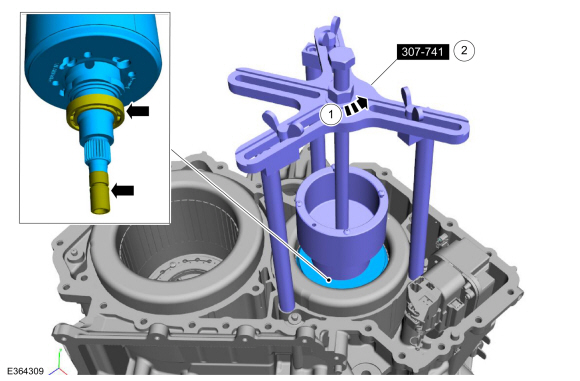
- Align the generator/starter stator with the marks on the transmission case made during removal.
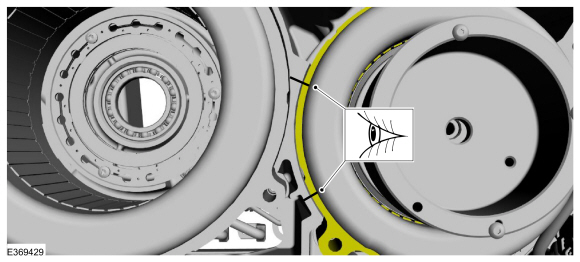
- Install the generator/starter stator bolts.
Torque: 18 lb-ft (25 N·m)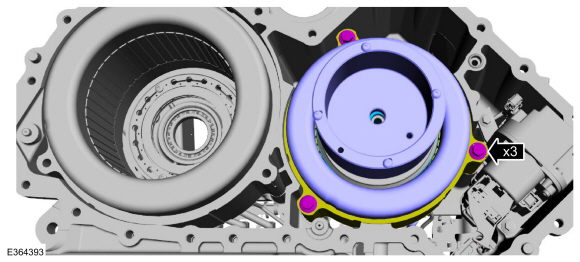
- Turn the special tool until the generator/starter rotor is fully installed.
Use the special service tool: 307-821 Engine Rotor Puller Installer.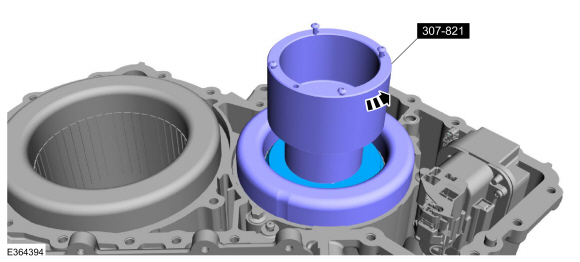
- Check the measurements recorded during disassembly to make sure the generator/starter rotor is fully installed.
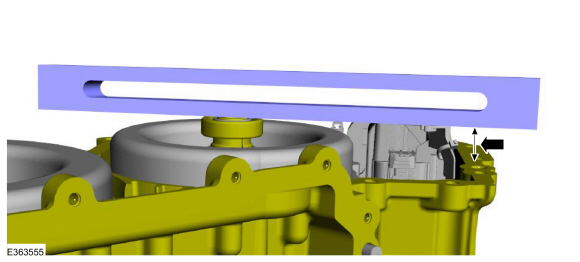
- Connect the park lock actuator.
- Install a new cable tie.
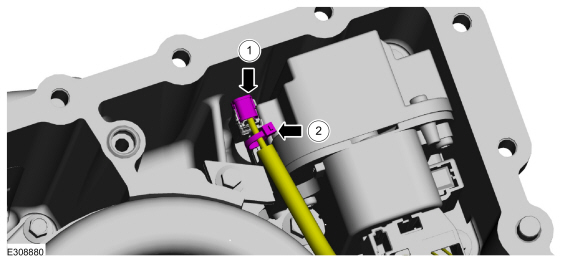
- Install the special tool to the traction motor stator windings.
Use special service tool: 307-821 Motor Rotor Remover/Installer.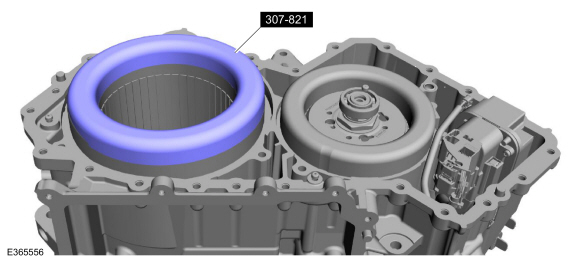
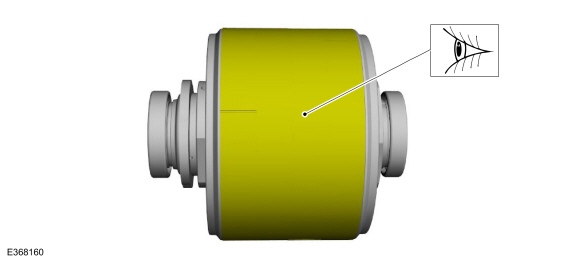
- Inspect the traction rotor surface for raised metal caused by scratches and wear. Remove all raised metal with very fine-grit sandpaper.
- Lubricate the traction motor bearing surface.
Material: Motorcraft® MERCON® ULV Automatic Transmission Fluid. / XT-12-QULV (WSS-M2C949-A, ) (MERCON® ULV)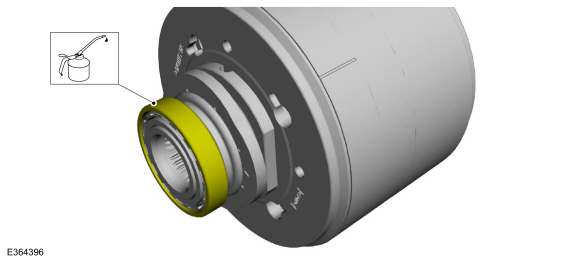
Using the special tools, install the traction motor rotor.- Turn the nut on the tie rod counterclockwise while holding the tie rod so that it does not come out of the rotor.
Use the special service tools: 307-741 Spring Compressor, Clutch F. , 307-821 Engine Rotor Puller Installer.
- Lower the rotor until the bottom of the tapered edge on the rotor is flush with the top edge of the stator core.
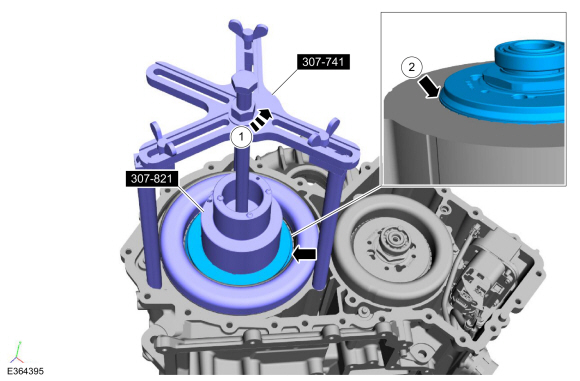
- Turn the nut on the tie rod counterclockwise while holding the tie rod so that it does not come out of the rotor.
- Align the traction motor stator with the marks on the transmission case made during removal.
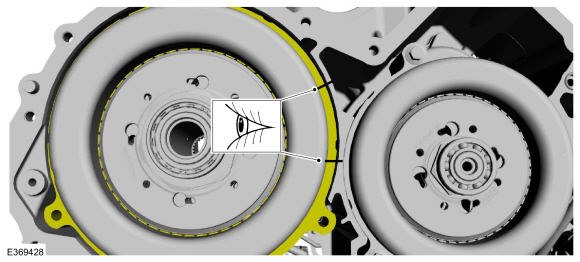
- Install the traction motor stator bolts.
Torque: 18 lb-ft (25 N·m)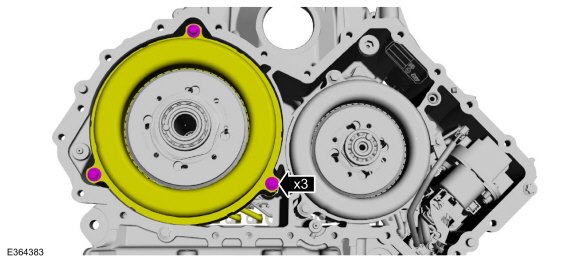
- Check the measurements recorded during disassembly to make sure the traction motor rotor is fully installed.
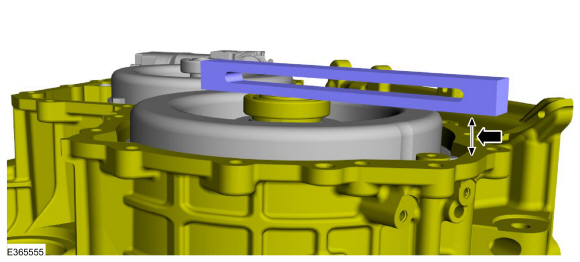
- Install the transmission case cover.
Refer to: Transmission Case Cover (307-01B Automatic Transmission — Automatic Transmission - HF45, Removal and Installation). - Connect the electrical connector of the traction motor stator.
- Connect the electrical connector of the generator/starter stator.
- Install the wiring retainer.
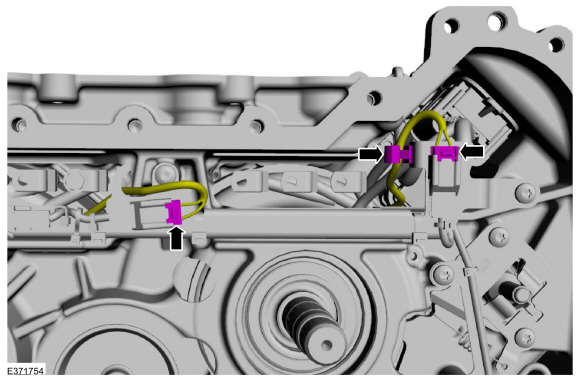
- Install the transmission high-voltage terminals.
Refer to: Transmission High-Voltage Terminals (307-01B Automatic Transmission - Automatic Transmission - HF45, Disassembly and Assembly of Components). NOTICE: When installing the bearing, press only on the inner bearing race, otherwise the bearing may be damaged.
Press the front bearing onto the traction motor pinion gear.
Use the general equipment: hydraulic press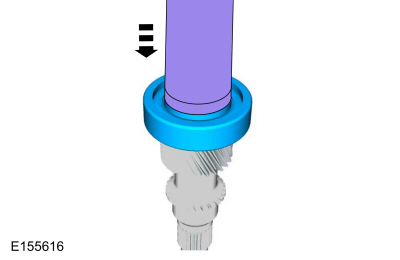
- Press the rear bearing onto the traction motor pinion gear.
Use the general equipment: hydraulic press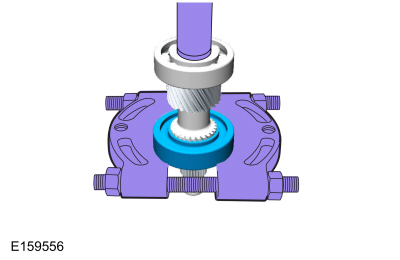
NOTICE: Do not use metal scrapers, wire brushes, power abrasive discs or other abrasive means to clean sealing surfaces. These tools leave scratches and gouges that create leak paths.
Make sure the mating surfaces are clean and free of foreign material.
Refer to: Cleaning and Preparing RTV Sealing Surfaces (303-00 Engine System - General Information, General Procedures).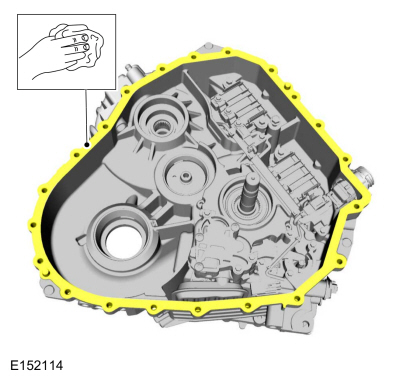
NOTICE: Do not use metal scrapers, wire brushes, power abrasive discs or other abrasive means to clean sealing surfaces. These tools leave scratches and gouges that create leak paths.
Make sure the mating surfaces are clean and free of foreign material.
Refer to: Cleaning and Preparing RTV Sealing Surfaces (303-00 Engine System - General Information, General Procedures).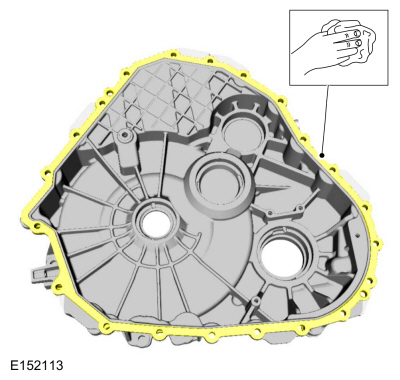
- Using the special tool, install the differential side bearing cup in the transmission case.
Use the special service tools: 204-029 Tie Rod. , 307-793 Installer, Bearing Cup. , 307-541 Installer, Transfer Gear Bearing.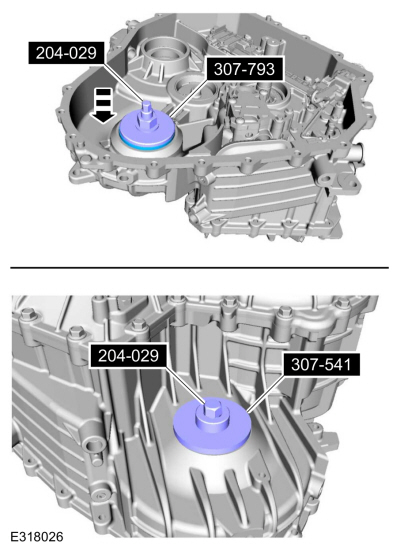
- Using the special tool, install the transfer shaft bearing cup on the transmission case side.
Use the special service tools: 205-153 (T80T-4000-W) Handle. , 307-795 Installer, Bearing Cup.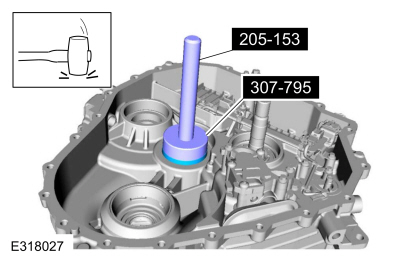
- Install the transfer gear assembly and the differential case assembly gear.
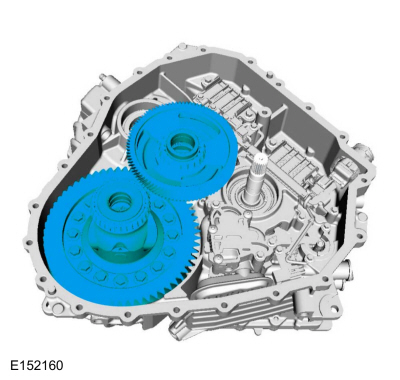
- Place the differential bearing cup and the transfer case bearing cup onto the bearings.
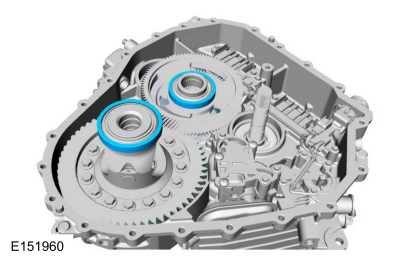
- Install the special tools over the bearing cups.
Use the special service tools: 307-792 Gauge, Differential Preload. , 307-794 Transfer Gear Shim Preload Tool.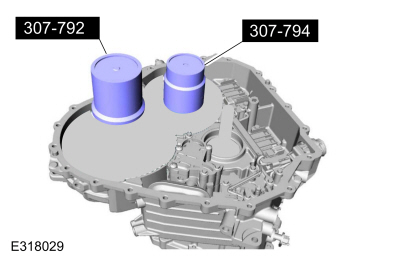
- Install the special fixtures by placing the shims on the studs.
Use the special service tool: 307-591 Shim Gauge, Differential/Transfer Gear Bearing.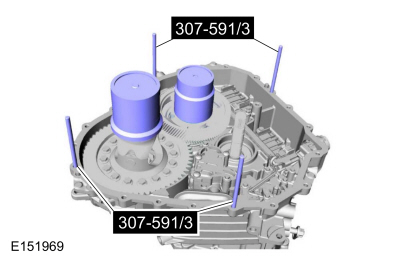
Use the special service tool: 307-591 Shim Gauge, Differential/Transfer Gear Bearing.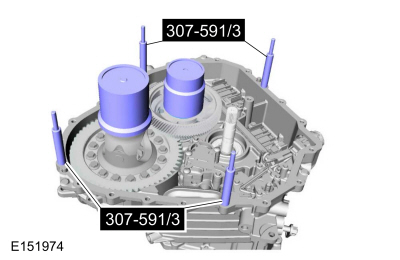
- Install the damper housing on the special fixtures.
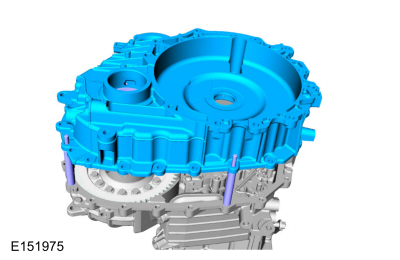
- Install the special tools by installing the nuts on the studs.
Use the special service tool: 307-591 Shim Gauge, Differential/Transfer Gear Bearing.
Torque: 18 lb-ft (24 N·m)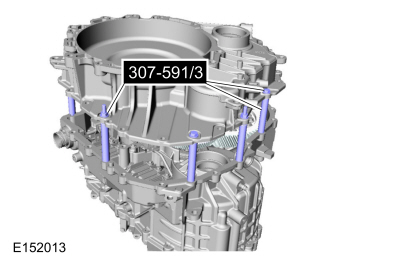
- Rotate the transfer shaft and differential several times to seat the bearing cups.
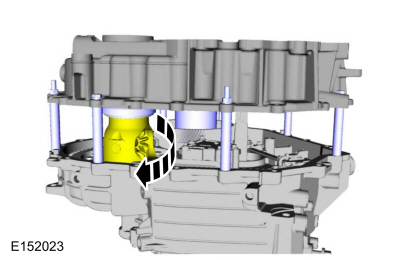
- Measure and record the smallest and largest preload clearance on the 307-591/1 Shim Gauge, Differential/Transfer Gear Bearing. Average the 2 measurements, then add 0.16 mm to obtain the differential bearing shim thickness. For differential bearing preload, shim part number.
Refer to: Specifications (307-01B Automatic Transmission - Automatic Transmission - HF45, Specifications).
Use the general equipment: feeler gauge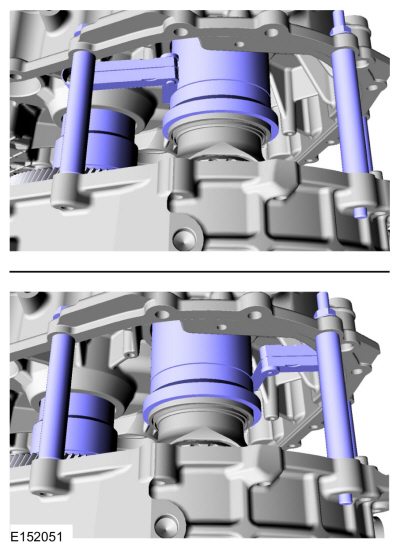
- Measure and record the minimum and maximum preload clearance using preload gauge, transfer gear 307-692. Average the 2 measurements, then add 0.15 mm to obtain the transfer case bearing preload shim thickness. Transfer bearing preload shim part number.
Refer to: Specifications (307-01B Automatic Transmission/Transaxle - Automatic Transmission/Transaxle - HF45, Specifications).
Use common service equipment: feeler gauge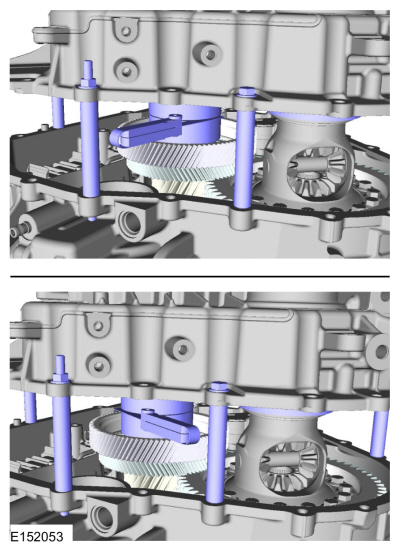
- Install the transfer shaft preload shim.
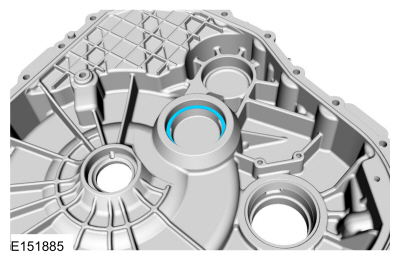
- Using the special tools, install the transfer case side gear bearing cup.
Use special service tools: 307-795 Installer, bearing cup. , 205-153 (T80T-4000-W) Handle.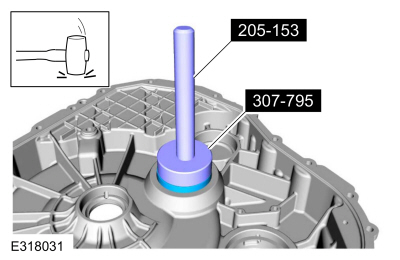
- Install the differential shim.
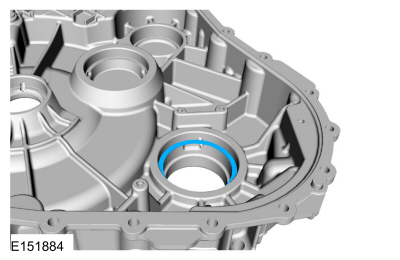
- Using the special tools, install the transfer case side differential bearing cup.
Use special service tools: 204-029 Drift. , 307-541 Installer, transfer gear bearing. , 307-793 Installer, bearing cup.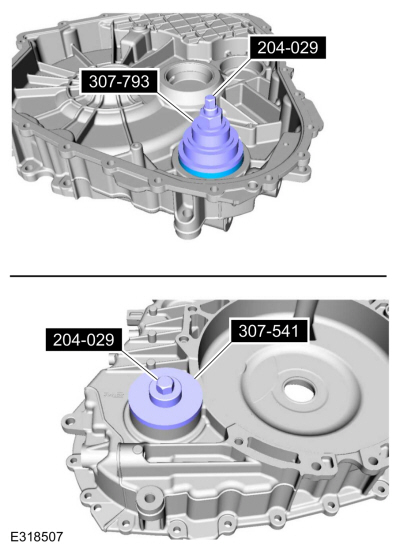
- Using the special tool, install the input shaft seal.
Use special service tool: 307-672 Installer, input and output seal guide.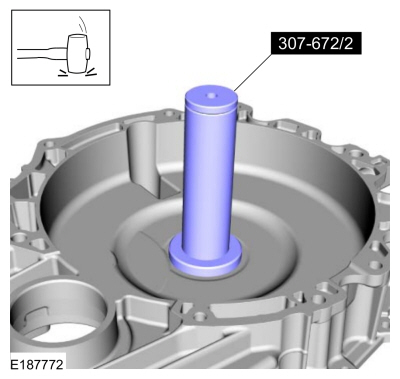
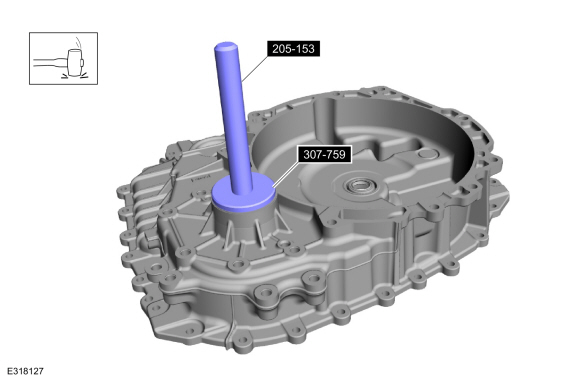
All-Wheel Drive (AWD)
- Using the special tool, install the right-hand axle seal.
Use special service tools: 307-759 Installer, axle seal - AWD. , 205-153 (T80T-4000-W) Handle.
 |
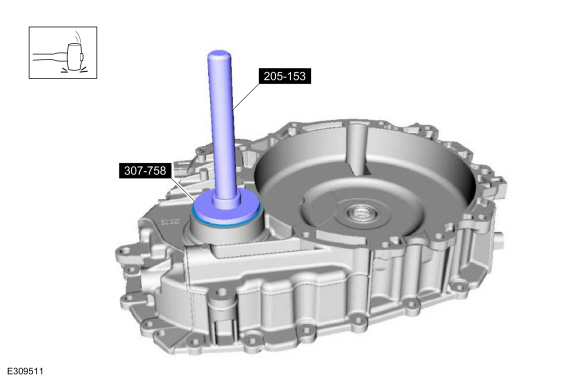
Front-Wheel Drive (FWD)
- Using the special tool, install the right-hand axle seal.
Use special service tools: 307-758 Installer, axle seal - FWD. , 205-153 (T80T-4000-W) Handle.
 |
All vehicles
- Remove the transmission fluid pan gasket and fasteners.
Torque: 97 lb-in (11 N·m)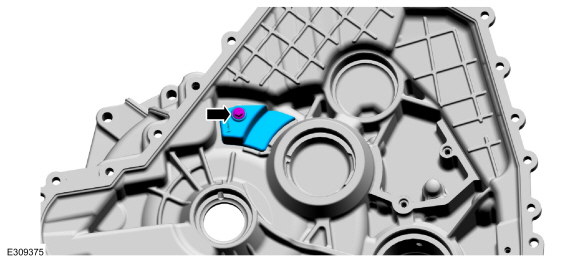
- Install the transmission fluid pan gasket and fasteners.
Torque: 97 lb-in (11 N·m)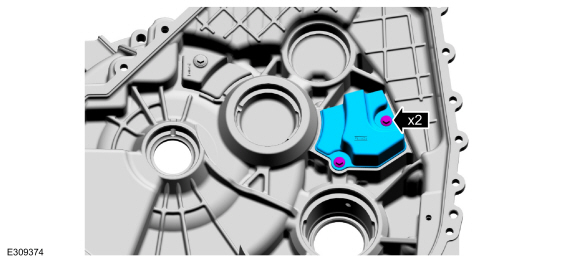
- Install the transmission fluid case baffle and fasteners.
Torque: 97 lb-in (11 N·m)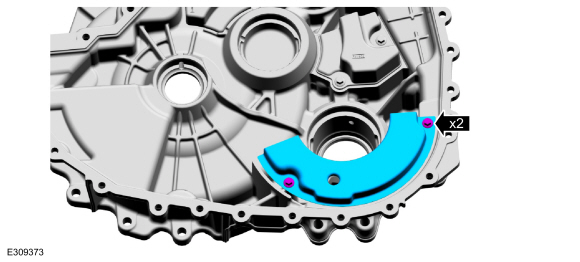
- Using the special tools, install the left axle seal.
Use the special service tools: 205-153 (T80T-4000-W) Handle, 307-758 Installer, Axle Seal - FWD.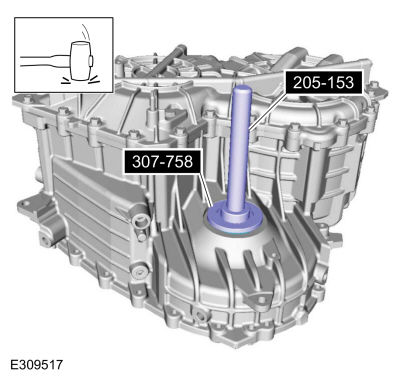
- Install the differential carrier assembly.
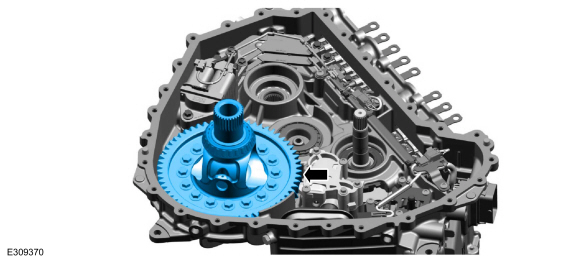
- Install the input final drive gear assembly.
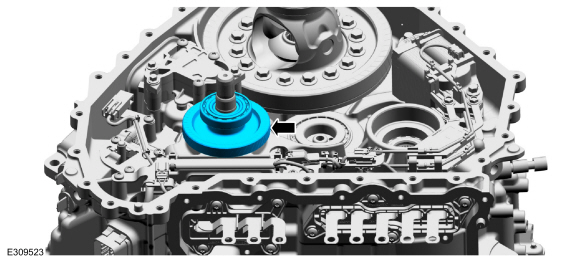
- Install the transfer shaft gear assembly and the traction motor drive gear assembly.
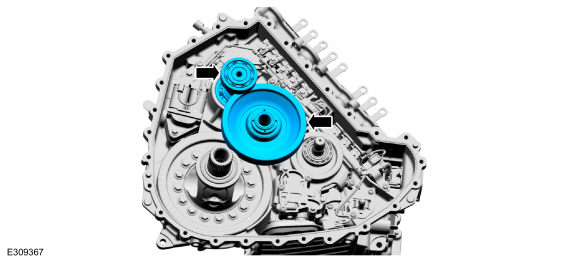
- Prepare the case sealing surfaces.
Refer to: RTV Sealing Surface Cleaning and Preparation (303-00 Engine System - General Information, General Procedures). - Apply silicone to the transmission case assembly.
Material: Motorcraft® Ultra Silicone Gasket Maker / TA-29 (WSS-M4G323-A8)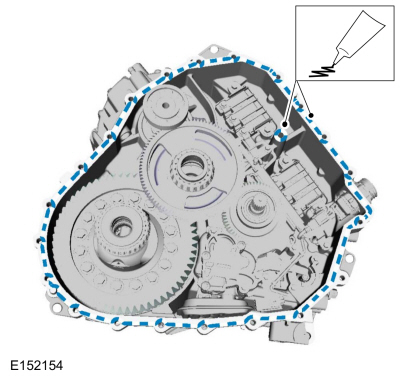
- Install the case, bolts and studs.
Torque: 18 lb-ft (25 N·m)
- Install the vent assembly.
Test yourself
A quick Ford Escape quiz: every answer comes with an explanation and a link to the manual page.