Piston pin
Removal
PROCEDURE
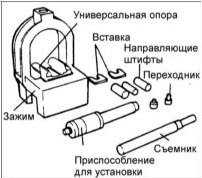
1. To disassemble and reassemble the piston and connecting rod, use special service tools 09234-33001.
2. Install the universal supports into the clamp between the connecting rod and the piston.
3. Insert the puller through the hole in the clamp arch.
Insert the clamp with the piston, connecting rod and puller under the press ram.
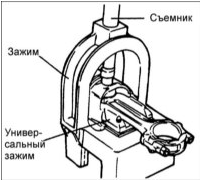
4. Using the puller, press the piston pin out of the piston.
Installation
PROCEDURE
1. Install the guide pins through the piston into the connecting rod, and install the piston pin from the other side of the piston.
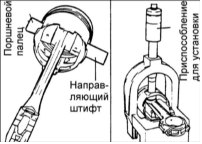
The guide pins locate the connecting rod in the piston. After installing the piston, connecting rod, piston pin and piston pin installation tool into the inserts, the guide pins also locate them in the clamp.
2. Install the piston assembly onto the clamp, making sure the guide pin supports the connecting rod in the piston pin.
3. Check the correct position of the piston and connecting rod, and, turning the knurled nut, secure the numbered bushing on the shaft.
4. Insert the shaft through the hole in the clamp arch. Press the piston pin into the connecting rod until the bushing on the shaft contacts the upper part of the clamp arch, and the guide pin comes out of the piston.
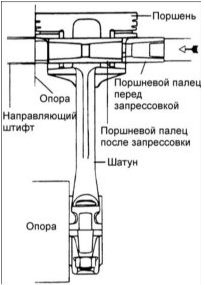
Piston pin press-in force must not exceed 22500 N.
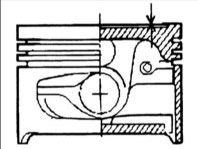
Press-in depth: 0.3–0.5 mm
Inspection
Piston and piston pin
PROCEDURE
1. Check the outer surface of the piston for damage, scoring or uneven wear. Replace the piston if necessary.
2. Check each piston ring for damage and uneven wear. Replace the piston rings if necessary.
When replacing the piston, the piston rings must also be replaced.
3. Check the piston pin by inserting it into the piston bore. The piston pin should slide smoothly into the piston when pressed by hand (at room temperature).
Piston Rings
PROCEDURE
1. Insert a new piston ring into the piston ring groove and measure the clearance between the piston ring and the groove wall with a feeler gauge. If the clearance exceeds the limit, replace the piston.
Piston ring-to-groove clearance:
No. 1 compression ring: 0.04–0.085 mm
No. 2 compression ring: 0.04–0.085 mm
Maximum clearance: 0.1 mm
2. Measure the piston ring end gap by inserting the piston ring into the cylinder bore by hand. Using the piston crown, push the piston ring into the lower part of the cylinder. Measure the piston ring end gap with a feeler gauge.
Piston ring end gap:
No. 1 compression ring: 0.15–0.30 mm
No. 2 compression ring: 0.20–0.40 mm
Oil control ring: 0.20–0.70 mm
Maximum end gap: 1.0 mm
Installation
PROCEDURE
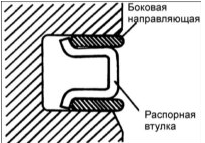
1. Install the expander.
2. Install the upper side rail. To install the side rail, first place one end of the side rail between the piston ring groove wall and the expander, press it in, then, pressing around the circumference, install it into the piston ring groove.
Do not use pliers to spread the piston rings when installing the side rail.
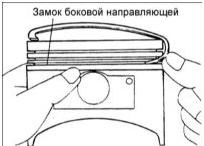
3. In the same way, install the lower side rail.
4. Using piston ring expander pliers, install the No. 2 compression ring.
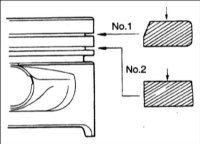
5. Using piston ring expander pliers, install the No. 1 compression ring.
6. Apply a thin coat of engine oil to the piston and piston rings.
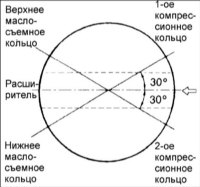
7. Position the piston ring end gaps as shown in the illustration.
8. Using a special tool, compress the piston rings onto the piston.
9. Install the piston with the piston rings into the No. 1 cylinder, with the mark on the piston facing the front of the cylinder block.
10. Using the handle of a hammer, tap the piston into the cylinder so that the big end of the connecting rod seats on the crankshaft journal.
11. Install the connecting rod bearing insert into the connecting rod cap.

12. Install the connecting rod cap and secure it with the nuts.
Tightening torque: 32–35 N•m
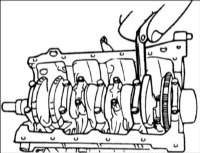
13. Using a feeler gauge inserted between the connecting rod and the crankshaft, measure the connecting rod side clearance.
Standard connecting rod side clearance: 0.10–0.25 mm
Maximum clearance: 0.40 mm
Test yourself
A quick Hyundai Accent quiz: every answer comes with an explanation and a link to the manual page.