DCT (Dual Clutch Transmission) System
Clutch Actuator Assembly Repair Procedures
In this manual: DCT (Dual Clutch Transmission) System
43steps
~273min
5/5difficulty
3special tools
Done 0 of 43
Removal
- Remove the air cleaner assembly and air duct. (Refer to Engine Mechanical System - "Air Cleaner")
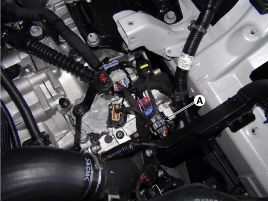
- Disconnect the clutch actuator connector (A).
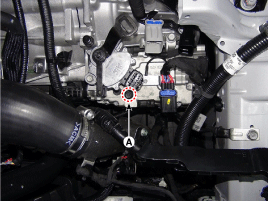
- Remove the ground bolt (A).
Tightening Torque: 9.8–11.7 N·m
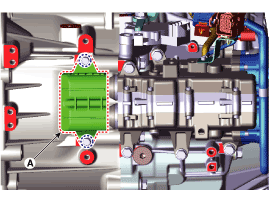
- Remove the fork cover (A).
Tightening torque: 3.9 ~ 5.9 N·m
- Remove the under cover. (Refer to Engine Mechanical System - "Engine Room Under Cover")
- Remove the vacuum pump. (Refer to Brake System — "Vacuum Pump")
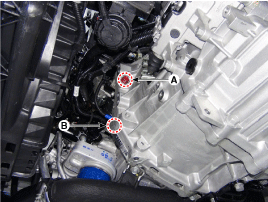
- Remove the starter mounting bolt (A) and the transmission lower mounting bolt (B).
Tightening torque: 42.2–54 N·m
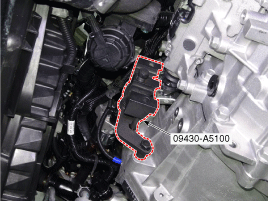
- Secure the clutch release fork after installing the special service tool (09430-A5100).
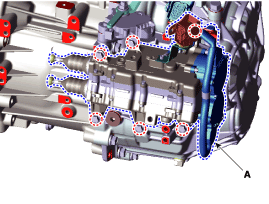
- Remove the clutch actuator (A).
Tightening torque: 19.6–26 N·m
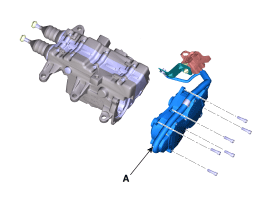
- When replacing the engine, remove the clutch actuator motor (A).
Tightening torque: 3.9 ~ 5.9 N·m
- If the DCT assembly or clutch actuator has been replaced, perform clutch actuator wear compensation. (Refer to Clutch Actuator Assembly - Adjustment)
Installation
- If only the motor has been replaced, install the clutch actuator motor.
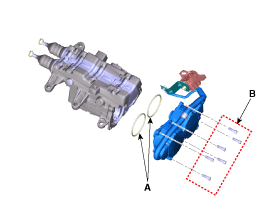
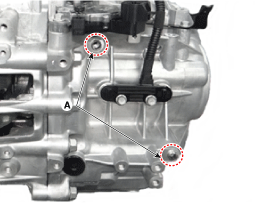
- Check the assembled condition of the installation pins (A) before installing the clutch actuator assembly.
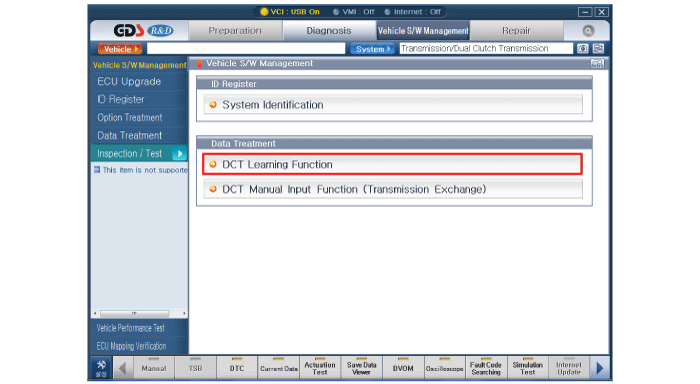
- Perform the clutch touch point learning procedure using the GDS.
Adjustment
A. Rewinding the Rod to Adjust Rod Length (When Only the Clutch Actuator Is Replaced)- Remove the clutch actuator assembly. (Refer to Clutch Actuator Assembly - Removal)
- Install the faulty clutch actuator (A) on the special service tool (09430-C1302) and secure the actuator with nuts and bolts.
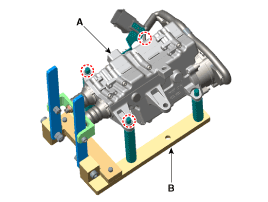
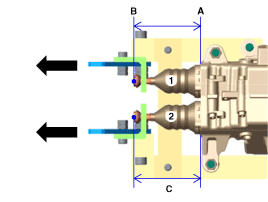
- Gently pull the lever of the clutch actuator removed from the vehicle and measure the length of each old rod (C).
Old Rod Length (C): Length from the base plane (A) to the end of the rod (B).
- Clutch Actuator 1
- Clutch Actuator 2
- Remove the clutch actuator from the special service tool (09430-C1302).
- Install the faulty clutch actuator (A) on the special service tool (09430-C1302) and secure the actuator with nuts and bolts.
- Secure the rod on the hook (B) and remove the rubber boot (A).
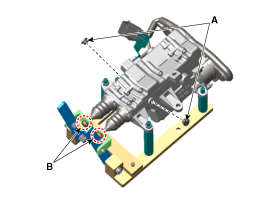
- Gently pull the lever of the new clutch actuator and measure the length of each new rod (C).
New Rod Length (C): Length from the base plane (A) to the end of the rod (B).
- Clutch Actuator 1
- Clutch Actuator 2
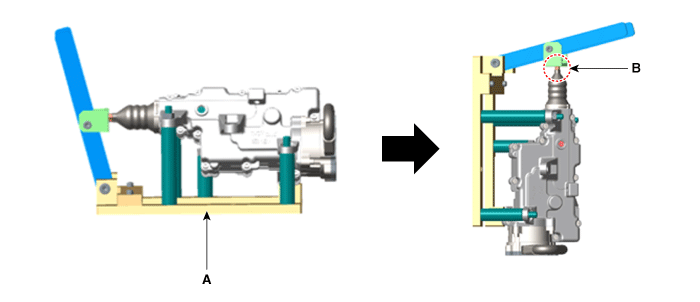
- With the clutch actuator fixture (09430-C1302) (A) installed, place the clutch actuator in a vertical position.
- With the actuator in a vertical position, remove the hook (B) from the rod.
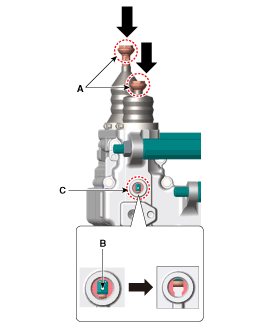
- Press the end of the rod (A) and release the pressure when you see the nut protrusion (B).
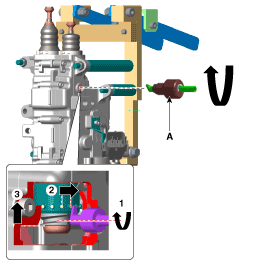
- Insert the special service tool (09430-C1300) (A) into the hole in the rubber seal. Turn the SST clockwise and adjust the length of the new clutch actuator rod to the "old rod length" measured in step 3. Increase (+) rod length: turn counterclockwise / one turn +0.25 mm (+0.0098 in). Decrease (-) rod length: turn clockwise / one turn -0.25 mm (-0.0098 in).
- With the clutch actuator holding fixture (09430-C1302) (A) installed, support the clutch actuator level.
- Align the holding fixture (09430-C1302) and install the hook (B) on the clutch actuator.
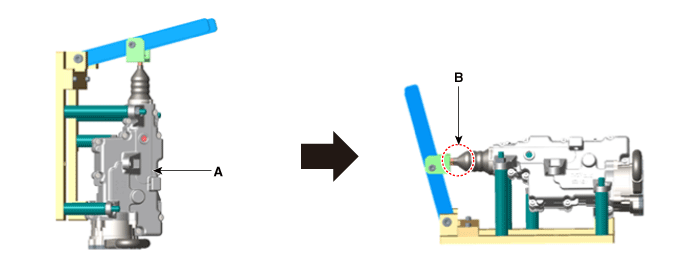
- Pull the clutch actuator lever slightly and check that the "rod length at final adjustment" matches the "old rod length" measured in step 3.
Rod length (C): length from the reference plane (A) to the rod end (B).
- Clutch Actuator 1
- Clutch Actuator 2
- Install the rubber seal (A).
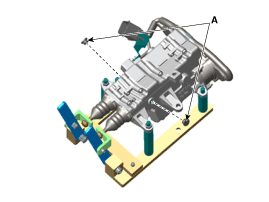
- Remove the clutch actuator assembly from the special service tool (09430-C1302).
- Remove the clutch actuator assembly. (Refer to Clutch Actuator Assembly - Removal)
- Install the faulty clutch actuator (A) on the special service tool (09430-C1302) and secure the actuator with nuts and bolts.
- Secure the rod on the hook (B) and remove the rubber boot (A).
- Pull the clutch actuator lever slightly, removed from the vehicle, and measure the length of each rod (C). If the length is less than the initialization length, you must perform initialization. Rod length (C): length from the reference plane (A) to the rod end (B). (Initialize rod length: 71.5–72.5 mm (2.8149–2.8543 in))
- Clutch Actuator 1
- Clutch Actuator 2
- Position the clutch actuator vertically with the SST (09430-C1302) (A) installed.
- With the actuator in a vertical position, remove the hook (B) from the rod.
- Press the end of the rod (A) and release the pressure when you see the nut protrusion (B).
- Insert the special service tool (09430-C1300) (A) into the hole in the rubber seal. Turn the SST counterclockwise and adjust the length of the clutch actuator rod. Increase (+) rod length: turn counterclockwise / one turn +0.25 mm (+0.0098 in). Decrease (-) rod length: turn clockwise / one turn -0.25 mm (-0.0098 in).
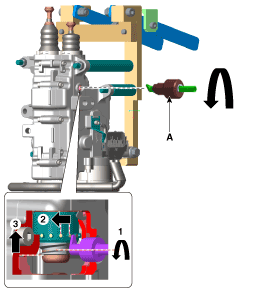
- With the clutch actuator holding fixture (09430-C1302) (A) installed, support the clutch actuator level.
- Align the holding fixture (09430-C1302) and install the hook (B) on the clutch actuator.
- Pull the clutch actuator lever slightly and check that the "rod length at final adjustment" matches the "initialized rod length". Rod length (C): length from the reference plane (A) to the rod end (B). (Initialize rod length: 71.5–72.5 mm (2.8149–2.8543 in))
- Clutch Actuator 1
- Clutch Actuator 2
- Install the rubber seal (A).
- Remove the clutch actuator assembly from the special service tool (09430-C1302).
Test yourself
A quick Hyundai Kona quiz: every answer comes with an explanation and a link to the manual page.
Was this page helpful?