Using the Radio Buttons, Tuning, Volume and Sound Control
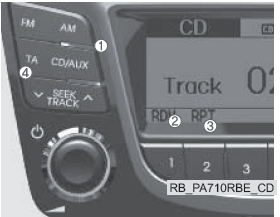
1. Button  Activates FM mode and switches between bands FM1 and FM2 each time the button is pressed.
2. Button  When the button is pressed,
 selects the AM band. The LCD displays the AM Mode indication.
3. Button  (if equipped) TA (Traffic Announcement). In FM, CD and AUX modes, turns RDS TA reception on and off.
4. Button
• If the button (SEEK) is pressed, the system automatically tunes to the next station with a lower frequency.
• If the button (SEEK) is pressed, the system automatically tunes to the next station with a higher frequency.
5. Button and button

• Turns the audio system on and off when the ignition key is in the ACC or ON position.
• Turning the knob clockwise or counterclockwise increases or decreases the volume.
• Depending on the model, if the ignition key is not in the ACC (ACCESSORY) or ON position, the warning "Battery Discharge" appears on the LCD 10 seconds after power-on, and the system automatically turns off after one hour of operation.

6. PRESET Button
• If the buttons ~
 are pressed for less than 0.8 seconds, the playing station is stored on each button.
• If the buttons ~
 are pressed for more than 0.8 seconds, the playing station is stored on the corresponding button with a beep.
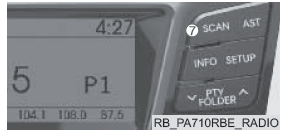
7. Button
• If the button is pressed, the system automatically seeks stations in the upward direction.
• The SCAN function sequentially goes through all stations, starting from the first, for 5 seconds.
• If the button is pressed again, scanning stops and the currently selected channel can be listened to.

8. Button  When the Dark button
 is pressed, the LCD and backlight turn on or off.
9. Button  When the button is pressed, the channels with strong reception are automatically selected and stored on the PRESET buttons
 ~
 , and the channel stored on PRESET1 starts playing.
If no channel is stored after AST, the previous channel plays.
• On some models, stores only to preset memory ~
 of FMA or AMA mode.
10. Button  • Move the button
 during RDS PTY search. Selects the program type.
• Move the button during RDS PTY search. Selects the program type.
11. Button  Press this button to enter SETUP mode. If no action is taken for 8 seconds, the display returns to the previous mode.
PA710rbE

PA710rbEbT

In SETUP mode, turn the knob to move the cursor between items, then press the button
 to select the desired item.
• MAIN
Select this item to enter the SCROLL and SDVC mode.

• SCROLL: Selects whether long file names scroll continuously "ON" or only once "OFF".

• SDVC (Speed Dependent Volume Control)
Selecting this item turns the SDVC function on or off. When set to ON, the volume level is adjusted automatically according to vehicle speed.

• MEDIA: Select the standard display of MP3 file information. You can select "Folder/File" or "Artist/Title" mode.
• RDS (if equipped): The RDS menu sequentially displays News/AF/Region/TA Vol menus.

• TA VOL (the TA VOL menu is displayed through the RDS menu)
Adjust the TA (Traffic Announcement) volume level to a normal sound volume level.

• rEGIoN (the rEGIoN menu is displayed through the rDS menu)
Determines whether the region code is used (oN) or not used (oFF) after the Alternative Frequency (AF) function is activated. If AUTo is selected, the frequency switching condition is determined automatically based on the reception status.

• CLoCK
Select this item to enter the clock setting mode (Clock) (12/24 h, Auto, Time).

• 12/24 Hr.
Select the 12/24 h button to enter the time display format menu.

• Auto: Select the Auto button to enter the rDS automatic time information menu.

• Time
Select the Time button to enter the time setting menu.
Set the hour and press the button , to confirm it.
Set the minutes and press the button , to complete the setting and exit the clock setting mode.
If the button , is pressed when the power is off, the user can immediately set the time on the display.

• Select PHONE (if equipped)
To enter the Bluetooth setting mode. For more information, refer to
the section "BLUETOOTH PHONE OPERATION".

• P.bASS (Power bass)
This function creates virtual sound effects and allows adjustment of the bass level.

AM mode (AMA) is not supported.
The CD changer model is not supported.


12. Button and button

Turn the knob clockwise or counterclockwise to increase or decrease the current frequency.
Press the button to change the modes:
BASS, MIDDLE, TREBLE, FADER and BALANCE TUNE.
The selected mode is displayed on the screen. After selecting each mode, turn the volume knob clockwise or counterclockwise.
• BASS Control (Bass Tone Adjustment)
To increase the low frequencies, turn the knob clockwise. To decrease the low frequencies, turn the knob counterclockwise.
• MIDDLE Control (Midrange Tone Adjustment)
To increase the midrange frequencies, turn the knob clockwise. To decrease the midrange frequencies, turn the knob counterclockwise.
• TREBLE Control (Treble Tone Adjustment)
To increase the high frequencies, turn the knob clockwise. To decrease the high frequencies, turn the knob counterclockwise.
• FADER Control (Fader Adjustment)
Turning the knob clockwise increases the rear speaker sound (the front speaker sound decreases).
Turning the knob counterclockwise increases the front speaker sound (the rear speaker sound decreases).
• BALANCE Control (Stereo Balance Adjustment)
Turning the knob clockwise increases the right speaker sound (the left speaker sound decreases).
Turning the knob counterclockwise increases the left speaker sound (the right speaker sound decreases).
Test yourself
A quick Hyundai Solaris quiz: every answer comes with an explanation and a link to the manual page.