Fuel System
Repair Procedures
In this manual: Fuel System
16steps
~96min
5/5difficulty
Done 0 of 16
Fuel Pressure Inspection (Low-Pressure System)
- Relieve the residual fuel pressure from the fuel line. (Refer to Fuel System - "Relieving Fuel Pressure in the Fuel Line")
- Install the Special Service Tool (SST).
- Disconnect the low pressure fuel feed hose from the inlet of the high pressure fuel pump.
- Install the special service tool for measuring fuel pressure between the low pressure fuel feed pipe and the low pressure inlet of the high pressure fuel pump (see figure below).
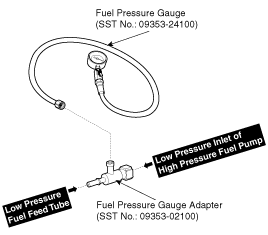
- Inspect for fuel leaks at the connections between the low-pressure fuel feed hose, the low-pressure inlet of the high-pressure fuel pump, and the SST with the ignition ON.
- Measure the fuel pressure.
- Start the engine and measure the fuel pressure at idle. Fuel pressure: 480 ~ 520 kPa (4.89 ~ 5.30 kgf/cm², 69.6 ~ 75.4 psi)
Fuel
PressureCause Related Part Too low Clogged fuel filter Fuel filter Fuel leakage Fuel Pressure Regulator Too high Fuel pressure regulator valve stuck Fuel Pressure Regulator - Stop the engine, and then check the fuel pressure gauge reading for changes. Specification: the gauge reading should be maintained for approximately 5 minutes after the engine is stopped.
Fuel Pressure
(After Engine Stop)Cause Related
PartFuel pressure drops slowly Injector leakage Injector Fuel pressure drops immediately Fuel pump check valve stuck open Fuel pump - Turn the ignition off.
- Start the engine and measure the fuel pressure at idle. Fuel pressure: 480 ~ 520 kPa (4.89 ~ 5.30 kgf/cm², 69.6 ~ 75.4 psi)
- Relieve the residual fuel pressure from the fuel line. (Refer to Fuel System - "Relieving Fuel Pressure in the Fuel Line")
- End of test
- Remove the special service tool (SST) from the low-pressure fuel feed tube and the low-pressure inlet of the high-pressure fuel pump.
- Connect the low-pressure fuel feed tube and the hose to the low-pressure inlet of the high-pressure fuel pump.
Release Fuel Line Residual Pressure
- Turn the ignition OFF and disconnect the negative battery cable.
- Remove the rear seat cushion. (Refer to Body - "Rear Seat Assembly")
- Remove the service cover (A) after loosening the screws (B).
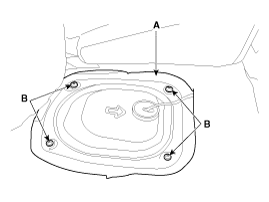
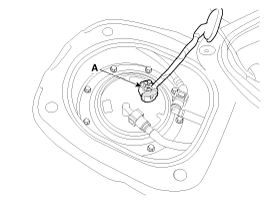
- Disconnect the fuel pump connector (A).
- Disconnect the electrical connector from the high-pressure fuel pump.
- Connect the negative battery cable.
- Run the engine for approximately 20 seconds to reduce pressure in both the high and low pressure lines. The engine may stall within the 20 second period. If not, turn the engine off.
- Continue with the service or repair. Use shop towels to cover the opening and catch any spilled fuel when opening the high-pressure system.
- Reinstall/reconnect all components in the reverse order of removal. Start the engine and check that it operates correctly, and check that there are no fuel leaks.
- After completion, clear the DTC using the GDS diagnostic tool (the procedure described above will set a DTC).
Test yourself
A quick Kia Cee'd quiz: every answer comes with an explanation and a link to the manual page.
Was this page helpful?