Multifunction switch
Specifications
Specifications
| Items | Specifications | |
| Rated Voltage | 12 V DC | |
| Operating Temperature Range | -22 - 176°F (-30 - 80°C) | |
| Rated Load | Wiper | Wiper: 6A (motor load) |
Components and Component Location
Components
[BCM Type]
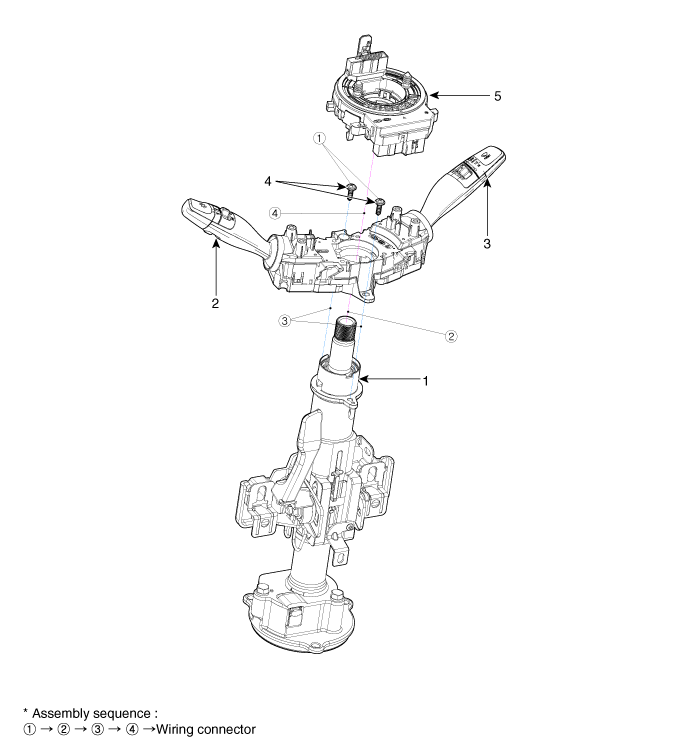
| 1. Steering column shaft 2. Light switch 3. Wiper/washer switch |
4. Screws 5. Clock spring |
[Type other than BCM]
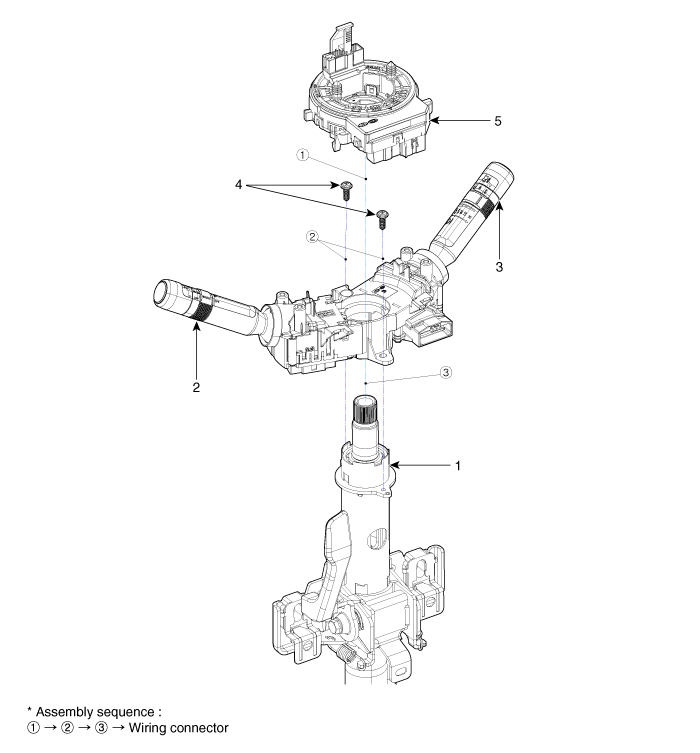
| 1. Steering column shaft 2. Light switch 3. Wiper/washer switch |
4. Screws 5. Clock spring |
[BCM Type]
(LHD)
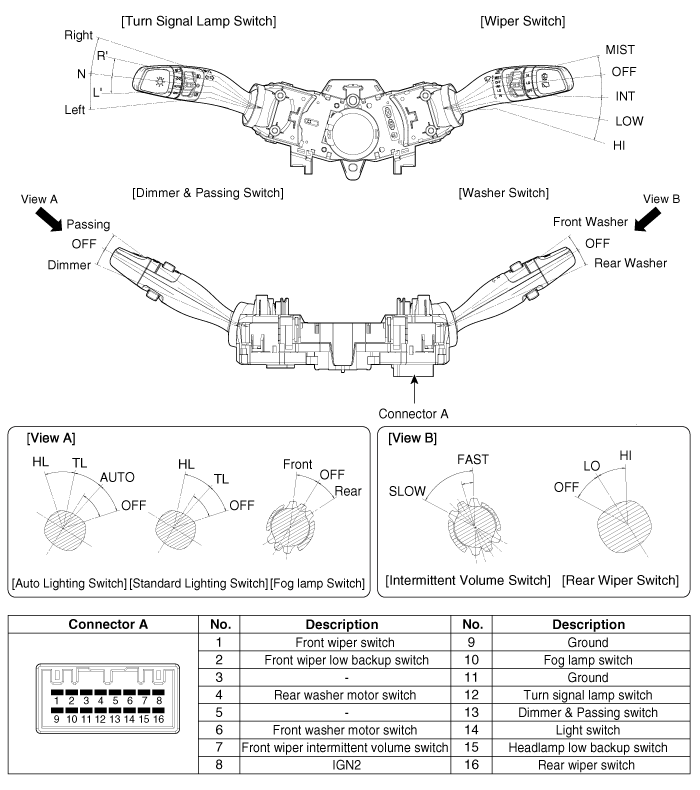
(Right-Hand Drive)
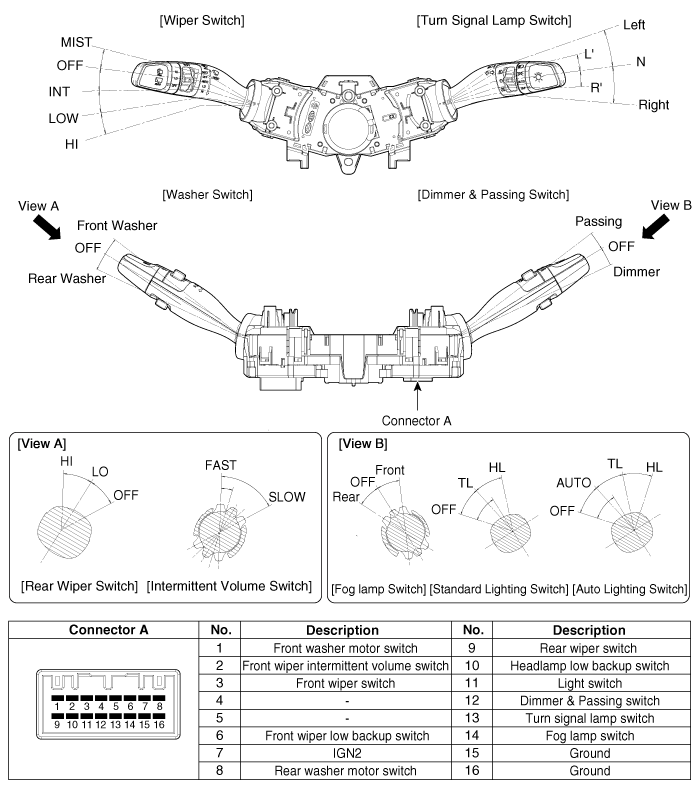
[Type other than BCM]
(LHD)
(Turn Signal Switch / Dimmer and Passing Switch)
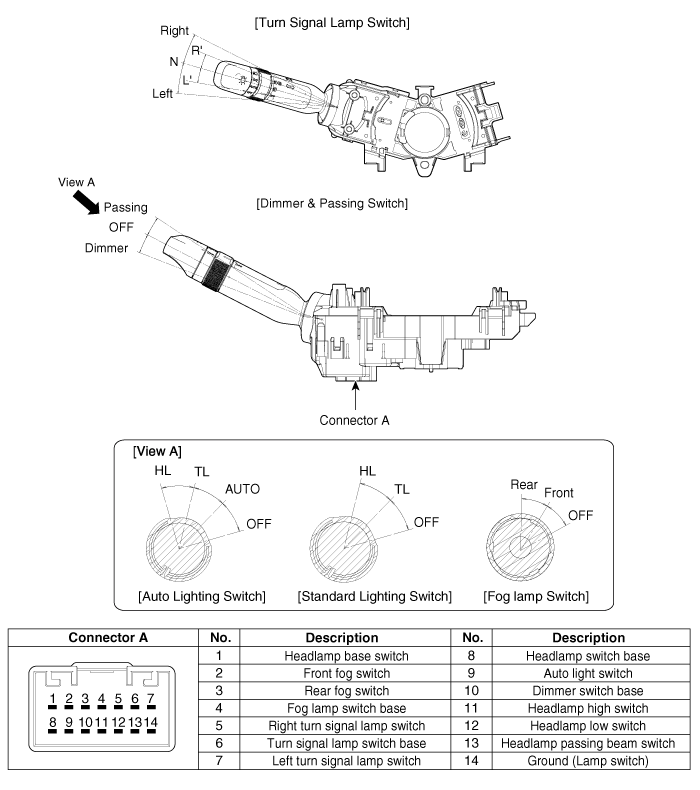
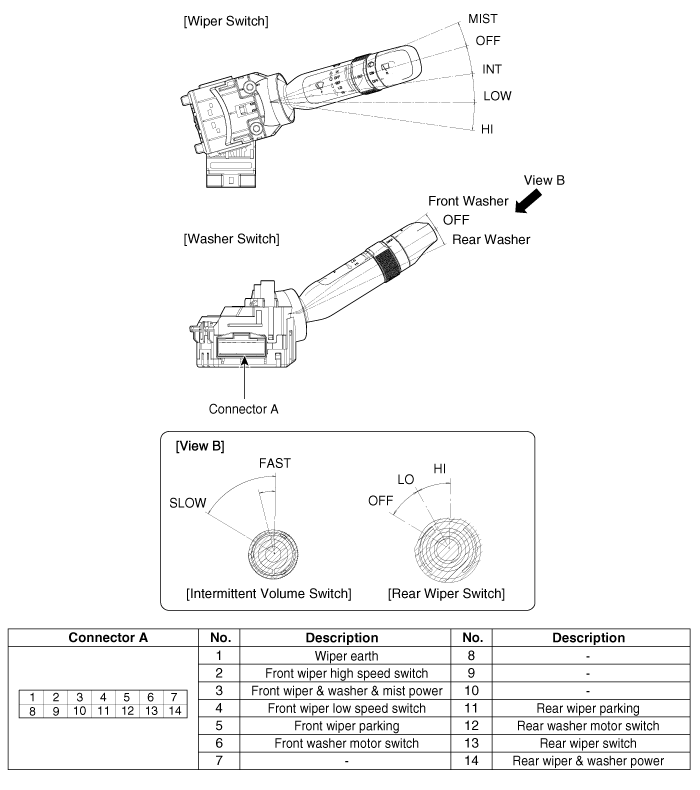
(Wiper/Washer Switch)
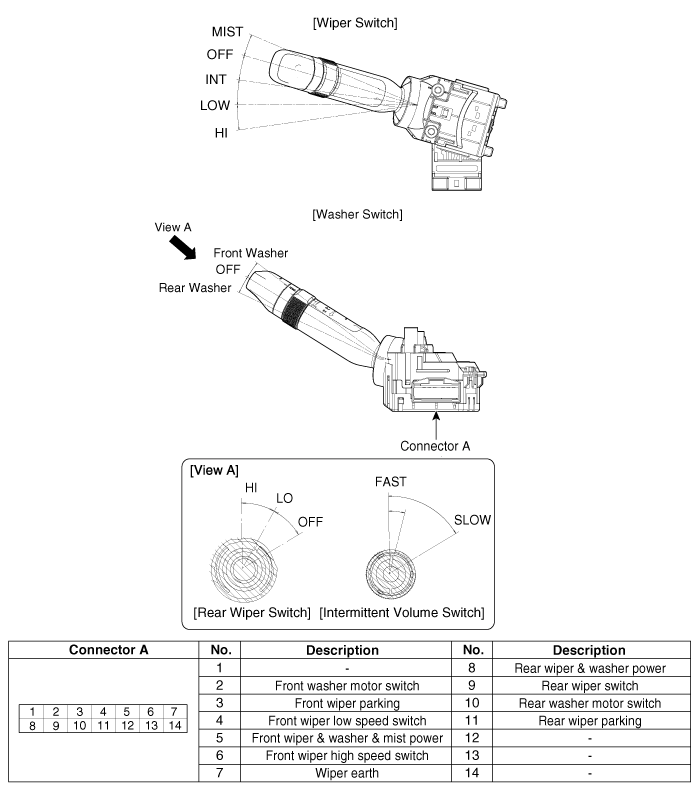
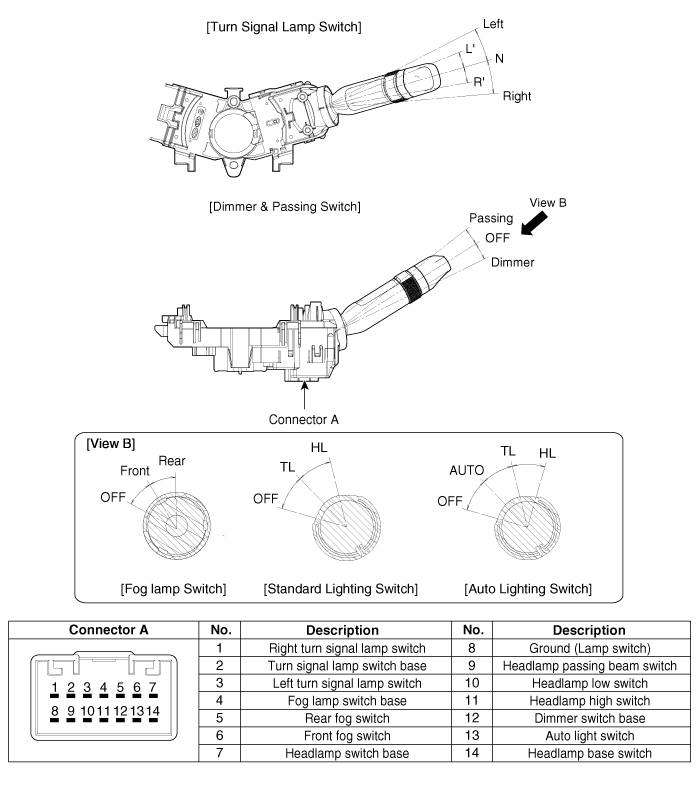
(Right-Hand Drive)
(Wiper/Washer Switch)
(Turn Signal Switch / Dimmer and Passing Switch)
Repair Procedures
Removal
[BCM Type]
Disconnect the negative (-) battery terminal.
Remove the steering wheel.
(Refer to Steering System - "Steering Wheel")
Remove the upper and lower steering column covers after loosening the screws.
(Refer to Body - "Steering Column Shroud Panel")
Remove the clockspring.
(Refer to "Restraint System - Driver Airbag Module (DAB) and Clock Spring")
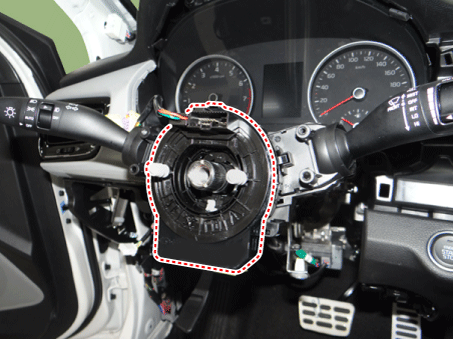
Disconnect the multifunction switch connector (A).
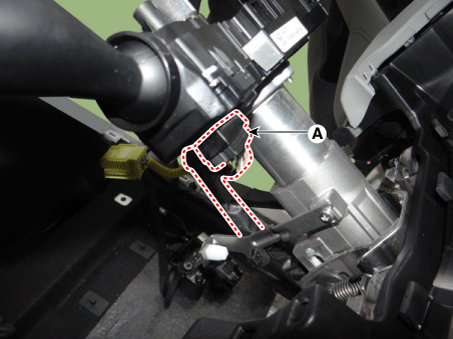
Remove the multifunction switch assembly (A) after loosening the screws.
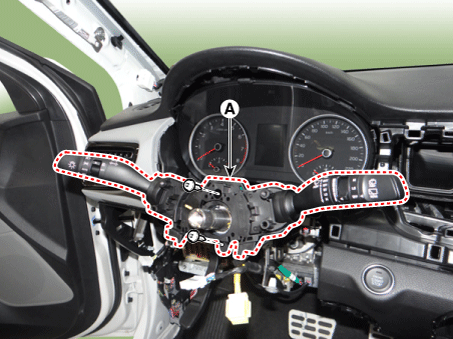
[Type other than BCM]
(LH)
(Turn Signal Switch / Dimmer and Passing Switch)
Disconnect the negative (-) battery terminal.
Remove the upper and lower steering column covers after loosening the screws.
(Refer to Body - "Steering Column Shroud Panel")
Remove the wiper/washer switch.
(Refer to Body Electrical System - "Multifunction Switch")
Remove the steering wheel.
(Refer to Steering System - "Steering Wheel")
Remove the clockspring.
(Refer to "Restraint System - Driver Airbag Module (DAB) and Clock Spring")
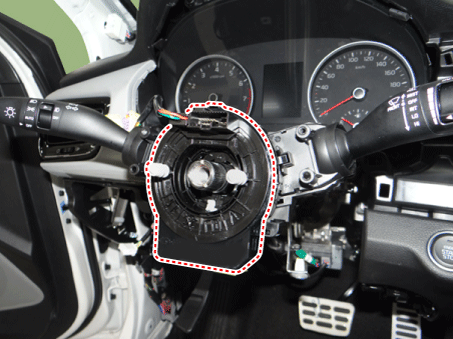
Disconnect the turn signal/dimmer switch and headlamp switch connector (A).
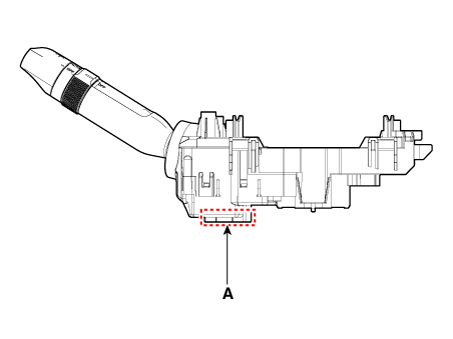
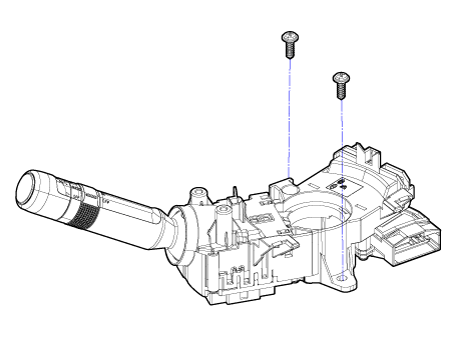
Remove the turn signal/dimmer switch and headlamp switch (A) after loosening the mounting screws.
(RH)
(Wiper/Washer Switch)
Disconnect the negative (-) battery terminal.
Remove the upper and lower steering column covers after loosening the screws.
(Refer to Body - "Steering Column Shroud Panel")
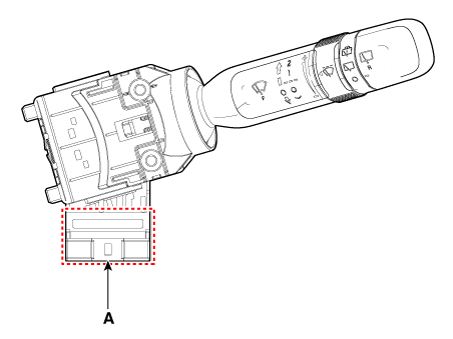
Disconnect the wiper/washer switch connector (A).
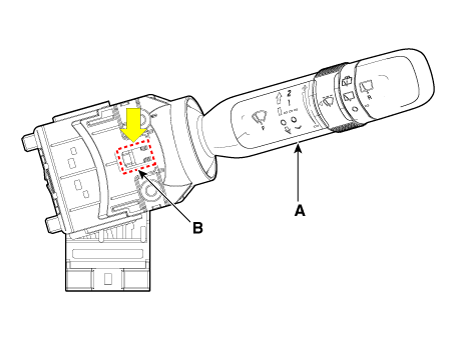
Remove the wiper/washer switch (A) by pressing the stopper pin (B).
Installation
[BCM Type]
Install the multifunction switch.
Install the clock spring.
Install the upper and lower steering column covers.
Install the steering wheel.
Connect the negative (-) battery terminal.
[Type without BCM]
(LH)
(Turn Signal Switch / Dimmer and Passing Switch)
Install the turn signal switch/dimmer switch and headlamp switch.
Connect the turn signal switch/dimmer switch and headlamp switch connector.
Install the clock spring.
Install the steering wheel.
Install the wiper/washer switch.
Install the upper and lower steering column covers.
Connect the negative (-) battery terminal.
(RH)
(Wiper/Washer Switch)
Install the wiper/washer switch.
Connect the wiper/washer switch connector.
Install the upper and lower steering column covers.
Connect the negative (-) battery terminal.
Inspection
Multifunction Switch Inspection
[BCM Type]
Check the circuit continuity between the terminals in each switch position, as shown below.
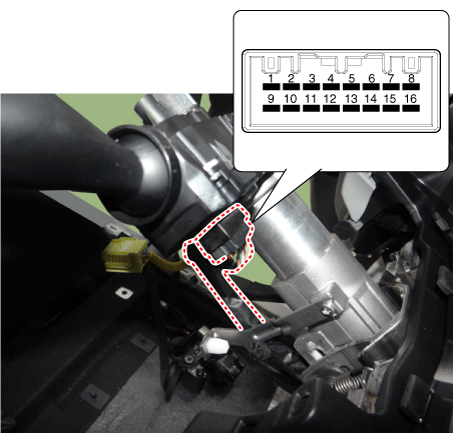
[Left Hand Drive]
Switch Switch Position Switch Terminal Resistance (Ω, ±3.5%) Front Wiper Switch FOG 1-9 330 OFF ∞ Intermittent (AUTO) 800 LOW 1800 HIGH 5700 Rear Wiper Switch OFF 9-16 ∞ LOW 910 HIGH 2910 Intermittent Wiper Volume Level 1 7-9 330 Level 2 690 Level 3 1310 Level 4 2610 Level 5 7310 Fog Light Switch OFF 9-10 ∞ Front Fog Lamp 910 Rear Fog Lamp 2910 Turn Signal Switch OFF 9-12 ∞ Left 910 Right 2910 Dimmer and Headlight Switch OFF 9-13 ∞ Passing 910 Dimmer 2910 Switch OFF 9-14 ∞ AUTO 680 Rear Lamp 1680 Low Beam 5580
[Right Hand Drive]
Switch Switch Position Switch Terminal Resistance (Ω, ±3.5%) Front Wiper Switch FOG 3-16 330 OFF ∞ Intermittent (AUTO) 800 LOW 1800 HIGH 5700 Rear Wiper Switch OFF 9-16 ∞ LOW 910 HIGH 2910 Intermittent Wiper Volume Level 1 2-16 330 Level 2 690 Level 3 1310 Level 4 2610 Level 5 7310 Fog Light Switch OFF 14-16 ∞ Front Fog Lamp 910 Rear Fog Lamp 2910 Turn Signal Switch OFF 13-16 ∞ Left 910 Right 2910 Dimmer and Headlight Switch OFF 12-16 ∞ Passing 910 Dimmer 2910 Switch OFF 11-16 ∞ AUTO 680 Rear Lamp 1680 Low Beam 5580
[Type other than BCM]
(LH)
(Turn Signal Switch / Dimmer and Passing Switch)
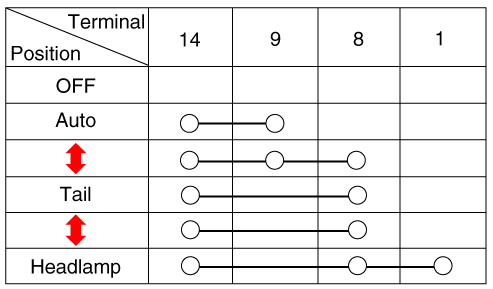
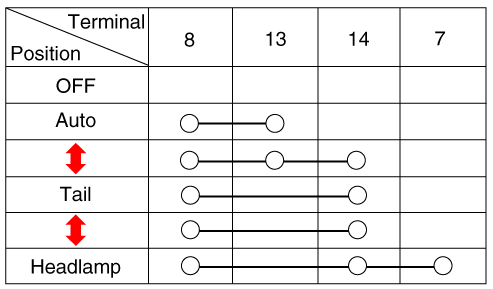
Check the circuit continuity between the terminals in each switch position, as shown below.
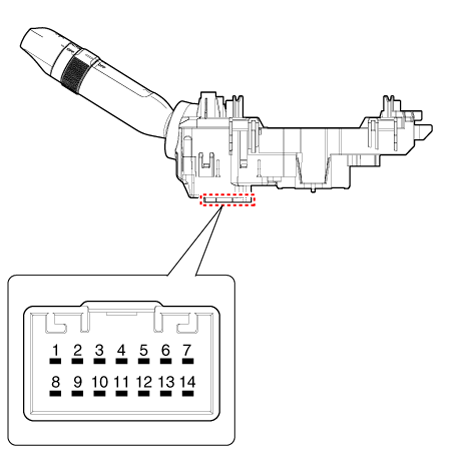
Light Switch (Auto Light)
[Left-hand drive]
[Right-hand drive]
Light Switch (Standard)
[Left-hand drive]
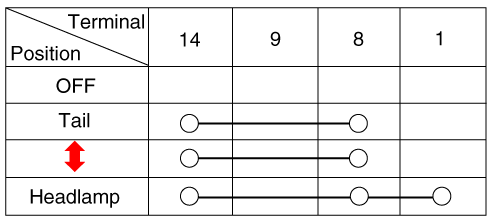
[Right-hand drive]
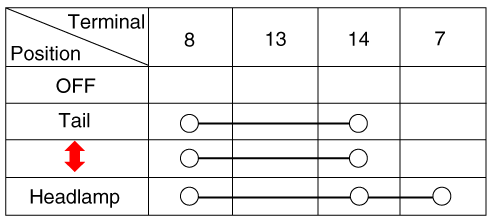
Dimmer and Passing Switch
[Left-hand drive]
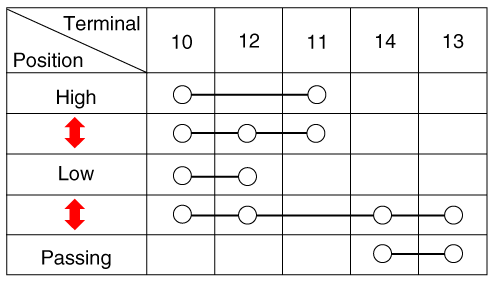
[Right-hand drive]
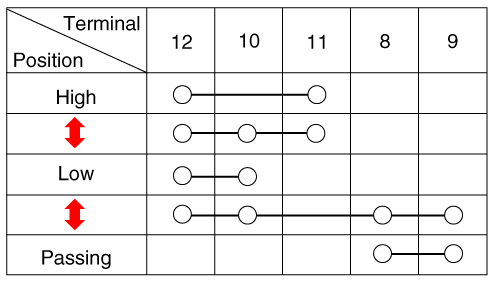
Turn Signal Switch
[Left-hand drive]
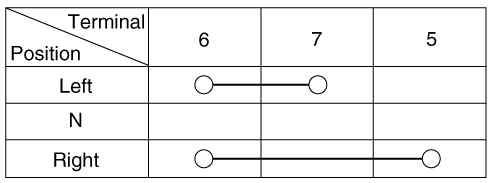
[Right-hand drive]
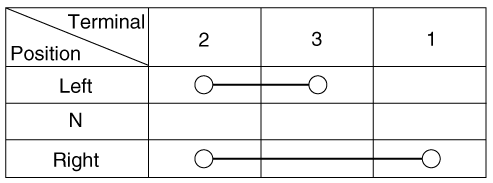
Front and Rear Fog Lamp
[Left-hand drive]
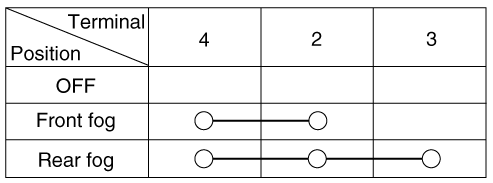
[Right-hand drive]
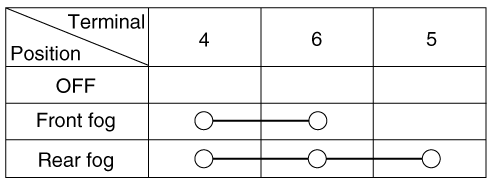
(RH)
(Wiper/Washer Switch)
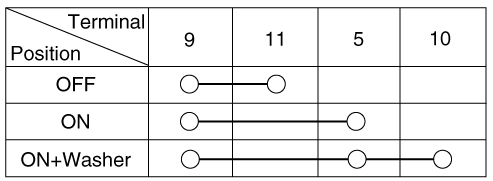
Check the circuit continuity between the terminals in each switch position, as shown below.
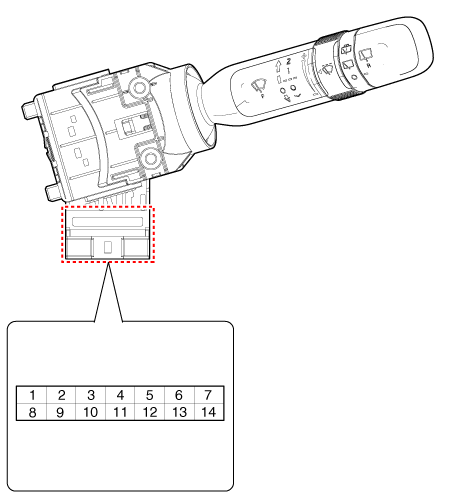
Front Wiper and Washer Switch
[Left-hand drive]
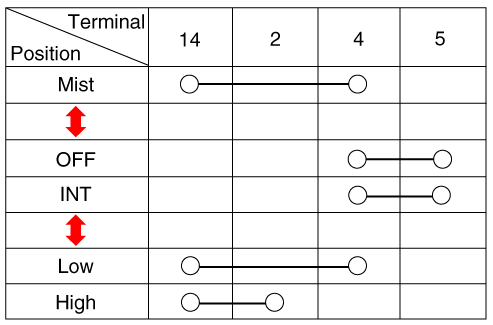
[Right-hand drive]
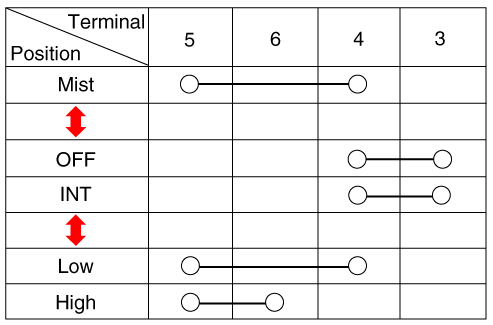
Front Washer Switch
[Left-hand drive]
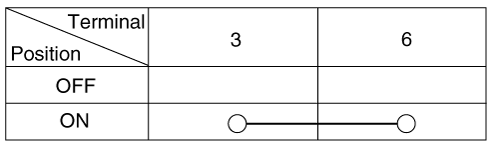
[Right-hand drive]
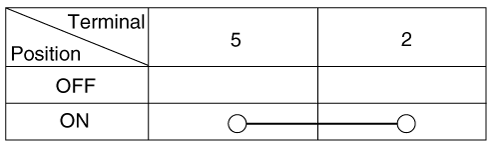
Rear Wiper and Washer Switch
[Left-hand drive]
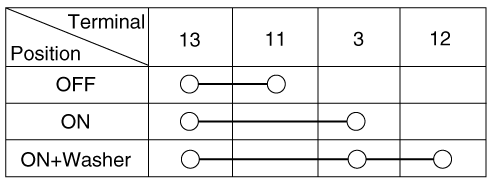
[Right-hand drive]
Inspection (with KDS/GDS)
[BCM Type Only]
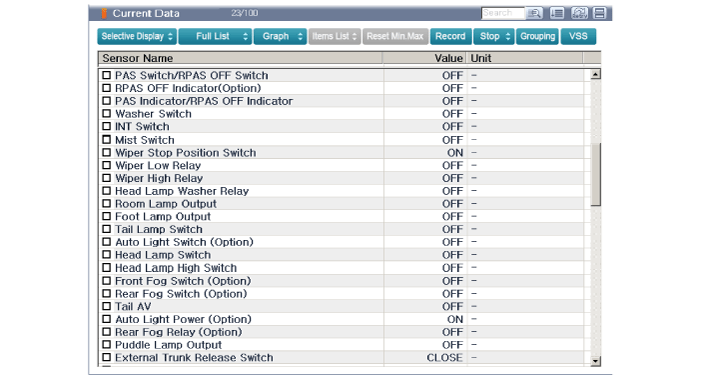
Electrical body system faults can be quickly diagnosed using the vehicle diagnostic system (KDS/GDS).
The diagnostic system (KDS/GDS) provides the following information.
Self-Diagnosis: Checks malfunction and Diagnostic Trouble Code (DTC)
Current Data: Check the system input/output status.
Actuation Test: Check the system operating status
Additional function: Control of other functions, including the setting parameter system and zero point adjustment.
Select "Vehicle Model" and "Body Control Module (BCM)" for inspection using the tester.
Select the "Current Data" menu to view the current input/output data status.
Test yourself
A quick Kia Rio YB quiz: every answer comes with an explanation and a link to the manual page.