Using the emergency tire repair kit
1. Stop the vehicle on a level surface as far away from traffic as possible and apply the parking brake.
2. Move the automatic transmission selector lever to Park (P), or for a manual transmission engage first gear or reverse (R), and switch off the engine.
3. Turn on the hazard warning lights.
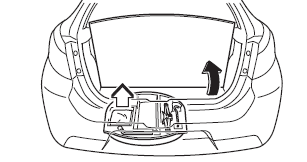
4. Ask the passengers to leave the vehicle, then remove the luggage and the emergency tire repair kit.
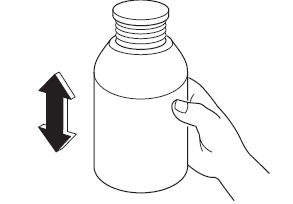
5. Shake the tire sealant container thoroughly.
CAUTION
Shaking the container after the filler hose has been screwed on may cause sealant to leak out of the hose. Sealant stains on clothing or other items may be impossible to remove. Shake the container before screwing on the hose.
CAUTION
The tire sealant can be used at outside temperatures down to -30 C. At low temperatures (0 C and below) the tire sealant tends to harden and injecting it into the tire will be difficult. Before repairing the tire, warm the sealant container inside the vehicle.
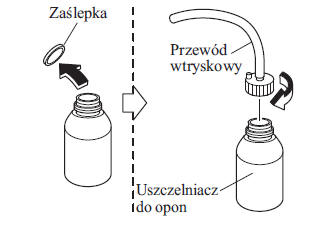
6. Remove the cap from the container.
Screw the filler hose on so that it pierces the container seal.
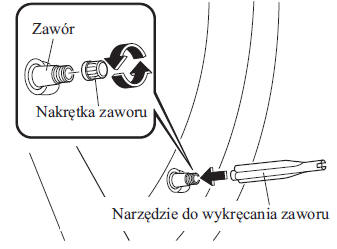
7. Remove the valve cap from the punctured tire.
Press the rear end of the valve core removal tool onto the valve core and release the air remaining in the tire.
CAUTION
If there is air in the tire when removing the valve, the valve may eject. Remove the valve carefully.
8. Unscrew the valve counterclockwise and remove it.
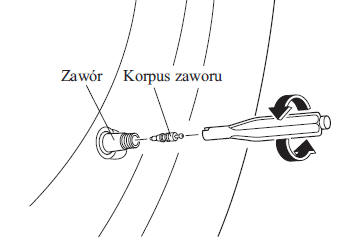
CAUTION
Store the valve where it will not become dirty.
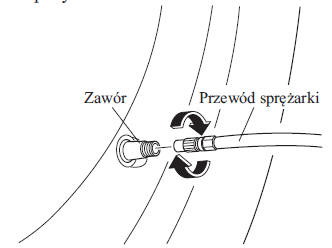
9. Fit the filler hose onto the valve stem.
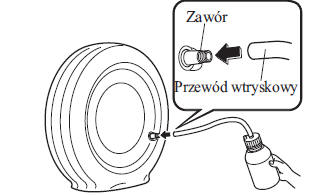
10. Holding the container upside down, squeeze it with your hands and inject all of the sealant into the tire.
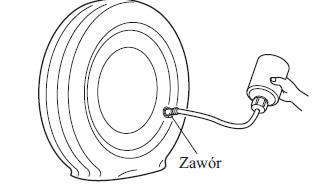
11. Remove the filler hose from the valve stem.
CAUTION
The tire sealant container is not reusable. Buy a new sealant container from an Authorized Mazda Dealer.
12. Install the valve core and tighten it clockwise.
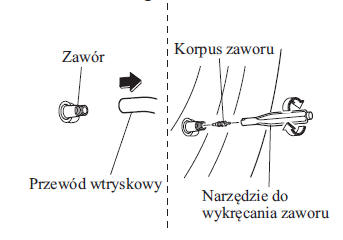
CAUTION
Do not throw away the empty tire sealant container. Return it to an Authorized Mazda Dealer when the tire is replaced. The empty container will be emptied of remaining sealant and disposed of.
13. Attach the injection hose to the cylinder's injection valve to prevent residual sealant from leaking out.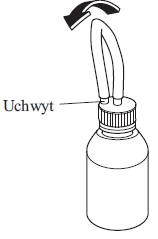
14. Place the speed limit sticker where it is clearly visible to the driver.
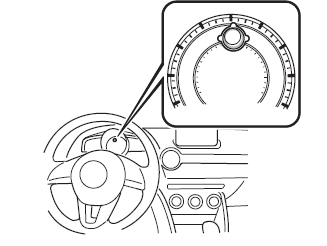
WARNING
Do not place the speed limit sticker on the instrument cluster, as it will obscure, for example, the warning lights, the hazard warning lights or the speedometer. Placing the speed limit sticker in the centre of the steering wheel endangers safety. The sticker could interfere with airbag deployment and cause serious injury.
15. Connect the compressor hose to the tire valve.
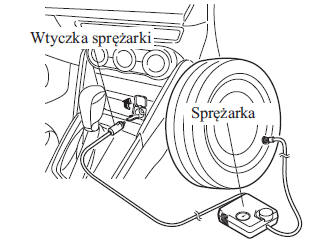
16. Insert the compressor plug into the accessory socket in the centre console and set the ignition switch to the ACC position.
CAUTION
- Before removing the compressor plug from the power socket, make sure the compressor power switch is turned off.
- The compressor is turned on and off with the button.
17. Turn on the compressor and carefully inflate the tire to the correct pressure.
WARNING
The compressor operating pressure must not exceed 300 kPa (3.1 kgf/cm2, 3 bar, 43.5 psi).
Compressor operating pressure above 300 kPa (3.1 kgf/cm2, 3 bar, 43.5 psi) is a safety hazard. If the pressure exceeds 300 kPa (3.1 kgf/cm2, 3 bar, 43.5 psi) during inflation, heated air will be blown out through the rear of the compressor and you may be burned.
CAUTION
If the compressor operates slowly or becomes hot, it has overheated. Turn it off immediately and do not restart it for at least 30 minutes.
CAUTION
Check the correct tire pressure on the tire pressure label (on the driver's door pillar).
Do not use the compressor for more than 10 minutes, as this may damage it.
If the tire pressure does not increase, the tire repair may be ineffective. If the tire does not reach the correct pressure within 10 minutes, the damage is most likely too extensive.
In this case, the tire cannot be repaired with the tire emergency repair kit. Contact a specialist service; we recommend a Mazda Authorized Service Center.
If the tire has been overinflated, slightly loosen the compressor's threaded nut and release some air.
18. Once the tire is inflated to the correct pressure, turn off the compressor and disconnect the compressor hose from the tire valve stem.
19. Screw on the valve cap.
20. Put the tire emergency repair kit back in the trunk and continue driving.
CAUTION
- Drive carefully to a specialist service; we recommend a Mazda Authorized Service Center, and do not exceed 80 km/h.
- If the vehicle is driven at 80 km/h or higher, it may start to vibrate.
CAUTION
(With Tire Pressure Monitoring System) If the tire pressure is not correct, the tire pressure monitoring system warning light will illuminate.
21. After 10 minutes or 5 km of driving, check the tire pressure with the pressure gauge built into the compressor. If the tire pressure has dropped below the correct level, inflate the tire again by performing the steps starting from step 16.
CAUTION
- If the tire pressure drops below 130 kPa (1.3 kgf/cm2 or bar, 18.9 psi), the repair with the repair kit has been ineffective. Stop the vehicle on a level surface as far as possible from traffic and contact a specialist service. We recommend a Mazda Authorized Service Center.
- If after performing steps 15 to 21 the tire pressure is still low, stop on a level surface as far as possible from traffic and contact a specialist service. We recommend a Mazda Authorized Service Center.
CAUTION
When checking the tire pressure with the pressure gauge built into the compressor, make sure the compressor power is switched off.
22. If the tire pressure remains stable, the tire repair has been successful. Drive carefully to a specialist service; we recommend a Mazda Authorized Service Center, to have the tire replaced.
CAUTION
- A tire that has been temporarily repaired with tire sealant is not suitable for further use. Mazda recommends replacing the tire with a new one.
- The wheel may be reused after removing any remaining sealant and thoroughly inspecting it. However, the complete valve must be replaced with a new one.
Test yourself
A quick Mazda 2 quiz: every answer comes with an explanation and a link to the manual page.