Audio System (Type C/Type D)
CAUTION
The description of the audio system functions in this manual may differ from the actual operation of the system, and the shapes of the screens and buttons, as well as the displayed letters and characters, may also differ from their actual appearance.
In addition, depending on future software updates, the content may change without prior notice.
The system audio (Type C/Type D) has three different user interfaces.
- Control panel
- Touch panel
- Voice recognition with the steering wheel switch and microphone
Control panel operation (HMI)
CAUTION
For safety reasons, some operations are unavailable while driving.
Using the volume knob
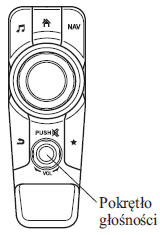 Press the volume knob to
mute or unmute the sound.
Turn the volume knob to adjust the volume. Turn it clockwise to increase the volume and counterclockwise to decrease it.
Buttons around the control knob
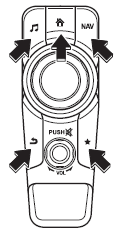 The following operations can be performed
using the buttons around the control knob.
 : Displays the home screen.
 : Displays the
Entertainment function screen.
 : Displays the
Navigation function screen (only for vehicles equipped with a navigation system). For operation of the Navigation screen, see the navigation system owner's manual. If the SD card for the navigation system is not inserted into the unit, a compass indicating the direction of vehicle travel is displayed.
 : Displays the
Favorites function screen. Press and hold to store individual items in Favorites. (Radio stations, the phone book, and navigation destinations can be stored.)
 : Returns to the
previous screen.
Using the control knob
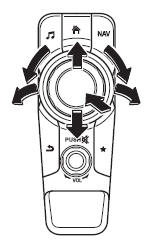 (Selecting icons on the screen)
1. Tilt or turn the control knob to move the cursor to the desired icon.
2. Press the control knob to select the icon.
CAUTION
For some functions, you can also press and hold the control knob.
Using the touch panel
CAUTION
Do not press the screen hard or operate it with sharp objects. Otherwise, the screen may be damaged.
CAUTION
For safety reasons, the touch panel cannot be operated while driving.
Basic operation
TOUCH/TAP
1. Touch or tap the item on the screen.
2. The function is activated and the next item is displayed.
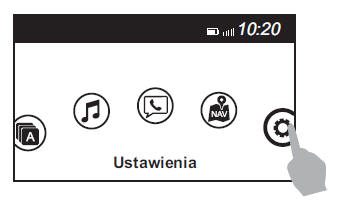
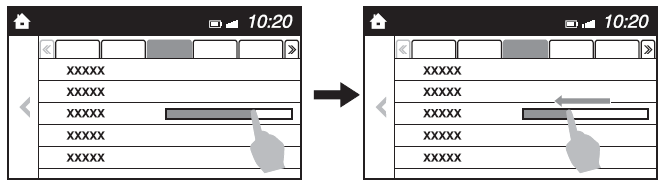
SLIDE
1. Touch the setting item that displays a slider.
2. Touch the slider with your finger and slide it to the desired level.
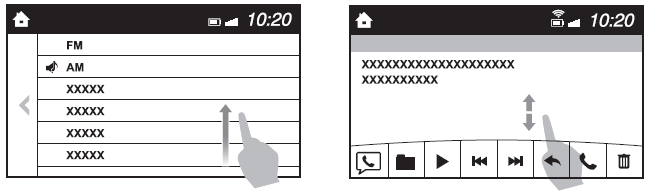
SWIPE
1. Touch the screen with your finger and slide it up or down.
2. This lets you display items that were previously hidden.
Returning to the previous screen
1. Touch .
Displaying the home screen
1. Touch .
Home screen
| Icon | Function |
 | Applications You can check information such as average fuel consumption, maintenance items and warnings. The displayed image may vary depending on the type and specification. |
 | Entertainment Operates the audio system, such as radio or CD mode. The most recently used audio source is displayed. An audio source that cannot be used at the time is skipped and the previous audio source is displayed. To change the audio source, select this icon |
 | Communication Bluetooth-related functions are available. |
 | Navigation Displays the navigation screen (vehicles with a navigation system). If the SD card for the navigation system is not inserted into the unit, a compass indicating the direction of vehicle travel is displayed. The compass may not show the correct direction when the vehicle is stopped or traveling at low speed. |
 | Settings General settings menu (e.g., display, sound, Bluetooth and language). The displayed image may vary depending on the type and specification. |

Volume/Display/Sound settings

Volume Adjustment
Turn the volume knob on the control panel. You can also use the volume buttons on the steering wheel.
Display Settings
Select the icon on the
home screen to display the settings screen.
Select , then
select the item you want to change.
Turning off the display/Clock
The center display can be turned off.
To turn off the display, select
.
After selecting
the center display turns off and the clock is displayed.
To turn the center display back on, do the following:
- Touch the center display.
- Use one of the control panel elements.

Setting the screen to day/night mode
You can select day or night mode for the screen.
 : Automatically switches
the screen according to outside light conditions*1
 Day mode
 Night mode
*1 If the dimmer control knob operation has been canceled, the screen will remain permanently in day mode.
Adjusting brightness
Adjust the brightness of the center display using the slider.
Adjusting contrast
Adjust the contrast of the center display using the slider.
Restoring the default display settings
All screen settings can be restored to their initial values.
1. Select Reset .
2. Select Yes.
Adjusting Sound Settings
Select the icon on the
home screen to display the settings screen.
Select Sound to choose the item you want to change.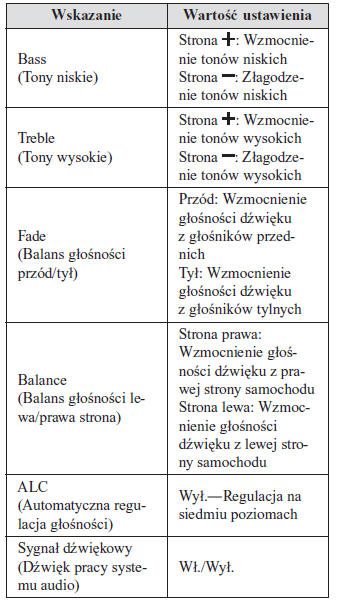
ALC (Automatic Level Control)
Automatic Level Control (ALC) is a function that automatically adjusts the volume and sound quality according to the vehicle speed.
The volume increases as the vehicle speed increases and decreases as the vehicle speed decreases.
Radio Operation (Type C)
Turning On the Radio
Select the icon on the home screen
and display the Entertainment function screen. After selecting the desired radio station, the following icons appear at the bottom of the center display.
AM/FM Radio
| Icon | Function |
 | Displays the Entertainment function menu. Use this button to switch between the different audio sources. |
 | Displays the station list. |
Select Refresh station list to display the frequencies of up to ten radio stations in the automatic preset list.
Select the desired frequency.


Scanning pauses for about five seconds when each station is found.
Select again to continue listening to that radio station.

Turn the control knob, swipe the screen, or touch the desired radio frequency.
Press or

to change the radio frequency one step at a time.
Press and hold or

to change the radio frequency continuously. Scanning stops when you release the icon or control knob.

Press and hold to change the radio frequency continuously.
Scanning stops when you release the icon or control knob.


Favorite Radio Stations
Selected stations can be programmed for quicker access.
Up to 50 stations can be programmed. The Favorites list is shared between AM and FM modes.
Saving to Favorites
Press and hold the icon
to program the current radio station. You can also program a station as follows.
1. To display the Favorites list, select the icon .
2. Select Add/Edit favorite radio.
3. Select Add <active station>.
4. The station is added to the end of the Favorites list.
CAUTION
The Favorites list is not erased when the battery is disconnected.
Selecting a Radio Station from Favorites
1. To display the Favorites list, select the icon .
2. Select the station name or frequency to tune to that radio station.
Deleting a Radio Station from Favorites
1. To display the Favorites list, select the icon .
2. Select Add/Edit favorite radio.
3. Select Delete.
4. Select the radio station or radio frequency you want to delete.
5. Select Delete.
Changing the Order of the Favorites List
1. To display the Favorites list, select the icon .
2. Select Add/Edit favorite radio.
3. Select Move.
4. Select the radio station or radio frequency. The selected radio station can be moved.
5. Slide the radio station or move it using the control knob, then select OK.
Radio Operation (Type D)
Turning On the Radio
Select the icon on the home screen
and display the Entertainment function screen. After selecting the desired radio station, the following icons appear at the bottom of the center display.
AM/FM Radio
| Icon | Function |
 | Displays the Entertainment function menu. Use this button to switch between the different audio sources. |
 | Displays the list of receivable RDS radio stations (FM only). |
 | Displays the station list (AM only). |
Select Refresh station list to display the frequencies of up to ten radio stations in the automatic preset list.
Select the desired frequency.


Scanning pauses for about five seconds when each station is found.
Select again to continue listening to that radio station.

Turn the control knob, swipe the screen, or touch the desired radio frequency.
Press or
 , to change the
radio frequency one step at a time.
Press and hold or

The radio frequency changes continuously. Scanning stops when you release the icon or control knob.


Press and hold to change the radio frequency continuously.
Scanning stops when you release the icon or control knob.


The following options can be set: Alternative Frequency On/Off and Regional Mode.

CAUTION
When the icon is selected or
 in
FM mode, every program is selected.
Favorite Radio Stations
Selected stations can be programmed for quicker access.
Up to 50 stations can be programmed. The Favorites list is shared between AM, FM, and DAB radio.
Saving to Favorites
Press and hold the icon to
program the current radio station. You can also program a station as follows.
1. To display the Favorites list, select the icon
2. Select Add/Edit favorite radio.
3. Select Add <active station>.
4. The station is added to the end of the Favorites list.
CAUTION
The Favorites list is not erased when the battery is disconnected.
Selecting a Radio Station from Favorites
1. To display the Favorites list, select the icon .
2. Select the station name or frequency to tune to that radio station.
Deleting a Radio Station from Favorites
1. To display the Favorites list, select the icon.
2. Select Add/Edit favorite radio.
3. Select Delete.
4. Select the radio station or radio frequency you want to delete.
5. Select Delete.
Changing the Order of the Favorites List
1. To display the Favorites list, select the icon .
2. Select Add/Edit favorite radio.
3. Select Move.
4. Select the radio station or radio frequency. The selected radio station can be moved.
5. Slide the radio station or move it using the control knob, then select OK.
Radio Data System (RDS)
Alternative Frequency (AF)
The AF function is available for the FM band.
Turns AF mode on. If the signal of a station is weak, the radio automatically switches to an alternative frequency.
If you want to receive only radio stations available in your area, turn on Regional mode (REG).
Turning AF/REG On or Off
In FM mode, select the icon , to
switch to the FM mode settings screen.
AF/REG can be turned on or off as follows: (Turning AF On/Off) Select On/Off on the FM mode settings screen.
(Turning REG On/Off) When AF is on, select the On/Off icon.
Traffic Information (TA)
While receiving an FM/AM station, select TA to switch to TA mode.
If traffic information reception is turned on, traffic announcements will be broadcast even while other functions (FM, CD, USB, AUX, BT audio, Radio Aha, or Radio Stitcher) are in use, and the message "Traffic Announcement" will be displayed.
If TA information reception is active on the Entertainment function screen, Cancel appears on the screen. Select Cancel to cancel TA information reception and return to TA standby mode. If TA information is displayed on a screen other than the Entertainment function screen, the selection screens TA off, Cancel, and Close appear on the display. Selecting Close on the screen closes the selection screen when TA information reception continues.
Selecting from the Station List
The list of available RDS radio stations is displayed. You can easily select the radio station you want to listen to from the list. If the station name is not available, the frequency is displayed. In addition, radio stations programmed with a Genre code (program types, e.g.
rock music, news, etc.) can be displayed separately by category.
CAUTION
Displaying the station list may take longer depending on reception conditions.
1. To display the radio station list, select the icon .
2. Select the station name or frequency to tune to that radio station.
(Selecting a Genre)
1. On the radio station list screen, select Genre to display the genre list screen.
2. Select the desired genre to display the list of radio stations in that genre.
CAUTION
Only one genre can be selected
DAB (Digital Audio Broadcasting) Radio Operation (Type D)*
What is DAB Radio?
DAB radio is a digital radio broadcasting system.
DAB radio provides a high-quality radio audio source, with automatic frequency switching in border areas.
Radio text can display information such as the track title or the artist name.
Turning On the Radio
1. Select on the home screen and display the Entertainment screen.
2. Select DAB. The following icons are displayed at the bottom of the screen.
| Icon | Function |
 | Displays the Entertainment function menu. Use this button to switch between the different audio sources. |
 | Displays the station list (station group and station). |
Select Refresh station list to refresh the station list.
Select Select Station Group to select the station group you want to display.

See the section "Operating the radio" (Type D) on page 5-56.

Tunes to each station in the list for 10 seconds.
Press the button again when the desired station is tuned in.CAUTION
If the station list is unavailable, the screen switches to the station list refresh screen. Refresh the station list.

See the section "Operating the radio" (Type D) on page 5-56.

Touch and hold to return to the highest station in the previous station group.

Touch and hold to go to the highest station in the next station group.


Example (Refreshing the station list and listening to DAB radio)
1. Select the icon and display the following screen.
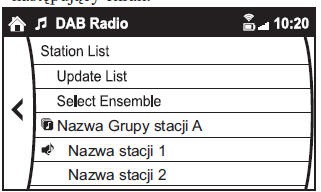
2. Select Refresh station list to refresh the station list.
3. Select Select Station Group to select the station group you want to display.
4. Select the desired station to start listening to the radio.
DAB radio settings
1. While using DAB radio, select the icon .
2. Select the desired item and enter the setting.
The following items can be set:
CAUTION
Depending on the radio station, radio text may or may not be displayed.
Radio text cannot be displayed in DAB-FM mode.
If no DAB signal is available, the message "Signal Lost" is displayed.
Change the station group or radio station, or refresh the station list.
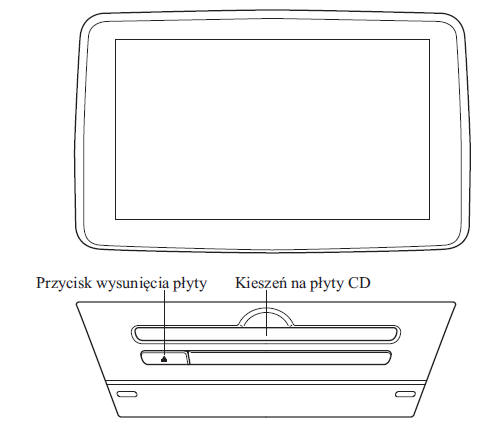
CD Player Operation*
CAUTION
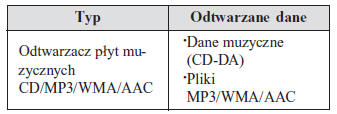
If a disc contains both music files (CD-DA) and MP3/WMA/AAC files, playback of these two or three file types will differ depending on the disc recording format.
Inserting a CD
Insert the CD into the slot with the printed side facing up. The mechanism positions the disc correctly and playback starts.
CAUTION
Playback starts after a short pause, during which the system reads the digital information recorded on the CD.
Ejecting a CD
To eject the disc, press the CD eject button ( ).
Playback
Select the icon on the home
screen when a CD is inserted, and display the Entertainment screen. After selecting CD, the following icons are displayed at the bottom of the center display.
| Icon | Function |
 | Displays the Entertainment function menu. Use this button to switch between the different audio sources. |
 | (CD) Displays the list of tracks on the CD. Select the track you want to play. (MP3/WMA/AAC CD) Displays the top-level folder/file list. Select the folder you want to open. Files in the selected folder are displayed. Select the file you want to play. |
 | (MP3/WMA/AAC CD only) Displays the list of tracks in the currently playing folder. Select the track you want to listen to. |
 | (CD) Repeats the current track. Select again to cancel. (MP3/WMA/AAC CD) Repeats the current track. If selected again, the tracks in the folder are repeated. Select again to cancel. |
 | (CD) Plays the tracks on the CD in random order. Select again to cancel. (MP3/WMA/AAC CD) Plays the tracks in the folder in random order. If selected again, the tracks on the CD are played in random order. Select again to cancel. |
 | (CD) Plays the beginning of each track on the CD to help you find the desired track. If selected again, the function is cancelled and you can continue listening to the current track. (MP3/WMA/AAC CD) Plays the beginning of each track in the folder to help you find the desired track. If selected again, the function is cancelled and you can continue listening to the current track. When operating the audio system during the scan process, the track being scanned plays normally. Then the selected audio system operation starts. |
 | If selected within a few seconds after a track starts playing, the previous track is played. If more than a few seconds have passed since the track started playing, the current track restarts. Touch and hold to start fast reverse. Playback stops when you release the icon or the control knob. |
 | Plays the CD. If selected again, playback is paused. |
 | Skips to the start of the next track. Touch and hold to start fast forward. Playback stops when you release the icon or the control knob. |
 | Displays the sound settings to improve sound quality. See "Volume/Display/Sound Settings" on page 5-52. |
Example (Searching for a track from the top level on an MP3/WMA/AAC CD)
1. Select the icon and display the list of folders/files at the top level.

2. After selecting a folder, the lists of folders/files in that folder are displayed.
3. Select the desired track.
CAUTION
To go up one folder level, select
Depending on the screen where the function is used, the repeat and shuffle icons may appear differently.
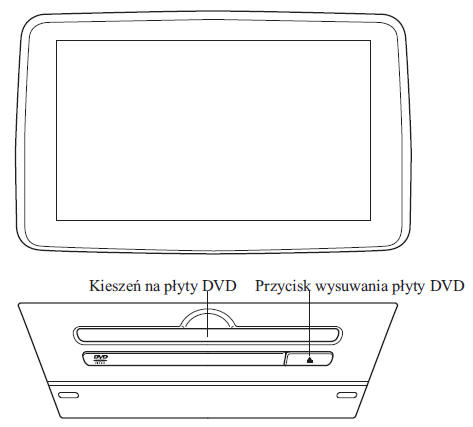
DVD player operation*
| Type | Playback data |
| DVD VIDEO/DVD-VR player | DVD VIDEO/DVD-VR disc |
Inserting a DVD
Insert the DVD into the slot with the printed side facing up. The DVD is loaded automatically, and the DVD main menu screen and the control panel are displayed.
CAUTION
Playback will begin after a short pause, during which the system reads the digital information recorded on the DVD.
Ejecting a DVD
To eject the DVD, press the DVD eject button ( ).
Playback
Select the icon on the home
screen when a DVD is inserted, and display the Entertainment screen. After selecting DVD, the DVD main menu and the control panel are displayed.
Once playback has started, the following icons are displayed at the bottom of the control panel on the screen.
| Icon | Function |
 | Displays the Entertainment function menu. Use this button to switch between the different audio sources. |
 | Returns to the DVD menu screen. |
 | Returns to the start of the previous chapter if selected within a few seconds after playback of the current chapter has started. Returns to the beginning of the current chapter if this icon is selected a few seconds after the current chapter has started playing. Press and hold during playback to start fast reverse. Press and hold longer while paused to play in reverse in slow motion. Playback stops when you release the icon or the control knob. |
 | Starts DVD playback. Select again to pause playback. |
 | Goes to the beginning of the next chapter. Press and hold during playback to start fast forward. Press and hold longer while paused to play in slow motion. Playback stops when you release the icon or the control knob. |
 | Changes the camera angle each time this icon is selected (only for DVDs that support this function). |
 | Turns subtitles on/off (only for DVDs that support this function). |
 | Changes the parental lock setting. The parental lock level and PIN code can be changed. |
 | Pauses playback and displays the DVD setup screen. To adjust the sound quality, select Sound Settings. See "Volume/Display/Sound Settings" on page 5-52. Select Aspect Ratio to change the aspect ratio (screen proportions). The following options are available: 16:9 Widescreen, 4:3 Letterbox and 4:3 Pan & Scan. |
 | Screen adjustment. Displays the video settings screen at the bottom of the screen. |
CAUTION
For safety reasons, images are not displayed while driving.
Move the icon

to move the control panel.When switching to DVD mode after playback has stopped, playback restarts without displaying the DVD menu screen.
DVD Function Settings
Sound quality and aspect ratio settings can be made.
Setting the Sound Quality
1. Select the icon .
2. To adjust the sound quality, select Sound Settings.
See "Volume/Display/Sound Settings" on page 5-52.
Setting the Aspect Ratio
1. Select the icon .
2. Select Aspect Ratio.
3. Select the desired aspect ratio.
Setting the Picture Quality
Brightness, contrast, tint and color can be adjusted.
When the icon is selected The following tabs are displayed
at the bottom of the screen.
| Tab | Function |
| Brightness | The screen brightness can be adjusted using the slider. |
| Contrast | The screen contrast can be adjusted using the slider. |
| Tint | The screen color tint can be adjusted using the slider. |
| Color | The screen color can be adjusted using the slider. |
| Reset | The screen settings can be reset to factory settings. Select Reset. |
AUX Audio Jack/USB Port Operation
A portable audio device or other similar commercially available device can be connected to the AUX jack to listen to music through the car speakers.
Use commercially available stereo mini jack cables (3.5 mm).
In addition, audio can be played through the car's audio system by connecting a USB device or an iPod-type device to the USB port.
See the "AUX/USB/iPod Mode" section on page 5-72.
Settings
CAUTION
The displayed image may vary depending on the type and specification.
Select the icon on the
home screen to display the settings screen.
Select the setting on the screen that you want to change.
On the configuration screen, the settings can be adjusted as follows:
| Tab | Item | Function | |
| AD-Disp (Head-up Display) | Height Brightness Adjustment Other | See "Head-up Display" on page 4-38. | |
| Display | See "Volume/Display/Sound Settings" on page 5-52. | ||
| Safety | Smart City Brake Support (changes the status of the Smart City Brake Support low-speed collision prevention system) Blind Spot Monitoring Volume (adjusts the volume of the Blind Spot Monitoring warning tones) Other | See the "Customizable Features" section on page 9-13. | |
| Sound | See "Volume/Display/Sound Settings" on page 5-52. | ||
| Clock | Set Clock | Displays the current time setting. Select + to advance the hour/minutes, and select - to set the hour/minutes back. AM/PM can only be selected when the 12-hour clock display is used. |
|
| GPS Sync | When ON is selected, "Set Clock" is disabled. | ||
| Time Format | Switches the time display between 12-hour and 24-hour mode. | ||
| Time Zone Selection | Selects the time zone. | ||
| Daylight Saving Time | Turns the daylight saving time setting on/off. When on, the time is advanced by 1 hour. When off, the time returns to standard time. |
||
| Vehicle | Rain Sensor Door Lock Other | See the "Customizable Features" section on page 9-13. | |
| Devices | Bluetooth | See "Preparing a Bluetooth Portable Device (Type C/Type D)" on page 5-113. | |
| Wi-Fi | Wi-Fi is used to provide real-time POI/traffic information search functions (e.g., fuel prices, weather, nearest restaurant). | ||
| System | Button Labels | Turns the button descriptions on/off. | |
| Language | Changes the language. | ||
| Temperature | Switches the temperature setting between Fahrenheit and Celsius. | ||
| Distance | Switches the distance setting between miles and kilometers. | ||
| Music Database Update | Used to update the Gracenote database. The Gracenote database is used in USB Audio mode and enables:
Gracenote can be downloaded from the Mazda Handsfree website. See the "Gracenote Database (Type C/Type D)" section on page 5-87. |
||
| Restore Factory Settings | Memory and settings are restored to factory defaults. The initial setup process starts when you select Yes. |
||
| Information | Terms and Disclaimers | Read them and give your consent. | |
| Version Information | You can check the current software version of the audio system and the Gracenote database. | ||
Apps
CAUTION
The displayed image may vary depending on the type and specification.
Select the icon on the
home screen and display the Apps screen. The following information can be checked.
| Home Screen | Item | Function |
| Fuel Consumption Monitor | Fuel Consumption Warning Status Efficiency Display Settings | See “Fuel Consumption Monitor” on page 4-94. |
| Periodic maintenance | Maintenance Schedule Tire Rotation Oil Change | See "Maintenance Monitor" on page 6-15. |
| Warning Indicator | You can check the warnings that are currently active. | See "If a Warning Light Comes On or Flashes" on page 7-34. |
Test yourself
A quick Mazda 2 quiz: every answer comes with an explanation and a link to the manual page.