AUX/USB/iPod Mode
A portable audio device or other similar commercially available device can be connected to the AUX jack to listen to music through the car speakers.
Commercially available stereo mini jack cables (3.5 ) are required.
For detailed information, contact a qualified service center; we recommend an Authorized Mazda Dealer.
In addition, audio can be played through the car's audio system by connecting a USB device or an iPod-type device to the USB port.
CAUTION
(Type C/Type D) The SD memory card slot is used for the navigation system. For vehicles with a navigation system, the SD card (original) containing map data is inserted into the memory card slot and used by the navigation system.
Type A/Type B (Without CD Player)
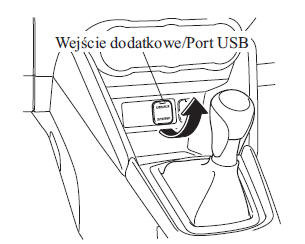
Type A/Type B (With CD Player)
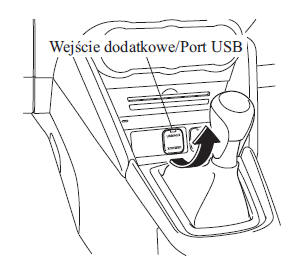
Type C/Type D (Without DVD/CD Player)
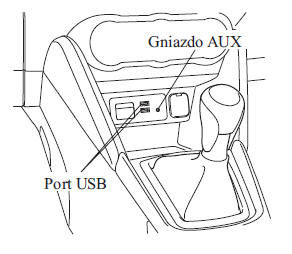
Type C/Type D (With DVD/CD Player)
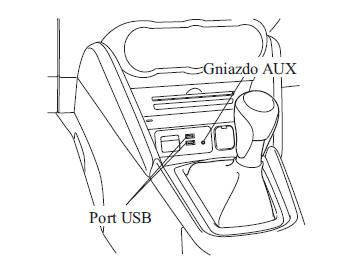
- AUX Mode Operation (Type A/Type B)
- USB Mode Operation (Type A/Type B)
- iPod Mode Operation (Type A/Type B)
- AUX Mode Operation (Type C/Type D)
- USB Mode Operation (Type C/Type D)
WARNING
Do not adjust the settings of the external audio device while driving: Adjusting the settings of the external device while driving is dangerous, as it may distract your attention from the road and cause a serious accident. Always adjust the settings of the external device while the vehicle is stopped.
CAUTION
- When the AUX jack/USB port is not in use, close its cover. If foreign objects get into the AUX jack/USB port and/or it is exposed to liquids, the system may malfunction.
- Depending on the portable audio device, noise may occur in the played audio when using the accessory power socket for connecting portable audio devices. (If noise occurs, do not use the accessory socket to connect audio devices.)
CAUTION
This mode may not be available depending on the portable audio device to be connected.
Before using the AUX jack/USB port, read the instruction manual of the device being connected.
To connect an external audio device to the AUX jack, use commercially available low-impedance stereo mini jack plugs (3.5 ). Before using the AUX jack, follow the manufacturer's recommendations on how to connect the device to the AUX jack.
To prevent battery discharge, do not use the AUX jack for extended periods when the engine is off or running at idle.
When connecting a device to the external AUX jack or USB port, you may hear noise depending on the device. If the device is connected to the accessory socket in the vehicle, the noise can be reduced by unplugging the device from it.
Using the USB Port/Auxiliary Audio (AUX) Jack
Type A/Type B (Without CD Player)
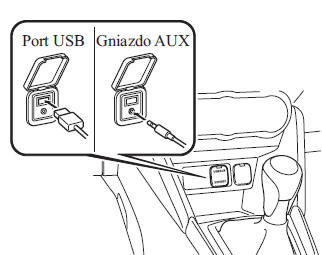
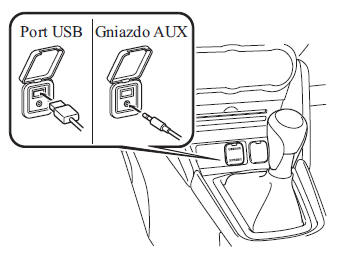
Type A/Type B (With CD Player)
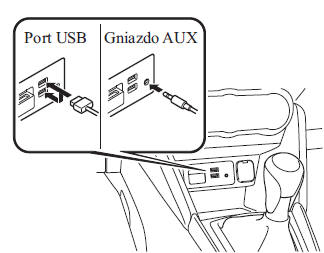
Type C/Type D (Without DVD/CD Player)
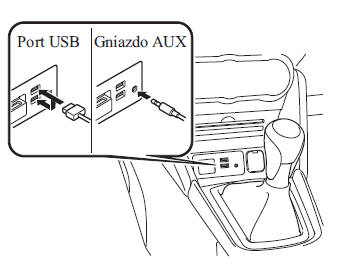
Type C/Type D (With DVD/CD Player)
Connecting a Device
1. If there is a cover over the AUX connector or USB port, remove it.
2. Connect the device plug to the USB port.
Connecting using a cable
1. If there is a cover over the AUX connector or USB port, remove it.
2. Connect the device cable with plug to the AUX/USB port connector.
WARNING
Make sure the connecting cable does not get tangled around the parking brake or gear shift lever. A tangled cable is a safety hazard, as it may interfere with driving and cause an accident.
CAUTION
Do not hang anything on the plug connected to the AUX/USB port, and do not handle it forcefully.
CAUTION
Insert the plug into the AUX/USB port carefully.
Insert and remove the plug perpendicular to the plane of the AUX/USB port opening.
Insert or remove the plug by holding its housing.
AUX Mode Operation (Type A/Type B)
1. Set the ignition switch to ACC or ON.
2. To turn on the audio system, press the power/volume knob.
3. Press the media button ( ) on the audio system console to
switch to AUX mode.
CAUTION
If the device is not connected to the AUX port, the mode will not switch to AUX.
Adjust the sound volume using the portable audio device or the audio system.
Sound settings other than volume can only be adjusted on the portable audio device.
When you unplug the portable device from the AUX port in AUX mode, noise may be heard.
USB Mode Operation (Type A/Type B)
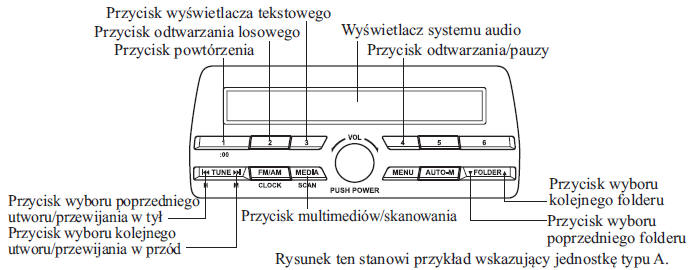
 This system does not support
USB 3.0 devices. Additionally, depending on the model or software version, other devices may not be supported.
Playback
1. Set the ignition switch to ACC or ON.
2. To turn on the audio system, press the power/volume knob.
3. Press the media button ( ), to switch to USB mode and
start playback.
CAUTION
Some devices, such as smartphones, may require a settings change to enable USB mode.
If no USB device is connected, the mode will not switch to USB.
If the USB device contains no playable data, the "NO CONTENTS" message flashes.
Tracks from the USB device are played in folder number order. Folders not containing MP3/WMA/AAC files are skipped.
Do not remove the USB device from the port while USB mode is active.
Doing so may damage the data.
Pause
To pause playback, press the Play/Pause button (4).
Press the button again to resume playback.
Fast Forward/Rewind
Press and hold the fast forward button ( ), to quickly
fast-forward the track.
Press and hold the rewind button ( ), to quickly
rewind the track.
Track Search
Press the track change button (
), to go to the beginning of the next track.
Press the track change button backward ( ) a few seconds after starting
playback to go to the beginning of the previous track.
Press the track change button backward ( ) after a few seconds of
playback to start playing from the beginning of the current track.
Folder search
To go to the previous folder, press ( ). To go to the
next folder, press ( ).
Track Scan
This function scans the track titles in the currently selected folder and plays 10 seconds of each track to help you find the track you want to listen to.
Press and hold the button ( )
during playback to start the scan (the track number will flash).
Press and hold the button ( )
again to turn off the scan.
CAUTION
After the scan is turned off, playback will start from the point where the scan was turned on.
Repeat Play
Track repeat
1. To repeat playback of the track you are currently listening to, press the repeat button (1) during playback.
"TRACK RPT" (Track repeat) appears on the display (the icon appears next to RPT at the bottom of the display).
2. To turn off track repeat, press the button again after 3 seconds.
Folder repeat
1. To repeat playback of the tracks in the current folder, press the repeat button (1) during playback, then press it again within 3 seconds. "FOLDER RPT" (Folder Repeat) appears on the display (next to RPT, at the bottom of the display, the icon appears ).
2. Press the button again to turn off track repeat.
Random Play
Tracks are selected and played in random order.
Random play of folder contents
1. To play the tracks in the folder in random order, press the random play button (2) during playback. "FOLDER RDM" (Folder Random) appears on the display (next to RDM, at the bottom of the display, the icon appears ).
2. To turn off random play of the tracks, press the button again after 3 seconds.
Random play of USB device contents
1. To play tracks on the USB device in random order, press the random play button (2) during playback, then press it again within 3 seconds. "ALL RDM" (random play of all tracks) appears on the display (next to RDM at the bottom of the display, the icon appears ).
2. To turn off random album play, press the button again.
Switching the Display
The information shown on the audio system display changes as described below each time the button (3) is pressed during playback.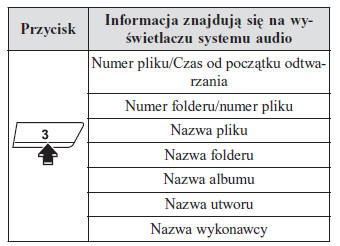
CAUTION
Information (artist name, track title) is displayed only when the USB device contains information that can be shown on the screen.
The system cannot display some characters. Characters that cannot be displayed are replaced with an asterisk (
 ).
Scrolling the Display
Only 13 characters can be displayed at one time. To display the rest of a long title, press the button (3). The next 13 characters will be displayed. After the last 13 characters of the title are displayed, press the button (3) again to return to the beginning of the title.
CAUTION
The number of characters that can be displayed is limited.
Error messages
When the "CHECK USB" message is displayed, it indicates an error on the USB device. Make sure the USB device contains MP3/WMA/AAC files and reconnect the device. If this message appears again, the audio system must be checked by a specialist service; we recommend an Authorized Mazda Service Center.
iPod Mode Operation (Type A/Type B)
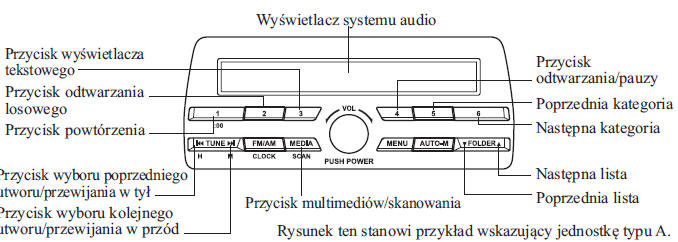
Depending on the device model or software version, the iPod may not be compatible. An error message is then displayed.
CAUTION
iPod functions cannot be operated on the iPod when it is connected to the audio system module, because the module controls the iPod functions.
Playback
1. Set the ignition switch to ACC or ON.
2. To turn on the audio system, press the power/volume knob.
3. Press the media button ( ), to switch to iPod mode and
start playback.
CAUTION
If no iPod is connected, switching to iPod mode is not possible.
If the iPod contains no playable data, the "NO CONTENTS" message is displayed.
Do not remove the device from the connector while iPod mode is active.
Otherwise, data may be damaged.
Pause
To pause playback, press the Play/Pause button (4).
Press the button again to resume playback.
Fast Forward/Rewind
Press and hold the fast forward button ( ), to quickly
fast-forward the track.
Press and hold the rewind button ( ), to quickly
rewind the track.
Track Search
Press the track change button (
), to go to the beginning of the next track.
Press the track change button backward ( ) for a few seconds (depending on the
iPod software version) after playback has started, to go to the beginning of the previous track.
Press the track change button backward ( ) after a few seconds (depending on the
iPod software version) of playback, to start playback from the beginning of the current track.
Category search
Press the previous category button (5) to select the previous category, and press the next category button (6) to select the next category.
CAUTION
The category may be: Playlist, Artist, Album, Song, Podcast, Genre, Composer or Audiobook.
List search
To select the previous list, press the previous list button ( ), to select the next list,
press the next list button ( ).
CAUTION
If the selected category is Song or Audiobook, there is no list.
Track Scan
This function scans the track titles in the currently selected list and plays 10 seconds of each track to help you find the track you want to listen to.
Press and hold the button ( )
during playback to start the scan (the track number will flash).
Press and hold the button ( )
again to turn off the scan.
CAUTION
After the scan is turned off, playback will start from the point where the scan was turned on.
Repeat Play
1. To repeat playback of the track you are currently listening to, press the repeat button (1) during playback.
"TRACK RPT" (Track Repeat) appears on the display (next to RPT, at the bottom of the display, the icon appears ).
2. Press the button again to turn off track repeat.
Random Play
Tracks are selected and played in random order.
Random track playback
1. To play tracks in the list in random order, press the random play button (2) during playback. "SONG RDM" (random play of songs) appears on the display (next to RDM at the bottom of the display, the icon appears ).
2. To turn off random play of the tracks, press the button again after 3 seconds.
Random album play
1. To play the tracks on the iPod in random order, press the random play button (2) during playback, then press it again within 3 seconds. The display shows "ALBUM RDM" (random album play) (next to RDM, an icon appears at the bottom of the display ).
2. To turn off random album play, press the button again.
CAUTION
The track number during random play is shown in the order of the content on the iPod.
Switching the Display
The information shown on the audio system display changes as described below each time the button (3) is pressed during playback.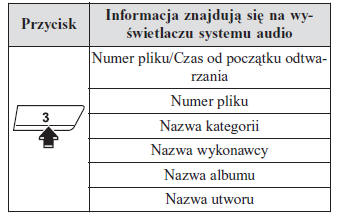
CAUTION
Information (artist name, track name) is displayed only when the iPod contains information that can be displayed.
The system cannot display some characters. Characters that cannot be displayed are replaced with an asterisk (
 ).
Scrolling the Display
Up to 13 characters can be displayed at one time. To display the rest of a long title, press the button (3).
The next 13 characters are displayed.
After the last 13 characters of the title are displayed, press the button (3) again to return to the beginning of the title.
CAUTION
The number of characters that can be displayed is limited.
Error messages
If "CHECK iPod" is displayed, an error has occurred on the iPod. Make sure the iPod contains playable files and that the device is connected correctly. If this message appears again, the audio system must be checked by a qualified service center. We recommend a Mazda Authorized Dealer.
Error Indications (Type A/Type B)
If an error message appears on the display, check the table for its cause. If you cannot find the cause of the error, contact a qualified service center. We recommend a Mazda Authorized Dealer.
| Message | Cause | Solution |
| CHECK USB | USB device malfunction | Make sure the USB device contains MP3/WMA/AAC files, then reconnect the device. |
If the error message does not disappear, contact a qualified service workshop. We recommend an Authorized Mazda Dealer.
AUX Mode Operation (Type C/Type D)
1. Select the icon on the
home screen and display the Entertainment function screen.
2. Select AUX to switch to AUX mode. The following icons appear at the bottom of the center display.
| Icon | Function |
 | Displays the Entertainment function menu. Use this button to switch between the different audio sources. |
 | Displays the sound settings to improve sound quality. See "Volume/Display/Sound Settings" on page 5-52. |
CAUTION
If the device is not connected to the AUX port, the mode will not switch to AUX.
Adjust the audio volume using the portable audio device, the control switch, or the audio system buttons.
Audio sound settings can also be made using the volume settings of the portable audio device.
When you unplug the portable device from the AUX port in AUX mode, noise may be heard.
USB Mode Operation (Type C/Type D)
This system does not support USB 3.0 devices. In addition, depending on the model or software version, other devices may not be supported.
Devices formatted in FAT32 are supported (USB devices formatted in other formats, such as NTFS, are not supported).
Playback
1. Select the icon on the
home screen and display the Entertainment function screen.
2. Select USB 1 or USB 2 to switch to USB mode. The following icons appear at the bottom of the center display.
| Icon | Function |
 | Displays the Entertainment function menu. Use this button to switch between the different audio sources. |
 | The category list is displayed. |
 | The current track list is displayed. Select the desired track to play it. |
 | Repeats the current track. Select again to repeat all tracks in the current track list. Select this button again to cancel this function. |
 | Tracks from the current track list are played in random order. Select again to cancel. |
 | Starts playing a track similar to the current track using Gracenote's More Like This. Select the desired track from the category list to cancel More Like This. |
 | If selected within a few seconds after a track starts playing, the previous track is played. If more than a few seconds have passed since the track started playing, the current track restarts. Touch and hold to start fast reverse. Playback stops when you release the icon or the control knob. |
 | The track is playing. Selecting it again temporarily pauses playback. |
 | Skips to the start of the next track. Press and hold to start fast forward. |
 | Displays the sound settings to improve sound quality. See "Volume/Display/Sound Settings" on page 5-52. |
CAUTION
Move the playback time slider to set it to the desired point in the track.
Depending on the screen where the function is used, the repeat and shuffle icons may appear differently.
Category list
To display the category list, select the icon
.
Select the desired category and item.
| Category | Function |
| Playlist | Displays the playlists on the device. |
| Artist | Displays a list of artist names. You can play all tracks or the tracks from a selected album of the chosen artist. |
| Album | Displays a list of album names. |
| Track | All tracks on the device are displayed. |
| Genre | Displays a list of genres. You can play all tracks, or the tracks of a selected album or artist, in the chosen genre. |
| Audiobook | Displays a list of audiobooks. You can select and play chapters. |
| Podcast | Displays a list of podcasts. You can select and play episodes. (A special service for certain Apple devices). |
| Folder | Displays the folder/file list. |
Example of use (to play all tracks on a USB device)
(Method 1)
1. Select , to display the
category list.
2. Select Track.
All tracks on the USB device are displayed.
3. Select the desired track.
The selected track then plays. All tracks on the USB device can be played in continuous playback mode.
CAUTION
Only tracks from the desired category selected in Step 2 are played.
(Method 2)*1
1. Select , to display the
category list.
2. Select Folder.
All folders on the USB device are displayed.
3. Select All Tracks.
All tracks on the USB device are displayed.
4. Select the desired track.
The selected track then plays. All tracks on the USB device can be played in continuous playback mode.
*1 Android devices or USB memory devices are supported.
CAUTION
Only tracks from the desired folder selected in Step 3 are played.
Gracenote Database (Type C/Type D)
When a USB device is connected to the system and music is playing, information such as album name, artist name, genre and title is displayed automatically, if the vehicle's database compilation matches the music being played. Information stored on this device uses the Gracenote music recognition service database.
CAUTION
For the most current Gracenote database information that can be installed, and how to install it, visit the Mazda hands-free system website: http://www.mazdahandsfree.com
Introduction
Music recognition technology and related data are provided by Gracenote.
Gracenote is the industry standard in music recognition technology and related content delivery. For more information, visit www.gracenote.com.
CD and music-related data from Gracenote, Inc., copyright 2000 to present Gracenote.
Gracenote software, copyright 2000 to present Gracenote. One or more patents owned by Gracenote apply to this product and service. Visit the Gracenote website for the current list of Gracenote patents.
Gracenote, CDDB, MusicID, MediaVOCS, the Gracenote logo and logotype, and the "Powered by Gracenote" logo are registered trademarks of Gracenote in the United States and/or other countries.
End User License Agreement for Gracenote Software. The application or device to which this agreement applies contains software from Gracenote, Inc., of Emeryville, California ("Gracenote"). The Gracenote software ("Gracenote Software") enables this device to identify discs and/or files and to obtain music-related information, including name, artist, track, and album information ("Gracenote Data"), from online servers or embedded databases (collectively "Gracenote Servers") and to perform other functions. You may use Gracenote Data only by means of the end-user functions of this application or device.
You agree to use Gracenote Data, Gracenote Software, and Gracenote Servers for your own personal, non-commercial use only. You agree not to assign, copy, transfer, or transmit the Gracenote Software or any Gracenote Data to any third party. YOU AGREE NOT TO USE OR EXPLOIT GRACENOTE DATA, GRACENOTE SOFTWARE, OR GRACENOTE SERVERS, EXCEPT AS EXPRESSLY PERMITTED IN THIS AGREEMENT.
Your license to use Gracenote Data, Gracenote Software, and Gracenote Servers will terminate if you violate these restrictions. Upon termination, you agree to cease all use of Gracenote Data, Gracenote Software, and Gracenote Servers. Gracenote reserves all rights to Gracenote Data, Gracenote Software, and Gracenote Servers, including all ownership rights. Under no circumstances will Gracenote be liable for any payment to you for any information you provide. You acknowledge that Gracenote may enforce its rights under this agreement directly against you in its own name.
Gracenote services use a unique identifier to track queries for statistical purposes. The purpose of a randomly assigned numeric identifier is to allow the Gracenote service to count queries without collecting any personal information about you. For more information, see the Gracenote Privacy Policy on the Gracenote service.
The Gracenote Software and each item of Gracenote Data are licensed to you under this license agreement on an "AS IS" basis.
Gracenote makes no express or implied representations or warranties regarding the accuracy of any Gracenote Data from Gracenote Servers. Gracenote reserves the right to delete data from Gracenote Servers and to change data categories for any reasons that Gracenote deems sufficient. Gracenote Software and Gracenote Servers are not guaranteed to be error-free or to operate without interruption. Gracenote is not obligated to provide new, enhanced, or additional data types or categories that Gracenote may provide in the future, and may discontinue its services at any time. GRACENOTE DISCLAIMS ALL DIRECT OR IMPLIED WARRANTIES, INCLUDING, BUT NOT LIMITED TO, IMPLIED WARRANTIES OF MERCHANTABILITY, FITNESS FOR A PARTICULAR PURPOSE, TITLE, AND NON-INFRINGEMENT. GRACENOTE DOES NOT WARRANT THE RESULTS THAT MAY BE OBTAINED FROM THE USE OF GRACENOTE SOFTWARE OR GRACENOTE SERVERS. IN NO EVENT WILL GRACENOTE BE LIABLE FOR ANY CONSEQUENTIAL OR INCIDENTAL DAMAGES, LOSS OF PROFITS, OR OTHER BENEFITS.
2000 to present. Gracenote, Inc.
Updating the Database
The Gracenote database can be updated using a USB device.
1. Connect the USB device containing the Gracenote update software.
2. Select the icon. on the
home screen to display the settings screen.
3. Select System, then select Music Database Update.
4. Select Find. A list of update packages saved on the USB device and the version name is displayed.
5. Select one of the packages to perform the update.
6. Select Yes.
CAUTION
Gracenote can be downloaded from the Mazda Handsfree website.
Test yourself
A quick Mazda 2 quiz: every answer comes with an explanation and a link to the manual page.