Audio System (Type A/Type B)
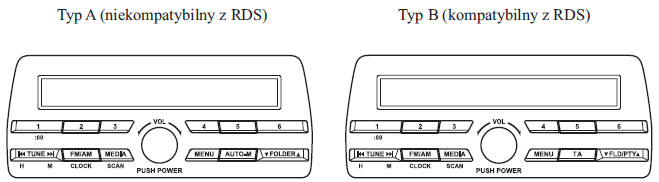
- Power/Volume/Sound Settings
- Clock
- Radio Operation (Type A)
- Radio Operation (Type B)
- CD Player Operation
- AUX Audio Jack/USB Port Operation
- Error Messages Displayed
Power/Volume/Sound Settings

Power
Set the ignition switch to ACC or ON. To turn on the audio system, press the power/volume knob. To turn it off, press the power/volume knob again.
Volume Adjustment
To adjust the volume, turn the power/volume knob. Turn the knob clockwise to increase the volume and counterclockwise to decrease it.
Adjusting Sound Settings
1. Press the menu button ( ),
to select the desired function. The selected function will be displayed.
2. To adjust the selected function, turn the knob as follows:
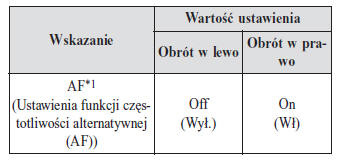
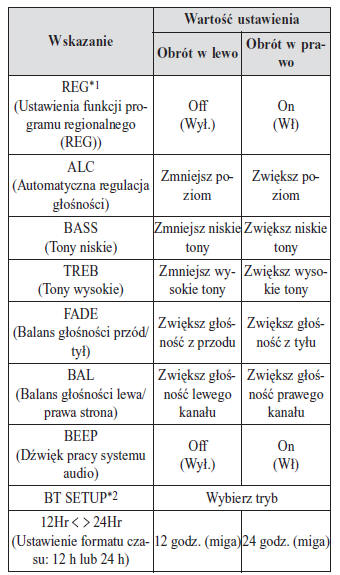
*1 Type B
*2 Depending on the model, this function may not be available.
CAUTION
If no operation is performed for several seconds, the previous screen will reappear on the display.
To clear the current treble, bass, front and rear speaker, and left and right channel settings, press and hold the menu button ( ) for 2
seconds. A beep will sound and "CLEAR" will appear on the display.
AF (Alternative Frequency Function) Settings (Type B)
The RDS AF function can be turned on or off. See the "Radio Operation" (Type B) section on page 5-38.
REG (Regional Program Function) Settings (Type B)
The RDS REG function can be turned on or off.
See the "Radio Operation" (Type B) section on page 5-38.
ALC (Automatic Level Control)
Automatic Level Control (ALC) is a function that automatically adjusts the audio volume level according to vehicle speed. The higher the vehicle speed, the higher the volume level. ALC can be turned off (OFF) or set to an operating level from 1 to 7. At level 7 (ALC LEVEL 7), the volume may increase to the maximum level. Select the operating level according to driving conditions.
BEEP (Audio System Operation Tone)
The tone sounded when a control button is pressed and held can be changed. The default setting is ON. Set to OFF to mute this tone.
BT SETUP Mode*
Music or other audio files recorded on commercially available portable audio devices and mobile phones equipped with Bluetooth wireless technology can be played through the speakers in your vehicle. In BT SETUP mode, these devices can be registered for Bluetooth mode or changed (page 5-94).
12Hr 24Hr (Clock Format Setting:
12-hour or 24-hour)
Turning the knob switches the time display between 12-hour and 24-hour (page 5-35).
Clock

Setting the Clock
The clock can be set when the ignition switch is in the ACC or ON position.
1. To set the time, press and hold the clock button ( ) for about 2
seconds, until a beep sounds.
2. The current hour will flash.
Changing the Time Display Mode
- To set the time, press the hour/minute setting button (
 ) while the current setting is flashing on the
display. - The hour advances each time the hour setting button (
 ) is pressed. The minutes advance each time the minute setting button (
 ).
Resetting the Time
1. Press and hold the clock button () for about 2 seconds, until a beep sounds.
2. Press the :00 button (1).
3. When this button is pressed, the time is set to the nearest full hour as follows: (Example)
12:01-12:29 12:00
12:30-12:59 1:00
CAUTION
After the :00 button (1) is pressed, the seconds count from "00".
To change the time display from 12-hour to 24-hour: Press the menu button (
 )
several times until the 12-hour or 24-hour time display mode is selected. While the time setting is flashing, turn the volume knob in either direction to select the desired time display mode.
Radio Operation (Type A)
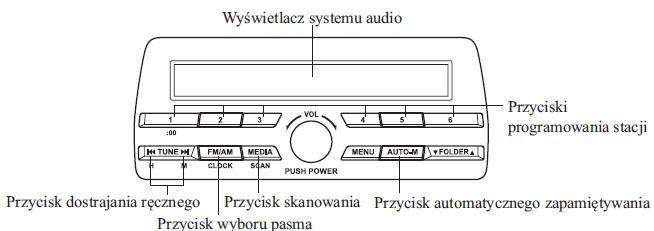
Turning On the Radio
To turn on the radio, press the band select button ( ).
Band Selection
Then press the band select button ( ) to switch bands in the following order: FM1
 FM2

AM.
The selected mode will be displayed.
CAUTION
If the signal received on the FM band is weak, reception automatically switches from STEREO to MONO to reduce noise.
Tuning
The radio can be tuned in several ways: manually, using Seek or Scan mode, selecting preset stations, and using the automatic station memory (Auto Store) function.
The easiest way to select a station is to store it as a preset.
Manual Tuning
Select a station by lightly pressing the tuning button ( ).
Seek Mode
Automatic station seeking starts when the tuning button ( ), until a beep sounds.
Seeking stops when a station is found.
CAUTION
If the button is pressed and held, seeking continues without stopping.
Scan
Press and hold the button (
) to automatically listen to the stations with the strongest signals. Scan pauses for about 5 seconds at each station found. Press and hold the button ( )
within this time to keep the station found.
Storing Stations (Presets)
6 memory positions can be used to store 6 AM stations and 12 FM stations.
1. To store a station, first select the AM, FM1 or FM2 band. Then tune the radio to the desired station.
2. Press and hold the preset button for about 2 seconds until you hear a beep. The display shows the number and frequency of the selected station. The station is stored.
3. Repeat this procedure for the other bands and frequencies you want to store. To select a station from memory, select the AM, FM1 or FM2 band and press the corresponding preset button. The display shows the channel number and the station frequency.
Automatic Station Preset
This function is especially useful when driving through areas where the frequencies of local stations are not known.
Press and hold the button (
) for about 2 seconds, until you hear a beep. The system automatically searches for and stores the 6 strongest stations in each selected frequency band.
When the search is complete, the station with the strongest signal is selected and its frequency appears on the display. Press and release the automatic preset button ( ),
to recall the stations from those that are automatically preset.
Each time, one preset station is selected; its frequency and channel number appear on the display.
CAUTION
If no station can be found during the search, the letter "A" is displayed.
Radio Operation (Type B)
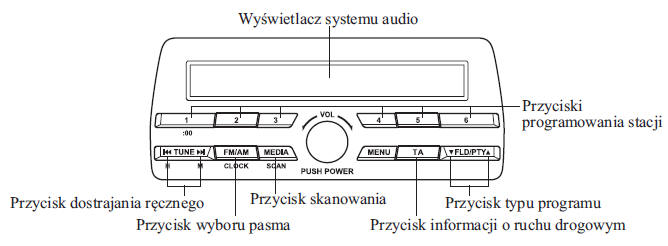
Turning On the Radio
To turn on the radio, press the band select button ( ).
Band Selection
Then press the band select button ( ) switches the bands
in the following order: FM1 FM2

MW/LW.
The selected mode will be displayed.
CAUTION
If the signal received on the FM band is weak, reception automatically switches from STEREO to MONO to reduce noise.
Tuning
The radio can be tuned in several ways: manually, using Seek or Scan mode, selecting preset stations, and using the automatic station memory (Auto Store) function.
The easiest way to select a station is to store it as a preset.
Manual Tuning
Select a station by lightly pressing the tuning button ( ).
Seek Mode
Automatic station seeking starts when the tuning button ( ), until a beep sounds.
Seeking stops when a station is found.
CAUTION
If the button is pressed and held, seeking continues without stopping.
Scan
Press and hold the button ( ),
to automatically scan the strongest stations. Scanning pauses for about 5 seconds at each station found. Press and hold the button ( )
within this time to keep the station found.
Storing Stations (Presets)
6 preset positions can be used to store 6 MW/LW stations and 12 FM stations.
1. To set a station, first select the MW/LW, FM1 or FM2 band.
Tune the radio to the selected station.
2. Press and hold the preset button for about 2 seconds until you hear a beep. The display shows the number and frequency of the selected station. The station is stored.
3. Repeat this procedure for the other bands and frequencies you want to store. To select a station from memory, select the MW/LW, FM1 or FM2 band and press the corresponding preset button. The display shows the channel number and the station frequency.
Radio Data System (RDS)
CAUTION
The RDS does not work if you are outside its broadcast range.
Alternative Frequency (AF)
The AF function is available for the FM band.
Press the menu button ( ) and
select AF. The display shows "AF". If the signal of the station is weak, the radio automatically switches to an alternative frequency.
If you want to continue listening to a regional program, press the menu button ( ) and select the REG function.
"REG ON" is displayed. To cancel, press the knob again and select REG. "REG OFF" is displayed.
Traffic Information (TA)
Pressing the traffic information button ( )
activates the TA function, and the display shows "TA".
If traffic information reception is switched on, traffic information is broadcast even if other functions (FM, CD, USB, iPod, AUX or BT audio) are in use at that time, and "Traffic Info" is displayed.
To end the traffic information reception and return to the previous mode, press the button ( ) while
listening to traffic information.
Program Type Button (PTY)
Some FM stations broadcast program type codes. These codes make it easy to find alternative stations broadcasting the same type of program.
Press the program type button ( ) with the FM band
selected. During reception, the program type indicator and "PTY" are displayed. If the program has no program type code, "None" is displayed.
(To select a program type):
1. Press the program type button () while the program type
indicator is displayed.
2. Do one of the following:
- Press a preset button (1 - 6).
- Press the program type button ( ).
(To search for a program of the selected type):
1. Press the program type button () while the program type
indicator is displayed.
2. Press the program type buttonuntil you hear a beep.
The radio searches for matching stations. If none is found, "Nothing" is displayed and the radio returns to the previously selected station.
(To assign program types to the preset buttons):
1. Press the program type button () while the program type
indicator is displayed.
2. Press the program type button () and select a
program type.
3. While the program types are displayed, press and hold a preset button for about 2 seconds.
Emergency Alert Information
If emergency alert reception is switched on, emergency information is broadcast even if other functions (FM, CD, USB, iPod, AUX or BT audio) are in use at that time, and "Alarm!" is displayed.
After the emergency alert ends, the radio returns to the previous mode.
CD Player Operation*
| Type | Playback data |
| CD/MP3/WMA/AAC music disc player |
|
CAUTION
If a disc contains both music files (CD-DA) and MP3/WMA/AAC files, playback of these two or three file types will differ depending on the disc recording format.
Inserting a CD
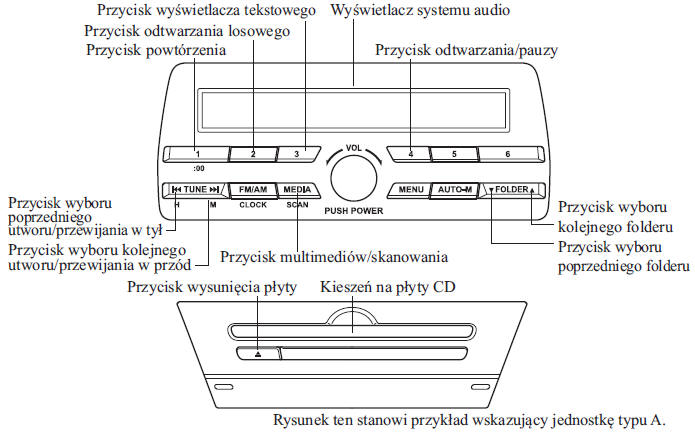
Insert the CD into the slot with the printed side facing up. The mechanism positions the disc correctly and playback starts.
CAUTION
Playback starts after a short pause, during which the system reads the digital information recorded on the CD.
Ejecting a CD
To eject the disc, press the CD eject button ( ).
Playback
Press the media button (
) to switch to CD mode and start playback.
CAUTION
CD mode is not available when no disc is inserted.
Pause
To pause playback, press the Play/Pause button (4).
Press the button again to resume playback.
CAUTION
CD mode is not available when no disc is inserted.
Pause
To pause playback, press the Play/Pause button (4).
Press the button again to resume playback.
Fast Forward/Rewind
Press and hold the fast forward button ( ) to
fast forward the track. Press and hold the rewind button ( ) to rewind
the track.
Track Search
Press the track change button ( ) once
to go to the beginning of the next track.
Press the track change button backward ( ) a few seconds after starting
playback to go to the beginning of the previous track.
Press the track change button backward ( ) after a few seconds of
playback to start playing from the beginning of the current track.
Folder Search (during playback of a CD containing MP3/WMA/AAC files)
To go to the previous folder, press ( ). To go to the
next folder, press ( ).
Track Scan
During CD playback
This function scans the track titles on the disc and plays 10 seconds of each track to help you find the track you want to listen to.
Press and hold the button ( )
during playback to start the scan (the track number will flash).
Press and hold the button ( )
again to turn off the scan.
During playback of a CD containing MP3/WMA/AAC files
This function scans the track titles in the currently selected folder and plays 10 seconds of each track to help you find the track you want to listen to. Press and hold the button ( ) during playback to
start the scan (the track number will flash).
Press and hold the button (
) again to turn off the scan.
CAUTION
After the scan is turned off, playback will start from the point where the scan was turned on.
Repeat Play
During CD playback
1. To repeat playback of the track you are currently listening to, press the repeat button (1) during playback.
"TRACK RPT" (Track Repeat) appears on the display (next to RPT, at the bottom of the display, the icon appears ).
2. Press the button again to turn off track repeat.
During playback of a CD containing MP3/WMA/AAC files
(Track Repeat)
1. To repeat playback of the track you are currently listening to, press the repeat button (1) during playback.
"TRACK RPT" (Track Repeat) appears on the display (next to RPT, at the bottom of the display, the icon appears ).
2. To turn off track repeat, press the button again after 3 seconds.
(Folder Repeat)
1. To repeat playback of the tracks in the current folder, press the repeat button (1) during playback, then press it again within 3 seconds. "FOLDER RPT" (Folder Repeat) appears on the display (next to RPT, at the bottom of the display, the icon appears ).
2. Press the button again to turn off track repeat.
Random Play
Tracks are selected and played in random order.
During CD playback
1. To play the tracks on the CD in random order, press the random play button (2) during playback of a track. "DISC RDM" (Disc Random) appears on the display (next to RDM, at the bottom of the display, the icon appears ).
2. To turn off random album play, press the button again.
During playback of a CD containing MP3/WMA/AAC files
(Folder Random)
1. To play the tracks in the folder in random order, press the random play button (2) during playback. "FOLDER RDM" (Folder Random) appears on the display (next to RDM, at the bottom of the display, the icon appears ).
2. To turn off random play of the tracks, press the button again after 3 seconds.
(Random Play of Entire Disc)
1. To play the tracks on the CD in random order, press the random play button (2) during playback, then press it again within 3 seconds.
"DISC RDM" (Disc Random) appears on the display (next to RDM, at the bottom of the display, the icon appears ).
2. To turn off random album play, press the button again.
Switching the Display
The information shown on the audio system display changes as described below each time the button (3) is pressed during playback.
CD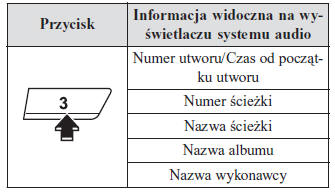
CD MP3/WMA/AAC
CAUTION
The displayed information (such as artist name and track title) refers only to the CD on which it was recorded.
The system cannot display some characters. Characters that cannot be displayed are replaced with an asterisk (
 ).
Scrolling the Display
Only 13 characters can be displayed at one time. To display the rest of a long title, press the button (3). The next 13 characters will be displayed. After the last 13 characters of the title are displayed, press the button (3) again to return to the beginning of the title.
CAUTION
The number of characters that can be displayed is limited.
Displayed Messages
"CHECK CD" indicates a CD fault. Check that the CD is not damaged, dirty or scratched, then reinsert it correctly. If the message appears again, insert a different CD known to be of good quality. If the message still appears, the player should be checked by a qualified service center; we recommend an Authorized Mazda Dealer.
AUX Audio Jack/USB Port Operation
A portable audio device or other similar commercially available device can be connected to the AUX jack to listen to music through the car speakers.
Use commercially available stereo mini jack cables (3.5 mm).
For detailed information, contact a qualified service center; we recommend an Authorized Mazda Dealer.
In addition, audio can be played through the car's audio system by connecting a USB device or an iPod-type device to the USB port.
See the "AUX/USB/iPod Mode" section on page 5-72.
Error Messages Displayed
If an error message appears on the audio system display, check its cause in the table. If you cannot find the cause of the error, contact a qualified service center; we recommend an Authorized Mazda Dealer.
| Message | Cause | Solution |
| CHECK CD | The CD is inserted upside down | Insert the CD correctly. If the error message does not disappear, contact a qualified service center. |
We recommend an authorized Mazda dealer.
Test yourself
A quick Mazda 2 quiz: every answer comes with an explanation and a link to the manual page.