Flat Tire Replacement
If one of your tires is flat, follow the steps below:
Securing the vehicle
- When it is safe to do so, move your vehicle to the side of the road and stop it as far away from traffic as possible.
- Turn on the vehicle's hazard warning lights.
- Park your vehicle on a level surface and apply the parking brake.
WARNING
Make sure the parking brake is applied securely and the continuously variable transmission is in the P (Park) position.
Never attempt to change a tire if your vehicle is parked on a slope or on an icy or slippery surface.
This is dangerous.
Never attempt to change a tire if your vehicle is near traffic. Wait for roadside assistance.
Wheel Chocking

Place wheel chocks of appropriate size 1 in front of and behind the wheel diagonally opposite the flat tire 2 to prevent the vehicle from moving when it is raised with the jack.
WARNING
Be sure to chock the wheel, as the vehicle may move and cause injury.
Removing the Spare Tire and Tools from the Trunk
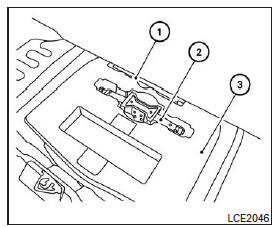
Open the trunk. Lift the cargo floor. Remove the wheel wrench 1 and the jack 2 from the storage cover 3. Then remove the storage cover 3 to access the spare tire.
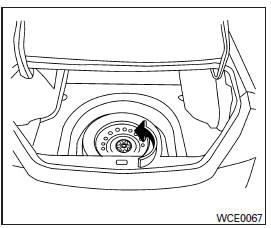
Turn the retainer to remove the spare tire.
Remove the spare tire.
Removing a Wheel Cover (if equipped)
WARNING
Do not pry off hub caps or wheel covers with your hands. You may injure yourself.
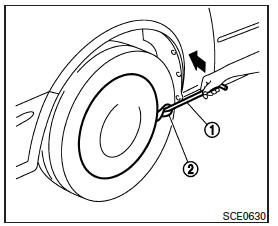
To remove the wheel cover, use the jack handle 1 as illustrated.
Place a cloth 2 between the wheel and the jack handle to prevent damage to the wheel and wheel cover.
Be careful not to scratch the wheel cover or the wheel surface.
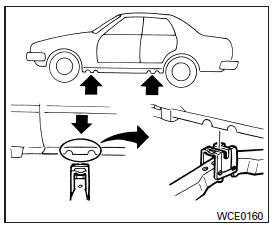
Jack Point
Jacking Up the Vehicle and Removing the Damaged Tire
WARNING
- Never get under a vehicle that is supported only by a jack. If work under the vehicle is required, use safety stands to support it.
- Use only the jack supplied with your vehicle to lift it.
Do not use it to lift another vehicle. This jack is designed exclusively for lifting your vehicle when you need to replace a wheel.
Do not use any other part of your vehicle as a jack point.
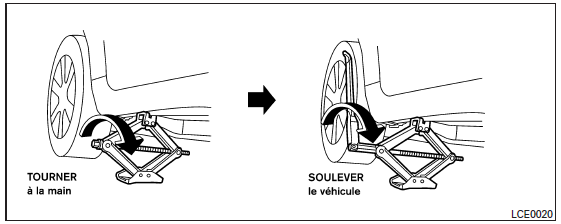
Always refer to the illustrations for the lifting points and jacking locations that correspond to your vehicle model and the type of jack being used.
Read the warning label attached to the jack and the following instructions carefully:
- Using the wheel wrench, loosen each wheel nut one or two turns counterclockwise.
The jack should rest on a firm, level surface.
- Hold the jack handle and shaft firmly with both hands to raise the vehicle.
Installing the spare tire
The spare tire should only be used in an emergency. Refer to the specific instructions in the "Wheels and Tires" section of the "Maintenance and Owner Service" chapter in this manual.
- Clean any mud or dirt from the surface between the wheel and the hub.
- Carefully install the spare tire and tighten the wheel nuts by hand.
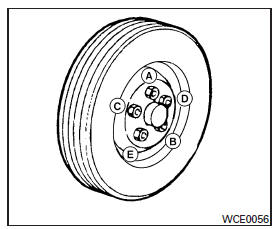
- Using the wheel wrench, tighten the wheel nuts alternately and evenly, as illustrated, until they are firmly seated.
- Slowly lower the vehicle until the tire touches the ground. Then firmly tighten the wheel nuts with the wheel wrench, following the sequence illustrated (A, B, C, D, E). Lower the vehicle completely.
WARNING
- If incorrect wheel nuts are used or the nuts are improperly tightened, the wheel could loosen or come off.
Using a torque wrench, tighten the wheel nuts to the specified torque as soon as possible.
Wheel nut torque:
113 N·m
Wheel nuts must be tightened to the specified torque at all times. It is recommended to tighten the wheel nuts to the specified torque whenever lubrication is required.
Adjust the tire pressure when the tires are COLD.
COLD: if the vehicle has been parked for three hours or more, or driven less than 1.6 km (1 mi).
The COLD tire inflation pressures are shown on the tire and loading information label located on the driver's side B-pillar.
- Store the flat tire and lifting equipment securely in your vehicle.
- Reinstall the spare tire cover and the cargo mat over the damaged tire.
- Close the cargo area.
WARNING
- Make sure the spare tire and jack are always stored properly after use. These items can become dangerous projectiles in an accident or during sudden braking.
- The spare tire should only be used in an emergency. Refer to the specific instructions in the "Wheels and Tires" section of the "Maintenance and Owner Service" chapter in this manual.
Test yourself
A quick Nissan Altima quiz: every answer comes with an explanation and a link to the manual page.