Camshaft
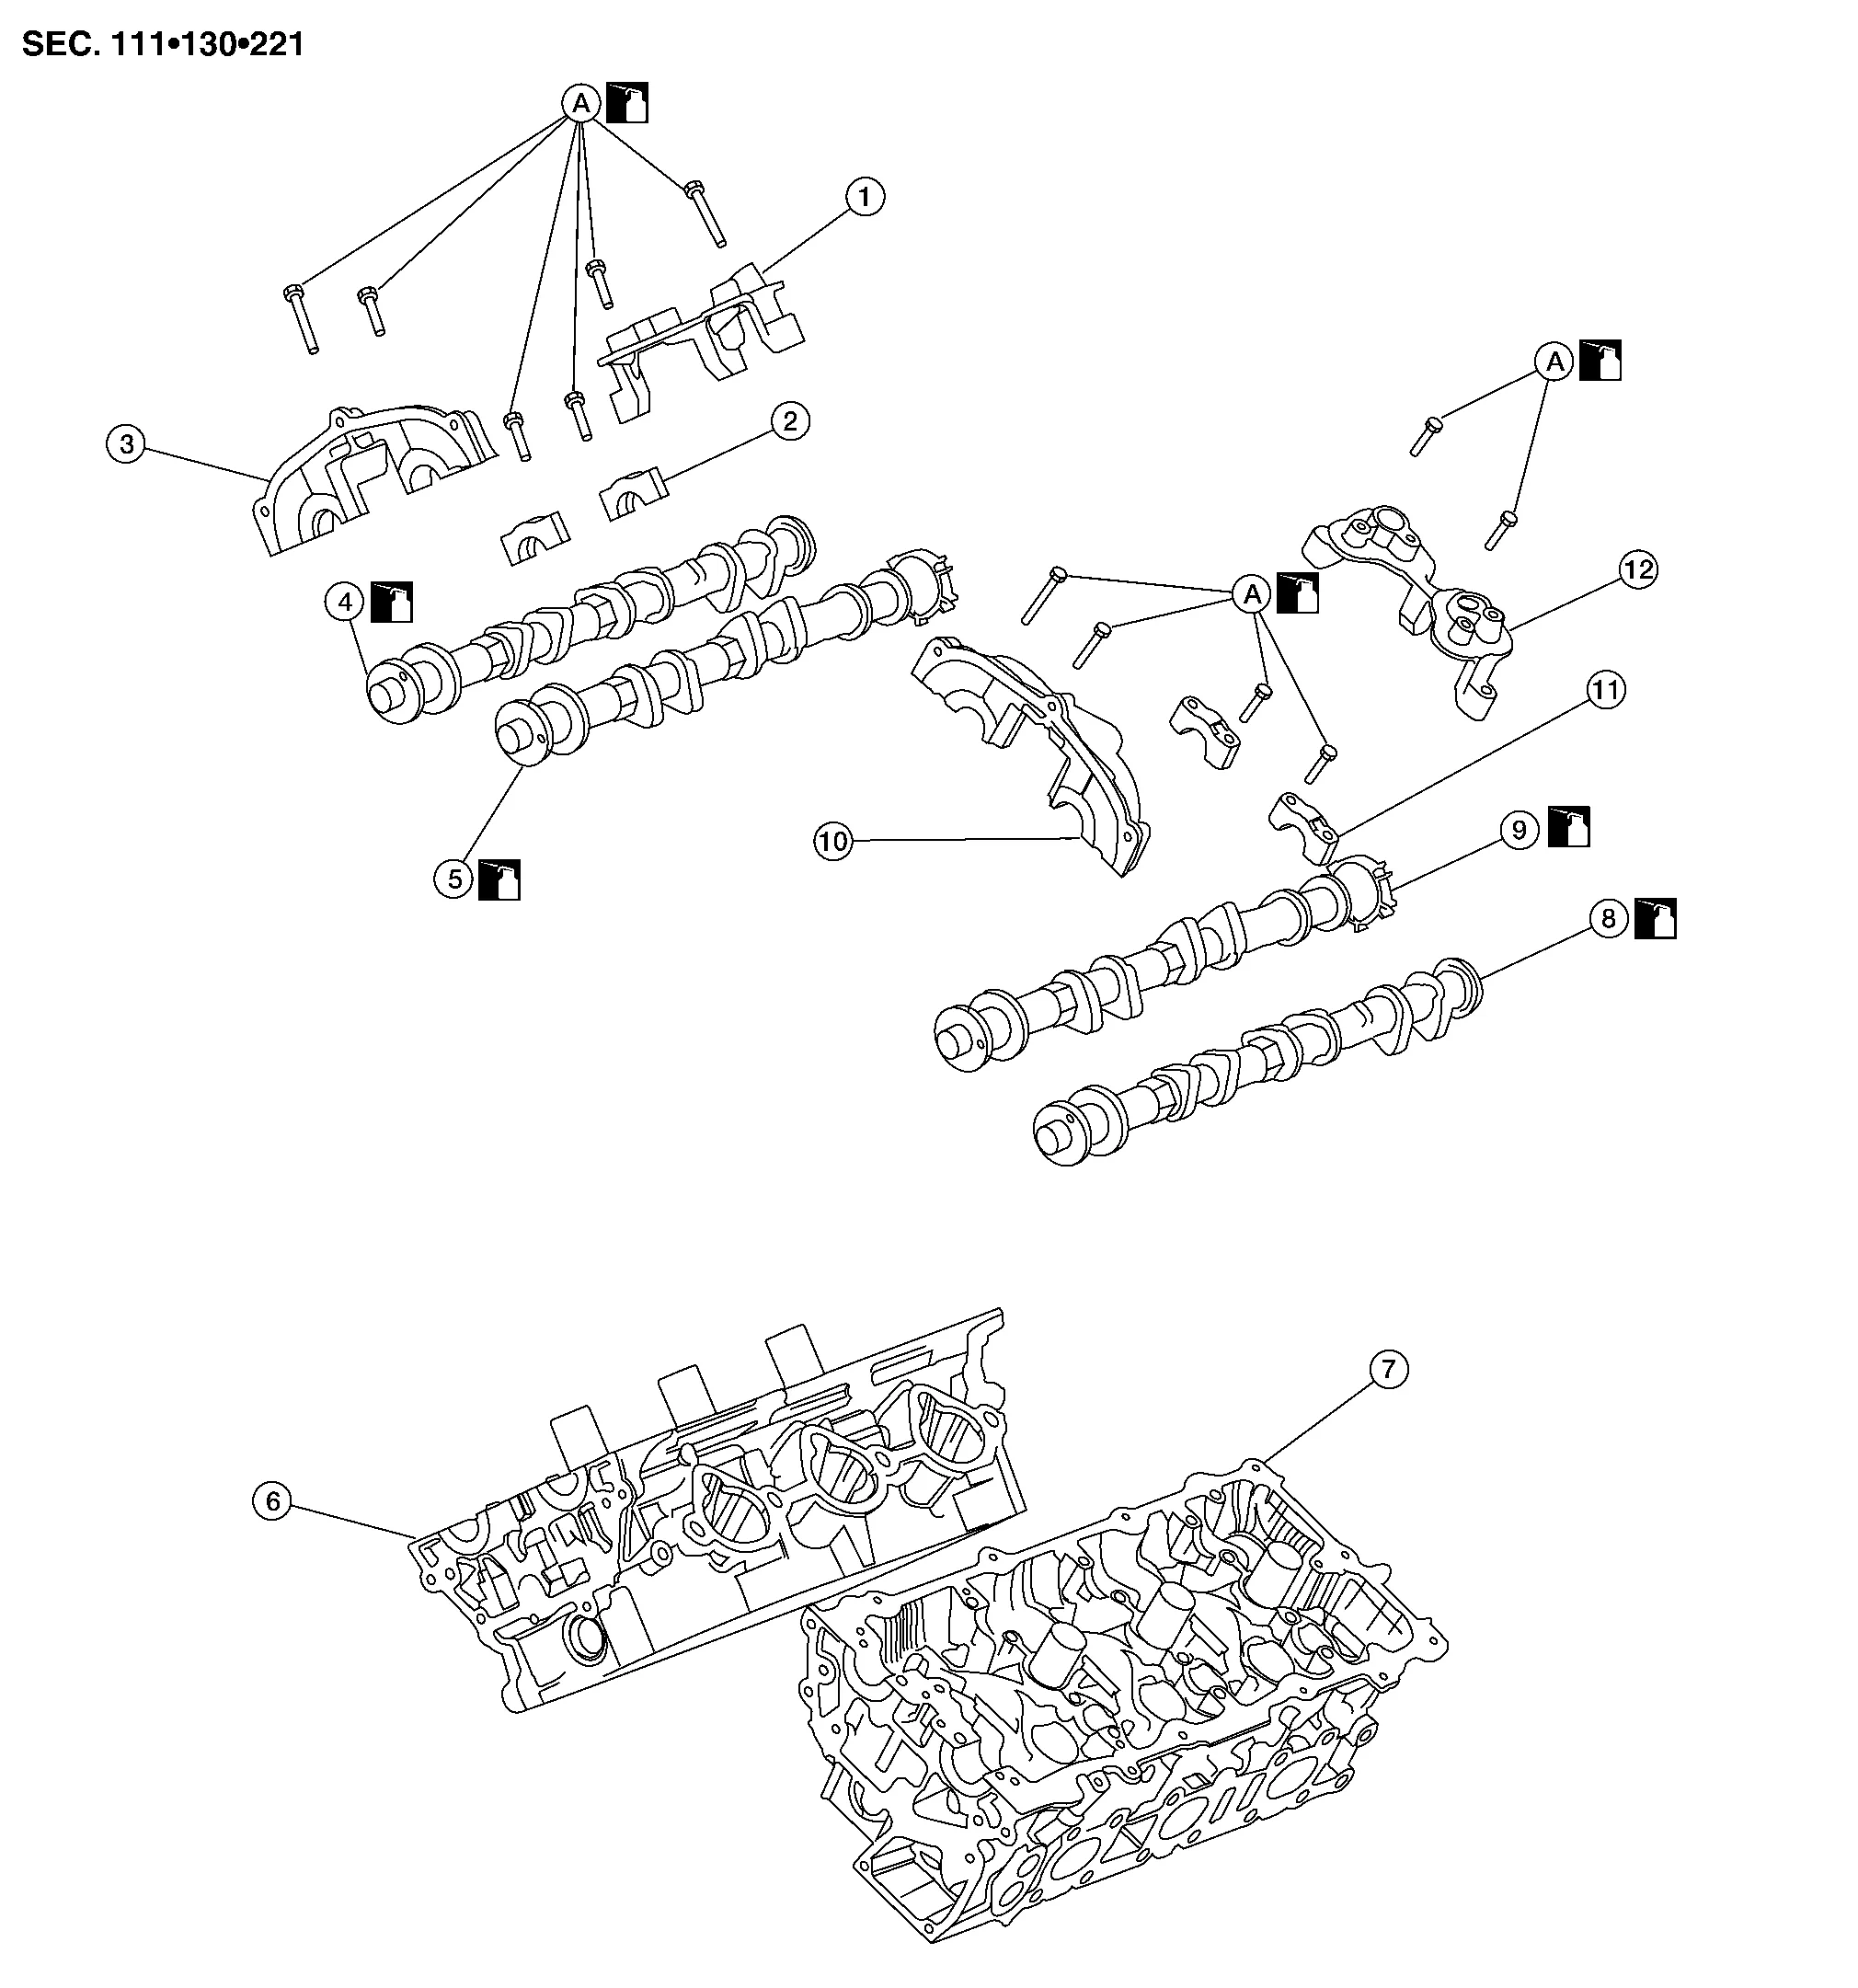
| 1. | Camshaft position sensor bracket (bank 1) | 2. | Camshaft brackets | 3. | No. 1 camshaft bracket (bank 1) |
| 4. | Camshaft (EXH) (bank 1) | 5. | Camshaft (INT) (bank 1) | 6. | Cylinder head (bank 1) |
| 7. | Cylinder head (bank 2) | 8. | Camshaft (EXH) (bank 2) | 9. | Camshaft (INT) (bank 2) |
| 10. | No. 1 camshaft bracket (bank 2) | 11. | Camshaft brackets | 12. | Camshaft position sensor bracket (bank 2) |
| A. | Refer to Removal and Installation. |
REMOVAL
Remove the timing chains. Refer to Removal and Installation.
Remove camshaft position sensor brackets (RH shown LH similar).
Remove the intake and exhaust camshaft brackets (bank 1) (C) and the camshafts (bank 1) (A/B).
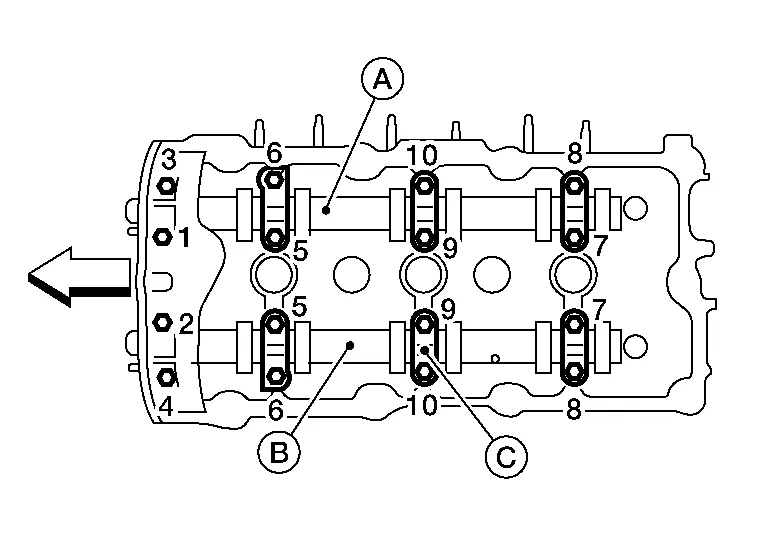
Mark the camshafts (bank 1) (A/B), camshaft brackets (bank 1) (C), and bolts so they are placed in the same position and direction for installation.
Equally loosen the camshaft bracket bolts in several steps in the numerical order as shown.
 |
:Engine front |
Remove the intake and exhaust camshaft brackets (bank 2) (B) and the camshafts (bank 2) (A/C).
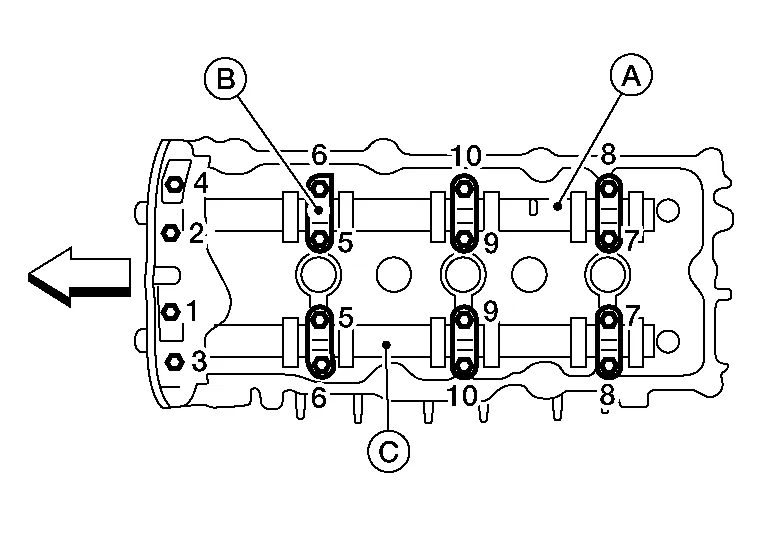
Mark the camshafts (bank 2) (A/C), camshaft brackets (bank 2) (B), and bolts so they are placed in the same position and direction for installation.
Equally loosen the camshaft bracket bolts in several steps in the numerical order as shown.
|
:Engine front |
Remove valve lifters (if necessary).
Remove secondary timing chain tensioner (2/5) from bank 1/bank 2 (A/B).
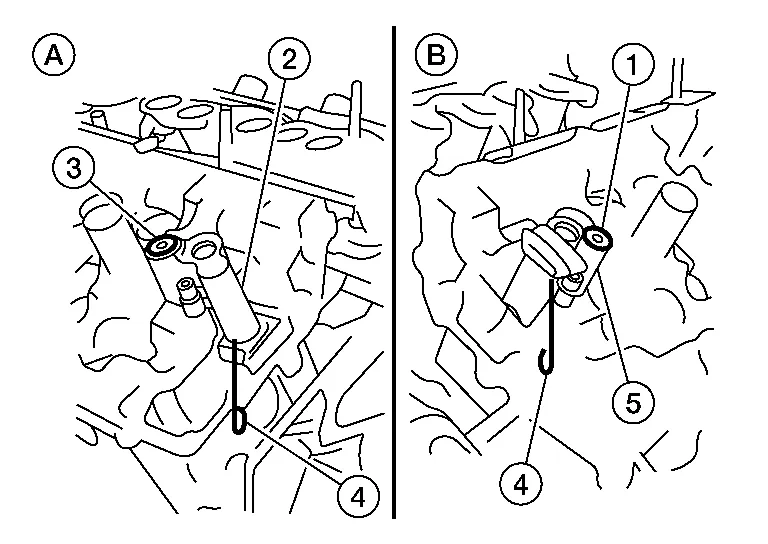
Remove secondary tensioner (2/5) with its stopper pin (4) attached.
INSTALLATION
Before installation, remove any old Silicone RTV Sealant (A) from component mating surfaces using a suitable tool.
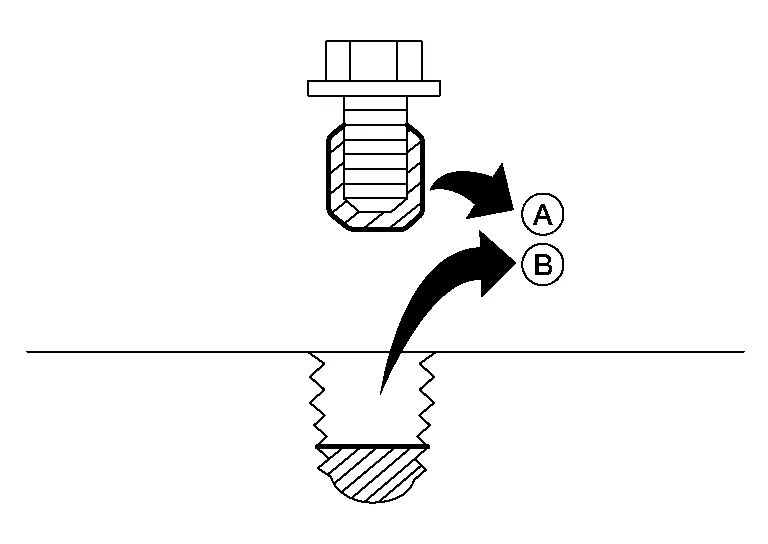
Remove the old Silicone RTV Sealant (A) from the bolt holes (B) and threads.
Do not scratch or damage the mating surfaces.
Before installing the front cam bracket, remove the old Silicone RTV Sealant (B) from the mating surface using a suitable tool (A).
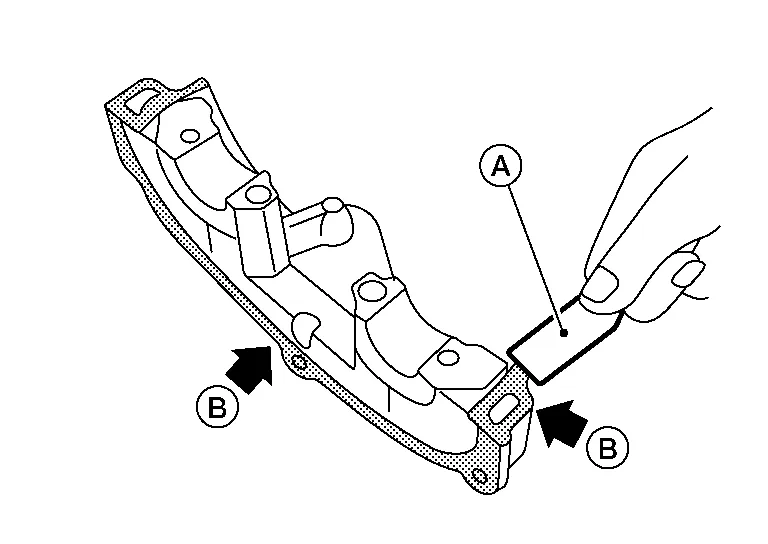
Do not scratch or damage the mating surface.
Turn the crankshaft until No. 1 piston is set at TDC on the compression stroke.
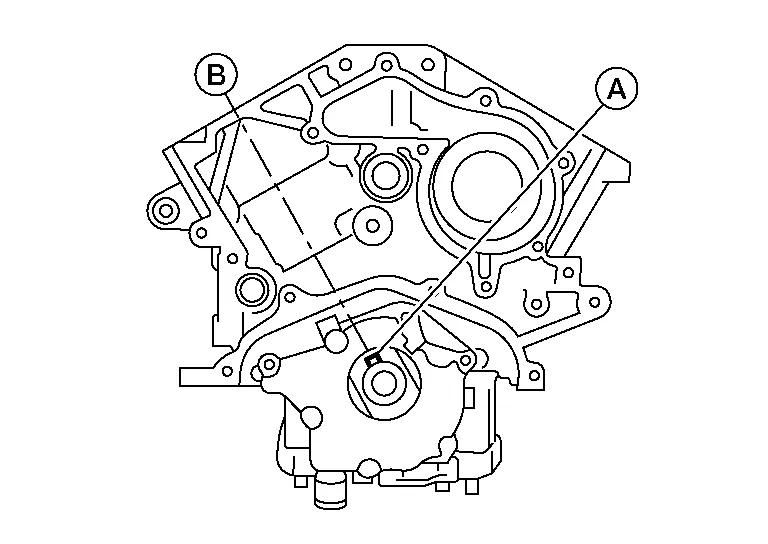
The crankshaft key (A) should line up with the right bank cylinder center line (B) as shown.
Install camshaft chain tensioners (1/2) at bank 1 (A) and bank 2 (B). Refer to Exploded View.
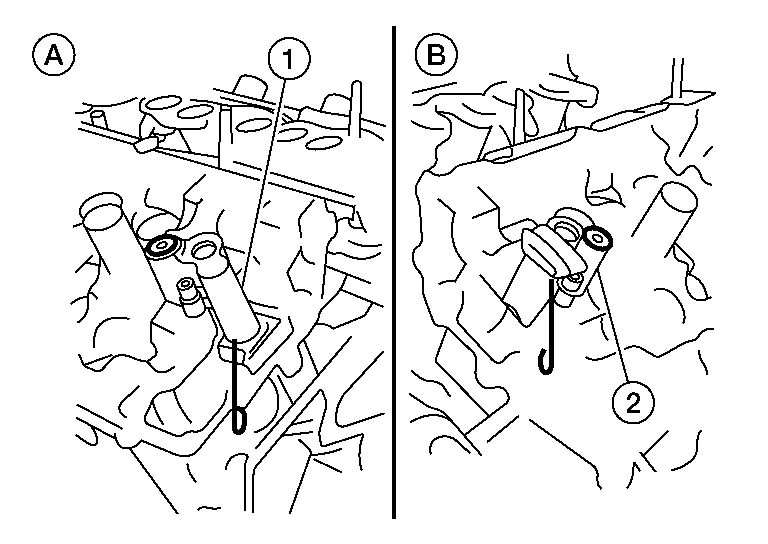
Install valve lifters, if removed.
Install exhaust camshaft (A) and intake camshaft (B) and camshaft brackets.
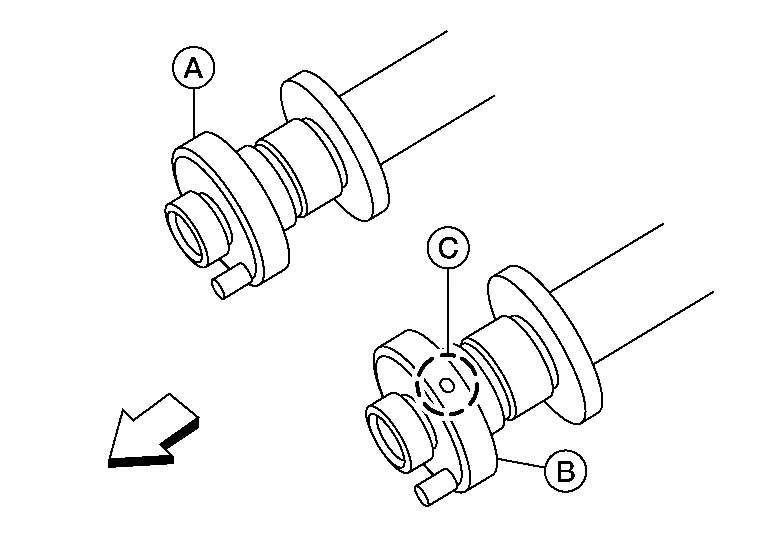
Intake camshaft has a drill mark (C) on camshaft sprocket mounting flange.
Follow your identification marks made during removal, or follow the identification marks that are present on the new camshafts components for proper placement and direction of the components.
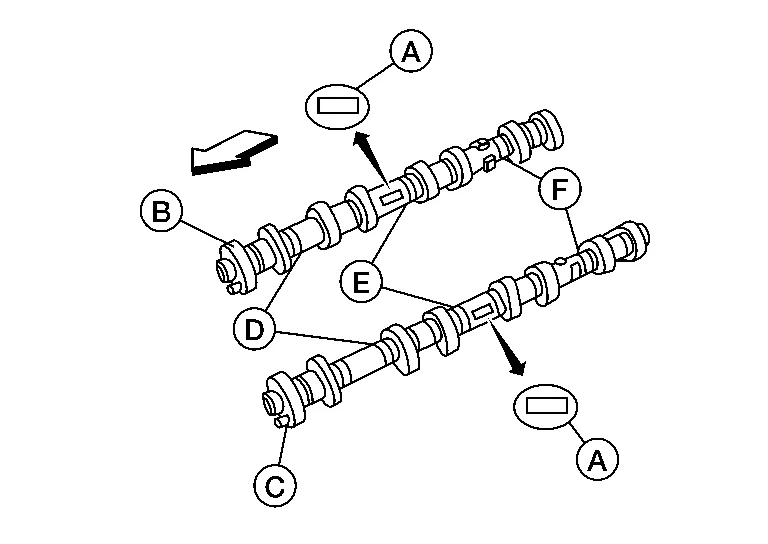
:Engine front Bank INT/EXH ID mark (A) Drill mark Paint marks M1 (E) M2 (F) M3 (D) 1 (B) INT 1A Yes Purple No Light blue EXH 1C No No Brown Light blue 2 (C) INT 1B Yes Purple No Light blue EXH 1D No No Brown Light blue Position the camshaft dowel pins (A) as shown.
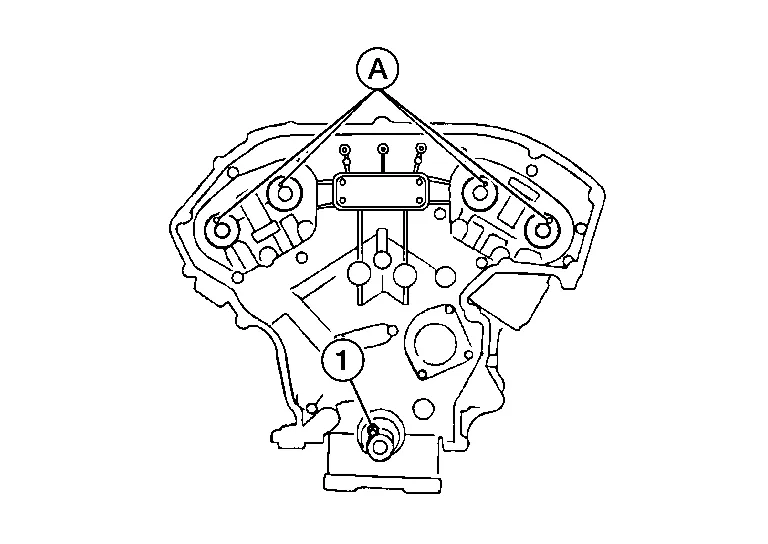
- :Crankshaft key
Apply sealant to mating surface of camshaft brackets (1) of bank 1 (A) and bank 2 (B) cylinder heads.
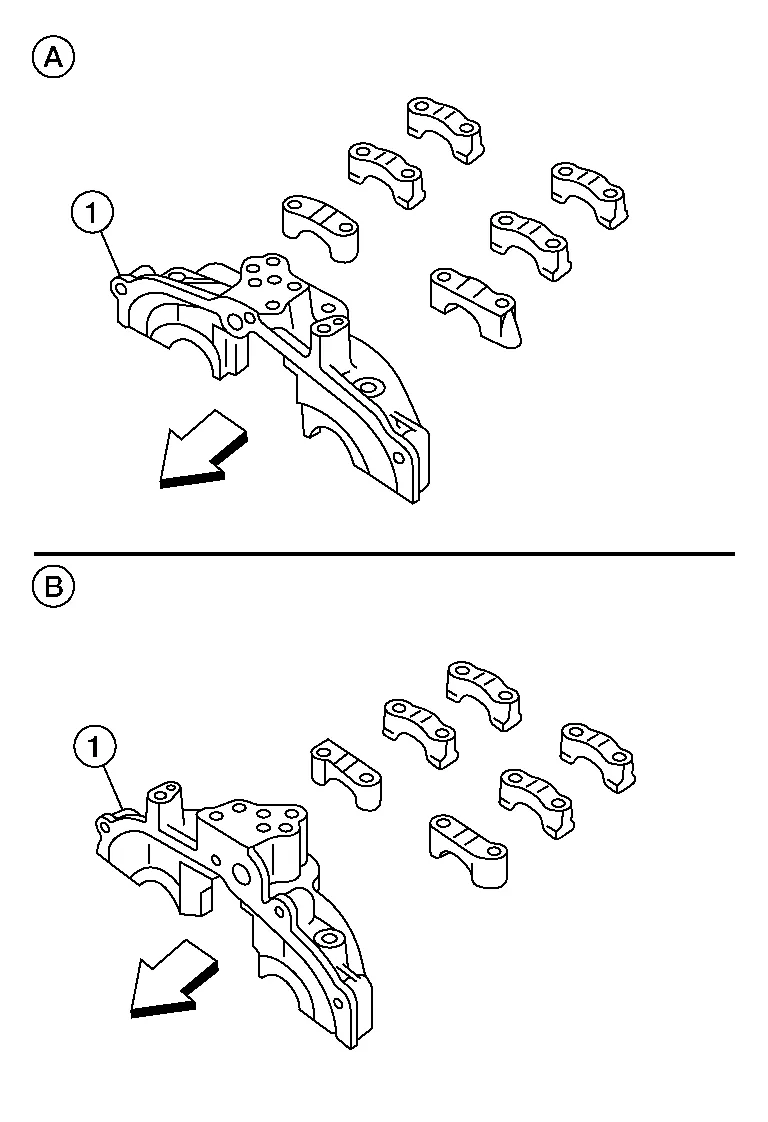
Use Genuine Silicone RTV Sealant, or equivalent. Refer to Recommended Chemical Products and Sealants.
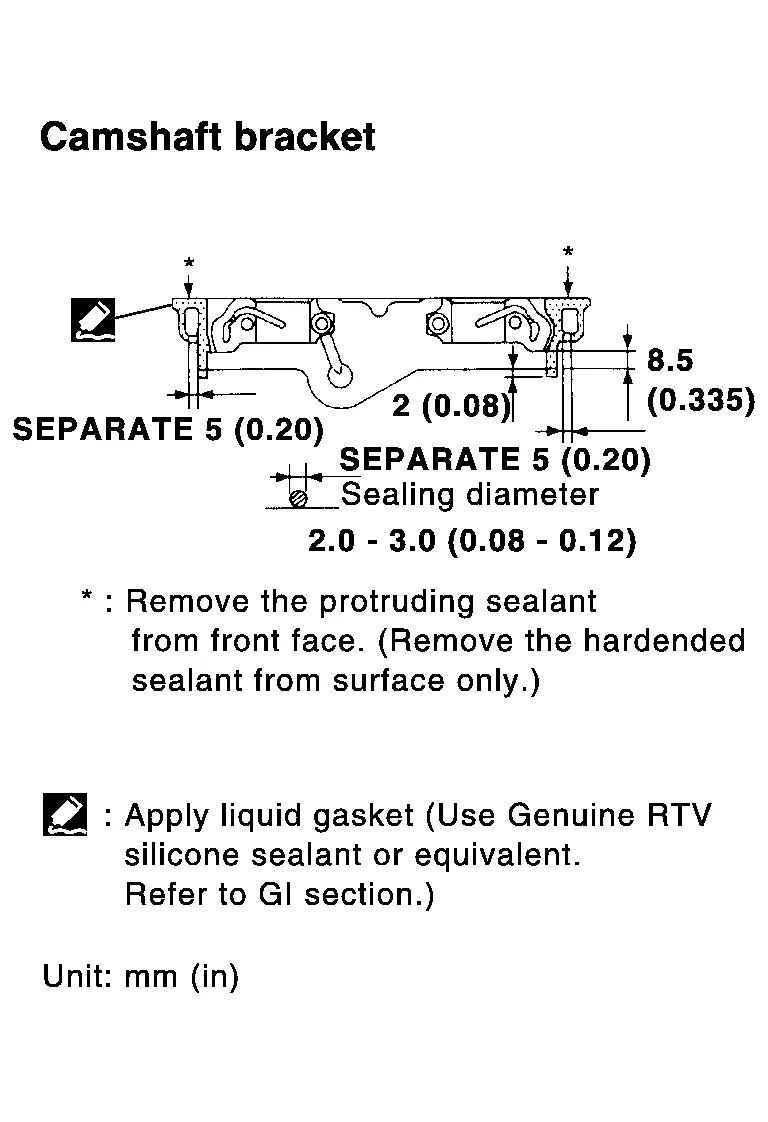
Before installation, wipe off any protruding sealant from front face of camshaft bracket. Refer to Precaution for Liquid Gasket.
:Engine front Install bank 1 (B) and bank 2 (C) camshaft brackets in their original positions and direction. Align the stamp marks (A) as shown.
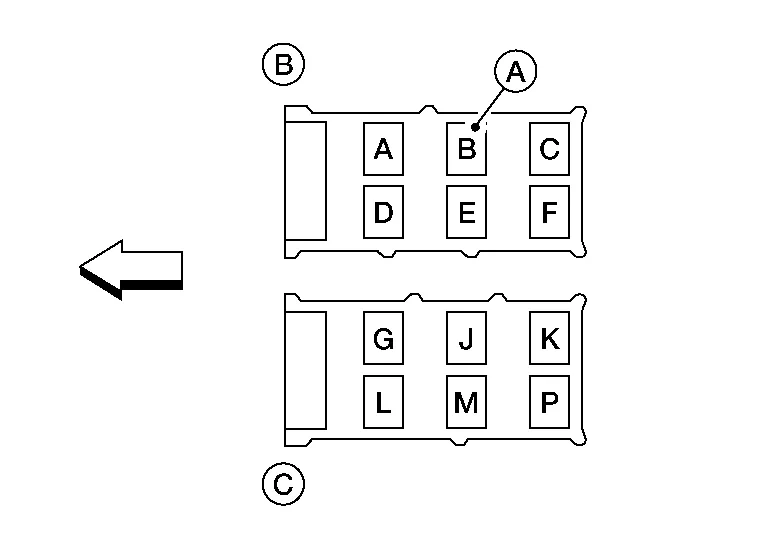
If checking and adjusting any part of valve assembly or camshaft, check valve clearance according to the reference data. Refer to Valve Clearance.
:Engine front Valve clearance (cold) Intake : 0.26 - 0.34 mm (0.010 - 0.013 in) Valve clearance (cold) Exhaust : 0.29 - 0.37 mm (0.011 - 0.015 in)
Locate the camshaft (EXH) (bank 1) (A) and camshaft (INT) (bank 1) (B). Tighten the camshaft brackets (C) in the three steps, in numerical order as shown.
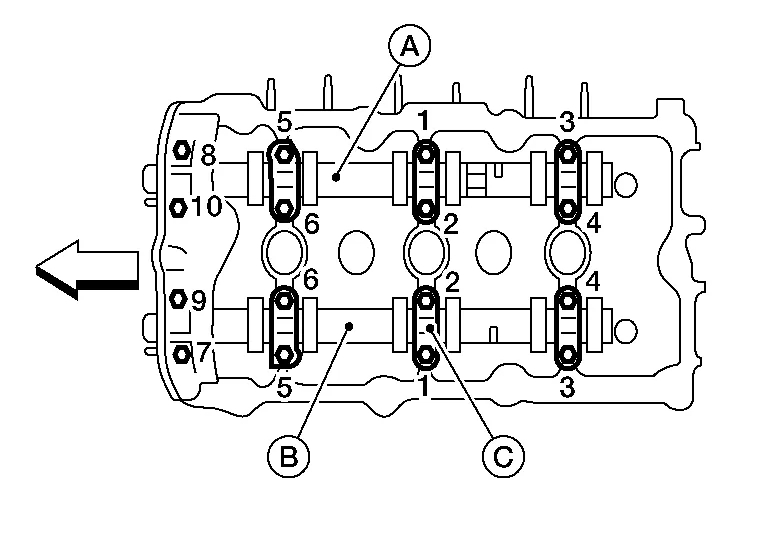
Locate the camshaft (EXH) (bank 2) (B) and camshaft (INT) (bank 2) (A). Tighten the camshaft brackets (C) in the three steps, in numerical order as shown.
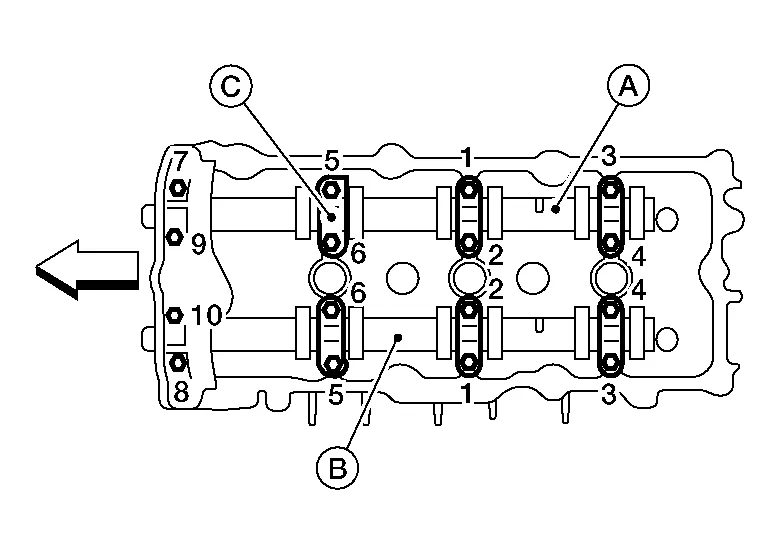
| 1 | 2 N·m | Tighten No. 7 - 10, then tighten 1 - 6 in numerical order as shown. |
| 2 | 5,9 N·m | Tighten No. 1 - 10 in numerical order as shown. |
| 3 | 10,4 N·m | Tighten No. 1 - 10 in numerical order as shown. |
Measure difference in levels between front end faces of No. 1 camshaft bracket and cylinder head.
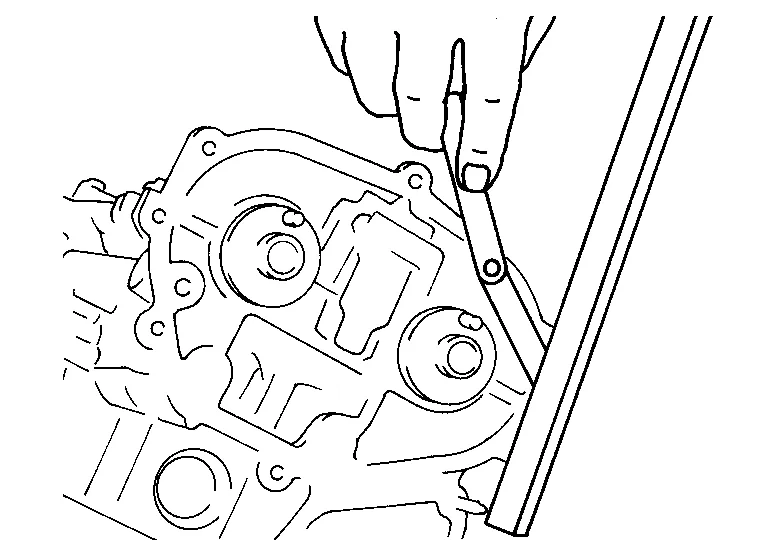
| Standard | : – 0.14 (– 0.0055 in) |
If measurement is outside the specified range, reinstall camshaft and camshaft bracket.
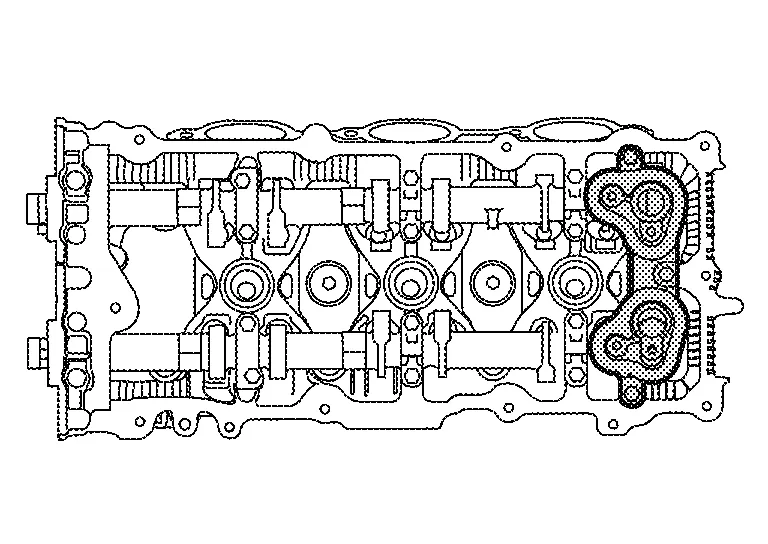
Install camshaft position sensor bracket [(PHASE (RH and LH bank)] and tighten to specified torque in sequence shown.
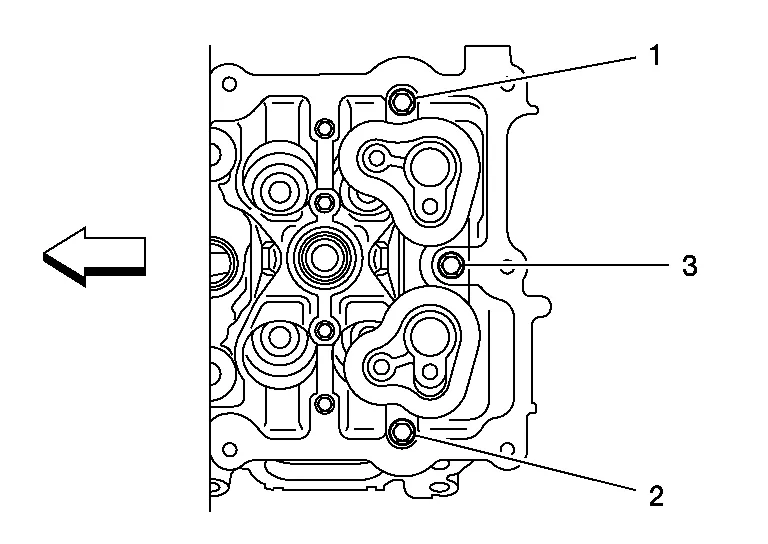
| Bolts 1-3 | : 10,4 N·m |
|
: Engine front |
Install the timing chains. Refer to Removal and Installation.
INSPECTION AFTER REMOVAL
Camshaft Visual Check
Check camshaft for scratches, seizure and wear. Replace if necessary.
Camshaft Runout
Put V-block on precise flat bed and support No. 2 and No. 4 journal of camshaft as shown.
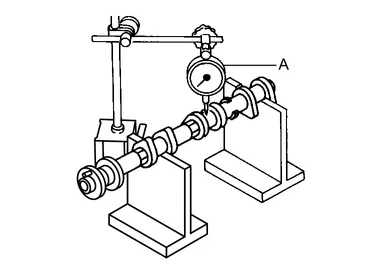
Set dial gauges vertically to No. 3 journal as shown.
Turn camshaft in one direction slowly by hand, measure the camshaft runout on the dial gauges.
Runout is the largest indicator reading after one full revolution. Refer to Camshaft.
If actual runout exceeds the limit, replace the camshaft.
Camshaft Cam Lobe Height
Measure camshaft cam lobe height as shown. Refer to Camshaft.
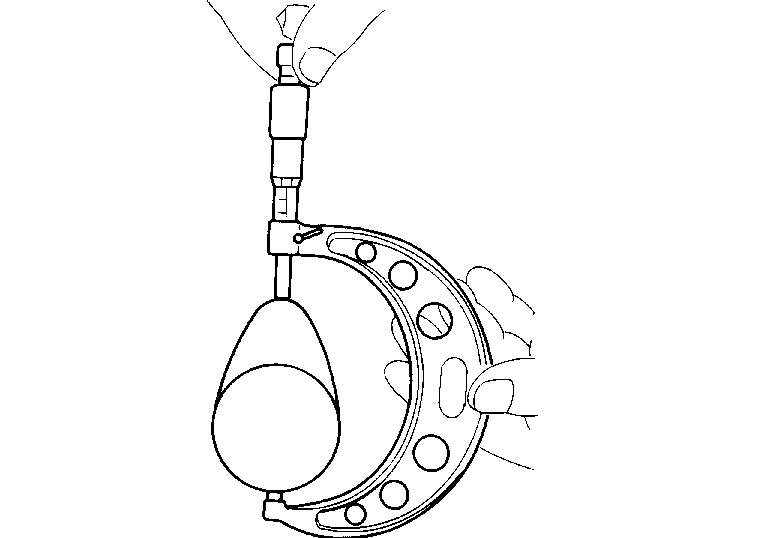
If wear has reduced the lobe height below specifications, replace the camshaft.
Camshaft Journal Clearance
Outer Diameter of Camshaft Journal
Measure outer diameter of camshaft journal as shown. Refer to Camshaft.

Inner Diameter of Camshaft Bracket
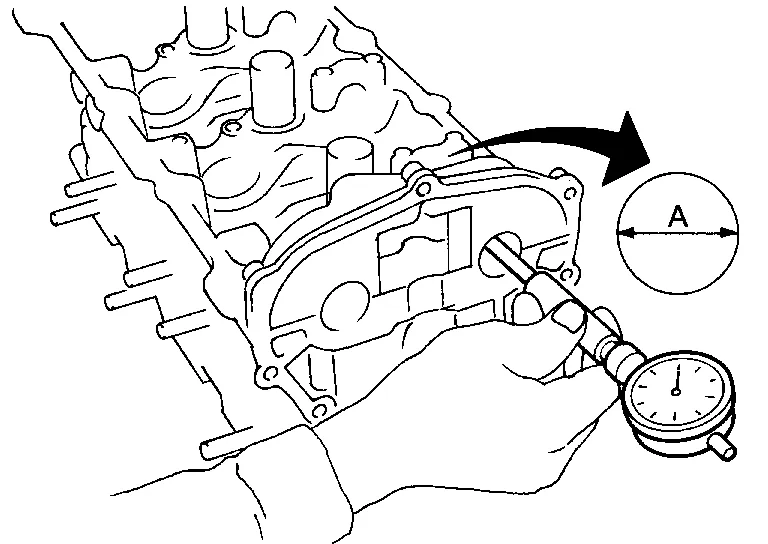
Tighten camshaft bracket bolt with specified torque.
Using inside micrometer, measure inner diameter (A) of camshaft bearing. Refer to Camshaft.
Calculation of Camshaft Journal Clearance
(Journal clearance) = (inner diameter of camshaft bracket) – (outer diameter of camshaft journal). Refer to Camshaft.
When out of the specified range, replace either or both camshaft and cylinder head.
Camshaft End Play
Install the camshaft in the cylinder head.
Install dial gauge in thrust direction on front end of camshaft. Measure end play when camshaft is moved forward/backward (in direction to axis) as shown. Refer to Camshaft.
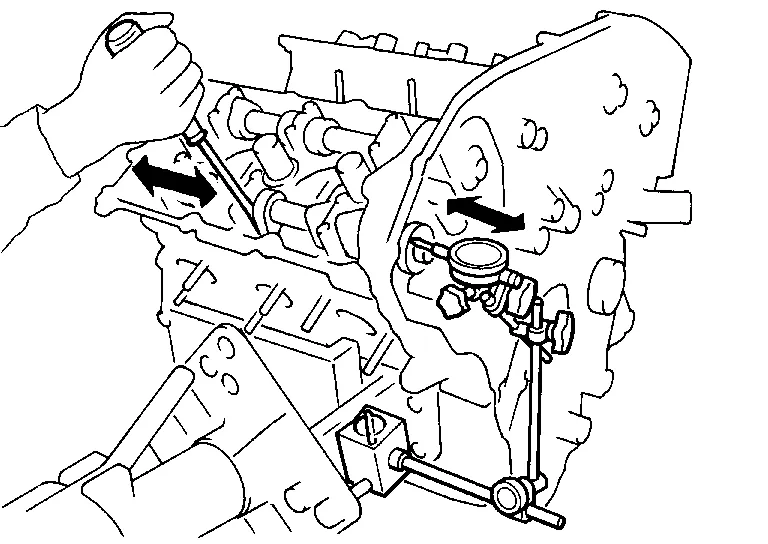
If out of the specified range, replace with new camshaft and measure again.
If out of the specified range again, replace with new cylinder head.
Camshaft Sprocket Runout
Put V-block on precise flat bed and support No. 2 and No. 4 journal of camshaft as shown.
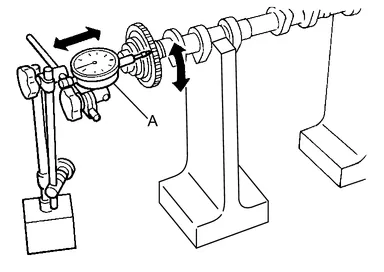
Install camshaft sprocket on camshaft.
Measure camshaft sprocket runout. Refer to Camshaft.
If sprocket runout exceeds the limit, replace camshaft sprocket.
Valve Lifter
Check if the surface of the valve lifter has any excessive wear or cracks, replace as necessary.
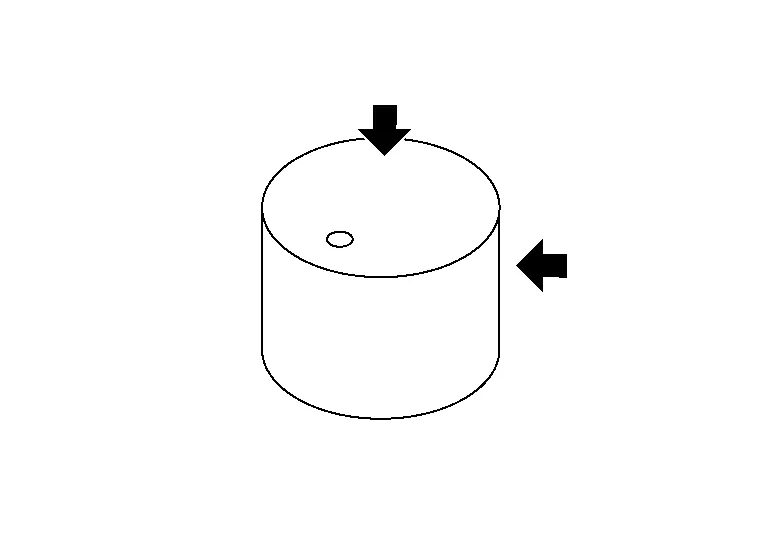
Valve Lifter Clearance
Outer Diameter of Valve Lifter
Measure the outer diameter of the valve lifter with a suitable tool (A). Refer to Camshaft.

If out of the specified range, replace the valve lifter.
Valve Lifter Bore Diameter
Using inside micrometer, measure diameter of valve lifter bore of cylinder head. Refer to Camshaft.
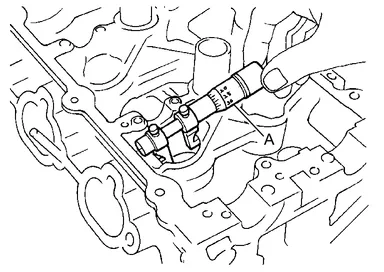
If out of the specified range, replace the cylinder head assembly.
Calculation of Valve Lifter Clearance
(Valve lifter clearance) = (hole diameter for valve lifter) – (outer diameter of valve lifter) Refer to Camshaft.
If out of specified range, replace either or both valve lifter and cylinder head assembly.
INSPECTION OF CAMSHAFT SPROCKET (INT) OIL GROOVE
Check engine oil level. Refer to Inspection.
Perform the following procedure so as to prevent the engine from being unintentionally started while checking.Release fuel pressure. Refer to Work Procedure. Disconnect ignition coil and injector harness connectors, if practical.
Remove intake valve timing control solenoid valve.
Crank engine, and then make sure that engine oil comes out from intake valve timing control solenoid valve cover oil hole. End cranking after checking.
Clean oil groove between oil strainer and intake valve timing control solenoid valve if engine oil does not come out from intake valve timing control solenoid valve cover oil hole.
Remove components between intake valve timing control solenoid valve and camshaft sprocket (INT), and then check each oil groove for clogging.
Clean oil groove if necessary.
After inspection, installation of the remaining components is in the reverse order of removal.