Exhaust Manifold and Three Way Catalyst
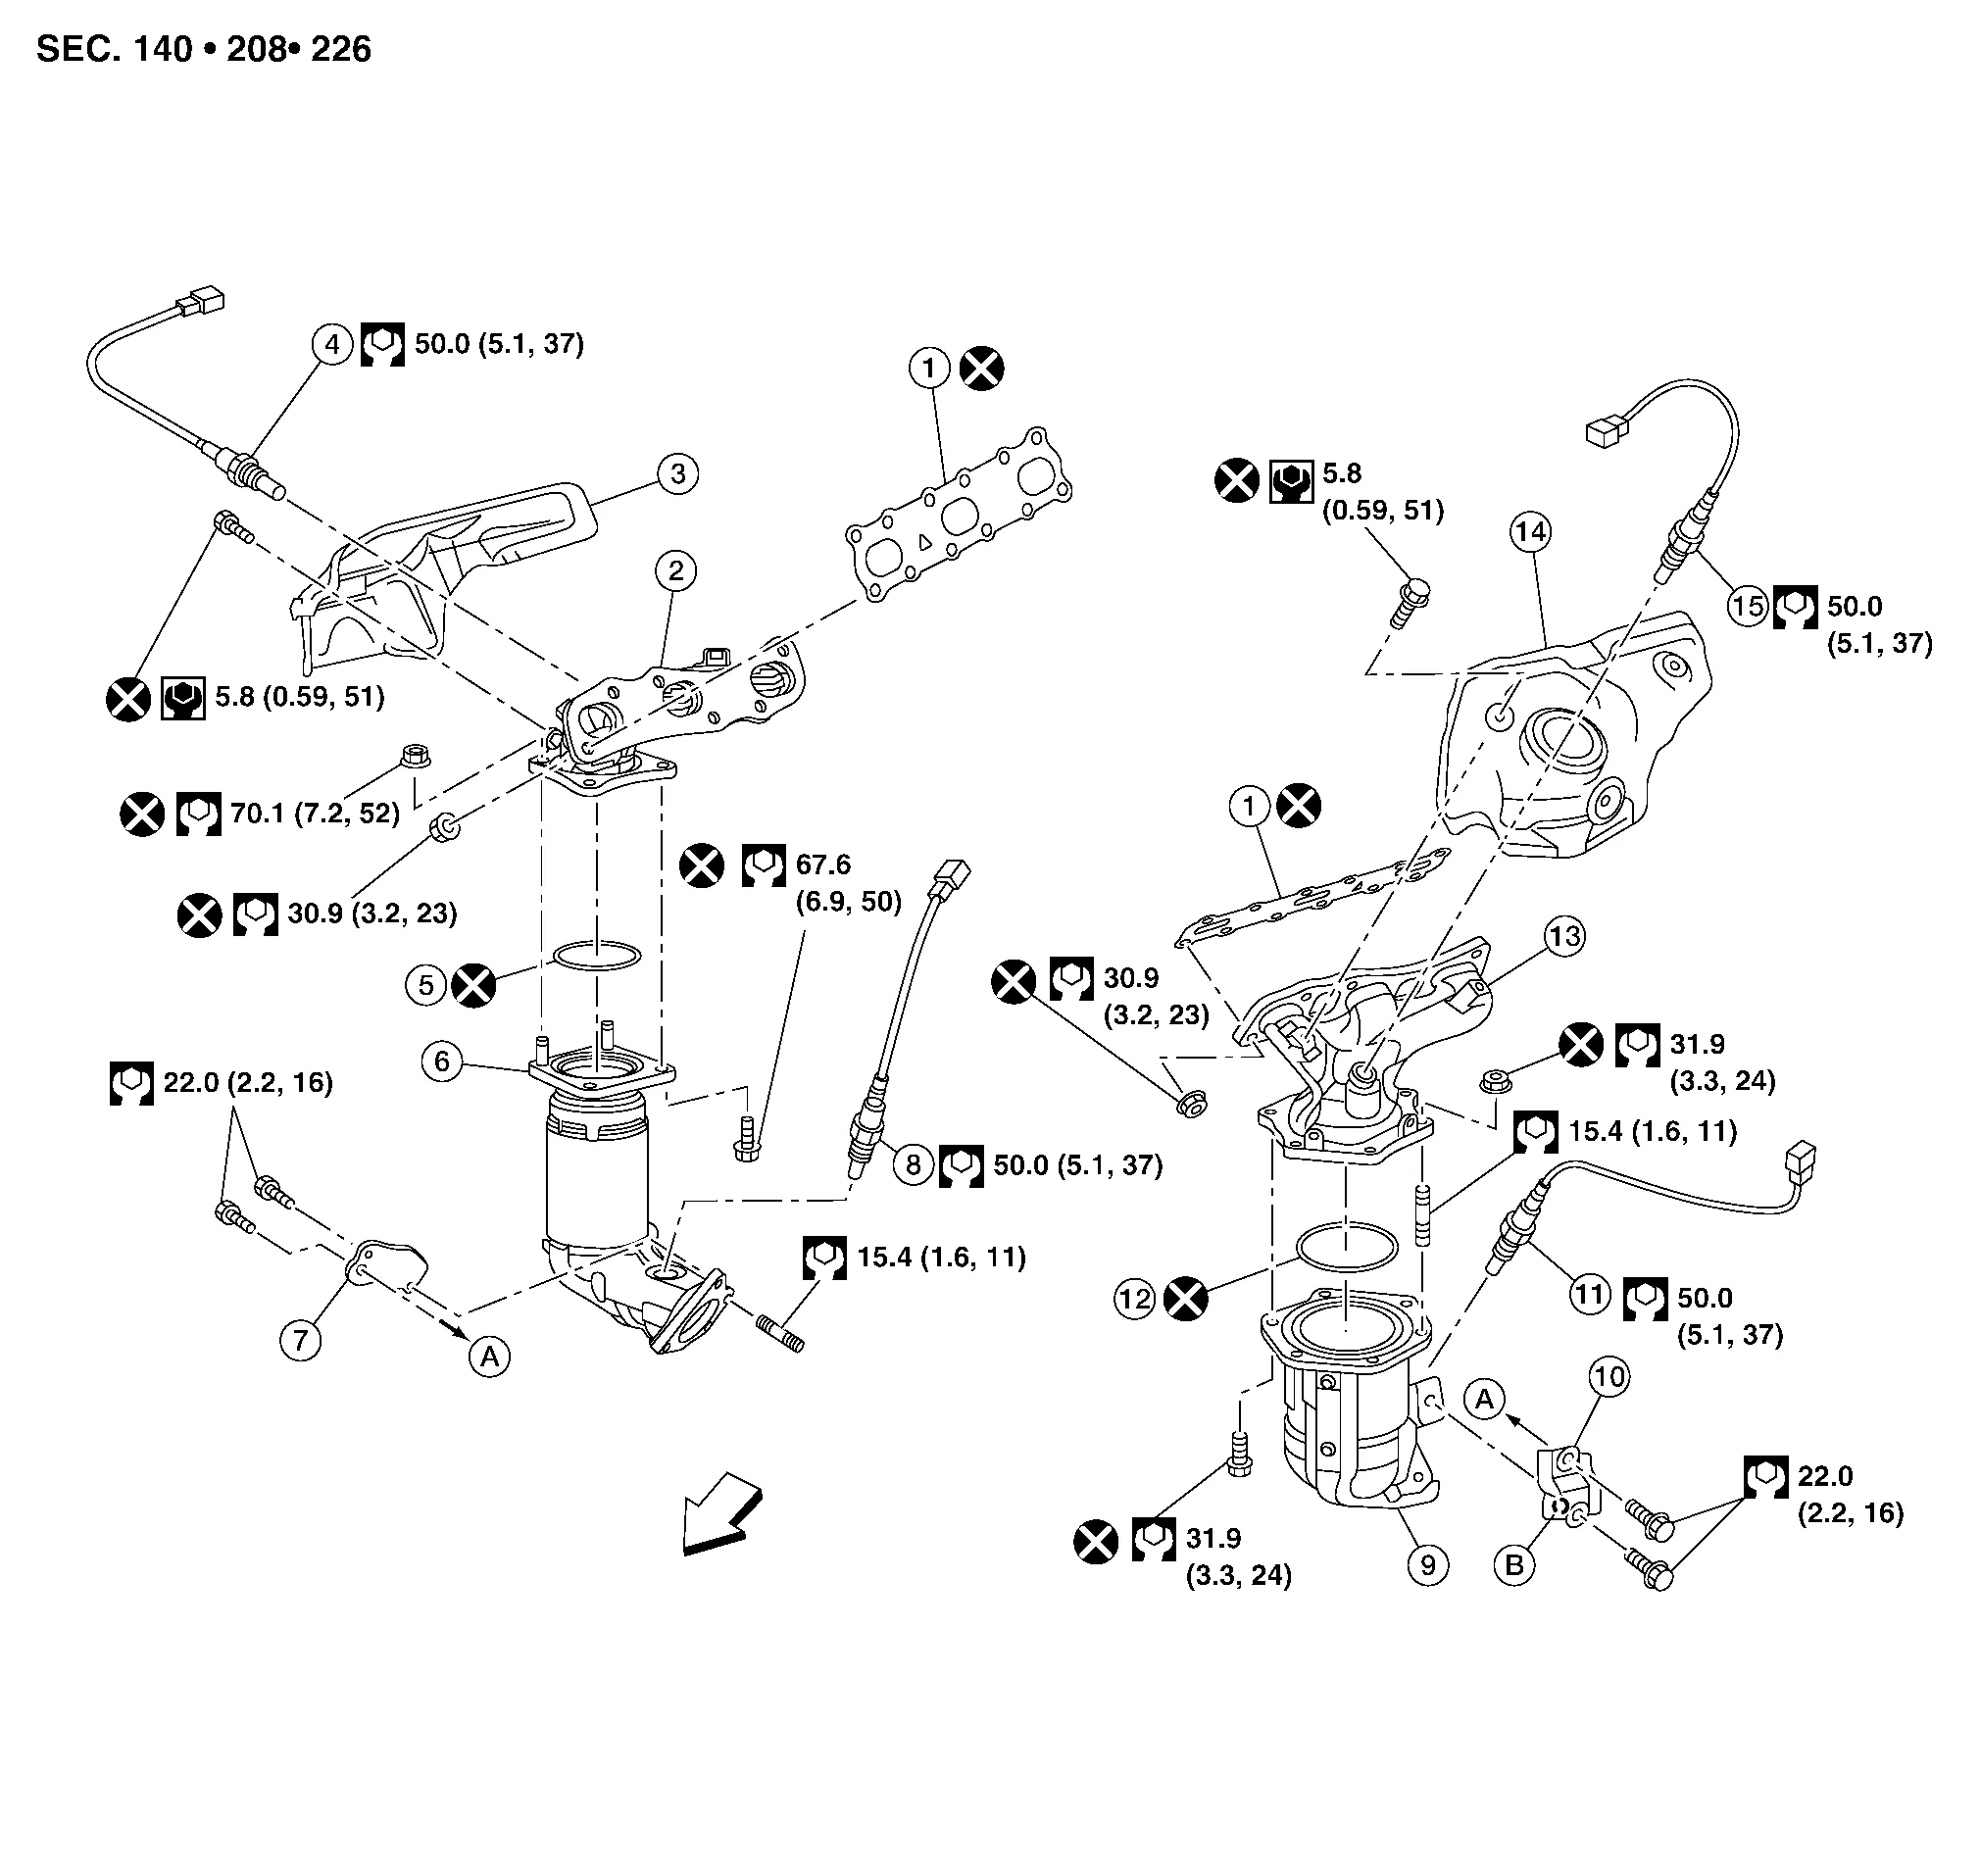
| 1. | Gasket | 2. | Exhaust manifold (bank 1) | 3. | Exhaust manifold cover (bank 1) |
| 4. | Air fuel ratio sensor 1 (bank 1) | 5. | Ring gasket | 6. | Three way catalyst (bank 1) |
| 7. | Three way catalyst support (bank 1) | 8. | Heated oxygen sensor 2 (bank 1) | 9. | Three way catalyst (bank 2) |
| 10. | Three way catalyst support (bank 2) | 11. | Heated oxygen sensor 2 (bank 2) | 12. | Ring gasket |
| 13. | Exhaust manifold (bank 2) | 14. | Exhaust manifold cover (bank 2) | 15. | Air fuel ratio sensor 1 (bank 2) |
| A. | To oil pan (upper). Refer to Exploded View. | B. | Upper mark |  |
Engine front |
REMOVAL
Remove the air cleaner case (upper), air cleaner case (lower), and air duct hose and resonator assembly. Refer to Removal and Installation.
Remove the battery and battery tray assembly. Refer to Removal and Installation.
Remove the front wheels and tires using power tool. Refer to Removal and Installation.
Remove the front under cover. Refer to Removal and Installation.
Remove the fender protector side covers (LH and RH). Refer to Exploded View.
Remove the radiator assembly. Refer to Removal and Installation.
Remove the engine cooling fan shroud and motor assembly. Refer to Removal and Installation.
Remove the front exhaust tube. Refer to Exploded View.
Support the engine with a suitable tool.
Remove the engine mount bracket (front). Refer to Exploded View (FWD) or Exploded View (AWD).
Remove the three way catalyst support (bank 2).
Remove heated oxygen sensor 2 (bank 2), air fuel ratio (A/F) sensor 1 (bank 2).Disconnect harness connector from each sensor, and remove the harness from the bracket and middle clamp. Remove both heated oxygen sensor and air fuel ratio (A/F) sensor using Tool.
| Tool numbers | : KV10114400 (J-38365) |
| : KV991J0050 (J-44626) |
Discard any heated oxygen sensor which has been dropped from a height of more than 0.5 m (19.7 in) onto a hard surface such as a concrete floor; replace with a new sensor.
Remove exhaust manifold and three way catalyst heat shields with power tool.
Remove the three way catalyst (bank 2) by loosening the bolts first and then removing the nuts and through bolts.
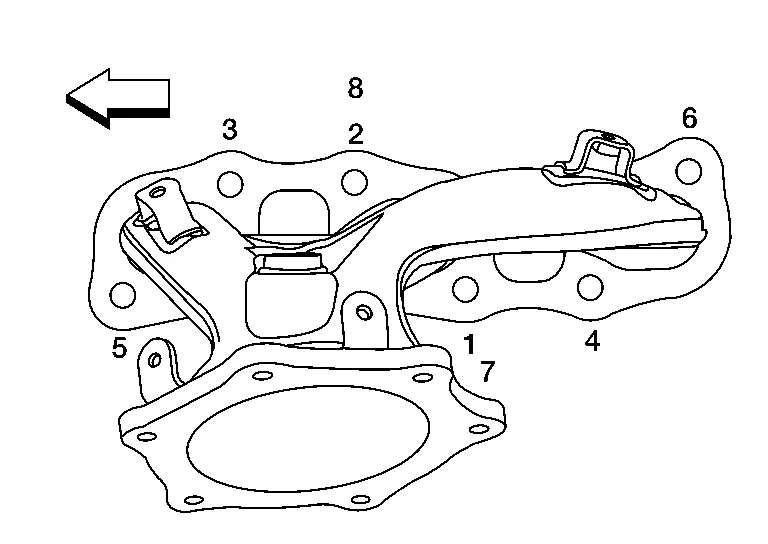
Loosen and remove the exhaust manifold nuts in the reverse order as shown.
|
: Engine front |
Remove the exhaust manifold (bank 2) and gasket.
INSPECTION AFTER REMOVAL
Surface Distortion
Use suitable tools (A/B) to check the flatness of the exhaust manifold mating surfaces.
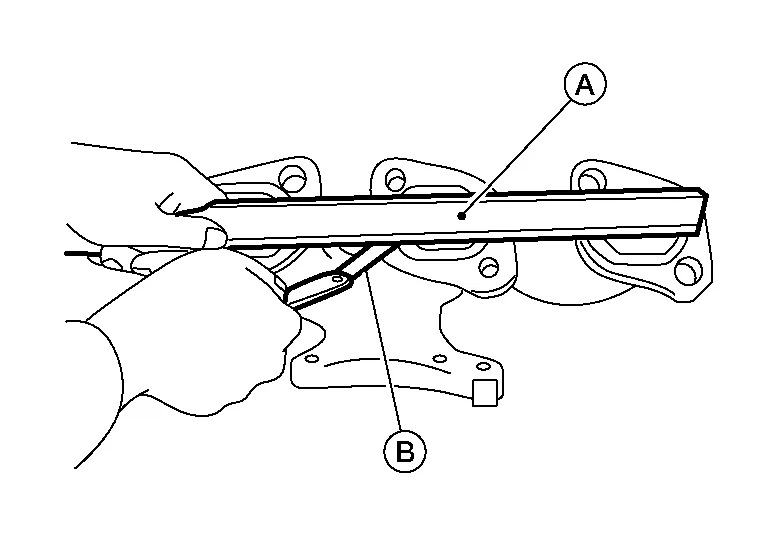
Limit : 0.3 mm (0.012 in) Replace the exhaust manifold if the measurement exceeds specifications.
INSTALLATION
Installation is in the reverse order of removal.
Install the studs in the exhaust manifold (if removed), and tighten to specification.
| Exhaust manifold studs | : 15,4 N·m |
Install the exhaust manifold gasket in the direction shown.
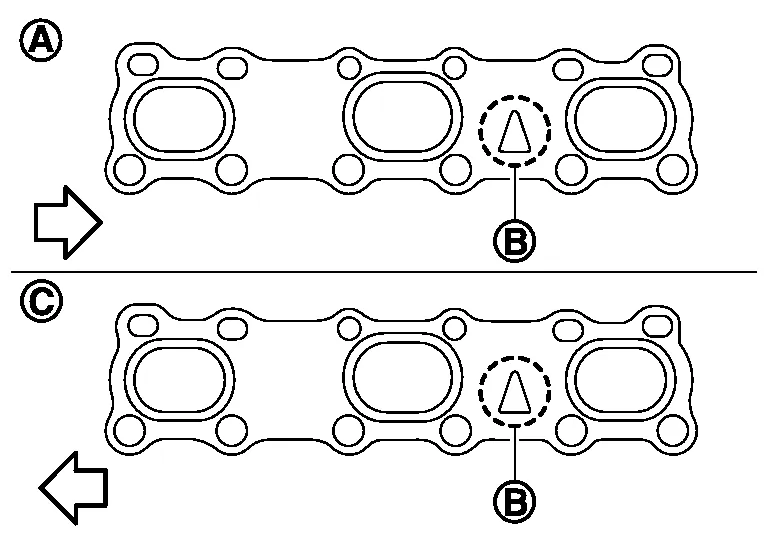
| (A) | : Bank 1 |
| (B) | : Triangle press |
| (C) | : Bank 2 |
|
: Engine front |
Install the exhaust manifold (bank 2) nuts and tighten to specification in the order shown.
|
: Engine front |
Perform the "Throttle Valve Closed Position Learning" when harness connector of the ECM is disconnected. Refer to Description.
Perform the "Accelerator Pedal Released Position Learning" when harness connector of the ECM is disconnected. Refer to Description.
REMOVAL
Remove the cowl top and the lower cowl top extension. Refer to Exploded View.
Remove the front wheel and tire (RH) (AWD models only) using a power tool. Refer to Removal and Installation.
Remove the front under cover. Refer to Removal and Installation.
Remove the fender protector side cover (RH) (AWD models only). Refer to Removal and Installation.
Remove transmission air breather hose. Refer to Exploded View.
Remove the front exhaust tube, hanger and heat insulator. Refer to Exploded View.
Remove the propeller shaft and propeller shaft center bearing (AWD models only). Refer to Removal and Installation.
Remove the RH front axle shaft (AWD models only). Refer to Removal and Installation (RH).
Remove the three way catalyst support (bank 1).
Remove heated oxygen sensor 2 (bank 1), air fuel ratio (A/F) sensor 1 (bank 1).disconnect harness connector from each sensor, and remove the harness from the bracket and middle clamp. Remove both heated oxygen sensors and air fuel ratio (A/F) sensors using Tool.
| Tool numbers | : KV10114400 (J-38365) |
| : KV991J0050 (J-44626) |
Discard any heated oxygen sensor which has been dropped from a height of more than 0.5 m (19.7 in) onto a hard surface such as a concrete floor; replace with a new sensor.
Remove exhaust manifold and three way catalyst heat shields with power tool.
Remove the three way catalyst (bank 1) by loosening the bolts first and then removing the nuts and through bolts.
Loosen the exhaust manifold nuts in the reverse order as shown.
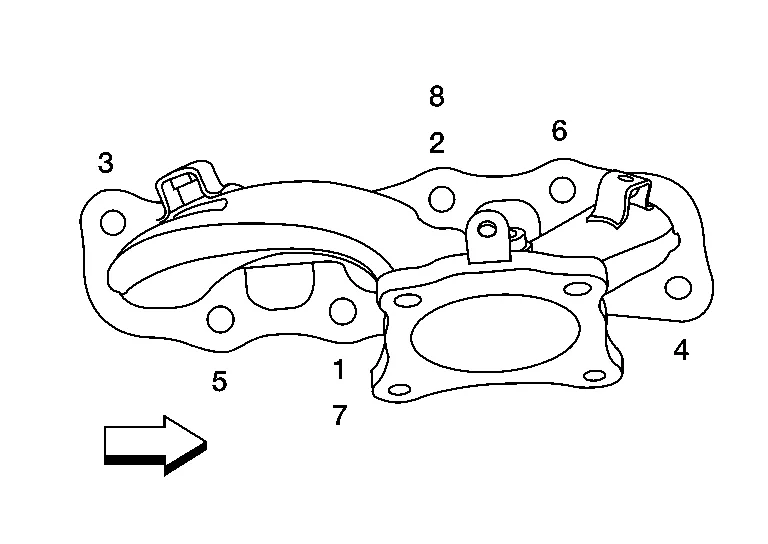
|
: Engine front |
Remove the exhaust manifold (bank 1) and gasket.
INSPECTION AFTER REMOVAL
Surface Distortion
Use suitable tools (A/B) to check the flatness of the exhaust manifold mating surfaces.
Limit : 0.3 mm (0.012 in) Replace the exhaust manifold if the measurement exceeds specifications.
INSTALLATION
Installation is in the reverse order of removal.
Install the studs in the exhaust manifold (if removed), and tighten to specification.
| Exhaust manifold studs | : 15,4 N·m |
Install the exhaust manifold gasket in the direction shown.
| (A) | : Bank 1 |
| (B) | : Triangle press |
| (C) | : Bank 2 |
|
: Engine front |
Install the exhaust manifold (bank 1) nuts and tighten to specification in the order shown.
|
: Engine front |