Timing Chain
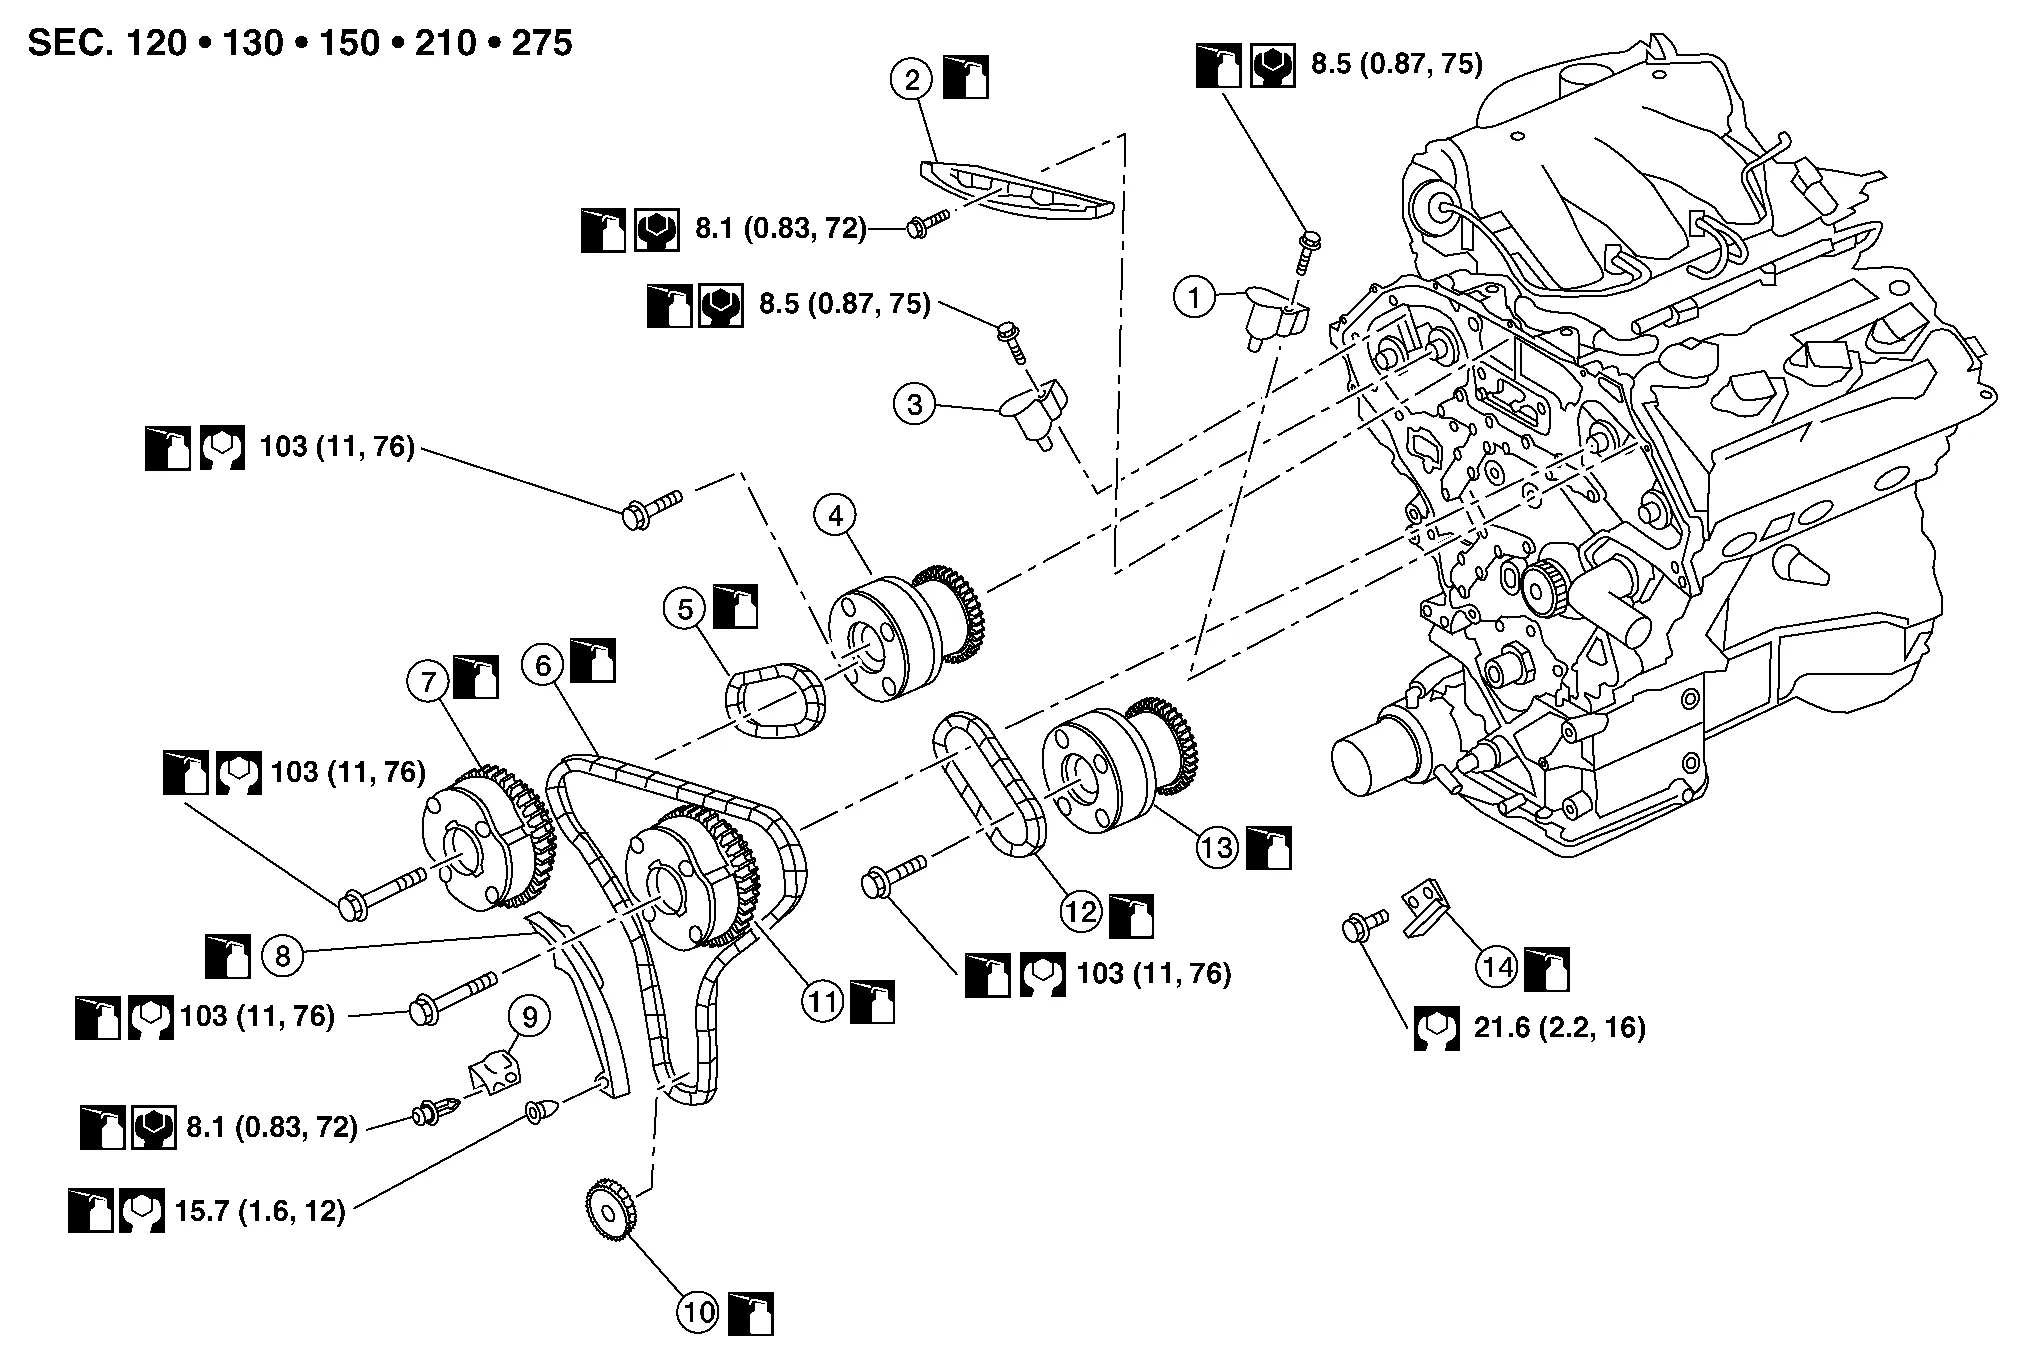
| 1. | Timing chain tensioner (secondary) (bank 2) | 2. | Internal chain guide | 3. | Timing chain tensioner (secondary) (bank 1) |
| 4. | Camshaft sprocket (bank 1) (EXH) | 5. | Timing chain (secondary) | 6. | Timing chain (primary) |
| 7. | Camshaft sprocket (bank 1) (INT) | 8. | Slack guide | 9. | Timing chain tensioner (primary) |
| 10. | Crankshaft sprocket | 11. | Camshaft sprocket (bank 2) (INT) | 12. | Timing chain (secondary) |
| 13. | Camshaft sprocket (bank 2) (EXH) | 14. | Tension guide |
REMOVAL
Remove front timing chain case. Refer to Removal and Installation.
Remove the intake manifold collector. Refer to Removal and Installation.
Remove the spark plugs. Refer to Removal and Installation.
Place paint marks on the timing chain and sprockets to indicate the correct position of the components for installation.
Disconnect the camshaft position sensor harness connectors.
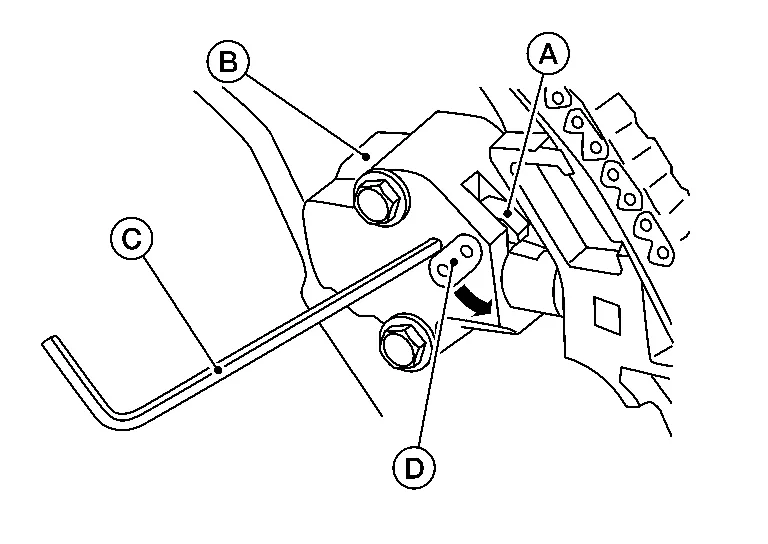
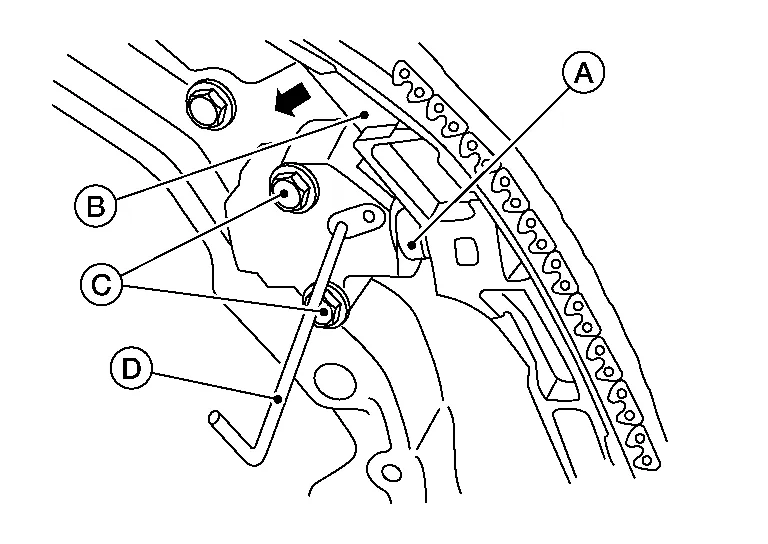
Remove the timing chain tensioner (primary).Pull lever down and release plunger stopper tab (A). Plunger stopper tab can be pushed up to release (coaxial structure with lever).
| (B) | : Timing chain tensioner (primary) |
| (C) | : Stopper pin |
| (D) | : Lever |
| (C) | : Installation bolts |
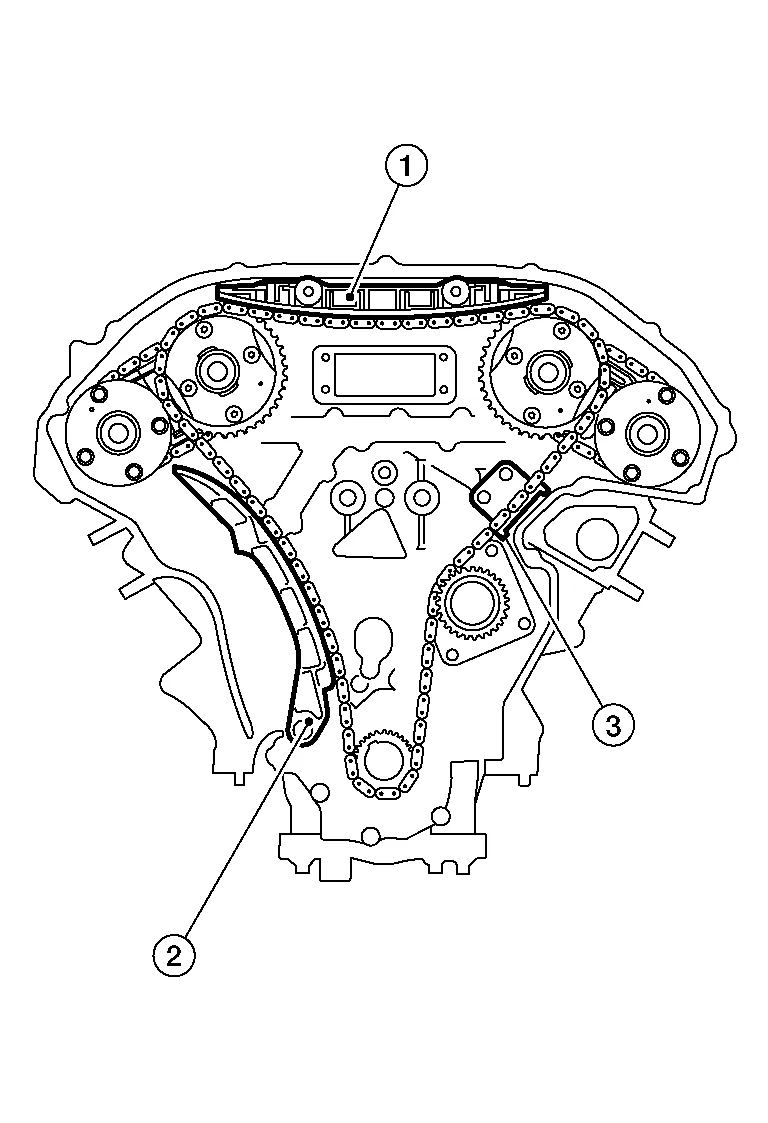
Remove internal chain guide (1), tension guide (3) and slack guide (2).
Remove timing chain (primary) and crankshaft sprocket.
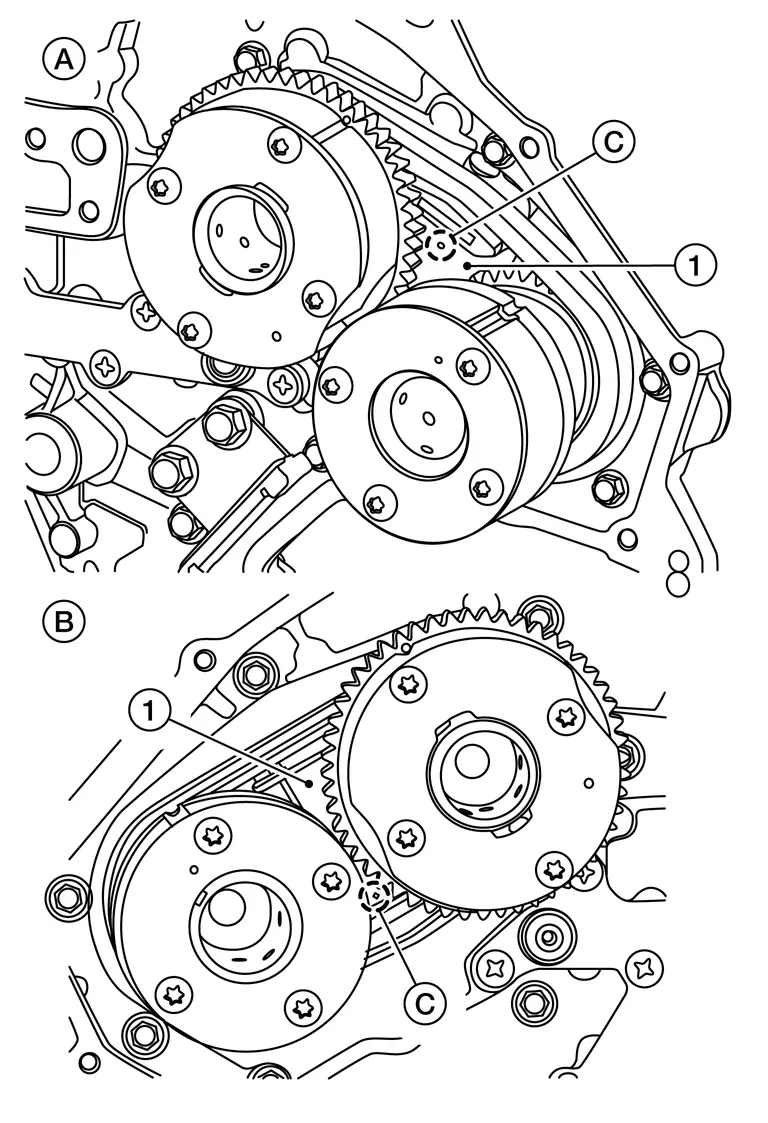
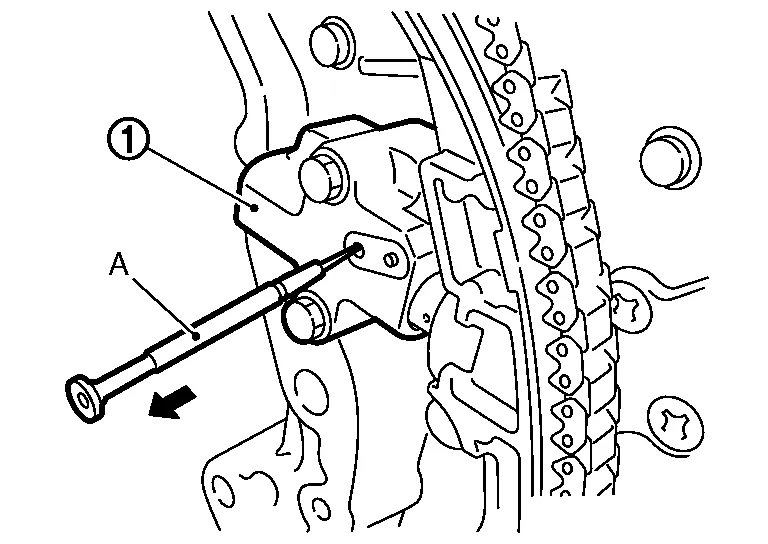
Remove timing chain (secondary) and camshaft sprockets as follows:Insert a suitable stopper pin into the hole (C) on the bank 1 (B) and bank 2 (A) timing chain tensioners [secondary (1)].
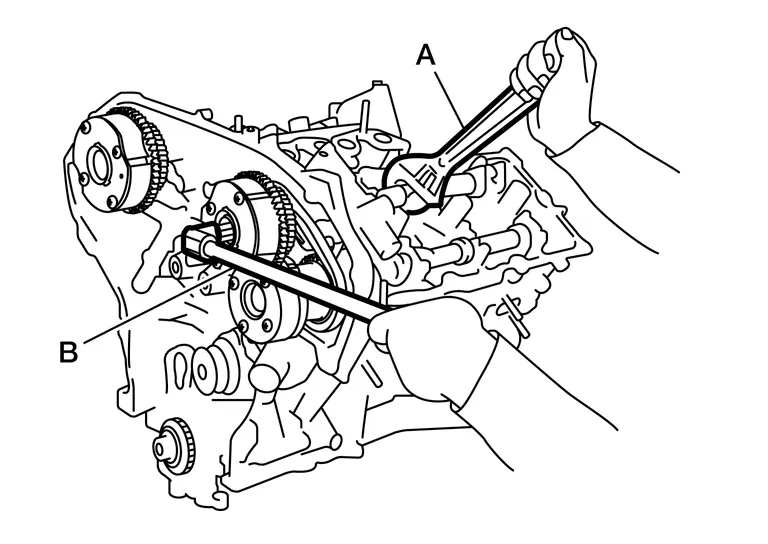
Secure the hexagonal portion of camshaft using a suitable tool (A) and loosen bolts with suitable tool (B).
Turn camshaft slightly to keep the chain tight when removing the timing chain (secondary).
Insert 0.5 mm (0.020 in) thick metal or resin plate between timing chain and timing chain tensioner plunger [guide (E)]. Remove timing chain [secondary (2)] together with camshaft sprockets with timing chain loose from guide groove.
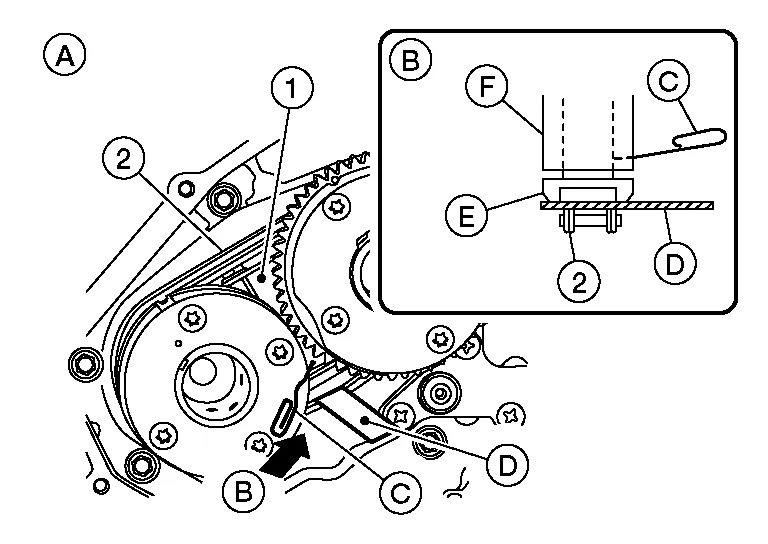
(1) : Timing chain tensioner (secondary) (A) : Bank 1 (RH) (B) : View B (C) : Stopper pin (D) : Plate (F) : Timing chain tensioner (body)
INSPECTION
Check for cracks and any excessive wear of the timing chain. Replace the timing chain as necessary.
INSTALLATION
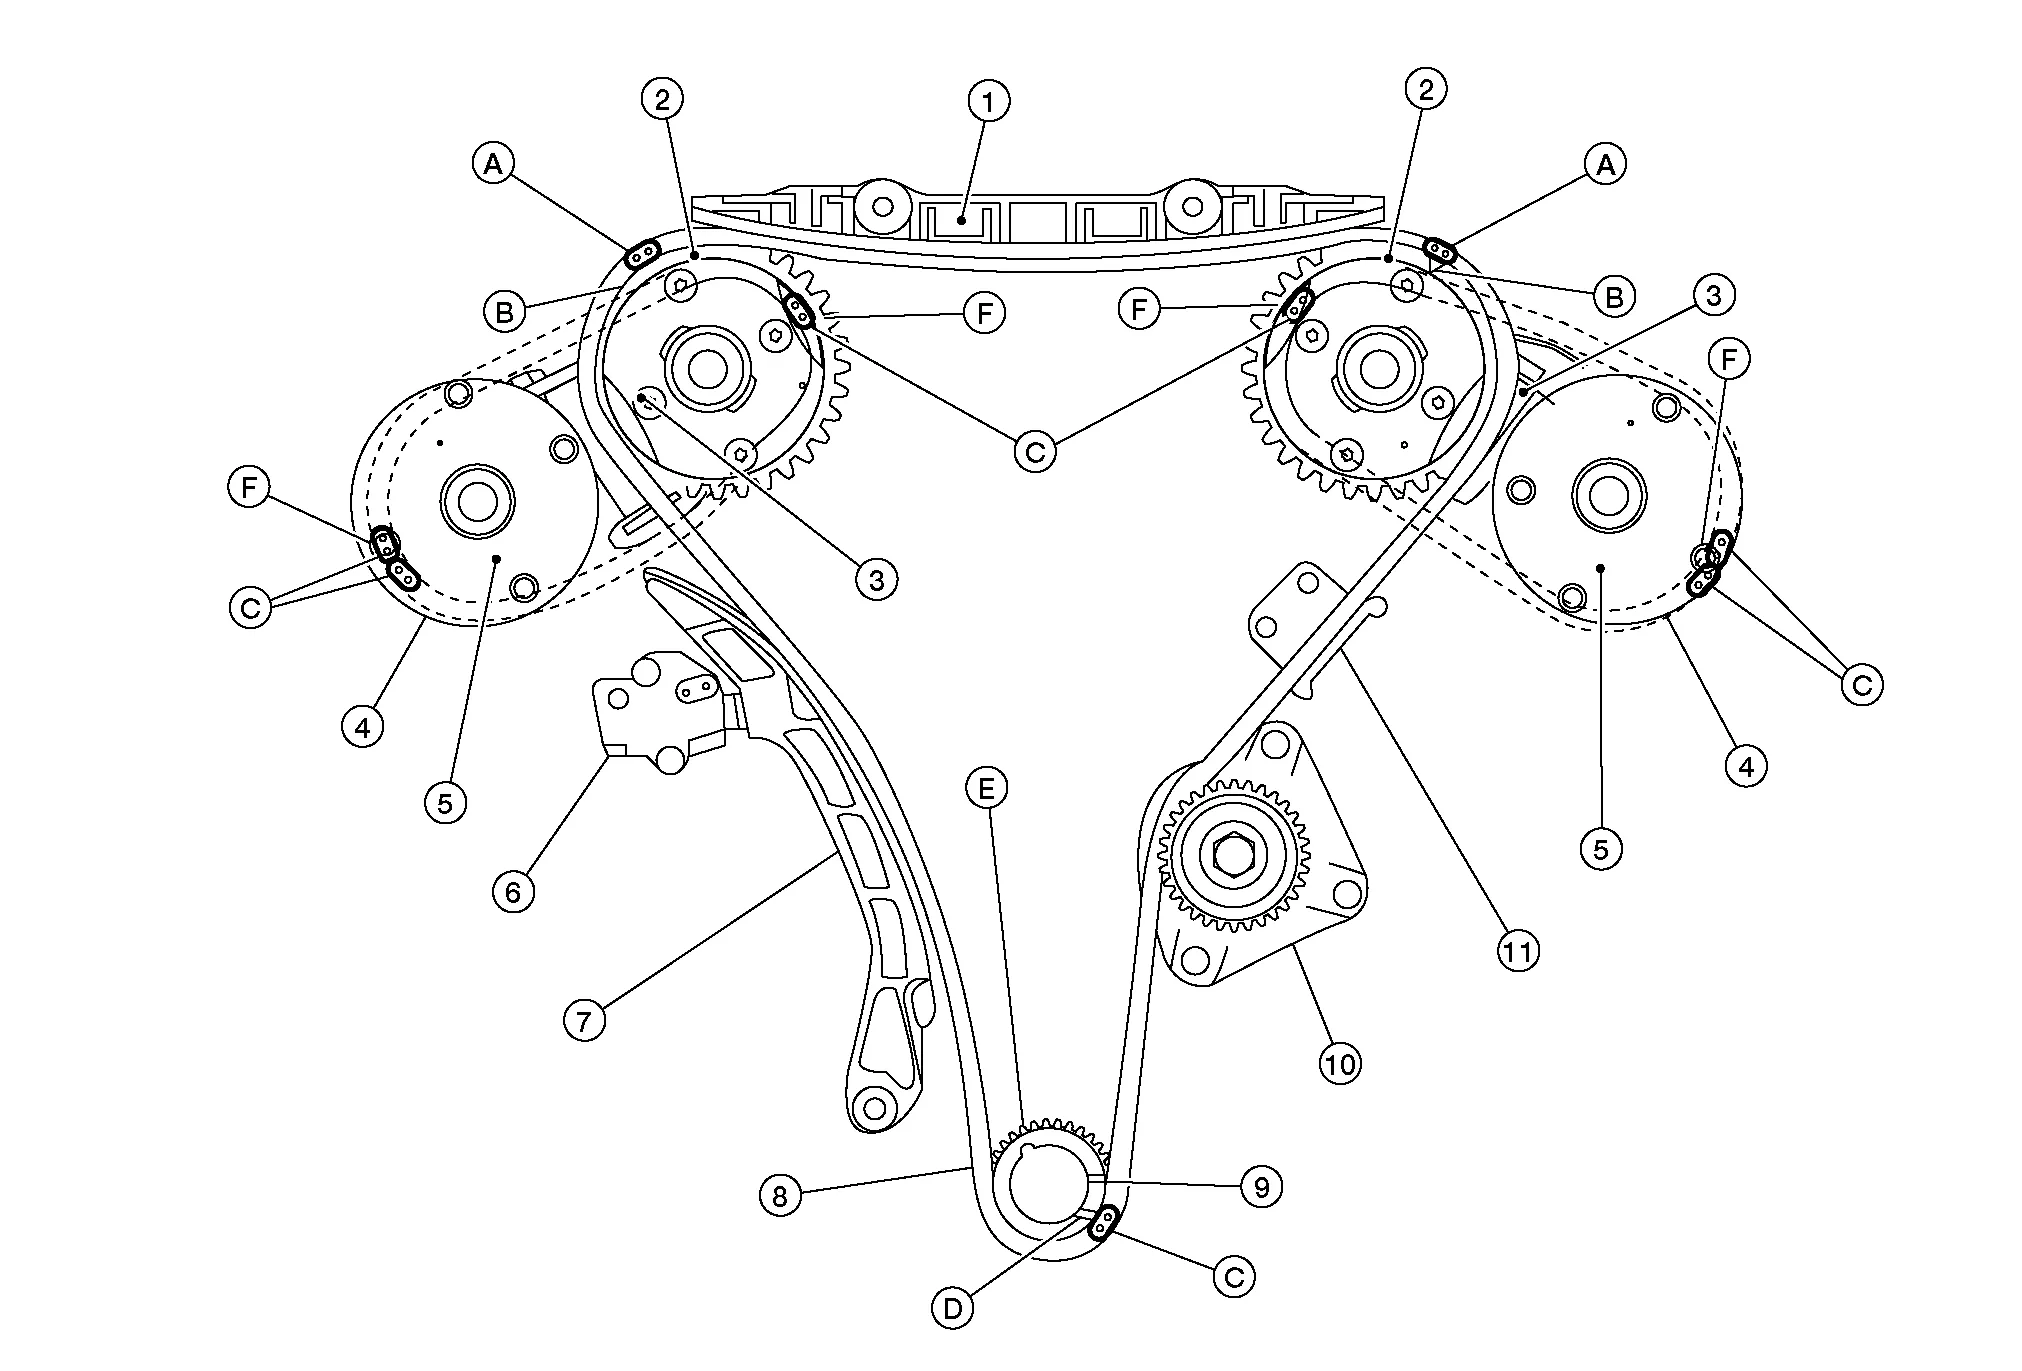
| 1. | Internal chain guide | 2. | Camshaft sprocket (INT) | 3. | Timing chain tensioner (secondary) |
| 4. | Timing chain (secondary) | 5. | Camshaft sprocket (EXH) | 6. | Timing chain tensioner (primary) |
| 7. | Slack guide | 8. | Timing chain (primary) | 9. | Crankshaft sprocket |
| 10. | Water pump | 11. | Tension guide | A. | Mating mark (green link) |
| B. | Mating mark (punched) | C. | Mating mark (orange link) | D. | Mating mark (notched) |
| E. | Crankshaft keyway | F. | Mating mark (back side) |
Install timing chain tensioners (secondary) with a new O-ring and the stopper pin attached.
Check that dowel pin (A) and crankshaft key (1) are located as shown. (No. 1 cylinder at compression TDC)
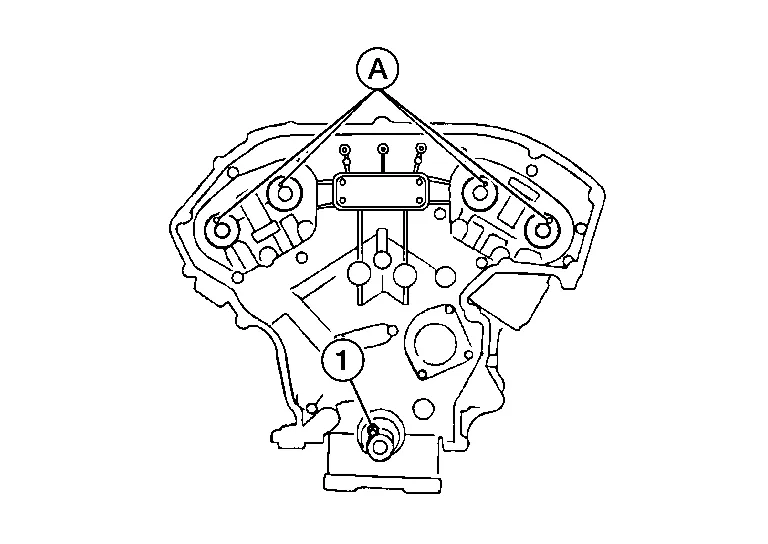
| Camshaft dowel pin | |
| : At cylinder head upper face side in each bank | |
| Crankshaft key | |
| : At cylinder head side of bank 1 | |
Install timing chain (secondary) and camshaft sprockets (INT and EXH) as follows:
Push plunger of timing chain tensioner (secondary) and keep it pressed in with stopper pin (A).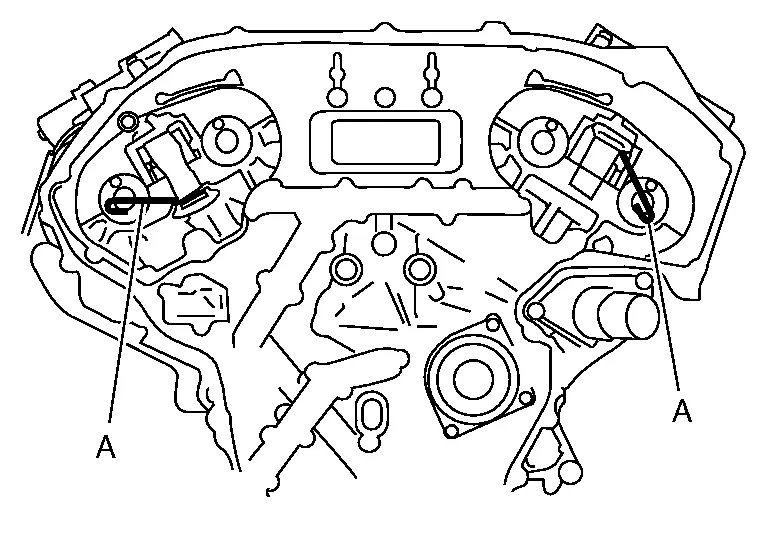
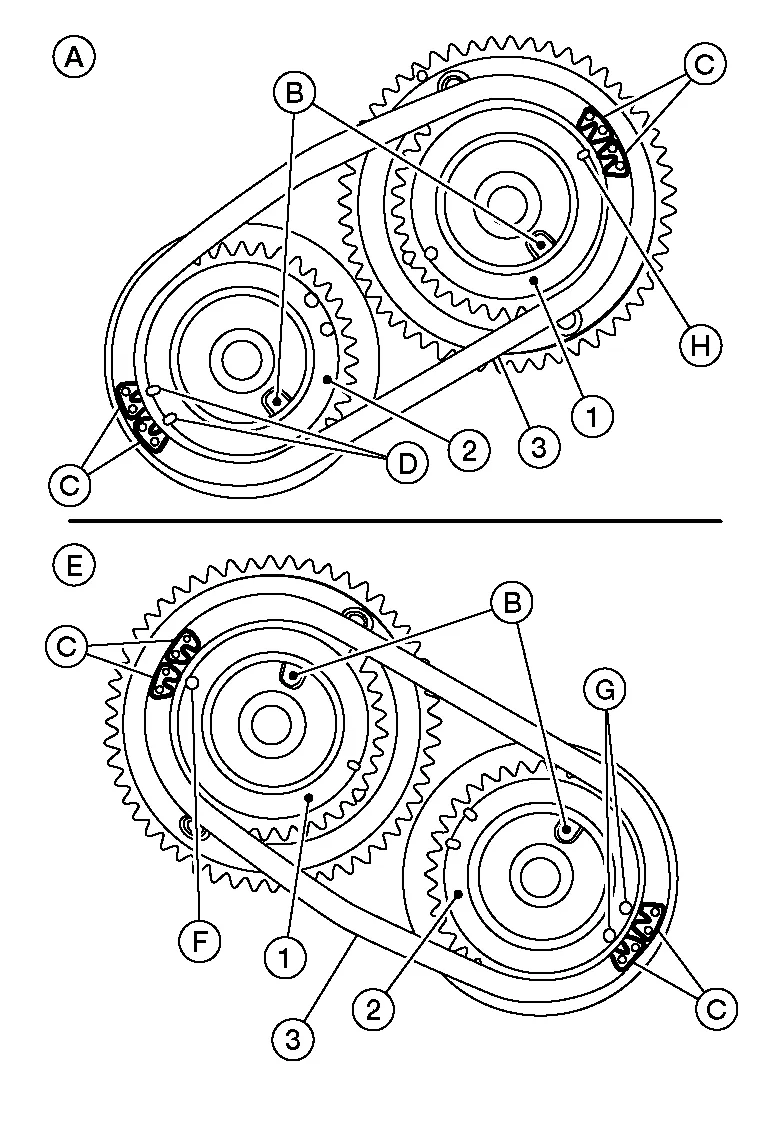
| (A) | : Bank 2 |
| (B) | : Dowel pin hole |
| (C) | : Orange links |
| (D) | : Mating mark (2 oblongs) |
| (E) | : Bank 1 |
| (F) | : Mating mark (Circle) |
| (G) | : Mating mark (2 circles on front face) |
| (H) | : Mating mark (Oblong) |
Align the mating marks on timing chain [secondary (orange link)] with the ones on camshaft sprockets [INT and EXH (punched)], and install them.
Mating marks for camshaft sprocket (INT) are on the back side of camshaft sprocket (secondary).
There are two types of mating mark, circle and oblong types. They should be used for the bank 1 and bank 2, respectively.
Bank 1 : Use circle type. Bank 2 : Use oblong type. Align dowel pin on camshafts with the groove on sprockets, and install them.
Tighten the bolts for the camshaft sprockets by hand enough to prevent the dowel pins from falling out of the grooves.
It may be difficult to visually check the dislocation of mating marks during and after installation. To make the matching easier, make a mating mark (A) on the top of sprocket teeth and its extended line with paint.
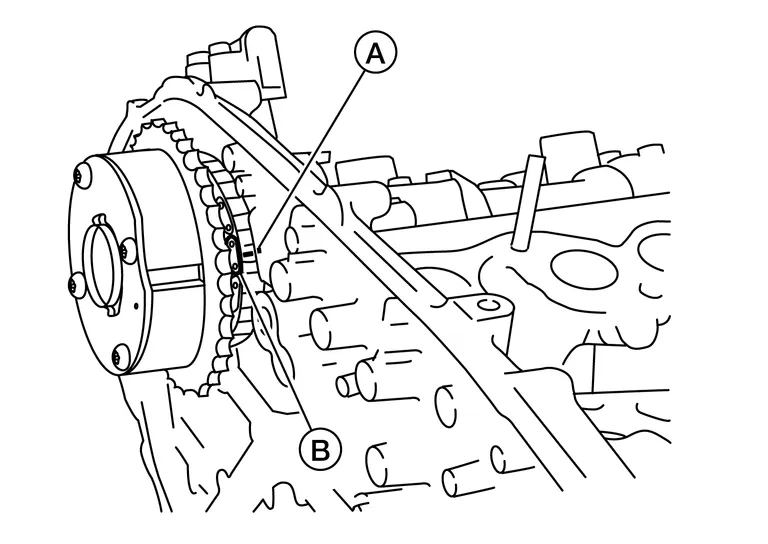
(B) : Mating mark (orange link)
After confirming the mating marks are aligned, tighten the camshaft sprocket bolts using suitable tool (B).
Secure the camshaft using a suitable tool (A) at the hexagonal portion to tighten the bolts.
Remove suitable stopper pins from hole (C) in timing chain tensioners [secondary (1)].
| (A) | : Bank 1 (RH) |
| (C) | : Bank 2 (LH) |
Install the crankshaft sprocket (C) on the crankshaft.
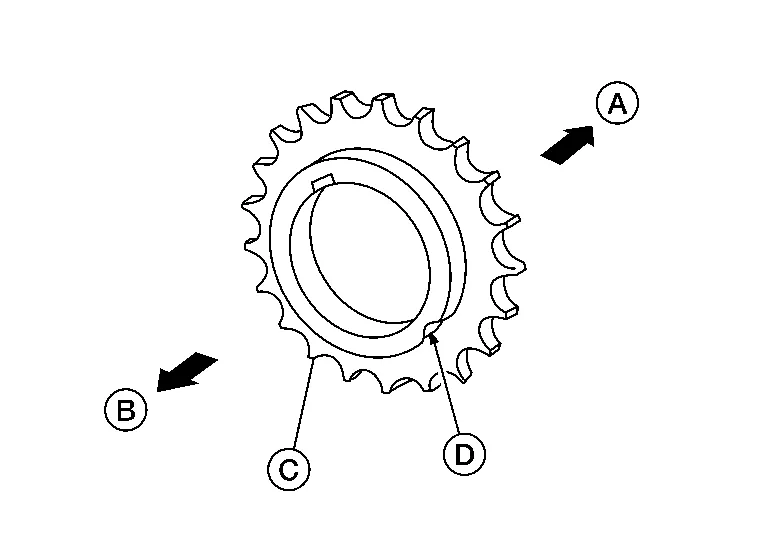
Make sure the mating marks (D) on the crankshaft sprocket (C) face the front of the engine (B).
The flat side of the crankshaft sprocket (C) is on the crankshaft side (A)
Install the timing chain (primary).
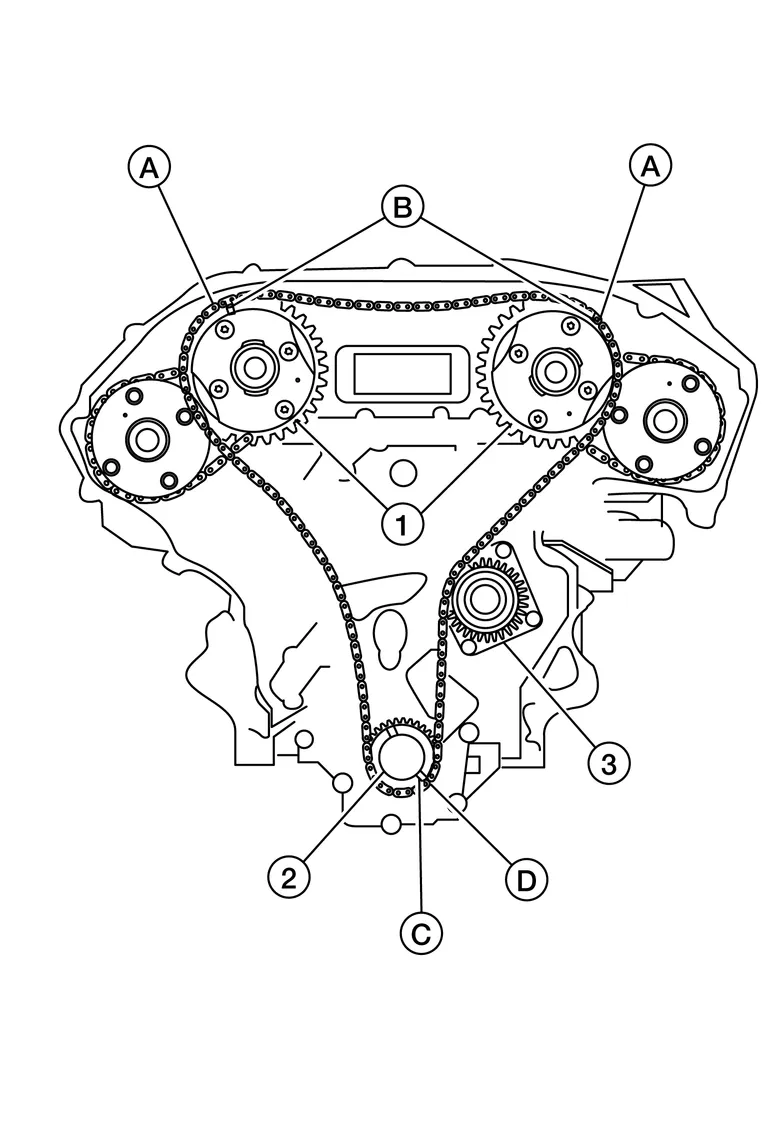
Install timing chain (primary) so the mating mark (punched) (B) on camshaft sprocket (1) is aligned with the green link (A) on the timing chain, while the mating mark (notched) (C) on the crankshaft sprocket (2) is aligned with the orange link (D) on the timing chain, as shown.
When it is difficult to align mating marks of the timing chain (primary) with each sprocket, gradually turn the camshaft using a wrench on the hexagonal portion to align it with the mating marks.
During alignment, be careful to prevent dislocation of mating mark alignments of the secondary timing chains.
- : Water pump
Install the internal chain guide (1) and slack guide (2).
- : Tension guide
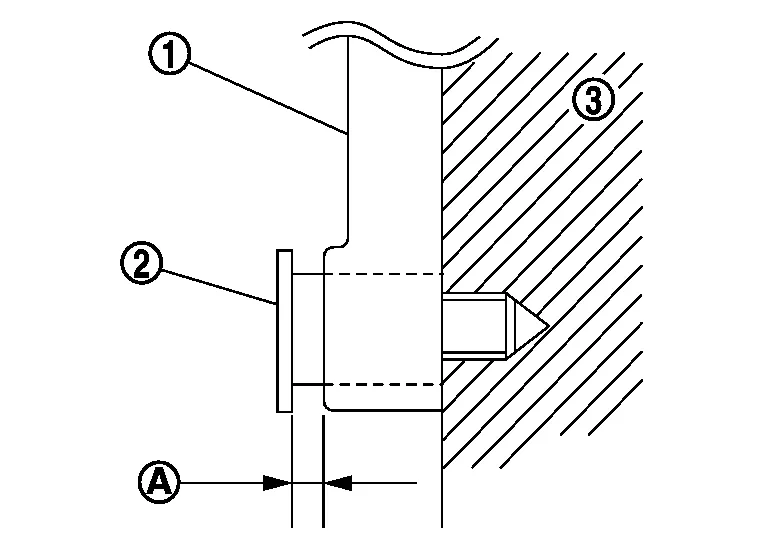
- : Slack guide
- : Cylinder block
Install the timing chain tensioner (primary) with the following procedure:Pull plunger stopper tab (A) up (or turn lever downward) so as to remove plunger stopper tab from the ratchet of plunger (D).
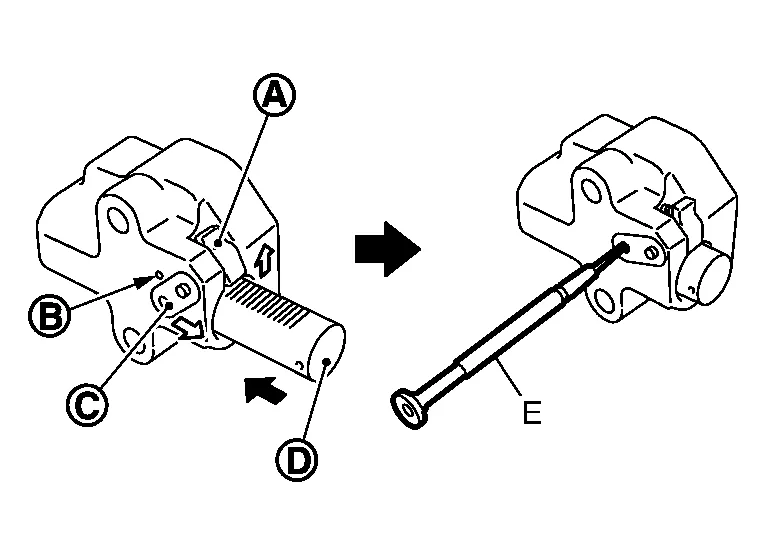
The lever parts and the tab are synchronized. Therefore, the plunger will be secured under this condition.
Remove any dirt and foreign materials completely from the back and the mounting surfaces of timing chain tensioner (primary).
Reconfirm that the matching marks on the sprockets and the timing chain have not slipped out of alignment.
Install the spark plugs. Refer to Removal and Installation.
Install the intake manifold collector. Refer to Removal and Installation.
Install the front timing chain case. Refer to Removal and Installation.