Oil Cooler
Components
COMPONENTS
ILLUSTRATION
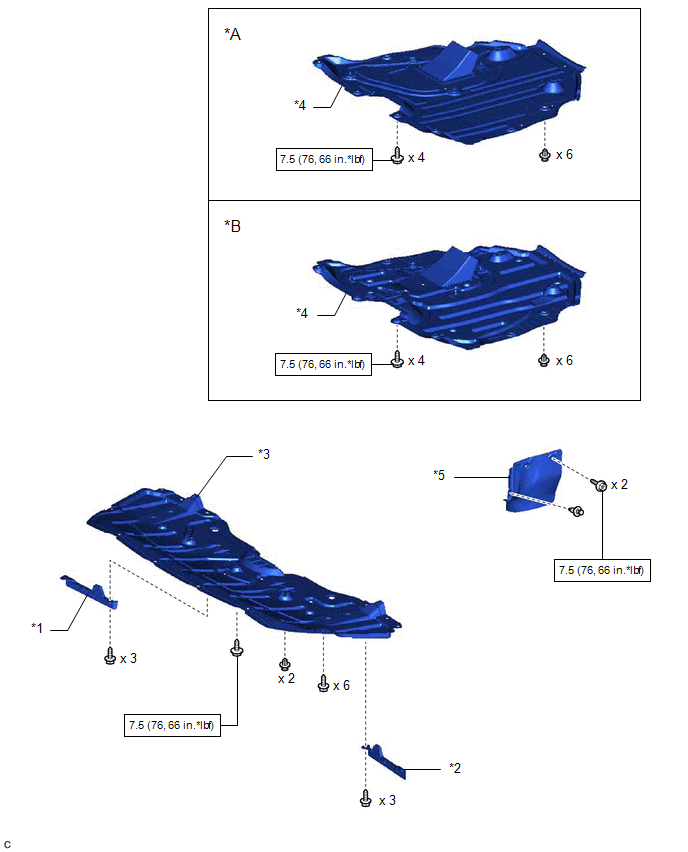
*A |
Type A |
*B |
Type B |
*1 |
FRONT WHEEL OPENING EXTENSION PAD RH |
*2 |
FRONT WHEEL OPENING EXTENSION PAD LH |
*3 |
NO. 1 ENGINE UNDER COVER |
*4 |
NO. 2 ENGINE UNDER COVER ASSEMBLY |
*5 |
FRONT FENDER APRON SEAL LH |
- |
- |
 |
N*m (kgf*cm, ft.*lbf): Specified torque |
- |
- |
ILLUSTRATION
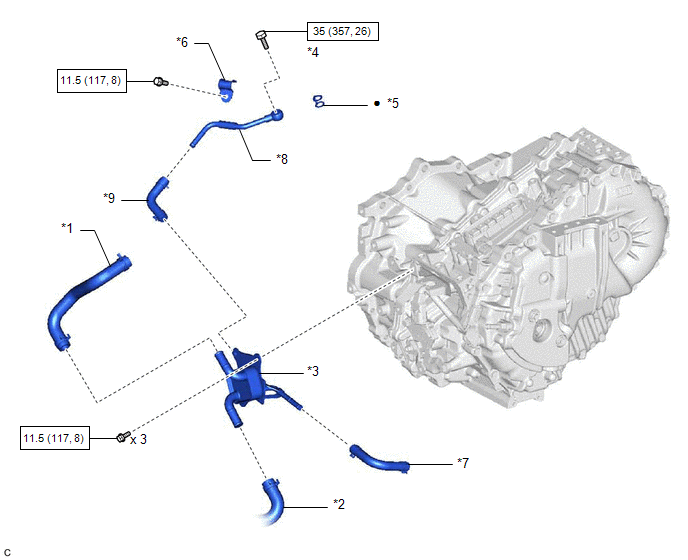
*1 |
NO. 1 INVERTER COOLING HOSE |
*2 |
NO. 5 INVERTER COOLING HOSE |
*3 |
MOTOR COOLING COOLER |
*4 |
OIL COOLER UNION BOLT |
*5 |
GASKET |
*6 |
NO. 1 OIL COOLER TUBE CLAMP |
*7 |
NO. 1 MOTOR COOLING HOSE |
*8 |
NO. 2 MOTOR COOLING PIPE |
*9 |
NO. 2 MOTOR COOLING HOSE |
- |
- |
|
N*m (kgf*cm, ft.*lbf): Specified torque |
● |
Non-reusable part |
Installation
INSTALLATION
PROCEDURE
1. INSTALL NO. 1 MOTOR COOLING HOSE
HINT:
Perform this procedure only when replacement of the motor cooling cooler is necessary.
(a) Coat the pipe of the motor cooling cooler with a small amount of ATF as shown in the illustration.
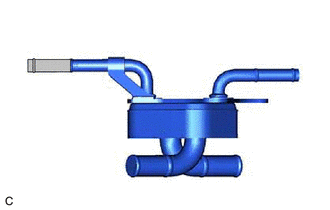
 |
ATF Application Area |
(b) Install the No. 1 motor cooling hose to the motor cooling cooler, and slide the clip to secure it.
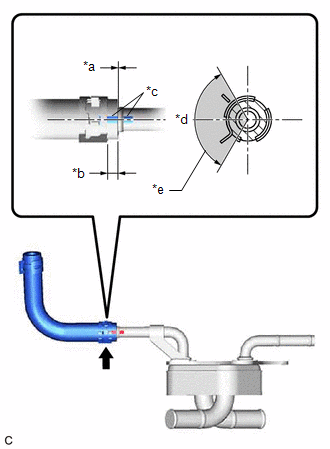
*a |
0 to 3 mm (0 to 0.118 in.) |
*b |
2 to 7 mm (0.0787 to 0.276 in.) |
*c |
Paint Mark |
*d |
Center of Paint Mark |
*e |
120° |
|
Claw of Clip Location |
NOTICE:
- Be careful not to deform the motor cooling cooler.
- Make sure to align the paint mark of the No. 1 motor cooling hose with the paint mark of the motor cooling cooler.
- Make sure that the claws of the clip are positioned within the area shown in the illustration.
2. INSTALL NO. 2 MOTOR COOLING HOSE
HINT:
Perform this procedure only when replacement of the motor cooling cooler is necessary.
(a) Coat the pipe of the motor cooling cooler with a small amount of ATF as shown in the illustration.
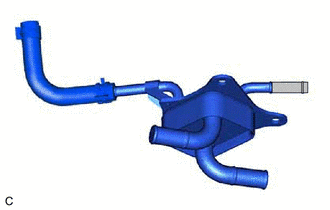
|
ATF Application Area |
(b) Install the No. 2 motor cooling hose to the motor cooling cooler, and slide the clip to secure it.
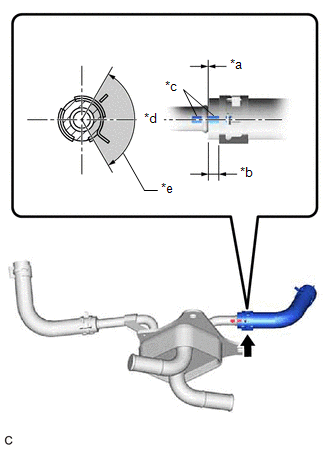
*a |
0 to 3 mm (0 to 0.118 in.) |
*b |
2 to 7 mm (0.0787 to 0.276 in.) |
*c |
Paint Mark |
*d |
Center of Paint Mark |
*e |
120° |
|
Claw of Clip Location |
NOTICE:
- Be careful not to deform the motor cooling cooler.
- Make sure to align the paint mark of the No. 2 motor cooling hose with the paint mark of the motor cooling cooler.
- Make sure that the claws of the clip are positioned within the area shown in the illustration.
3. INSTALL NO. 2 MOTOR COOLING PIPE
(a) Install the No. 2 motor cooling pipe to the No. 2 motor cooling hose, and slide the clip to secure it.
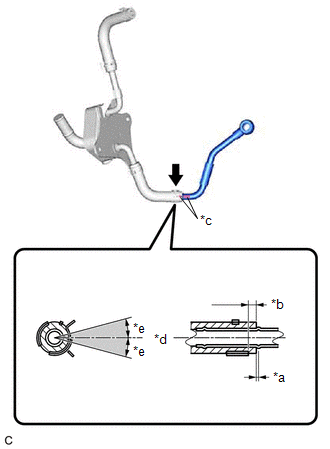
*a |
0 to 3 mm (0 to 0.118 in.) |
*b |
2 to 7 mm (0.0787 to 0.276 in.) |
*c |
Paint Mark |
*d |
Center of Paint Mark |
*e |
15° |
|
Center of Clip Location |
NOTICE:
- Make sure to align the paint mark of the No. 2 motor cooling pipe with the paint mark of the No. 2 motor cooling hose.
- Make sure that the center of the clip (between the claws of the clip) is within 15° of the center of the paint mark as shown in the illustration.
4. INSTALL MOTOR COOLING COOLER
(a) Connect the No. 1 motor cooling hose to the transaxle housing tube connector, and slide the clip to secure it.
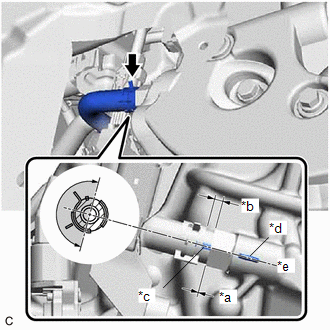
*a |
0 to 3 mm (0 to 0.118 in.) |
*b |
2 to 7 mm (0.0787 to 0.276 in.) |
*c |
Paint Mark |
*d |
Rib |
*e |
Center of Rib |
*f |
180° |
|
Claw of Clip Location |
NOTICE:
- Make sure to align the paint mark of the No. 1 motor cooling hose with the rib of the hybrid vehicle transaxle assembly.
- Make sure that the claws of the clip are within the location shown in the illustration.
(b) Temporarily install the motor cooling cooler to the No. 1 transmission control cable bracket with the 3 bolts. |
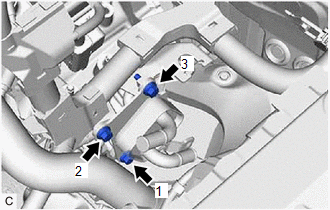 |
(c) Tighten the 3 bolts in the order shown in the illustration.
Torque:
11,5 N·m {117 kgf·cm, 8 ft·lbf}
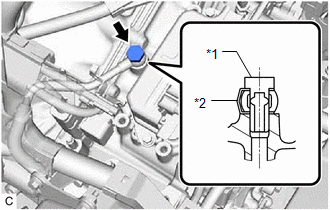
(d) Temporarily install the No. 2 motor cooling pipe to the hybrid vehicle transaxle assembly with the oil cooler union bolt and a new gasket. |
|
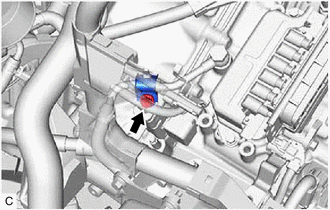
(e) Install the No. 2 motor cooling pipe to the hose bracket with the bolt and No. 1 oil cooler tube clamp. Torque: 11,5 N·m {117 kgf·cm, 8 ft·lbf} |
 |
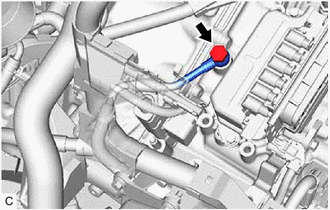
(f) Tighten the oil cooler union bolt. Torque: 35 N·m {357 kgf·cm, 26 ft·lbf} |
 |
5. CONNECT NO. 5 INVERTER COOLING HOSE
Click here 
6. INSTALL NO. 1 INVERTER COOLING HOSE
(a) Install the No. 1 inverter cooling hose to the motor cooling cooler, and slide the clip to secure it.
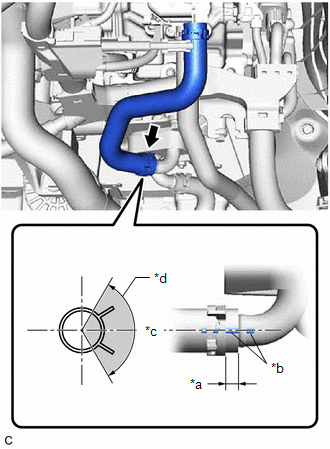
*a |
2 to 7 mm (0.0787 to 0.276 in.) |
*b |
Paint Mark |
*c |
Center of Paint Mark |
*d |
120° |
|
Claw of Clip Location |
NOTICE:
- Be careful not to deform the motor cooling cooler.
- Make sure to align the paint mark of the No. 1 inverter cooling hose with the paint mark of the motor cooling cooler.
- Make sure that the claws of the clip are positioned within the area shown in the illustration.
7. INSTALL INVERTER WITH CONVERTER ASSEMBLY
Click here
8. INSPECT HYBRID TRANSAXLE FLUID
Click here
9. INSPECT FOR HYBRID TRANSAXLE FLUID LEAK
10. INSTALL FRONT FENDER APRON SEAL LH
Click here
11. INSTALL NO. 2 ENGINE UNDER COVER ASSEMBLY
Click here
12. INSTALL NO. 1 ENGINE UNDER COVER
Click here
13. INSTALL FRONT WHEEL OPENING EXTENSION PAD LH
Click here
14. INSTALL FRONT WHEEL OPENING EXTENSION PAD RH
Click here
Removal
REMOVAL
The necessary procedures (adjustment, calibration, initialization, or registration) that must be performed after parts are removed and installed, or replaced during motor cooling cooler removal/installation are shown below.
Necessary Procedures After Parts Removed/Installed/ReplacedReplaced Part or Performed Procedure | Necessary Procedure | Effect/Inoperative Function when Necessary Procedure not Performed | Link |
|---|---|---|---|
| *: When performing learning using the Techstream. Click here |
|||
Auxiliary battery terminal is disconnected/reconnected |
Perform steering sensor zero point calibration |
Lane departure alert system (w/ Steering Control) |
 |
Pre-collision system |
|||
Intelligent clearance sonar system* |
|||
Lighting system (w/ AFS)(EXT) |
|||
Memorize steering angle neutral point |
Parking assist monitor system |
|
|
Panoramic view monitor system |
|
||
Replacement of ECM |
Perform Vehicle Identification Number (VIN) registration |
MIL illuminates |
|
Replacement of inverter with converter assembly |
Resolver learning |
|
|
CAUTION:
- Orange wire harnesses and connectors indicate high-voltage circuits. To prevent electric shock, always follow the procedure described in the repair manual.
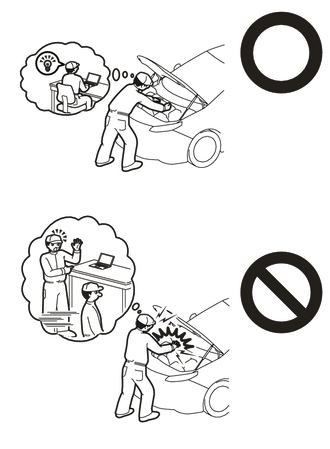
Click here
- To prevent electric shock, wear insulated gloves when working on wire harnesses and components of the high voltage system.
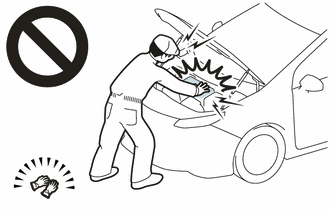
NOTICE:
- After turning the power switch off, waiting time may be required before disconnecting the cable from the negative (-) auxiliary battery terminal. Therefore, make sure to read the disconnecting the cable from the negative (-) auxiliary battery terminal notices before proceeding with work.
Click here
- If the ECM has been struck or dropped, replace it.
- Perform Vehicle Identification Number (VIN) registration when replacing the ECM.
Click here
PROCEDURE
1. REMOVE FRONT WHEEL OPENING EXTENSION PAD RH
Click here
2. REMOVE FRONT WHEEL OPENING EXTENSION PAD LH
Click here
3. REMOVE NO. 1 ENGINE UNDER COVER
Click here
4. REMOVE NO. 2 ENGINE UNDER COVER ASSEMBLY
Click here
5. REMOVE FRONT FENDER APRON SEAL LH
Click here
6. REMOVE INVERTER WITH CONVERTER ASSEMBLY
Click here
7. REMOVE NO. 1 INVERTER COOLING HOSE
(a) Slide the clip and remove the No. 1 inverter cooling hose from the motor cooling cooler. |
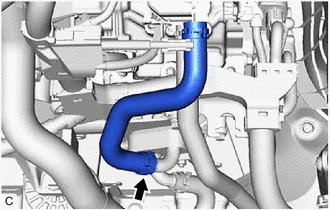 |
8. DISCONNECT NO. 5 INVERTER COOLING HOSE
Click here
9. REMOVE MOTOR COOLING COOLER
(a) Remove the oil cooler union bolt and gasket to disconnect the No. 2 motor cooling pipe from the hybrid vehicle transaxle assembly. |
|
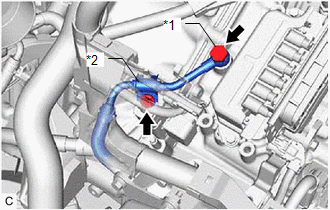
(b) Remove the bolt and No. 1 oil cooler tube clamp to disconnect the No. 2 motor cooling pipe from the hose bracket.
(c) Remove the 3 bolts to disconnect the motor cooling cooler from the No. 1 transmission control cable bracket. |
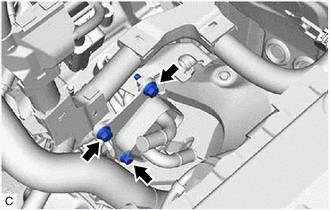 |
(d) Slide the clip and disconnect the No. 1 motor cooling hose from the transaxle housing tube connector. NOTICE: Make sure not to remove the No. 1 motor cooling hose from the motor cooling cooler as the motor cooling cooler may be deformed. |
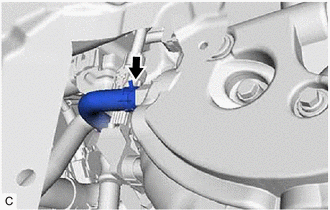 |
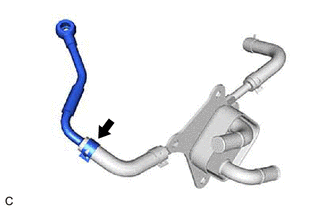
10. REMOVE NO. 2 MOTOR COOLING PIPE
(a) Slide the clip and remove the No. 2 motor cooling pipe from the No. 2 motor cooling hose. NOTICE: Make sure not to remove the No. 2 motor cooling hose from the motor cooling cooler as the motor cooling cooler may be deformed. |
 |