Transmission Removal and Installation
Removal
PROCEDURE
1. Disconnect the negative battery cable.
* If your vehicle's stereo has an anti-theft code system, make sure you know the radio activation code before disconnecting the battery.
2. If the same transmission is to be reinstalled, simply remove the cable clamp from the bracket and disconnect the throttle cable from the linkage on the throttle body. If the transmission is to be replaced, disconnect the throttle cable from the throttle body (in both cases, refer to Subsection 7.2.4).
3. Remove the air filter (refer to Subsection 5.9).

4. Remove the upper bolts of the left transmission mount (indicated by arrows). There are two more bolts, but they cannot be reached without raising the vehicle; they are located at the bottom front.
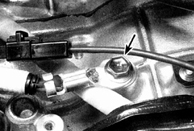
5. Disconnect the ground wire from the transmission (the bolt to be removed is indicated by the arrow in the photo).
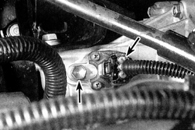
6. Disconnect the vehicle speed sensor connector (indicated by the right arrow), the neutral start switch (refer to Subsection 7.2.6) and the solenoid (A240L transmission only), located next to the neutral start switch at the front left corner of the transmission.
7. Release the wire clamps on the transmission and move the wires aside so they do not interfere with transmission removal.
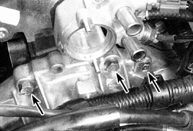
8. Remove the upper bolts (indicated by arrows) securing the transmission to the engine. Remove the upper starter mounting bolt from the transmission.
9. Raise the vehicle and support it on stands.
10. Remove the underbody engine shield.
11. Disconnect the shift cable from the transmission (refer to Subsection 7.2.5).
12. Remove the exhaust pipe section between the exhaust manifold and the catalytic converter (refer to Subsection 5.13).
13. Drain the transmission fluid and, when removing the three-speed transmission, drain the differential oil.
14. Remove the driveshafts (refer to Subsection 8.3).
* It is not necessary to remove the driveshafts completely; the inner joints can be disconnected and moved aside. However, there will be more clearance if the driveshafts are fully removed. This is also a good time to inspect the joint boots for wear or damage and, if necessary, refill them with new grease (refer to Subsection 8.3).
15. Suspend the engine from a hoist hook or place a jack under it, with a wooden block between the jack and the oil pan to distribute the load.
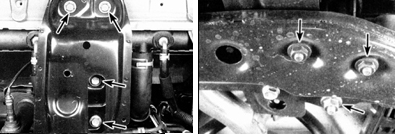
16. Remove the four front crossmember mounting bolts (indicated by arrows in the left photo) and the three rear crossmember mounting nuts (indicated by arrows in the right photo).
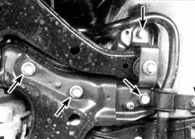
17. Remove the five bolts (indicated by arrows) on each side of the suspension crossmember (the left side is shown in the photo; the right side is identical).
18. Disconnect the wires from the starter, remove the lower starter-to-transmission bolt and remove the starter (refer to Subsection 3.3.14).
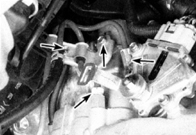
19. Remove the bolts (indicated by arrows) of the coolant hose clamps. Remove the coolant hose clamps from the transmission, then disconnect the hoses from the transmission.
20. To disconnect the transmission dipstick tube from the transmission, remove the bracket bolt at the front of the body panel, then pull the tube upward.
21. Place a jack under the transmission, preferably one designed for this purpose. Secure the transmission with chains so that it is more stable on the jack.
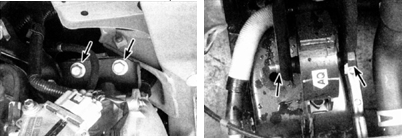
22. Remove the two remaining lower transmission mounting bolts (indicated by arrows in the left photo). Remove the front and rear mount bolts (indicated by arrows in the right photo) so that the engine can be tilted slightly to the left to facilitate transmission removal and installation.
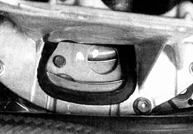
23. Remove the torque converter cover. Mark the position of the torque converter relative to the drive plate so that it can be installed in the same position as before removal. Remove the six torque converter mounting bolts. Rotate the crankshaft to access each bolt in turn.
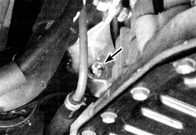
24. Remove the lower transmission-to-engine mounting bolts. The three lower bolts are shown in the illustration in step 22. The other three bolts are located on the opposite side of the engine, slightly below the lower starter mounting bolt. Remove the lower transmission-to-engine bolt on the front of the transmission (indicated by the arrow).
25. Move the transmission to the side to separate it from the engine locating dowels. Make sure the torque converter disengages from the clutch disc. Secure the torque converter to the transmission so that it does not fall out during removal. Lower the transmission.
Installation
PROCEDURE
1. Before installation, make sure the torque converter is securely retained in the transmission.
2. Place the transmission on a jack and raise it to the required height. Avoid tilting the transmission so the torque converter does not fall out. Connect the cooler lines.
3. Carefully install the transmission on the engine. Make sure it seats fully on the locating dowels and the torque converter is installed correctly.
4. Rotate the torque converter to align the bolt holes in it with the holes in the clutch disc. Make sure the alignment marks on the torque converter and clutch disc, made before removal, match.
5. Install the lower transmission-to-engine bolts and tighten them to the specified torque given in subsection 7.2.1.
6. Install the torque converter-to-driveplate bolts and tighten them to the specified torque given in subsection 7.2.1. Install the torque converter cover.
7. Install the crossmember and the suspension crossmember. Securely tighten the bolts and nuts.
8. Remove the jacks supporting the transmission and engine.
9. Install the starter (see subsection 3.3.14). It is easier to install the upper starter bolt after the vehicle is lowered to the ground.
10. Insert the dipstick tube into the transmission and install the tube bracket on the transmission.
11. Tighten the cooler line fittings and install the retaining clips on the transmission.
12. Install and/or connect the driveshafts to the transmission (see subsection 8.3).
13. Install and adjust the park/neutral position switch (see subsection 7.2.6).
14. Connect and adjust the shift cable (see subsection 7.2.5) and the throttle cable (see subsection 7.2.4).
15. Connect the solenoid connector (on the A240L transmission), the park/neutral position switch, and the vehicle speed sensor connector. Make sure the wires are correctly secured to the transmission case.
16. Install the exhaust pipe section between the exhaust manifold and the catalytic converter (see subsection 5.13).
17. Remove the supports and lower the vehicle to the ground.
18. Install the upper transmission bolts and tighten them to the specified torque given in subsection 7.2.1. Install and tighten the upper starter bolt if not already done.
19. Fill the transmission to the required level with the specified type of automatic transmission fluid (see subsection 2.1). Drive the vehicle and check the transmission for leaks.
Test yourself
A quick Toyota Corolla quiz: every answer comes with an explanation and a link to the manual page.