Release Bearing and Clutch Release Fork
* Asbestos dust produced by wear of the clutch friction material and deposited on clutch components is hazardous to health. Do not breathe it.
Removal and Inspection
PROCEDURE
1. Disconnect the negative battery cable.
* If your vehicle's stereo has an anti-theft code system, make sure you know the radio activation code before disconnecting the battery.
2. Remove the transmission (refer to Subsection 7.1.5 and Subsection 7.2.8).
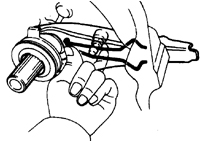
3. Remove the clutch release fork from the ball stud, then remove the release bearing from the fork.

4. Hold the bearing by its outer race and rotate the inner race while applying pressure to it. If the bearing does not rotate smoothly or makes noise, replace it. Wipe the bearing with a clean cloth and
inspect it for damage, cracks or signs of wear.
5. Do not immerse the bearing in solvent. Sealant is used to seal the bearing, and immersion in solvent will dissolve the sealant and the bearing will fail. Also inspect the clutch release fork for cracks and deformation.
Installation
PROCEDURE
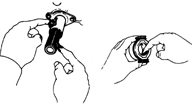
1. Fill the inner groove of the release bearing with high-temperature grease. Also apply a thin layer of the same grease to the transmission input shaft splines and the bearing installation area.
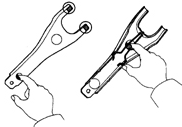
2. Lubricate the clutch release fork socket that accepts the fork ball stud, the ends of the fork and the end of the release cylinder pushrod with high-temperature grease.
3. Install the release bearing into the clutch release fork socket.
4. Slide the release bearing onto the transmission input shaft, inserting the clutch release fork through the opening in the clutch housing. Install the fork onto the ball stud.
5. Apply a thin layer of high-temperature grease to the surface of the release bearing where it contacts the diaphragm spring fingers of the pressure plate.
6. Installation is the reverse of removal.
Test yourself
A quick Toyota Corolla quiz: every answer comes with an explanation and a link to the manual page.