DESCRIPTION
The outer mirror control ECU assembly controls the outer rear view mirror assembly (footwell lights).
WIRING DIAGRAM 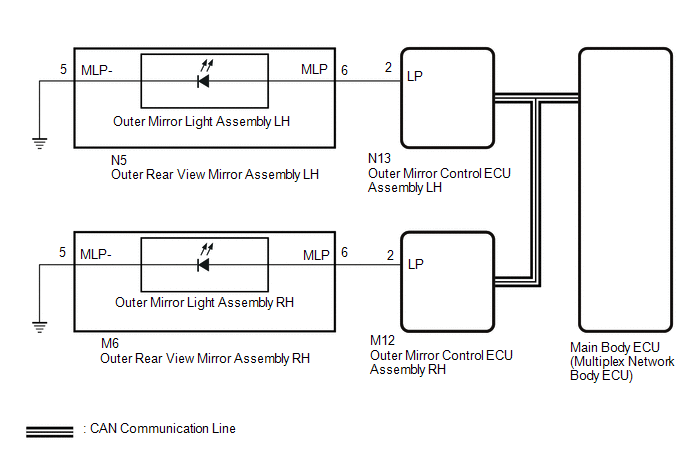
PROCEDURE
CHECK FOOTWELL LIGHTS
(a) Check the illumination of each footwell lights.
Result | Proceed to |
Footwell light LH does not illuminate. |
A |
Footwell light RH does not illuminate. |
B |
| B |
 |
GO TO STEP 6 |
| A |
 |
|
PERFORM ACTIVE TEST USING TECHSTREAM
(a) Perform the Active Test according to the display on the Techstream.
Click here  Mirror L
Tester Display | Test Part | Control Range | Diagnostic Note |
Fr Foot Light |
Outer rear view mirror assembly LH (footwell light LH) |
OFF or ON |
- |
OK:
Footwell light LH turn on.
| OK |
|
PROCEED TO NEXT SUSPECTED AREA SHOWN IN PROBLEM SYMPTOMS TABLE |
| NG |
|
|
INSPECT OUTER REAR VIEW MIRROR ASSEMBLY LH
(a) Remove the outer rear view mirror assembly LH.
Click here
(b) Inspect the outer rear view mirror assembly LH.
Click here
| NG |
|
GO TO STEP 5 |
| OK |
|
|
CHECK HARNESS AND CONNECTOR (OUTER REAR VIEW MIRROR ASSEMBLY LH - OUTER MIRROR CONTROL ECU ASSEMBLY LH AND BODY GROUND)
(a) Disconnect the N5 outer rear view mirror assembly LH connector.
(b) Disconnect the N13 outer mirror control ECU assembly LH connector.
(c) Measure the resistance according to the value(s) in the table below.
Standard Resistance:
Tester Connection | Condition | Specified Condition |
N5-6 (MLP) - N13-2 (LP) |
Always |
Below 1 Ω |
N5-5 (MLP-) - Body ground |
Always |
Below 1 Ω |
N5-6 (MLP) or N13-2 (LP) - Body ground |
Always |
10 kΩ or higher |
| OK |
|
REPLACE OUTER MIRROR CONTROL ECU ASSEMBLY LH |
| NG |
|
REPAIR OR REPLACE HARNESS OR CONNECTOR |
CHECK OUTER MIRROR LIGHT ASSEMBLY LH
(a) Temporarily replace the outer mirror light assembly LH with a new or normally functioning one.
Click here
(b) Perform the Active Test according to the display on the Techstream.
Click here Mirror L
Tester Display | Test Part | Control Range | Diagnostic Note |
Fr Foot Light |
Outer rear view mirror assembly LH (footwell light LH) |
OFF or ON |
- |
OK:
Footwell light LH turn on.
| OK |
|
END (OUTER MIRROR LIGHT ASSEMBLY LH IS DEFECTIVE) |
| NG |
|
REPLACE OUTER REAR VIEW MIRROR ASSEMBLY LH |
PERFORM ACTIVE TEST USING TECHSTREAM
(a) Perform the Active Test according to the display on the Techstream.
Click here Mirror R
Tester Display | Test Part | Control Range | Diagnostic Note |
Fr Foot Light |
Outer rear view mirror assembly RH (footwell light RH) |
OFF or ON |
- |
OK:
Footwell light RH turn on.
| OK |
|
PROCEED TO NEXT SUSPECTED AREA SHOWN IN PROBLEM SYMPTOMS TABLE |
| NG |
|
|
INSPECT OUTER REAR VIEW MIRROR ASSEMBLY RH
(a) Remove the outer rear view mirror assembly RH.
Click here
(b) Inspect the outer rear view mirror assembly RH.
Click here
| NG |
|
GO TO STEP 9 |
| OK |
|
|
CHECK HARNESS AND CONNECTOR (OUTER REAR VIEW MIRROR ASSEMBLY RH - OUTER MIRROR CONTROL ECU ASSEMBLY RH AND BODY GROUND)
(a) Disconnect the M6 outer rear view mirror assembly RH connector.
(b) Disconnect the M12 outer mirror control ECU assembly RH connector.
(c) Measure the resistance according to the value(s) in the table below.
Standard Resistance:
Tester Connection | Condition | Specified Condition |
M6-6 (MLP) - M12-2 (LP) |
Always |
Below 1 Ω |
M6-5 (MLP-) - Body ground |
Always |
Below 1 Ω |
M6-6 (MLP) or M12-2 (LP) - Body ground |
Always |
10 kΩ or higher |
| OK |
|
REPLACE OUTER MIRROR CONTROL ECU ASSEMBLY RH |
| NG |
|
REPAIR OR REPLACE HARNESS OR CONNECTOR |
CHECK OUTER MIRROR LIGHT ASSEMBLY RH
(a) Temporarily replace the outer mirror light assembly RH with a new or normally functioning one.
Click here
(b) Perform the Active Test according to the display on the Techstream.
Click here Mirror R
Tester Display | Test Part | Control Range | Diagnostic Note |
Fr Foot Light |
Outer rear view mirror assembly RH (footwell light RH) |
OFF or ON |
- |
OK:
Footwell light RH turn on.
| OK |
|
END (OUTER MIRROR LIGHT ASSEMBLY RH IS DEFECTIVE) |
| NG |
|
REPLACE OUTER REAR VIEW MIRROR ASSEMBLY RH |
|