Audio, Visual, Telematics

Stereo Component Amplifier Power Source Circuit

~1min read

DESCRIPTION

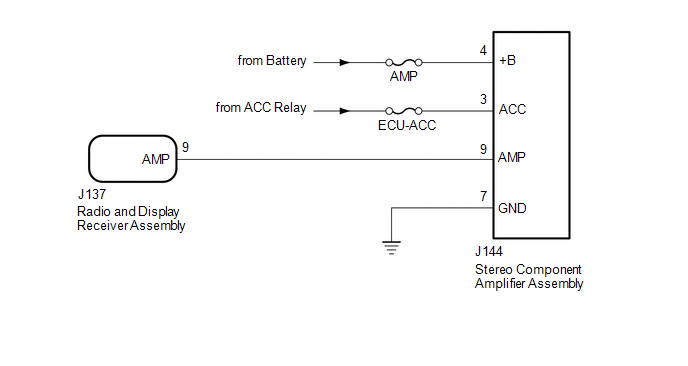
This circuit provides power to the stereo component amplifier assembly.

WIRING DIAGRAM
NOTICE:

Inspect the fuses for circuits related to this system before performing the following procedure.

PROCEDURE

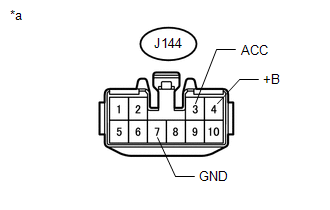
  1. CHECK HARNESS AND CONNECTOR (STEREO COMPONENT AMPLIFIER ASSEMBLY - BATTERY AND BODY GROUND)

(a) Disconnect the stereo component amplifier assembly connector.

(b) Measure the resistance according to the value(s) in the table below.

Standard Resistance:

Tester Connection

Condition

Specified Condition

J144-7 (GND) - Body ground

Always

Below 1 Ω

(c) Measure the voltage according to the value(s) in the table below.

Standard Voltage:

Tester Connection

Condition

Specified Condition

J144-4 (+B) - Body ground

Always

11 to 14 V

J144-3 (ACC) - Body ground

Ignition switch ACC

11 to 14 V

Text in Illustration

*a

Front view of wire harness connector

(to Stereo Component Amplifier Assembly)

NG

REPAIR OR REPLACE HARNESS OR CONNECTOR

OK
  1. CHECK HARNESS AND CONNECTOR (STEREO COMPONENT AMPLIFIER ASSEMBLY - RADIO AND DISPLAY RECEIVER ASSEMBLY)

(a) Disconnect the J144 stereo component amplifier assembly connector.

(b) Disconnect the J137 radio and display receiver assembly connector.

(c) Measure the resistance according to the value(s) in the table below.

Standard Resistance:

Tester Connection

Condition

Specified Condition

J144-9 (AMP) - J137-9 (AMP)

Always

Below 1 Ω

J144-9 (AMP) - Body ground

Always

10 kΩ or higher

OK

PROCEED TO NEXT SUSPECTED AREA SHOWN IN PROBLEM SYMPTOMS TABLE

NG

REPAIR OR REPLACE HARNESS OR CONNECTOR